The module lifecycle stage: General Availability
To use ContainerdV2 as the container runtime on cluster nodes, the operating systems on virtual machines must meet the following requirements:
- Linux kernel version 5.8 or newer.
CgroupsV2support.- Systemd version
244or newer. erofskernel module support.
For more information, see the documentation.
In Amazon AWS, Ubuntu distributions with a custom kernel without erofs are used. To bring the OS into compliance with the requirements and add the necessary modules, you can use the command sudo apt install linux-modules-extra-aws.
The cloud-init package must be installed on the VMs.
After the virtual machine is started, the following services associated with this package must be started:
cloud-config.service;cloud-final.service;cloud-init.service.
To use the cloud-provider and machine-controller-manager modules, you must access the AWS API as an IAM user with a sufficient set of privileges.
Make sure that you have access to the desired regions and that you have the necessary quotas.
The provider supports working with only one disk in the virtual machine template. Make sure the template contains only one disk.
JSON Policy
First, prepare a JSON file with the configuration of the necessary privileges:
{
    "Version": "2012-10-17",
    "Statement": [
        {
            "Sid": "VisualEditor0",
            "Effect": "Allow",
            "Action": [
                "autoscaling:DescribeAutoScalingGroups",
                "autoscaling:DescribeLaunchConfigurations",
                "autoscaling:DescribeTags",
                "ec2:AllocateAddress",
                "ec2:AssociateAddress",
                "ec2:AssociateRouteTable",
                "ec2:AttachInternetGateway",
                "ec2:AttachVolume",
                "ec2:AuthorizeSecurityGroupEgress",
                "ec2:AuthorizeSecurityGroupIngress",
                "ec2:CreateInternetGateway",
                "ec2:CreateKeyPair",
                "ec2:CreateNATGateway",
                "ec2:CreateRoute",
                "ec2:CreateRouteTable",
                "ec2:CreateSecurityGroup",
                "ec2:CreateSubnet",
                "ec2:CreateTags",
                "ec2:CreateVolume",
                "ec2:CreateVpc",
                "ec2:DeleteInternetGateway",
                "ec2:DeleteKeyPair",
                "ec2:DeleteNATGateway",
                "ec2:DeleteRoute",
                "ec2:DeleteRouteTable",
                "ec2:DeleteSecurityGroup",
                "ec2:DeleteSubnet",
                "ec2:DeleteTags",
                "ec2:DeleteVolume",
                "ec2:DeleteVpc",
                "ec2:DescribeAccountAttributes",
                "ec2:DescribeAddresses",
                "ec2:DescribeAddressesAttribute",
                "ec2:DescribeAvailabilityZones",
                "ec2:DescribeImages",
                "ec2:DescribeInstanceAttribute",
                "ec2:DescribeInstanceCreditSpecifications",
                "ec2:DescribeInstances",
                "ec2:DescribeInstanceTypes",
                "ec2:DescribeInstanceTopology",
                "ec2:DescribeInternetGateways",
                "ec2:DescribeKeyPairs",
                "ec2:DescribeNatGateways",
                "ec2:DescribeNetworkInterfaces",
                "ec2:DescribeRegions",
                "ec2:DescribeRouteTables",
                "ec2:DescribeSecurityGroups",
                "ec2:DescribeSecurityGroupRules",
                "ec2:DescribeSubnets",
                "ec2:DescribeTags",
                "ec2:DescribeVolumesModifications",
                "ec2:DescribeVolumes",
                "ec2:DescribeVpcAttribute",
                "ec2:DescribeVpcClassicLink",
                "ec2:DescribeVpcClassicLinkDnsSupport",
                "ec2:DescribeVpcs",
                "ec2:DetachInternetGateway",
                "ec2:DetachVolume",
                "ec2:DisassociateAddress",
                "ec2:DisassociateRouteTable",
                "ec2:ImportKeyPair",
                "ec2:ModifyInstanceAttribute",
                "ec2:ModifySubnetAttribute",
                "ec2:ModifyVolume",
                "ec2:ModifyVpcAttribute",
                "ec2:ReleaseAddress",
                "ec2:RevokeSecurityGroupEgress",
                "ec2:RevokeSecurityGroupIngress",
                "ec2:RunInstances",
                "ec2:TerminateInstances",
                "ec2:DescribeVpcPeeringConnections",
                "ec2:CreateVpcPeeringConnection",
                "ec2:DeleteVpcPeeringConnection",
                "ec2:AcceptVpcPeeringConnection",
                "ec2:CreateNetworkInterface",
                "ec2:DescribeNetworkInterfaceAttribute",
                "ec2:ModifyNetworkInterfaceAttribute",
                "ec2:DeleteNetworkInterface",
                "ec2:DescribeNetworkInterfaces",
                "elasticloadbalancing:AddTags",
                "elasticloadbalancing:ApplySecurityGroupsToLoadBalancer",
                "elasticloadbalancing:AttachLoadBalancerToSubnets",
                "elasticloadbalancing:ConfigureHealthCheck",
                "elasticloadbalancing:CreateListener",
                "elasticloadbalancing:CreateLoadBalancer",
                "elasticloadbalancing:CreateLoadBalancerListeners",
                "elasticloadbalancing:CreateLoadBalancerPolicy",
                "elasticloadbalancing:CreateTargetGroup",
                "elasticloadbalancing:DeleteListener",
                "elasticloadbalancing:DeleteLoadBalancer",
                "elasticloadbalancing:DeleteLoadBalancerListeners",
                "elasticloadbalancing:DeleteTargetGroup",
                "elasticloadbalancing:DeregisterInstancesFromLoadBalancer",
                "elasticloadbalancing:DeregisterTargets",
                "elasticloadbalancing:DescribeListeners",
                "elasticloadbalancing:DescribeLoadBalancerAttributes",
                "elasticloadbalancing:DescribeLoadBalancerPolicies",
                "elasticloadbalancing:DescribeLoadBalancers",
                "elasticloadbalancing:DescribeTargetGroups",
                "elasticloadbalancing:DescribeTargetHealth",
                "elasticloadbalancing:DetachLoadBalancerFromSubnets",
                "elasticloadbalancing:ModifyListener",
                "elasticloadbalancing:ModifyLoadBalancerAttributes",
                "elasticloadbalancing:ModifyTargetGroup",
                "elasticloadbalancing:RegisterInstancesWithLoadBalancer",
                "elasticloadbalancing:RegisterTargets",
                "elasticloadbalancing:SetLoadBalancerPoliciesForBackendServer",
                "elasticloadbalancing:SetLoadBalancerPoliciesOfListener",
                "iam:AddRoleToInstanceProfile",
                "iam:CreateInstanceProfile",
                "iam:CreateRole",
                "iam:CreateServiceLinkedRole",
                "iam:DeleteInstanceProfile",
                "iam:DeleteRole",
                "iam:DeleteRolePolicy",
                "iam:GetInstanceProfile",
                "iam:GetRole",
                "iam:GetRolePolicy",
                "iam:ListInstanceProfilesForRole",
                "iam:ListRolePolicies",
                "iam:ListAttachedRolePolicies",
                "iam:PassRole",
                "iam:PutRolePolicy",
                "iam:RemoveRoleFromInstanceProfile",
                "iam:TagRole",
                "kms:DescribeKey",
                "sts:GetCallerIdentity"
            ],
            "Resource": "*"
        }
    ]
}
Below, you can find instructions on how to apply this policy.
Configuring IAM via the web interface
In order to configure IAM via the web interface, first create a new Policy and apply the previously created JSON file to it:
- Open
Identity and Access Management (IAM). - Open the
Policiespage and clickCreate Policy. - Select the
JSONtab and insert the policy. - Click
Next: Tags, thenNext: Review. - Enter a policy name in the
Namefield (e.g.,D8CloudProviderAWS). - Click
Create Policy.
Then add a new user:
- Open the
Userspage of IAM and clickAdd users. - Enter a name in the
User namefield (e.g.,deckhouse).
And apply the created Policy to it:
- Select
Access key - Programmatic accessin theSelect AWS credential typearea. - Click
Next: Permissions. - Select the
Attach existing policies directlytab. - Search (use the
Filter policiesfield) for the policy name entered above (e.g.,D8CloudProviderAWS) and click the checkbox next to it. - Click
Next: Tags, thenNext: Review. - Click
Create user.
Save credentials (Access key ID and Secret access key).
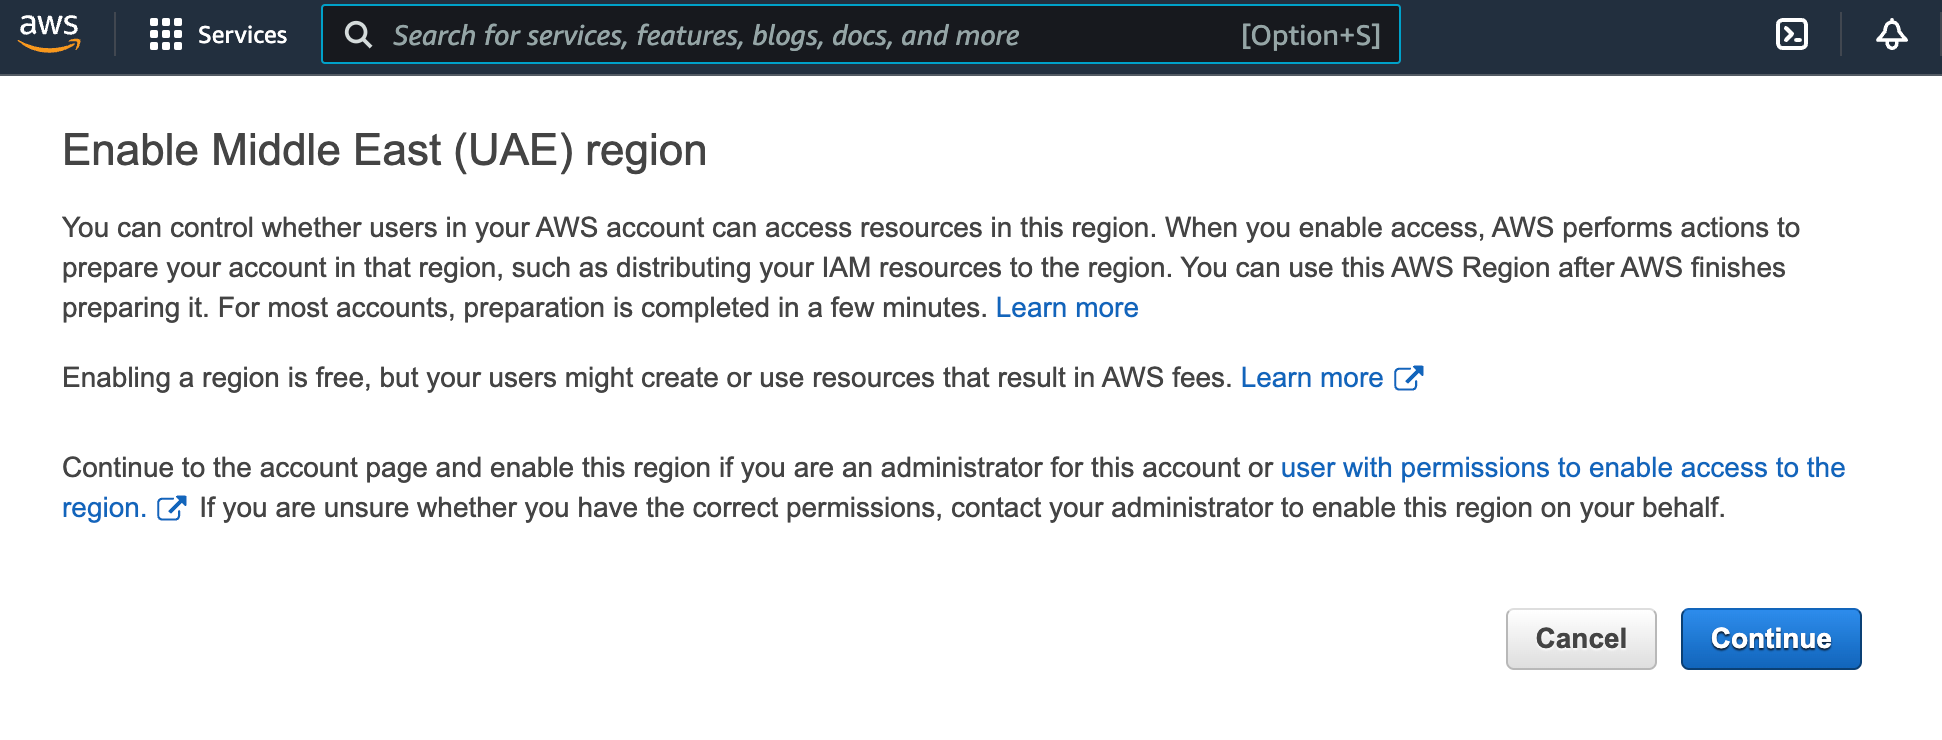
Make sure that you have access to the desired regions. Select the desired region from the dropdown list in the upper right corner.
If there is a switch to the selected region, then there is access to the region.
If there is no access to the region, then you will receive the following message (may differ):
In this case, click
Continueto enable the region.
Configuring IAM via the CLI
Create the JSON specification using the following command.
cat > policy.json << EOF
<Policy JSON spec>
EOF
Create a new Policy based on the specification created above with D8CloudProviderAWS as a policy name and the ARN identifier:
aws iam create-policy --policy-name D8CloudProviderAWS --policy-document file://policy.json
You will see the following:
{
    "Policy": {
        "PolicyName": "D8CloudProviderAWS",
        "PolicyId": "AAA",
        "Arn": "arn:aws:iam::123:policy/D8CloudProviderAWS",
        "Path": "/",
        "DefaultVersionId": "v1",
        "AttachmentCount": 0,
        "PermissionsBoundaryUsageCount": 0,
        "IsAttachable": true,
        "CreateDate": "2020-08-27T02:52:06+00:00",
        "UpdateDate": "2020-08-27T02:52:06+00:00"
    }
}
Create a new user:
aws iam create-user --user-name deckhouse
You will see the following:
{
    "User": {
        "Path": "/",
        "UserName": "deckhouse",
        "UserId": "AAAXXX",
        "Arn": "arn:aws:iam::123:user/deckhouse",
        "CreateDate": "2020-08-27T03:05:42+00:00"
    }
}
You need to allow access to the API and remember your AccessKeyId + SecretAccessKey values:
aws iam create-access-key --user-name deckhouse
You will see the following:
{
    "AccessKey": {
        "UserName": "deckhouse",
        "AccessKeyId": "XXXYYY",
        "Status": "Active",
        "SecretAccessKey": "ZZZzzz",
        "CreateDate": "2020-08-27T03:06:22+00:00"
    }
}
Attach the specified Policy to the specified User:
aws iam attach-user-policy --user-name username --policy-arn arn:aws:iam::123:policy/D8CloudProviderAWS
Configuring IAM via Terraform
An example of configuring IAM via Terraform:
resource "aws_iam_user" "user" {
  name = "deckhouse"
}

resource "aws_iam_access_key" "user" {
  user = aws_iam_user.user.name
}

resource "aws_iam_policy" "policy" {
  name        = "D8CloudProviderAWS"
  path        = "/"
  description = "Deckhouse policy"

  policy = <<EOF
<JSON Policy>
EOF
}

resource "aws_iam_user_policy_attachment" "policy-attachment" {
  user       = aws_iam_user.user.name
  policy_arn = aws_iam_policy.policy.arn
}