How do I find out all Deckhouse parameters?
Deckhouse is configured using global settings, module settings, and various custom resources. Read more in the documentation.
To view global Deckhouse settings:
kubectl get mc global -o yaml
To list the status of all modules (available for Deckhouse version 1.47+):
kubectl get modules
To get the user-authn module configuration:
kubectl get moduleconfigs user-authn -o yaml
How do I find the documentation for the version installed?
The documentation for the Deckhouse version running in the cluster is available at documentation.<cluster_domain>, where <cluster_domain> is the DNS name that matches the template defined in the modules.publicDomainTemplate parameter.
Documentation is available when the documentation module is enabled. It is enabled by default except the Minimal bundle.
Deckhouse update
How to find out in which mode the cluster is being updated?
You can view the cluster update mode in the configuration of the deckhouse module. To do this, run the following command:
kubectl get mc deckhouse -oyaml
Example of the output:
apiVersion: deckhouse.io/v1alpha1
kind: ModuleConfig
metadata:
  creationTimestamp: "2022-12-14T11:13:03Z"
  generation: 1
  name: deckhouse
  resourceVersion: "3258626079"
  uid: c64a2532-af0d-496b-b4b7-eafb5d9a56ee
spec:
  settings:
    releaseChannel: Stable
    update:
      windows:
      - days:
        - Mon
        from: "19:00"
        to: "20:00"
  version: 1
status:
  state: Enabled
  status: ""
  type: Embedded
  version: "1"
There are three possible update modes:
- Automatic + update windows are not set. The cluster will be updated after the new version appears on the corresponding release channel.
- Automatic + update windows are set. The cluster will be updated in the nearest available window after the new version appears on the release channel.
- Manual. Manual action is required to apply the update.
How do I set the desired release channel?
Change (set) the releaseChannel parameter in the deckhouse module configuration to automatically switch to another release channel.
It will activate the mechanism of automatic stabilization of the release channel.
Here is an example of the deckhouse module configuration with the Stable release channel:
apiVersion: deckhouse.io/v1alpha1
kind: ModuleConfig
metadata:
  name: deckhouse
spec:
  version: 1
  settings:
    releaseChannel: Stable
How do I disable automatic updates?
To completely disable the Deckhouse update mechanism, remove the releaseChannel parameter in the deckhouse module configuration.
In this case, Deckhouse does not check for updates and even doesn’t apply patch releases.
It is highly not recommended to disable automatic updates! It will block updates to patch releases that may contain critical vulnerabilities and bugs fixes.
How do I apply an update without having to wait for the update window?
To apply an update immediately without having to wait for the update window, set the release.deckhouse.io/apply-now : "true" annotation on the DeckhouseRelease resource.
An example of a command to set the annotation to skip the update windows for version v1.56.2:
kubectl annotate deckhousereleases v1.56.2 release.deckhouse.io/apply-now="true"
An example of a resource with the update window skipping annotation in place:
apiVersion: deckhouse.io/v1alpha1
kind: DeckhouseRelease
metadata:
  annotations:
    release.deckhouse.io/apply-now: "true"
...
How to understand what changes the update contains and how it will affect the cluster?
You can find all the information about Deckhouse versions in the list of Deckhouse releases.
Summary information about important changes, component version updates, and which components in the cluster will be restarted during the update process can be found in the description of the zero patch version of the release. For example, v1.46.0 for the v1.46 Deckhouse release.
A detailed list of changes can be found in the Changelog, which is referenced in each release.
How do I understand that the cluster is being updated?
During the update:
- The
DeckhouseUpdatingalert is firing. - The
deckhousePod is not theReadystatus. If the Pod does not go to theReadystatus for a long time, then this may indicate that there are problems in the work of Deckhouse. Diagnosis is necessary.
How do I know that the update was successful?
If the DeckhouseUpdating alert is resolved, then the update is complete.
You can also check the status of Deckhouse releases.
An example:
$ kubectl get deckhouserelease
NAME       PHASE        TRANSITIONTIME   MESSAGE
v1.46.8    Superseded   13d
v1.46.9    Superseded   11d
v1.47.0    Superseded   4h12m
v1.47.1    Deployed     4h12m
The Deployed status of the corresponding version indicates that the switch to the corresponding version was performed (but this does not mean that it ended successfully).
Check the status of the Deckhouse Pod:
$ kubectl -n d8-system get pods -l app=deckhouse
NAME                   READY  STATUS   RESTARTS  AGE
deckhouse-7844b47bcd-qtbx9  1/1   Running  0       1d
- If the status of the Pod is
Running, and1/1indicated in the READY column, the update was completed successfully. - If the status of the Pod is
Running, and0/1indicated in the READY column, the update is not over yet. If this goes on for more than 20-30 minutes, then this may indicate that there are problems in the work of Deckhouse. Diagnosis is necessary. - If the status of the Pod is not
Running, then this may indicate that there are problems in the work of Deckhouse. Diagnosis is necessary.
Possible options for action if something went wrong:
-
Check Deckhouse logs using the following command:
kubectl -n d8-system logs -f -l app=deckhouse | jq -Rr 'fromjson? | .msg' - Collect debugging information and contact technical support.
- Ask for help from the community.
How do I know that a new version is available for the cluster?
As soon as a new version of Deckhouse appears on the release channel installed in the cluster:
- The alert
DeckhouseReleaseIsWaitingManualApprovalfires, if the cluster uses manual update mode (the update.mode parameter is set toManual). - There is a new custom resource DeckhouseRelease. Use the
kubectl get deckhousereleasescommand, to view the list of releases. If theDeckhouseReleaseis in thePendingstate, the specified version has not yet been installed. Possible reasons whyDeckhouseReleasemay be inPending:- Manual update mode is set (the update.mode parameter is set to
Manual). - The automatic update mode is set, and the update windows are configured, the interval of which has not yet come.
- The automatic update mode is set, update windows are not configured, but the installation of the version has been postponed for a random time due to the mechanism of reducing the load on the repository of container images. There will be a corresponding message in the
status.messagefield of theDeckhouseReleaseresource. - The update.notification.minimalNotificationTime parameter is set, and the specified time has not passed yet.
- Manual update mode is set (the update.mode parameter is set to
How do I get information about the upcoming update in advance?
You can get information in advance about updating minor versions of Deckhouse on the release channel in the following ways:
- Configure manual update mode. In this case, when a new version appears on the release channel, the alert
DeckhouseReleaseIsWaitingManualApprovalwill fire and a new custom resource DeckhouseRelease will appear in the cluster. - Configure automatic update mode and specify the minimum time in the minimalNotificationTime parameter for which the update will be postponed. In this case, when a new version appears on the release channel, a new custom resource DeckhouseRelease will appear in the cluster. And if you specify a URL in the update.notification.webhook parameter, then the webhook will be called additionally.
How do I find out which version of Deckhouse is on which release channel?
Information about which version of Deckhouse is on which release channel can be obtained at https://flow.deckhouse.io.
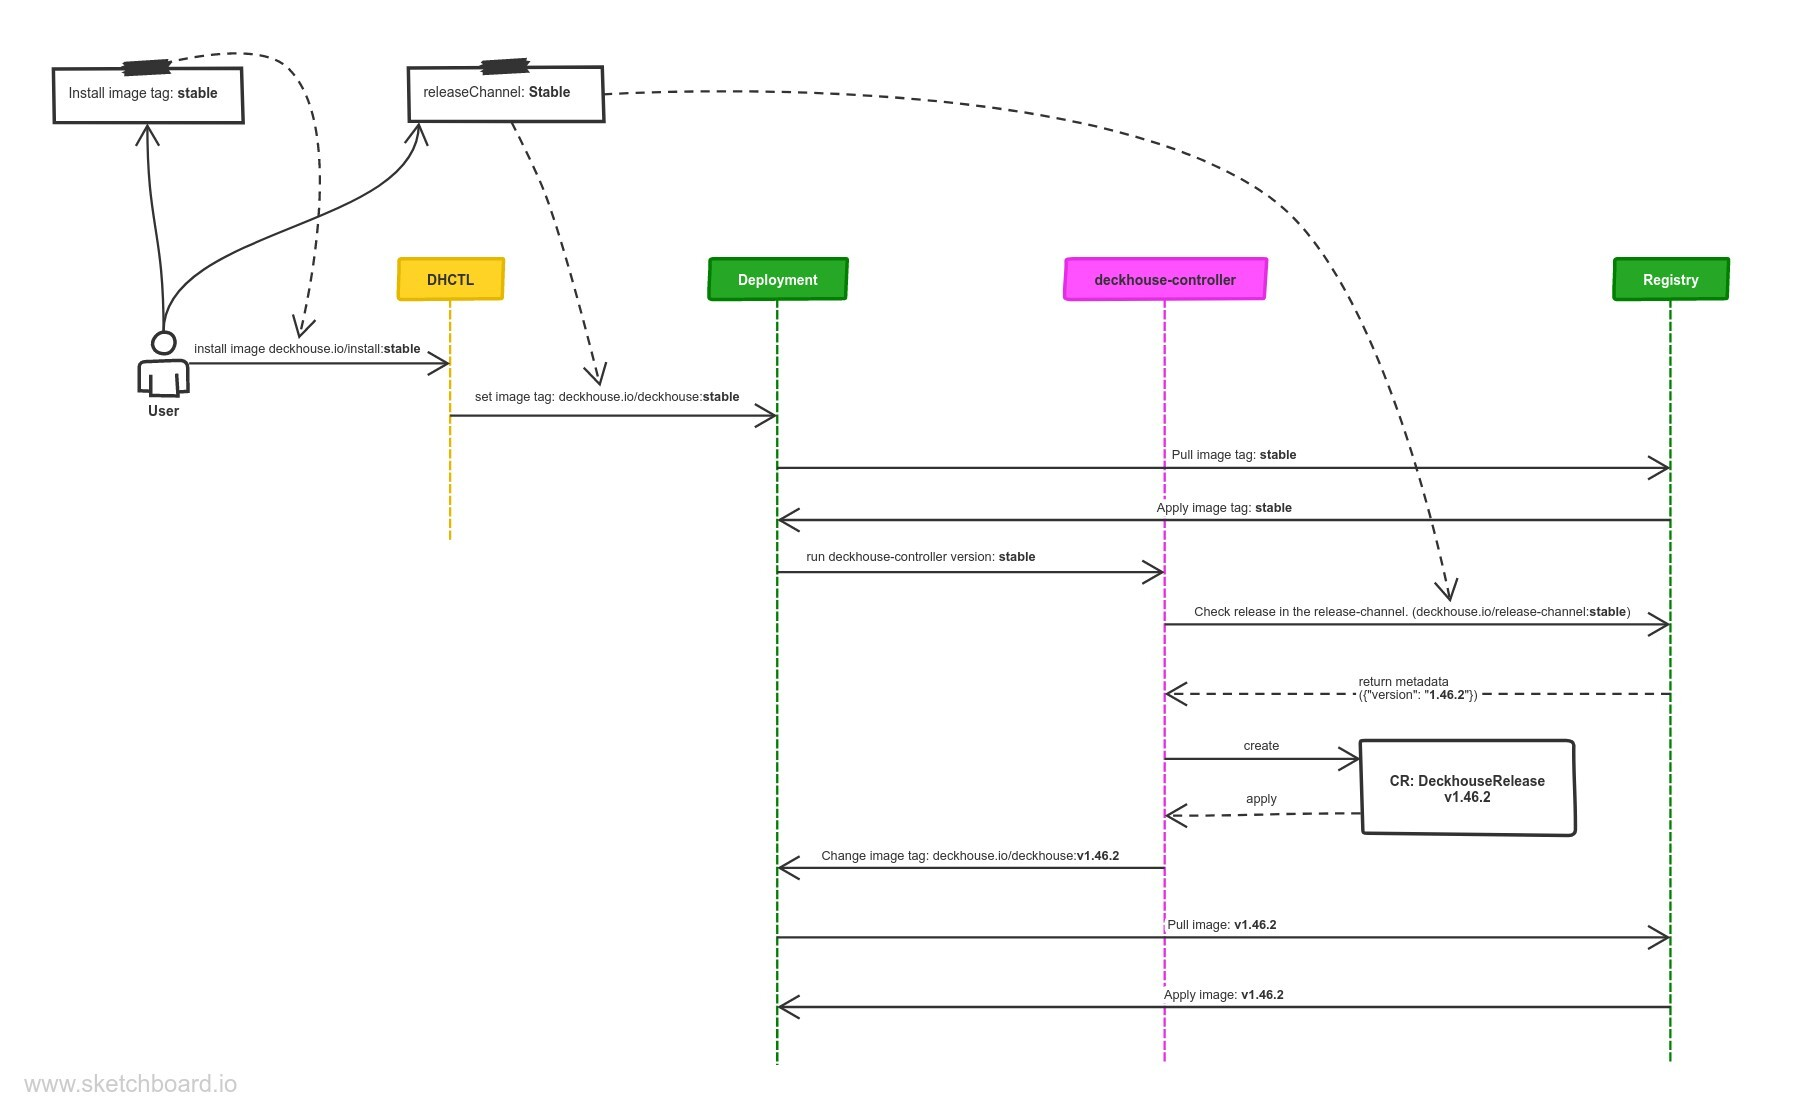
How does automatic Deckhouse update work?
Every minute Deckhouse checks a new release appeared in the release channel specified by the releaseChannel parameter.
When a new release appears on the release channel, Deckhouse downloads it and creates CustomResource DeckhouseRelease.
After creating a DeckhouseRelease custom resource in a cluster, Deckhouse updates the deckhouse Deployment and sets the image tag to a specified release tag according to selected update mode and update windows (automatic at any time by default).
To get list and status of all releases use the following command:
kubectl get deckhousereleases
Patch releases (e.g., an update from version 1.30.1 to version 1.30.2) ignore update windows settings and apply as soon as they are available.
What happens when the release channel changes?
- When switching to a more stable release channel (e.g., from
AlphatoEarlyAccess), Deckhouse downloads release data from the release channel (theEarlyAccessrelease channel in the example) and compares it with the existingDeckhouseReleases:- Deckhouse deletes later releases (by semver) that have not yet been applied (with the
Pendingstatus). - if the latest releases have been already Deployed, then Deckhouse will hold the current release until a later release appears on the release channel (on the
EarlyAccessrelease channel in the example).
- Deckhouse deletes later releases (by semver) that have not yet been applied (with the
- When switching to a less stable release channel (e.g., from
EarlyAcesstoAlpha), the following actions take place:- Deckhouse downloads release data from the release channel (the
Alpharelease channel in the example) and compares it with the existingDeckhouseReleases. - Then Deckhouse performs the update according to the update parameters.
- Deckhouse downloads release data from the release channel (the
What do I do if Deckhouse fails to retrieve updates from the release channel?
- Make sure that the desired release channel is configured.
-
Make sure that the DNS name of the Deckhouse container registry is resolved correctly.
Retrieve and compare the IP addresses of the Deckhouse container registry (
registry.deckhouse.io) on one of the nodes and in the Deckhouse pod. They should match.Here is how you can retrieve the IP address of the Deckhouse container registry on a node:
$ getent ahosts registry.deckhouse.io
46.4.145.194    STREAM registry.deckhouse.io
46.4.145.194    DGRAM
46.4.145.194    RAW
Here is how you can retrieve the IP address of the Deckhouse container registry in a pod:
$ kubectl -n d8-system exec -ti deploy/deckhouse -c deckhouse -- getent ahosts registry.deckhouse.io
46.4.145.194    STREAM registry.deckhouse.io
46.4.145.194    DGRAM  registry.deckhouse.io
If the retrieved IP addresses do not match, inspect the DNS settings on the host. Specifically, check the list of domains in the
searchparameter of the/etc/resolv.conffile (it affects name resolution in the Deckhouse pod). If thesearchparameter of the/etc/resolv.conffile includes a domain where wildcard record resolution is configured, it may result in incorrect resolution of the IP address of the Deckhouse container registry (see example).
Air-gapped environment; working via proxy and third-party registry
How do I configure Deckhouse to use a third-party registry?
This feature is available in Enterprise Edition only.
Deckhouse only supports Bearer authentication for container registries.
Tested and guaranteed to work with the following container registries: Nexus, Harbor, Artifactory, Docker Registry, Quay.
Deckhouse can be configured to work with a third-party registry (e.g., a proxy registry inside private environments).
Define the following parameters in the InitConfiguration resource:
imagesRepo: <PROXY_REGISTRY>/<DECKHOUSE_REPO_PATH>/ee. The path to the Deckhouse EE image in the third-party registry, for exampleimagesRepo: registry.deckhouse.io/deckhouse/ee;registryDockerCfg: <BASE64>. Base64-encoded auth credentials of the third-party registry.
Use the following registryDockerCfg if anonymous access to Deckhouse images is allowed in the third-party registry:
{"auths": { "<PROXY_REGISTRY>": {}}}
registryDockerCfg must be Base64-encoded.
Use the following registryDockerCfg if authentication is required to access Deckhouse images in the third-party registry:
{"auths": { "<PROXY_REGISTRY>": {"username":"<PROXY_USERNAME>","password":"<PROXY_PASSWORD>","auth":"<AUTH_BASE64>"}}}
<PROXY_USERNAME>— auth username for<PROXY_REGISTRY>.<PROXY_PASSWORD>— auth password for<PROXY_REGISTRY>.<PROXY_REGISTRY>— registry address:<HOSTNAME>[:PORT].<AUTH_BASE64>— Base64-encoded<PROXY_USERNAME>:<PROXY_PASSWORD>auth string.
registryDockerCfg must be Base64-encoded.
The InitConfiguration resource provides two more parameters for non-standard third-party registry configurations:
registryCA- root CA certificate to validate the third-party registry’s HTTPS certificate (if self-signed certificates are used);registryScheme- registry scheme (HTTPorHTTPS). The default value isHTTPS.
Tips for configuring Nexus
The following requirements must be met if the Nexus repository manager is used:
Docker Bearer Token Realmmust be enabled (Administration -> Security -> Realms).- Docker proxy repository must be pre-created (Administration -> Repository -> Repositories):
Allow anonymous docker pullmust be enabled. This option enables Bearer token authentication to work. Note that anonymous access won’t work unless explicitly enabled in Administration -> Security -> Anonymous Access, and theanonymoususer is not granted access rights to the created repository.Maximum metadata agefor the created repository must be set to0.
- Access control must be configured as follows:
- The Nexus role must be created (Administration -> Security -> Roles) with the folowing permissions:
nx-repository-view-docker-<repo>-browsenx-repository-view-docker-<repo>-read
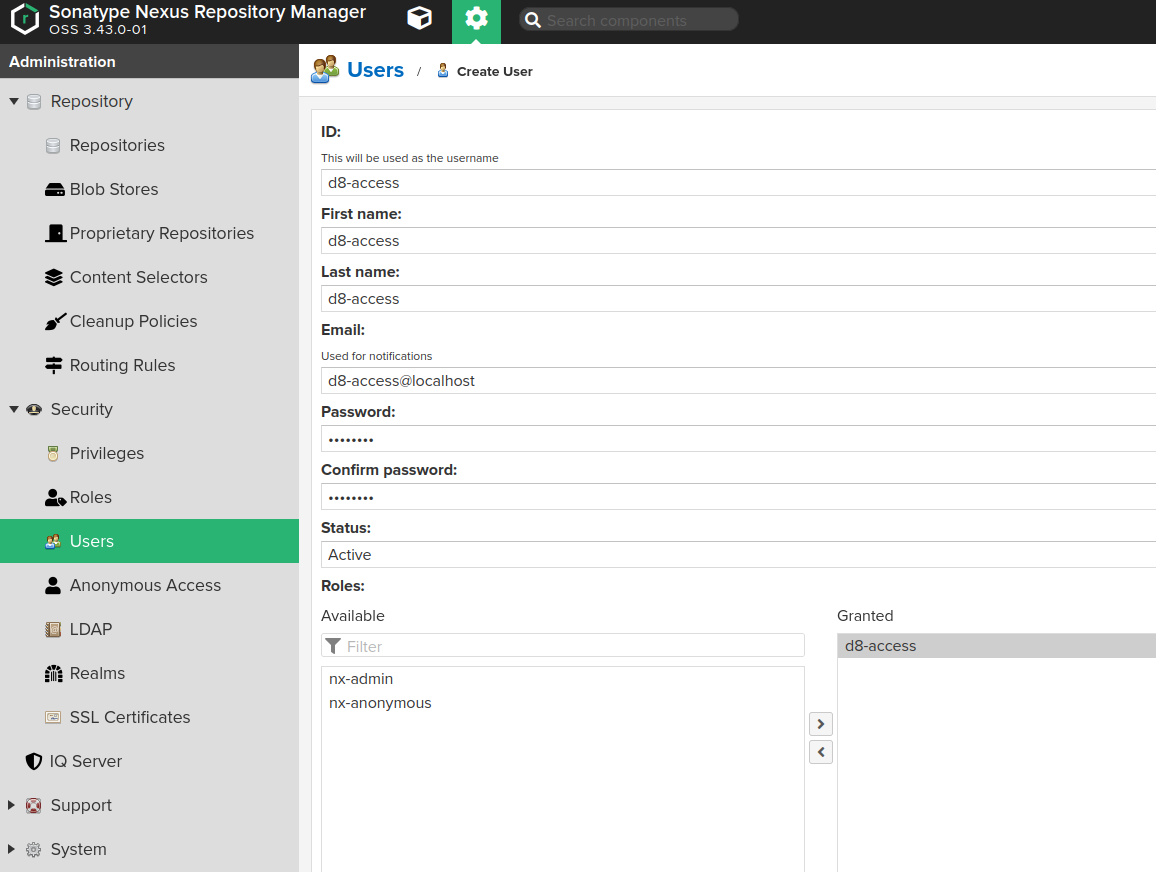
- The user (Administration -> Security -> Users) must be created with the above role granted.
- The Nexus role must be created (Administration -> Security -> Roles) with the folowing permissions:
Configuration:
-
Enable
Docker Bearer Token Realm(Administration -> Security -> Realms):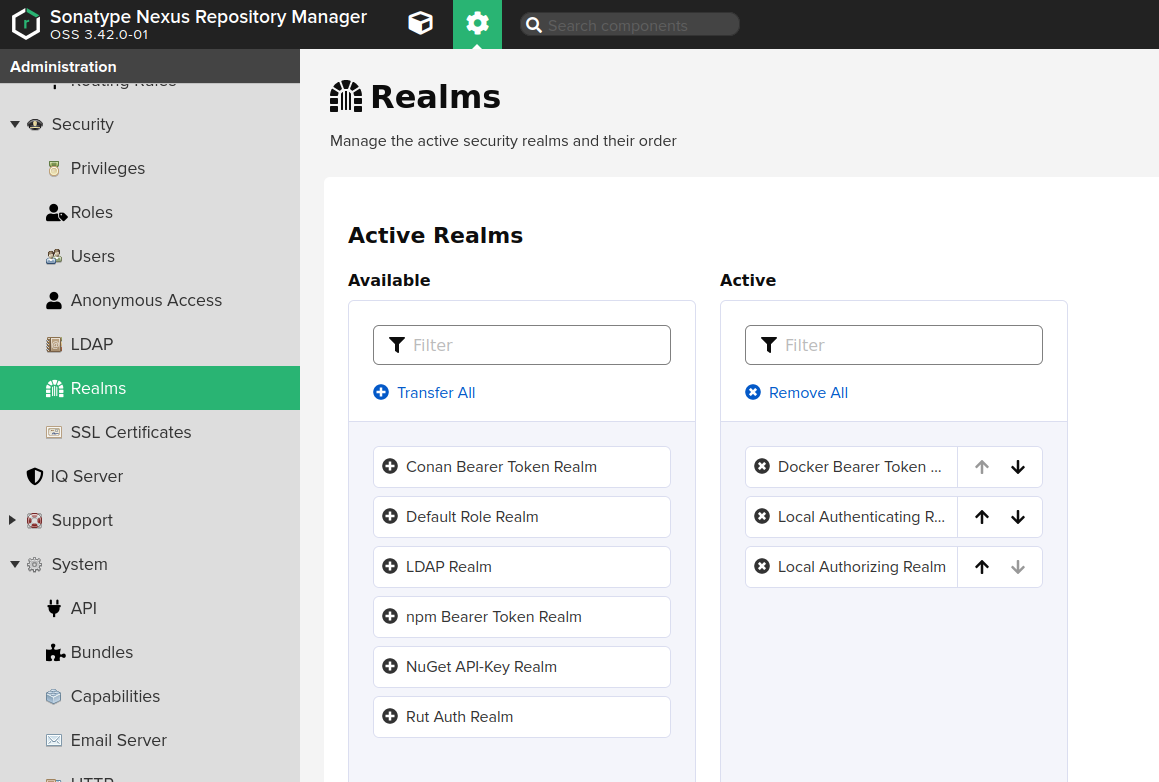
-
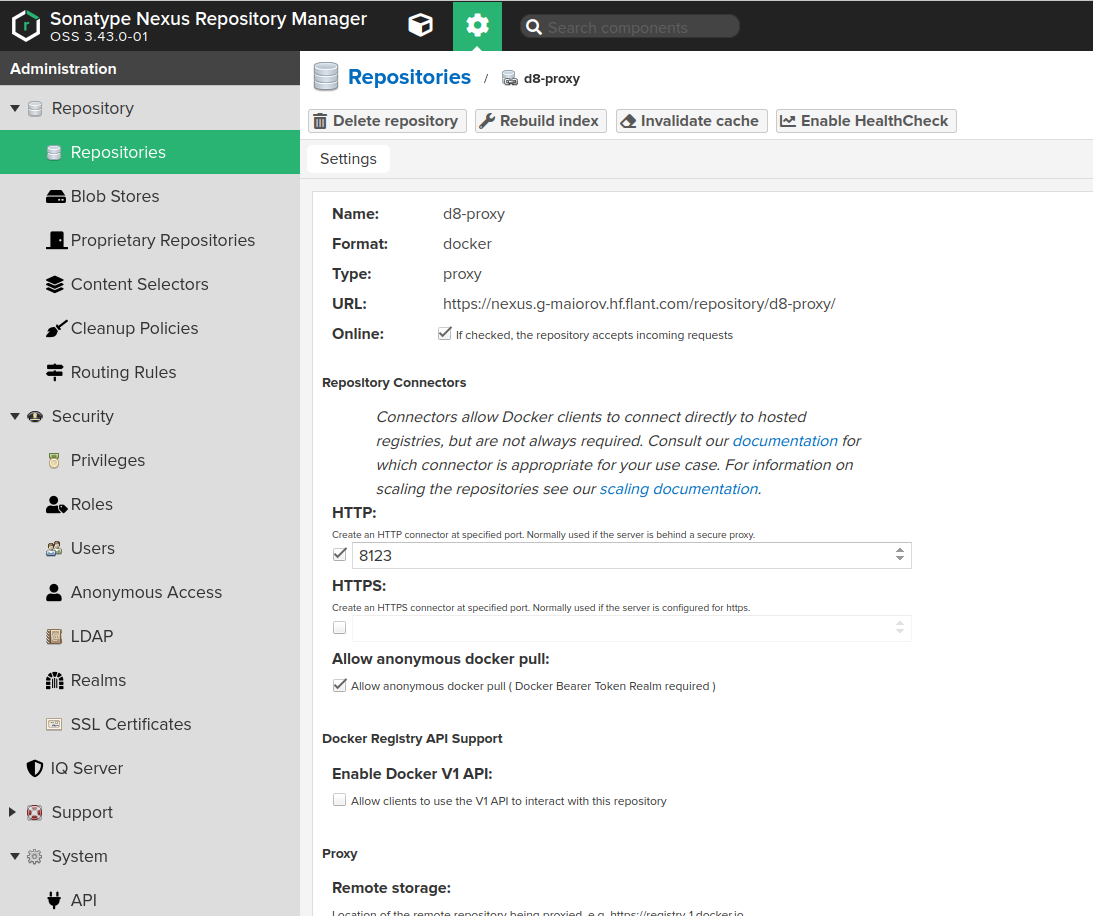
Create a docker proxy repository (Administration -> Repository -> Repositories) pointing to the Deckhouse registry:
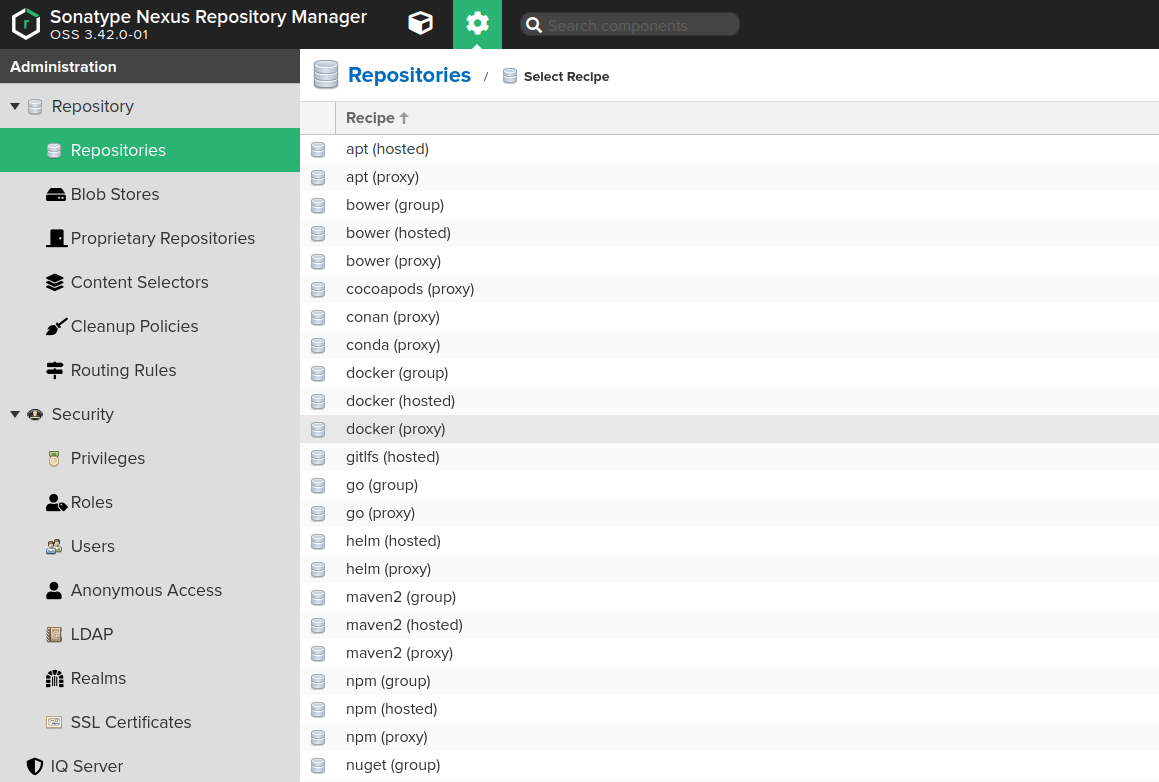
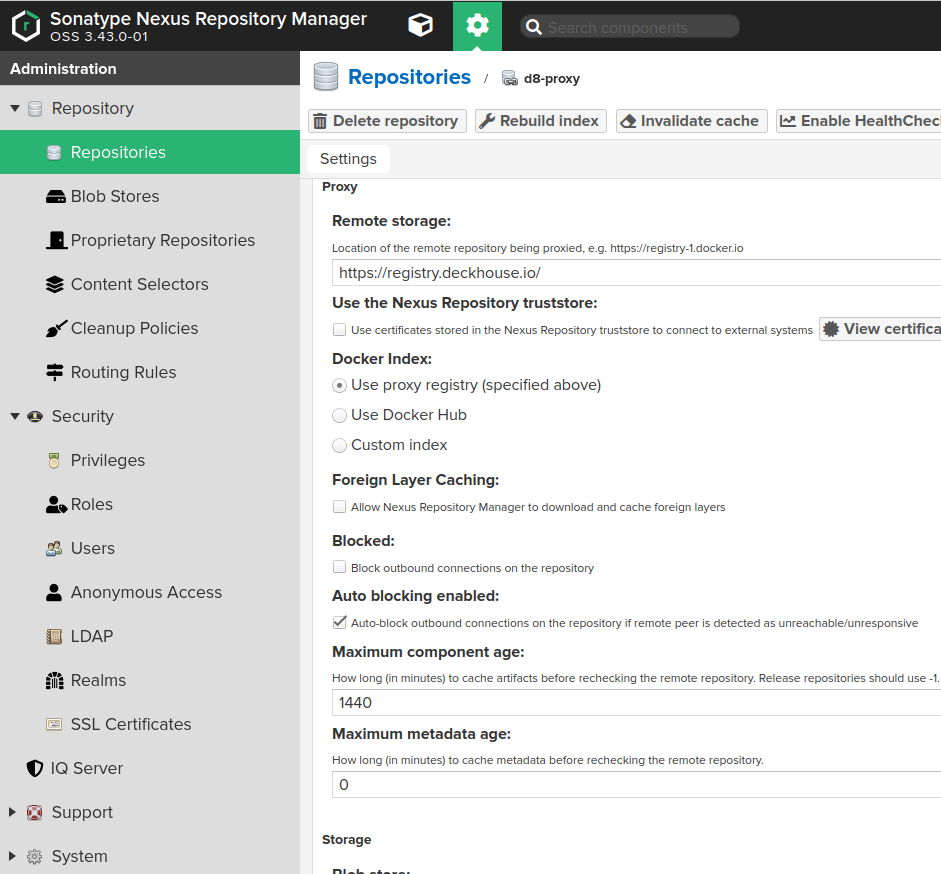
- Fill in the fields on the Create page as follows:
Namemust contain the name of the repository you created earlier, e.g.,d8-proxy.Repository Connectors / HTTPorRepository Connectors / HTTPSmust contain a dedicated port for the created repository, e.g.,8123or other.Allow anonymous docker pullmust be enabled for the Bearer token authentication to work. Note that anonymous access won’t work unless explicitly enabled in Administration -> Security -> Anonymous Access and theanonymoususer is not granted access rights to the created repository.Remote storagemust be set tohttps://registry.deckhouse.io/.- You can disable
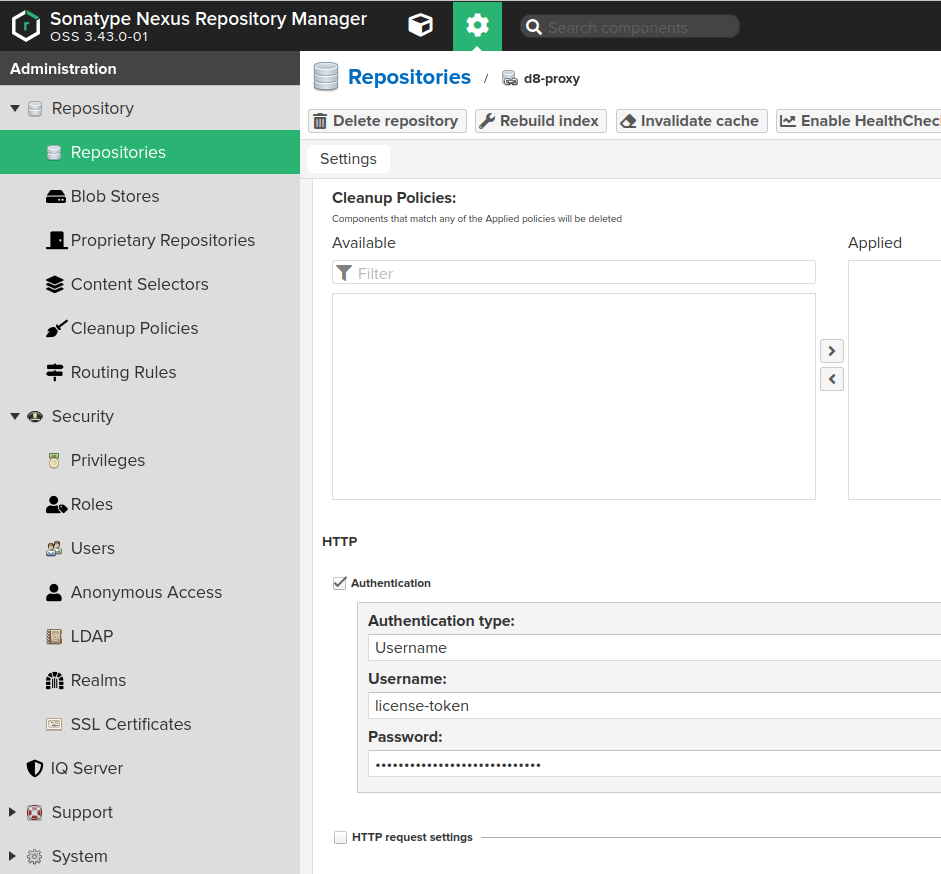
Auto blocking enabledandNot found cache enabledfor debugging purposes, otherwise they must be enabled. Maximum Metadata Agemust be set to0.Authenticationmust be enabled if you plan to use Deckhouse Enterprise Edition and the related fields must be set as follows:Authentication Typemust be set toUsername.Usernamemust be set tolicense-token.Passwordmust contain your license key for Deckhouse Enterprise Edition.
- Configure Nexus access control to allow Nexus access to the created repository:
-
Create a Nexus role (Administration -> Security -> Roles) with the
nx-repository-view-docker-<repo>-browseandnx-repository-view-docker-<repo>-readpermissions.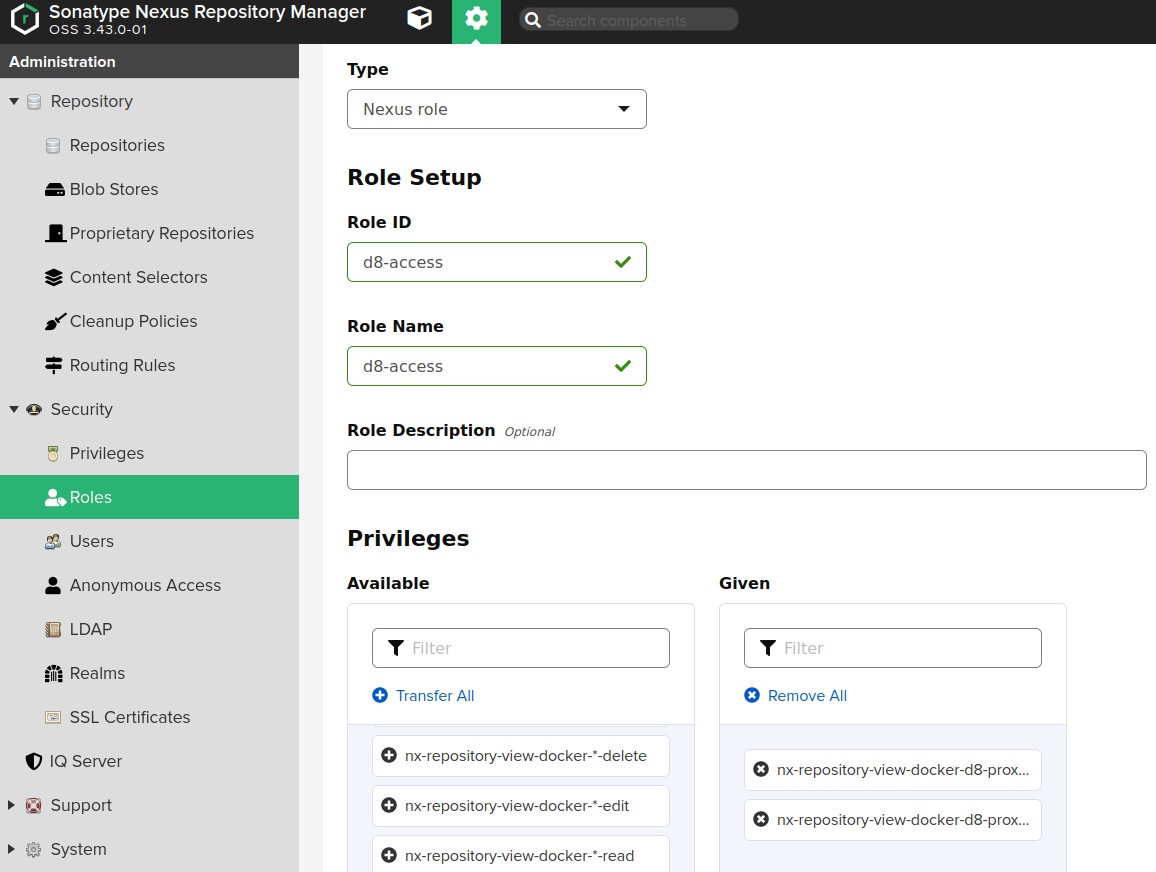
-
Create a user with the role above granted.
-
Tips for configuring Harbor
You need to use the Proxy Cache feature of a Harbor.
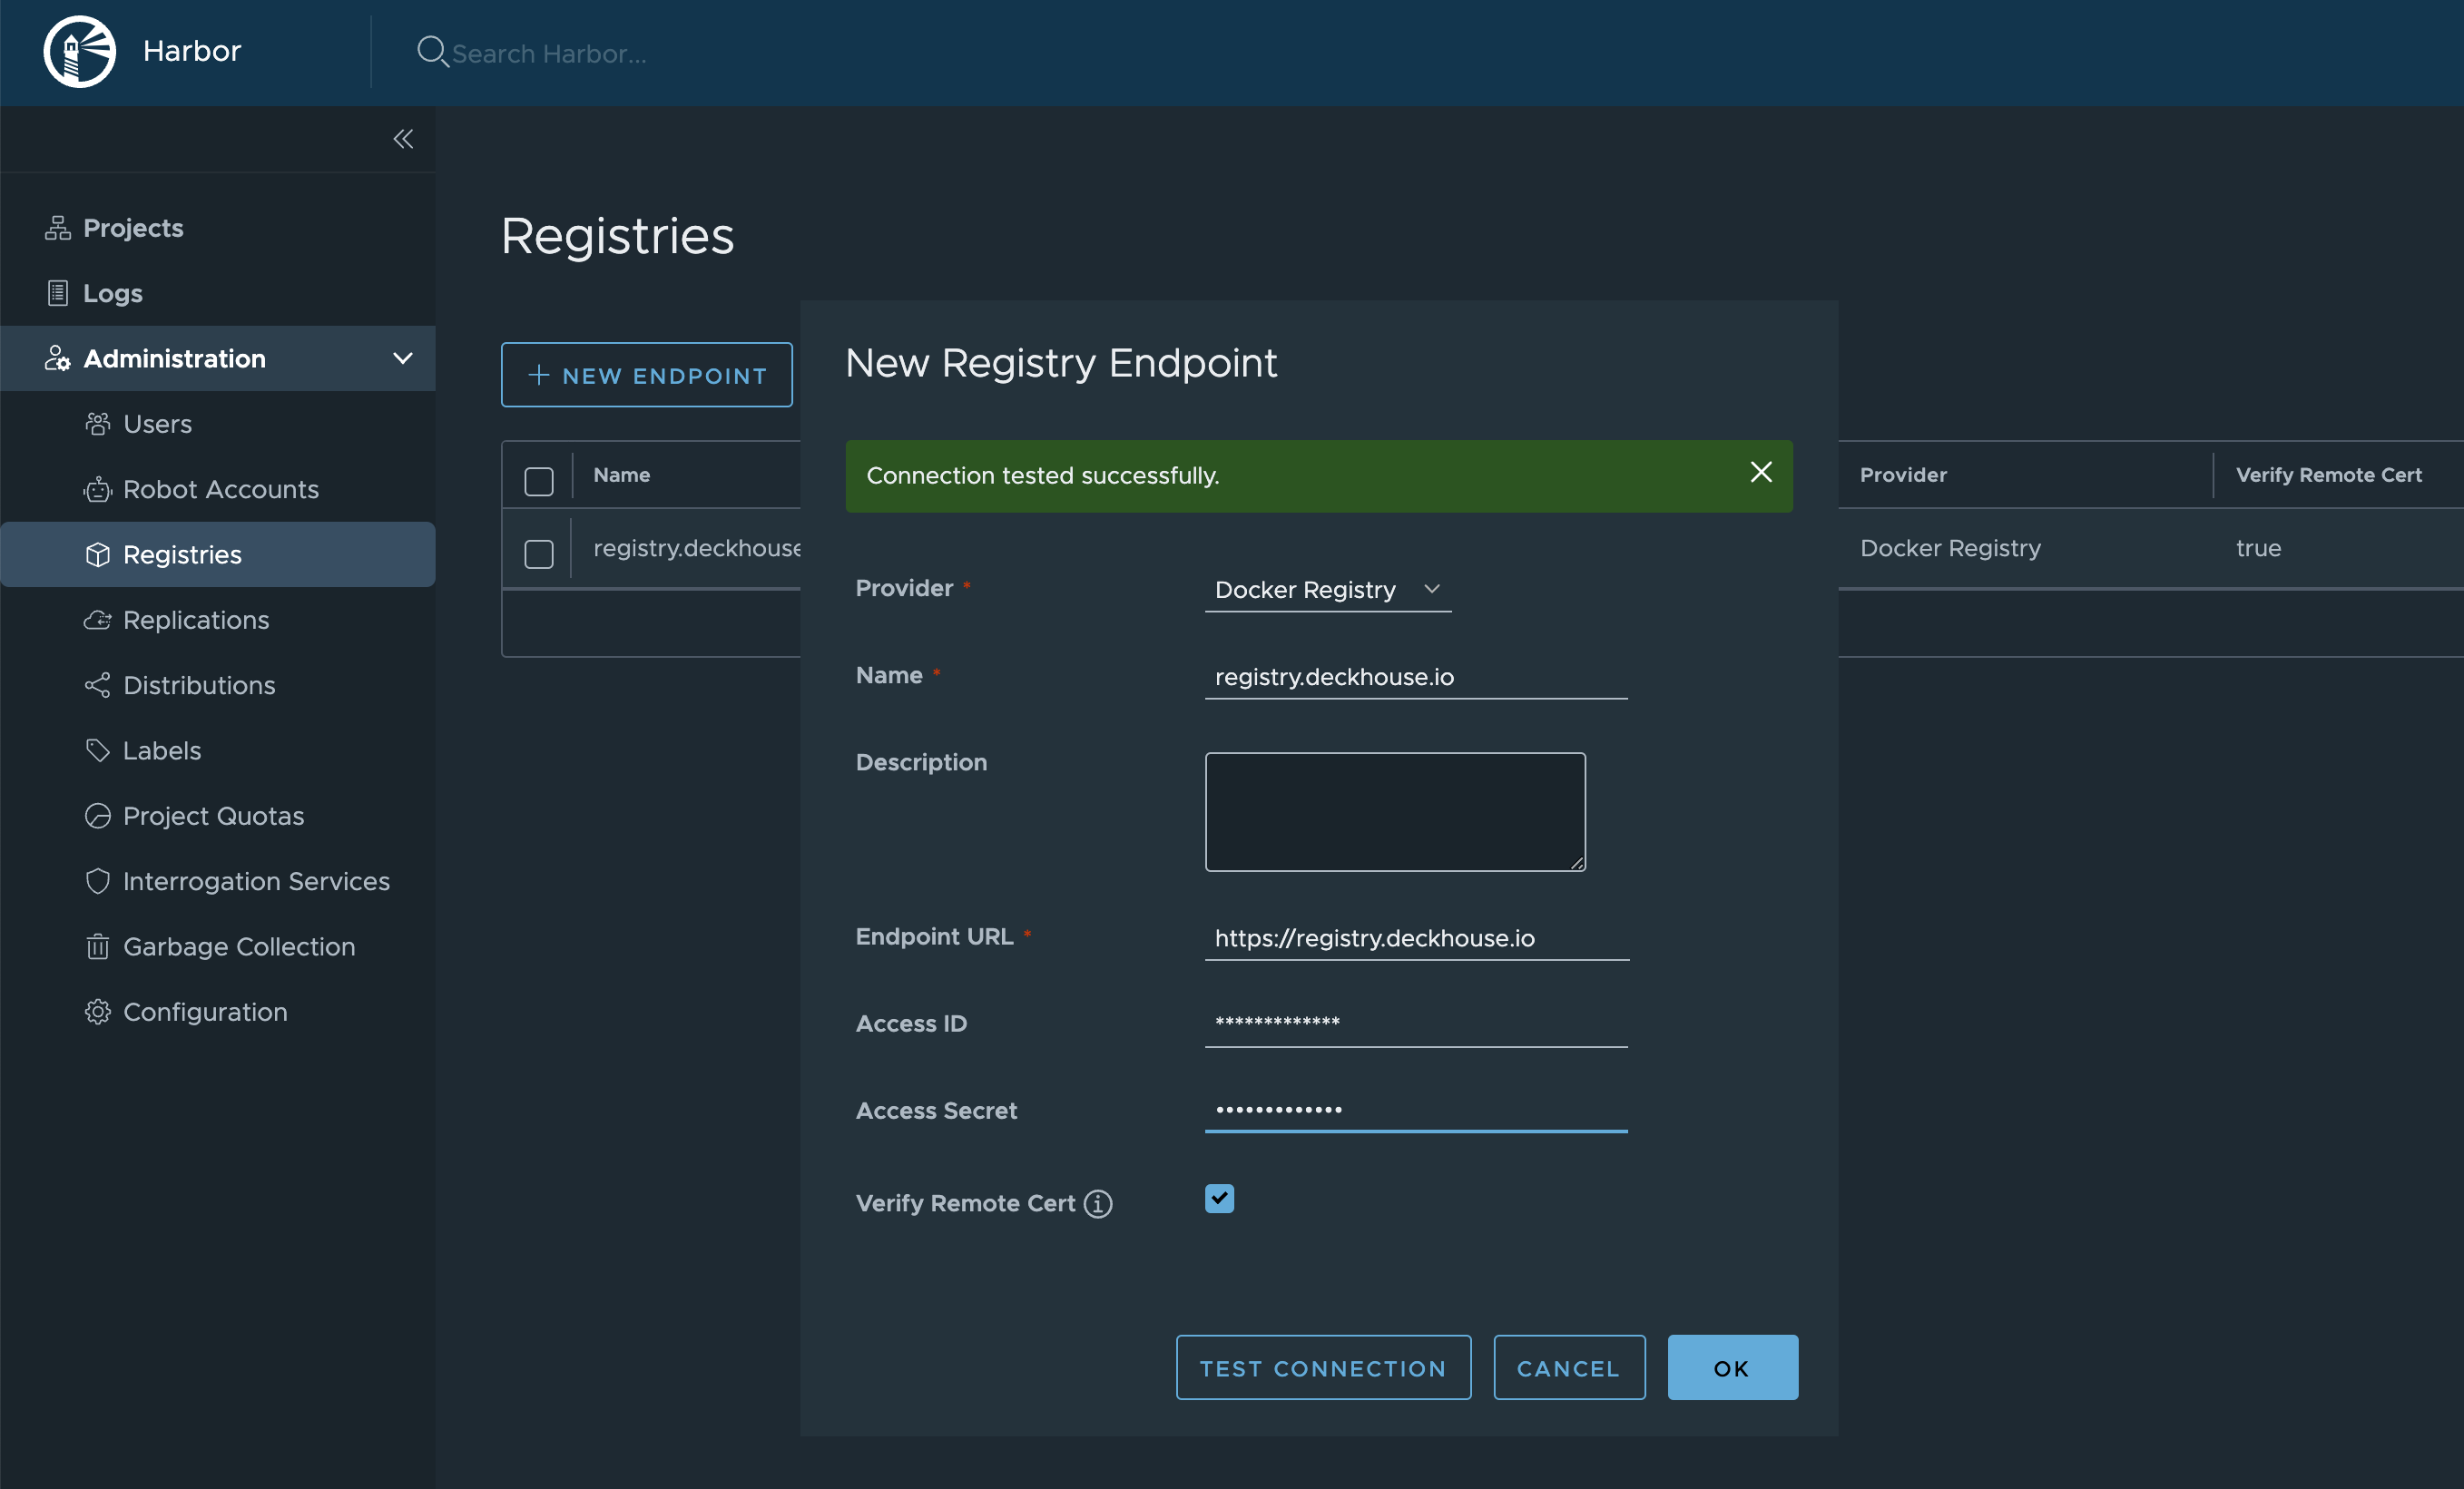
- Create a Registry:
Administration -> Registries -> New Endpoint.Provider:Docker Registry.Name— specify any of your choice.Endpoint URL:https://registry.deckhouse.io.- Specify the
Access IDandAccess Secretfor Deckhouse Enterprise Edition.
- Create a new Project:
Projects -> New Project.Project Namewill be used in the URL. You can choose any name, for example,d8s.Access Level:Public.Proxy Cache— enable and choose the Registry, created in the previous step.
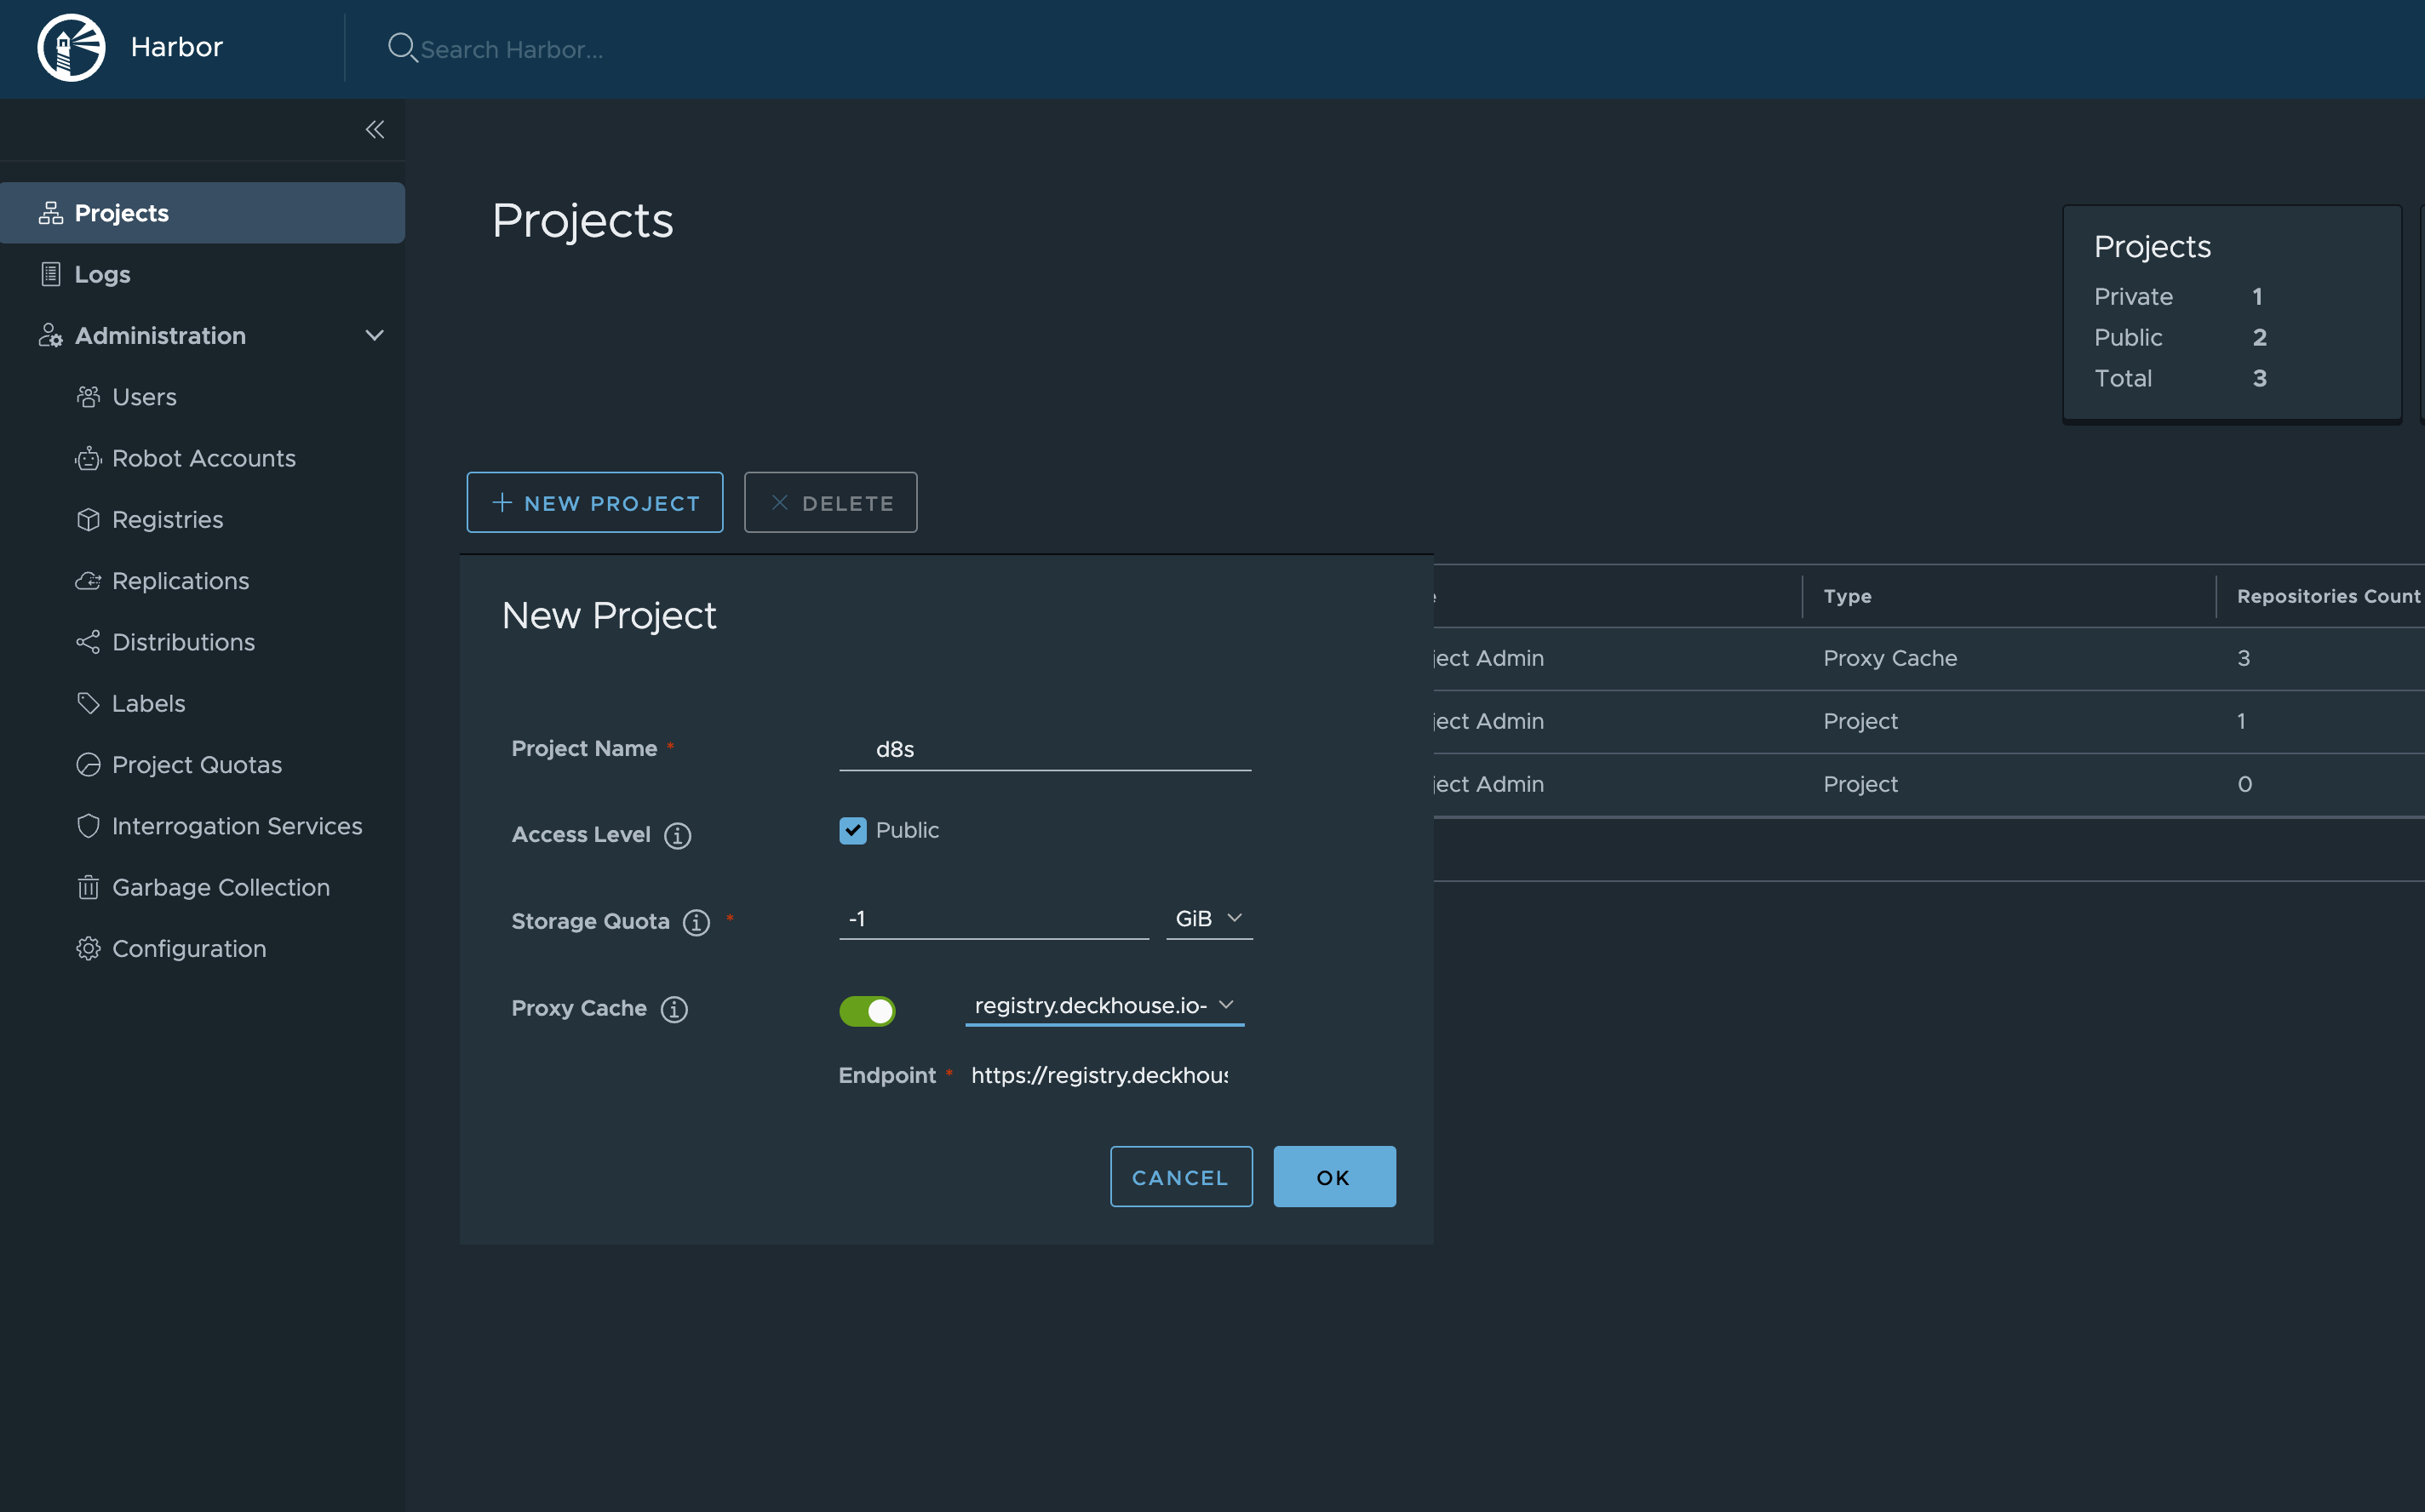
Thus, Deckhouse images will be available at https://your-harbor.com/d8s/deckhouse/ee:{d8s-version}.
Manually uploading images to an air-gapped registry
This feature is available in Enterprise Edition only.
-
If necessary, log in to the container registry
registry.deckhouse.iousing your license key.docker login -u license-token registry.deckhouse.io -
Run the Deckhouse installer version 1.58.6 or higher.
docker run -ti --pull=always -v $(pwd)/d8-images:/tmp/d8-images registry.deckhouse.io/deckhouse/ee/install:v1.58.6 bashNote that the directory on the host will be mounted in the installer container. This directory will contain the pulled Deckhouse tarball and generated DeckhouseReleases manifests.
-
Pull Deckhouse images using the
dhctl mirrorcommand.dhctl mirrorpulls only the latest available patch versions of a minor Deckhouse release. For example, for Deckhouse 1.52, only one version,1.52.10, will be pulled, as it is sufficient to update Deckhouse from version 1.51.The command below will pull Deckhouse tarballs for versions that are on the release channels (check flow.deckhouse.io for the current status of the release channels):
DHCTL_CLI_MIRROR_LICENSE="<DECKHOUSE_LICENSE_KEY>" dhctl mirror --images-bundle-path /tmp/d8-images/d8.tarIf you interrupt the download before it is finished, calling the command again will check which images have already been downloaded, and the download will continue. This will only happen if no more than 24 hours have passed since the download interruption. Use the
--no-pull-resumeflag, to start the download from scratch.To pull all Deckhouse images starting from a particular version, specify it in the
--min-versionparameter in theX.Yformat.For example, here is how you can pull all Deckhouse version images starting from version 1.45:
DHCTL_CLI_MIRROR_LICENSE="<DECKHOUSE_LICENSE_KEY>" dhctl mirror --images-bundle-path /tmp/d8-images/d8.tar --min-version=1.45Note that
--min-versionparameter will be ignored if you specify version above current rock-solid channel.To pull Deckhouse images from a specific registry repository, specify that repository with the
--sourceflag. The optional--source-loginand--source-passwordflags are used to authenticate to a given registry. If they are omitted, mirroring will be performed anonymously.For example, here is how you can pull images from a third-party registry:
DHCTL_CLI_MIRROR_SOURCE_LOGIN="user" DHCTL_CLI_MIRROR_SOURCE_PASSWORD="password" dhctl mirror --source="corp.company.com/sys/deckhouse" --images-bundle-path /tmp/d8-images/d8.tarNote:
--licenseflag acts as a shortcut for--source-login ($DHCTL_CLI_MIRROR_SOURCE_LOGINand--source-password ($DHCTL_CLI_MIRROR_SOURCE_PASSWORD)flags for the Deckhouse registry. If you specify both license and login+password pair for source registry, the latter will be used.dhctl mirrorsupports digesting of the final set of Deckhouse images with the GOST R 34.11-2012 (Stribog) hash function (the--gost-digestparameter). The checksum will be logged and written to a file with the.tar.gostsumextension next to the tar-archive containing the Deckhouse images. -
Optional: Copy the
dhctlbinary from the container to the directory where Deckhouse images were pulled.cp /usr/bin/dhctl /tmp/d8-images/dhctl -
Upload the directory with the pulled Deckhouse images to a host with access to the air-gapped registry.
-
To continue with installation, use the
dhctlbinary you copied before OR repeat steps 1 and 2 for the Deckhouse installer on the host with access to the air-gapped registry. Make sure the directory with the pulled Deckhouse images is mounted into the container. Push the images to the air-gapped registry using thedhctl mirrorcommand.Example of pushing images from the
/tmp/d8-images/d8.tartarball:DHCTL_CLI_MIRROR_USER="<USERNAME>" DHCTL_CLI_MIRROR_PASS="<PASSWORD>" dhctl mirror --images-bundle-path /tmp/d8-images/d8.tar --registry="your.private.registry.com:5000/deckhouse/ee"Please note that the images will be uploaded to the registry along the path specified in the
--registryparameter (in the example above - /deckhouse/ee). Before running the command, make sure this path exists in your registry, and the account you are using has write permissions.If your registry does not require authentication, you may omit both
--registry-loginand--registry-passwordflags as well asDHCTL_CLI_MIRROR_USER/DHCTL_CLI_MIRROR_PASSvariables. -
Once pushing images to the air-gapped private registry is complete, you are ready to install Deckhouse from it. Refer to the Getting started guide.
To run the installer, use its image from your private registry where Deckhouse images reside, rather than from the public registry. In other words, your address should look something like
your.private.registry.com:5000/deckhouse/ee/install:stableinstead ofregistry.deckhouse.io/deckhouse/ee/install:stable.During installation, add your registry address and authorization data to the
InitConfigurationresource (the imagesRepo and registryDockerCfg parameters; you might refer to step 3 of the Getting started guide as well).After installation, apply DeckhouseReleases manifests that were generated during pull operation to your cluster via
kubectlas follows:kubectl apply -f $(pwd)/d8-images/deckhousereleaases.yaml
Manually uploading images of Deckhouse modules into an isolated private registry
The steps below are necessary for manually loading images of modules connected from the module source (the ModuleSource resource):
- Run Deckhouse installer version 1.56.0 or higher:
docker run -ti --pull=always -v $(HOME)/d8-modules:/tmp/d8-modules -v $(HOME)/module_source.yml:/tmp/module_source.yml registry.deckhouse.io/deckhouse/ce/install:v1.58.4 bash
Note that the directory from the host file system is mounted in the installer container. It will store module images and the ModuleSource YAML manifest describing the source of modules.
-
Pull module images from their source registry, defined as a
ModuleSourceresource, into a dedicated directory using the commanddhctl mirror-modules.dhctl mirror-modulespulls only versions of modules available in the module release channels at the time of copying.The following command will pull module images from the source described in the
ModuleSourceresource located in the$HOME/module_source.ymlfile:dhctl mirror-modules -d /tmp/d8-modules -m /tmp/module_source.yml -
Optional: Copy the
dhctlbinary from the container to the directory to which Deckhouse images were pulled.cp /usr/bin/dhctl /tmp/d8-images/dhctl -
To continue with installation, use the
dhctlbinary you copied earlier OR repeat steps 1 and 2 for the Deckhouse installer on the host with access to the air-gapped registry. Make sure the directory with the pulled modules images is mounted into the container. -
Upload module images to the isolated registry using the
dhctl mirror-modulescommand.Below is an example of a command for pulling images from the
/tmp/d8-modulesdirectory:DHCTL_CLI_MIRROR_USER="<USERNAME>" DHCTL_CLI_MIRROR_PASS="<PASSWORD>" dhctl mirror-modules -d /tmp/d8-modules --registry="your.private.registry.com:5000/deckhouse-modules"Please note that the images will be uploaded to the registry along the path specified in the
--registryparameter (in the example above - /deckhouse-modules). Before running the command, make sure this path exists in your registry, and the account you are using has write permissions.If your registry does not require authentication, omit both
--registry-loginand--registry-passwordflags. -
After uploading the images to the air-gapped registry, edit the
ModuleSourceYAML manifest:- Change the
.spec.registry.repofield to the address that you specified in the--registryparameter when you uploaded the images; - Change the
.spec.registry.dockerCfgfield to a base64 string with the authorization data for your registry indockercfgformat. Refer to your registry’s documentation for information on how to obtain this token.
- Change the
-
Apply the
ModuleSourcemanifest you got in the previous step to the cluster.kubectl apply -f $HOME/module_source.ymlOnce the manifest has been applied, the modules are ready for use. For more detailed instructions on configuring and using modules, please refer to the module developer’s documentation.
How do I switch a running Deckhouse cluster to use a third-party registry?
Using a registry other than registry.deckhouse.io and registry.deckhouse.ru is only available in the Enterprise Edition.
To switch the Deckhouse cluster to using a third-party registry, follow these steps:
- Run
deckhouse-controller helper change-registryinside the Deckhouse Pod with the new registry settings.-
Example:
kubectl exec -ti -n d8-system deploy/deckhouse -- deckhouse-controller helper change-registry --user MY-USER --password MY-PASSWORD registry.example.com/deckhouse -
If the registry uses a self-signed certificate, put the root CA certificate that validates the registry’s HTTPS certificate to file
/tmp/ca.crtin the Deckhouse Pod and add the--ca-file /tmp/ca.crtoption to the script or put the content of CA into a variable as follows:$ CA_CONTENT=$(cat <<EOF -----BEGIN CERTIFICATE----- CERTIFICATE -----END CERTIFICATE----- -----BEGIN CERTIFICATE----- CERTIFICATE -----END CERTIFICATE----- EOF ) $ kubectl exec -n d8-system deploy/deckhouse -- bash -c "echo '$CA_CONTENT' > /tmp/ca.crt && deckhouse-controller helper change-registry --ca-file /tmp/ca.crt --user MY-USER --password MY-PASSWORD registry.example.com/deckhouse/ee"
-
- Wait for the Deckhouse Pod to become
Ready. Restart Deckhouse Pod if it will be inImagePullBackoffstate. - Wait for bashible to apply the new settings on the master node. The bashible log on the master node (
journalctl -u bashible) should contain the messageConfiguration is in sync, nothing to do. - If you want to disable Deckhouse automatic updates, remove the releaseChannel parameter from the
deckhousemodule configuration. -
Check if there are Pods with original registry in cluster (if there are — restart them):
kubectl get pods -A -o json | jq '.items[] | select(.spec.containers[] | select((.image | contains("deckhouse.io"))))
  | .metadata.namespace + "\t" + .metadata.name' -r
How to bootstrap a cluster and run Deckhouse without the usage of release channels?
This method should only be used if there are no release channel images in your air-gapped registry.
- If you want to install Deckhouse with automatic updates disabled:
- Use the tag of the installer image of the corresponding version. For example, use the image
your.private.registry.com/deckhouse/install:v1.44.3, if you want to install releasev1.44.3. - Set the corresponding version number in the deckhouse.devBranch parameter of the
InitConfigurationresource. - Do not set the deckhouse.releaseChannel parameter of the
InitConfigurationresource.
- Use the tag of the installer image of the corresponding version. For example, use the image
- If you want to disable automatic updates for an already installed Deckhouse (including patch release updates), then delete the releaseChannel parameter from the
deckhousemodule configuration.
Using a proxy server
This feature is available in Enterprise Edition only.
Use the proxy parameter of the ClusterConfiguration resource to configure proxy usage.
An example:
apiVersion: deckhouse.io/v1
kind: ClusterConfiguration
clusterType: Cloud
cloud:
  provider: OpenStack
  prefix: main
podSubnetCIDR: 10.111.0.0/16
serviceSubnetCIDR: 10.222.0.0/16
kubernetesVersion: "Automatic"
cri: "Containerd"
clusterDomain: "cluster.local"
proxy:
  httpProxy: "http://user:password@proxy.company.my:3128"
  httpsProxy: "https://user:password@proxy.company.my:8443"
Changing the configuration
How do I change the configuration of a cluster?
The general cluster parameters are stored in the ClusterConfiguration structure.
To change the general cluster parameters, run the command:
kubectl -n d8-system exec -ti deploy/deckhouse -- deckhouse-controller edit cluster-configuration
After saving the changes, Deckhouse will bring the cluster configuration to the state according to the changed configuration. Depending on the size of the cluster, this may take some time.
How do I change the configuration of a cloud provider in a cluster?
Cloud provider setting of a cloud of hybrid cluster are stored in the <PROVIDER_NAME>ClusterConfiguration structure, where <PROVIDER_NAME> — name/code of the cloud provider. E.g., for an OpenStack provider, the structure will be called OpenStackClusterConfiguration.
Regardless of the cloud provider used, its settings can be changed using the following command:
kubectl -n d8-system exec -ti deploy/deckhouse -- deckhouse-controller edit provider-cluster-configuration
How do I change the configuration of a static cluster?
Settings of a static cluster are stored in the StaticClusterConfiguration structure.
To change the settings of a static cluster, run the command:
kubectl -n d8-system exec -ti deploy/deckhouse -- deckhouse-controller edit static-cluster-configuration
How to switch Deckhouse EE to CE?
The instruction implies using the public address of the container registry: registry.deckhouse.io. Using a registry other than registry.deckhouse.io and registry.deckhouse.ru is only available in the Enterprise Edition.
Deckhouse CE does not support cloud clusters on OpenStack and VMware vSphere.
To switch Deckhouse Enterprise Edition to Community Edition, follow these steps:
-
Make sure that the modules used in the cluster are supported in Deckhouse CE. Disable modules that are not supported in Deckhouse CE.
-
Run the following command:
kubectl exec -ti -n d8-system deploy/deckhouse -- deckhouse-controller helper change-registry registry.deckhouse.io/deckhouse/ce -
Wait for the Deckhouse Pod to become
Ready:kubectl -n d8-system get po -l app=deckhouse -
Restart Deckhouse Pod if it will be in
ImagePullBackoffstate:kubectl -n d8-system delete po -l app=deckhouse -
Wait for Deckhouse to restart and to complete all tasks in the queue:
kubectl -n d8-system exec deploy/deckhouse -- deckhouse-controller queue main | grep status:Example of output when there are still jobs in the queue (
length 38):# kubectl -n d8-system exec deploy/deckhouse -- deckhouse-controller queue main | grep status: Queue 'main': length 38, status: 'run first task'Example of output when the queue is empty (
length 0):# kubectl -n d8-system exec deploy/deckhouse -- deckhouse-controller queue main | grep status: Queue 'main': length 0, status: 'waiting for task 0s' -
On the master node, check the application of the new settings.
The message
Configuration is in sync, nothing to doshould appear in thebashiblesystemd service log on the master node.An example::
# journalctl -u bashible -n 5 Jan 12 12:38:20 demo-master-0 bashible.sh[868379]: Configuration is in sync, nothing to do. Jan 12 12:38:20 demo-master-0 systemd[1]: bashible.service: Deactivated successfully. Jan 12 12:39:18 demo-master-0 systemd[1]: Started Bashible service. Jan 12 12:39:19 demo-master-0 bashible.sh[869714]: Configuration is in sync, nothing to do. Jan 12 12:39:19 demo-master-0 systemd[1]: bashible.service: Deactivated successfully. -
Check if there are any Pods left in the cluster with the Deckhouse EE registry address:
kubectl get pods -A -o json | jq '.items[] | select(.spec.containers[] | select((.image | contains("deckhouse.io/deckhouse/ee"))))
  | .metadata.namespace + "\t" + .metadata.name' -r | sort | uniq
Sometimes, some static Pods may remain running (for example,
kubernetes-api-proxy-*). This is due to the fact that kubelet does not restart the Pod despite changing the corresponding manifest, because the image used is the same for the Deckhouse CE and EE. To make sure that the corresponding manifests have also been changed, run the following command on any master node:grep -ri 'deckhouse.io/deckhouse/ee' /etc/kubernetes | grep -v backupThe output of the command should be empty.
How to switch Deckhouse CE to EE?
You will need a valid license key (you can request a trial license key if necessary).
The instruction implies using the public address of the container registry: registry.deckhouse.io. If you use a different container registry address, change the commands or use the instruction for switching Deckhouse to using a third-party registry.
To switch Deckhouse Community Edition to Enterprise Edition, follow these steps:
-
Run the following command:
LICENSE_TOKEN=<PUT_YOUR_LICENSE_TOKEN_HERE> kubectl exec -ti -n d8-system deploy/deckhouse -- deckhouse-controller helper change-registry --user license-token --password $LICENSE_TOKEN registry.deckhouse.io/deckhouse/ee -
Wait for the Deckhouse Pod to become
Ready:kubectl -n d8-system get po -l app=deckhouse -
Restart Deckhouse Pod if it will be in
ImagePullBackoffstate:kubectl -n d8-system delete po -l app=deckhouse -
Wait for Deckhouse to restart and to complete all tasks in the queue:
kubectl -n d8-system exec deploy/deckhouse -- deckhouse-controller queue main | grep status:Example of output when there are still jobs in the queue (
length 38):# kubectl -n d8-system exec deploy/deckhouse -- deckhouse-controller queue main | grep status: Queue 'main': length 38, status: 'run first task'Example of output when the queue is empty (
length 0):# kubectl -n d8-system exec deploy/deckhouse -- deckhouse-controller queue main | grep status: Queue 'main': length 0, status: 'waiting for task 0s' -
On the master node, check the application of the new settings.
The message
Configuration is in sync, nothing to doshould appear in thebashiblesystemd service log on the master node.An example:
# journalctl -u bashible -n 5 Jan 12 12:38:20 demo-master-0 bashible.sh[868379]: Configuration is in sync, nothing to do. Jan 12 12:38:20 demo-master-0 systemd[1]: bashible.service: Deactivated successfully. Jan 12 12:39:18 demo-master-0 systemd[1]: Started Bashible service. Jan 12 12:39:19 demo-master-0 bashible.sh[869714]: Configuration is in sync, nothing to do. Jan 12 12:39:19 demo-master-0 systemd[1]: bashible.service: Deactivated successfully. -
Check if there are any Pods left in the cluster with the Deckhouse CE registry address:
kubectl get pods -A -o json | jq '.items[] | select(.spec.containers[] | select((.image | contains("deckhouse.io/deckhouse/ce"))))
  | .metadata.namespace + "\t" + .metadata.name' -r | sort | uniq
Sometimes, some static Pods may remain running (for example,
kubernetes-api-proxy-*). This is due to the fact that kubelet does not restart the Pod despite changing the corresponding manifest, because the image used is the same for the Deckhouse CE and EE. To make sure that the corresponding manifests have also been changed, run the following command on any master node:grep -ri 'deckhouse.io/deckhouse/ce' /etc/kubernetes | grep -v backupThe output of the command should be empty.
How do I upgrade the Kubernetes version in a cluster?
To upgrade the Kubernetes version in a cluster change the kubernetesVersion parameter in the ClusterConfiguration structure by making the following steps:
-
Run the command:
kubectl -n d8-system exec -ti deploy/deckhouse -- deckhouse-controller edit cluster-configuration - Change the
kubernetesVersionfield. - Save the changes. Cluster nodes will start updating sequentially.
- Wait for the update to finish. You can track the progress of the update using the
kubectl get nocommand. The update is completed when the new version appears in the command’s output for each cluster node in theVERSIONcolumn.
How do I run Deckhouse on a particular node?
Set the nodeSelector parameter of the deckhouse module and avoid setting tolerations. The necessary values will be assigned to the tolerations parameter automatically.
Use only nodes with the CloudStatic or Static type to run Deckhouse. Also, avoid using a NodeGroup containing only one node to run Deckhouse.
Here is an example of the module configuration:
apiVersion: deckhouse.io/v1alpha1
kind: ModuleConfig
metadata:
  name: deckhouse
spec:
  version: 1
  settings:
    nodeSelector:
      node-role.deckhouse.io/deckhouse: ""