The module lifecycle stage: Generally available version
The module has requirements for installation
How to check module health?
To do this, you need to check the status of the pods in the d8-csi-huawei namespace. All pods should be in the Running or Completed state and should be running on all nodes.
d8 k -n d8-csi-huawei get pod -owide -wWhich SAN is supported?
- OceanStor V5 (V500R007, V500R007 Kunpeng)
- OceanStor (6.1.x / V700R001C00 / V700R001C10)
- OceanStor Dorado
- OceanStor A series / A Series
- OceanStor Pacific series
- FusionStorage block
- OceanDisk 1500T (NAS)
- OceanDisk 1500/1600 series
How can I use the same physical storage system Huawei for different clusters independently?
In Huawei storage systems, there’s a concept called vStore. This is a virtual storage system — essentially storage within storage.
Using two vStores in the same cluster is not supported. This limitation is connected with host mapping to vStores — different vStores cannot have hosts with identical names or identical iSCSI initiators.
As an example, let’s configure the storage system for two clusters, each running the csi-huawei module.
Storage System Configuration
Creating a vStore
-
Log in to the storage system as the superadmin created during system initialization.
-
Navigate to the top menu item
Services > vStores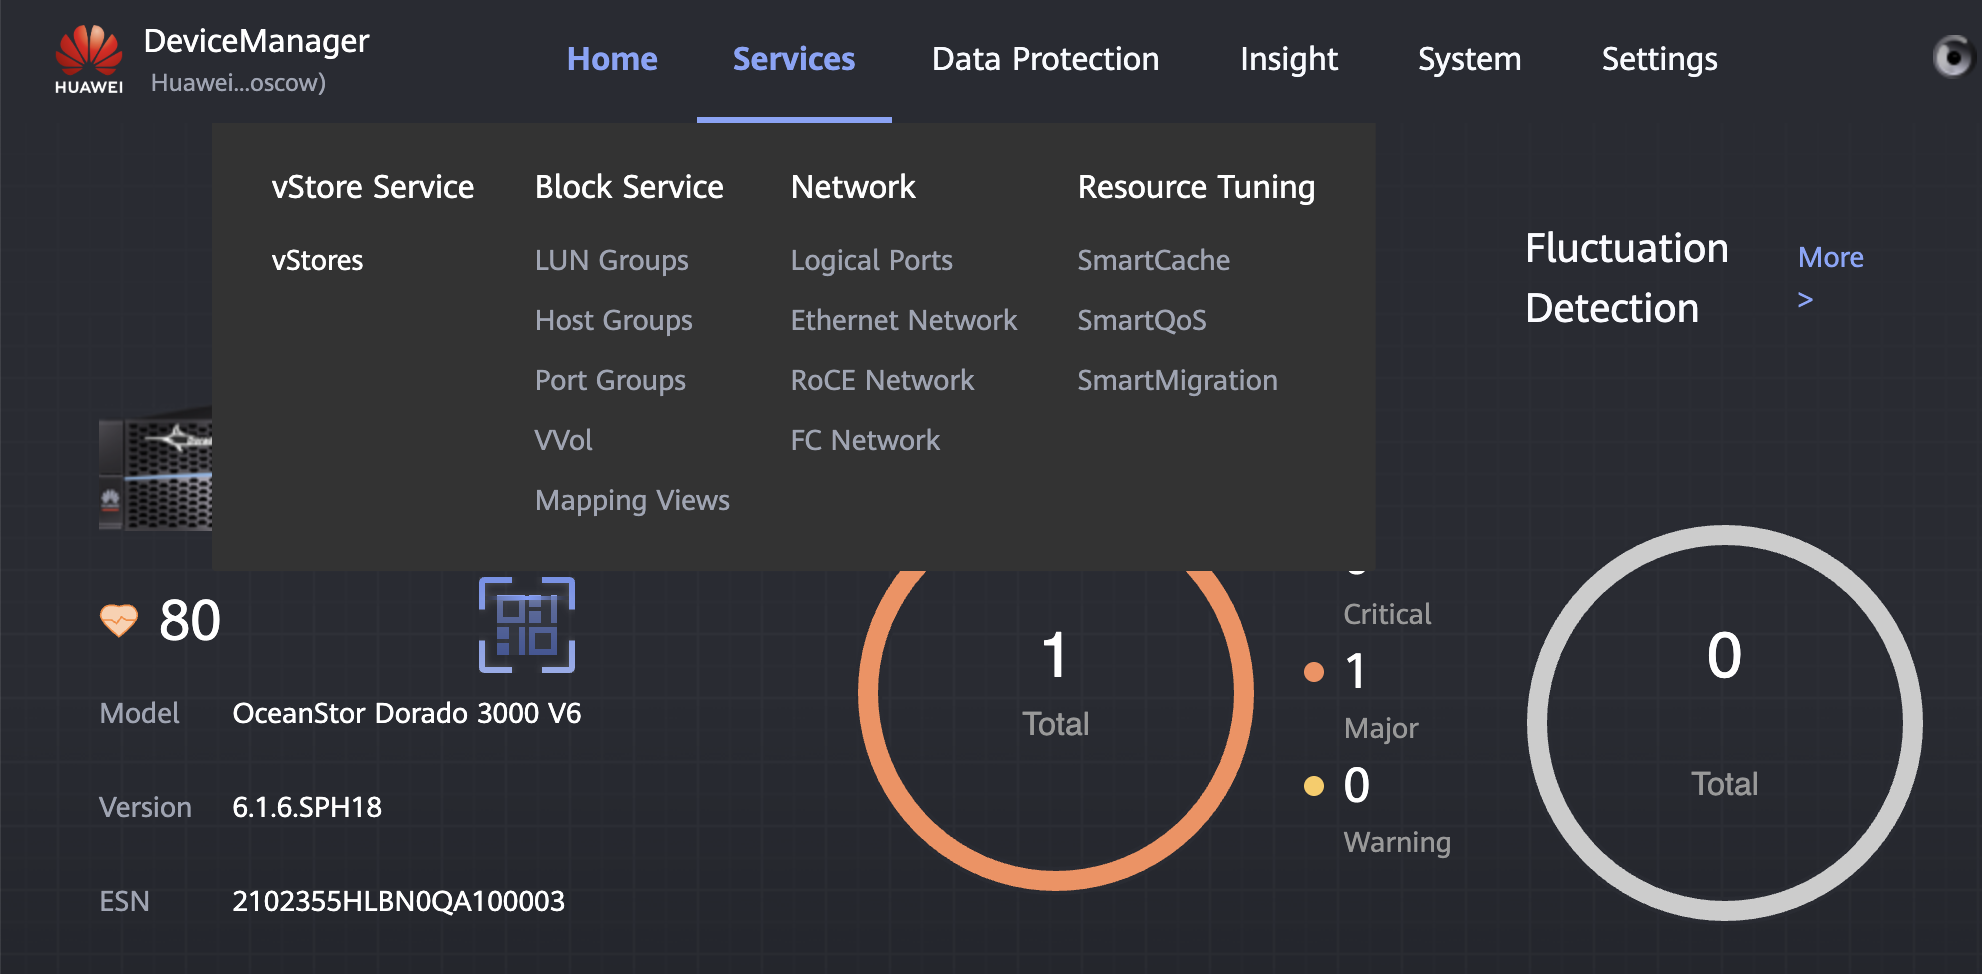
-
Click
Createbutton and fill out the form: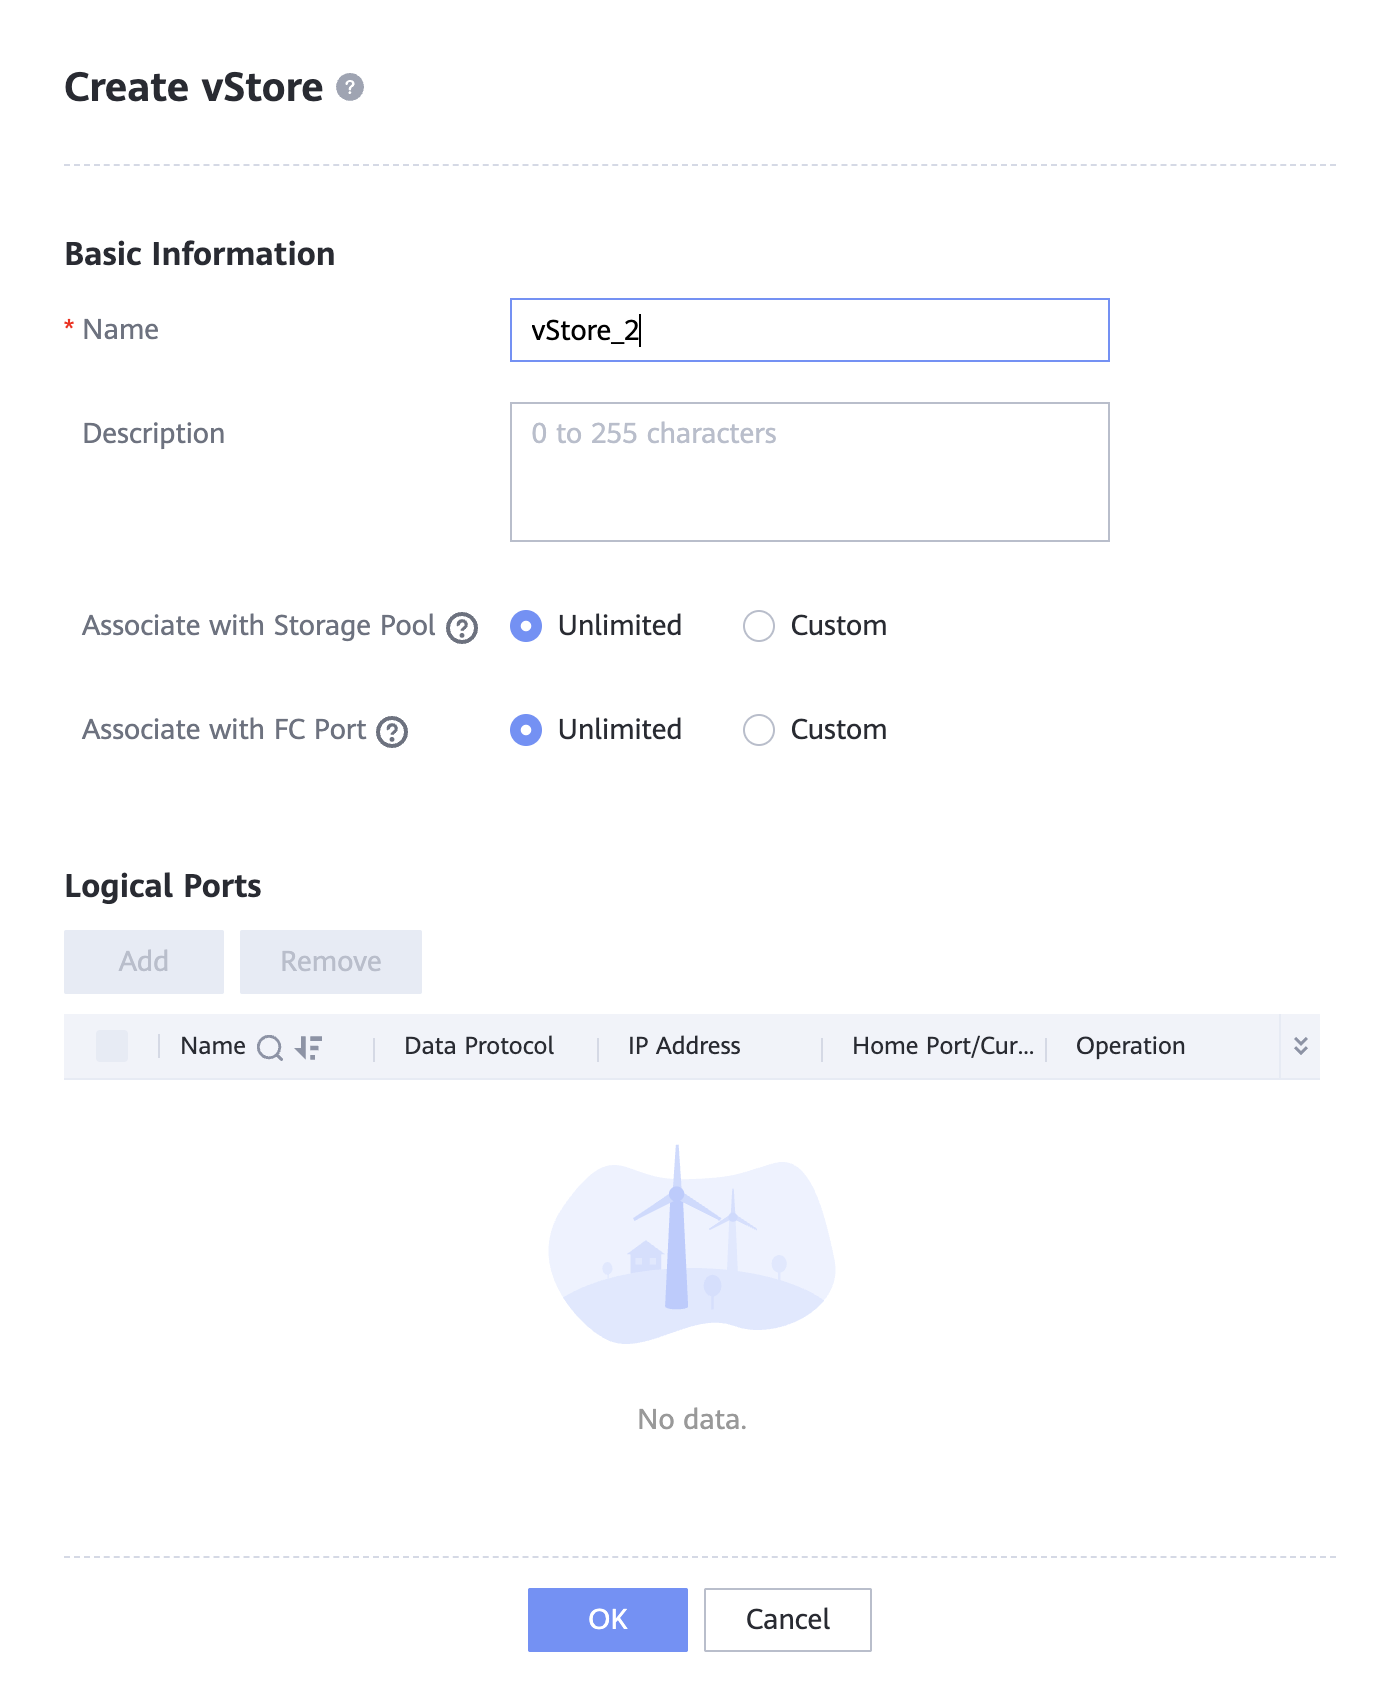
Where:
Name— vStore name (e.g., vStore_2),Associate with Storage Pool— option to bind vStore to specific storage pools (limits vStore to use these pools only),Associate with FC Port— option to bind vStore to specific physical FibreChannel ports.
Then click OK — the vStore is created.
-
Create a vStore management user
In the vStore list, select created vStore with a single click. In the opened window, go to the
User managementtab and clickCreate: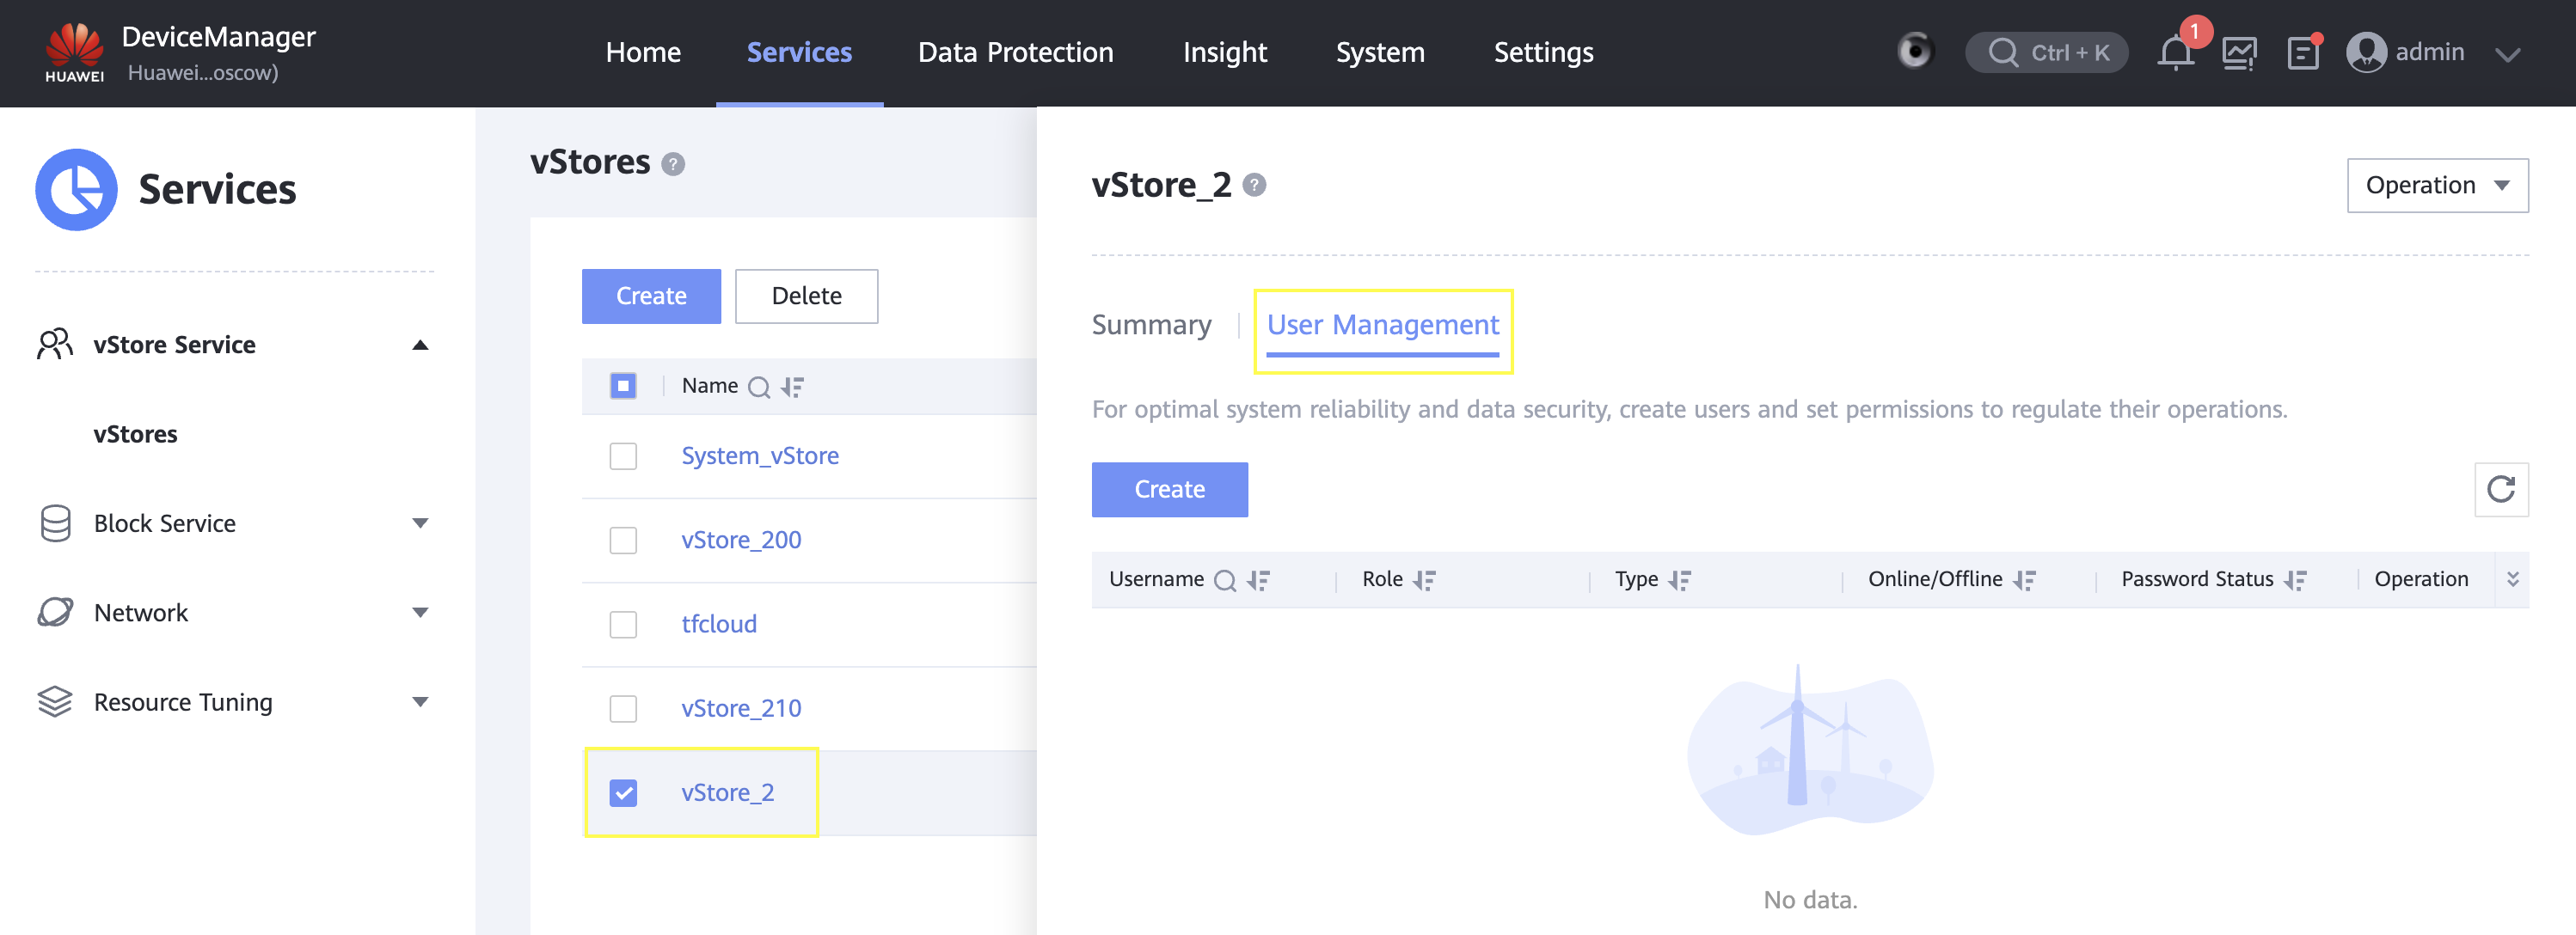
Fill out the form:
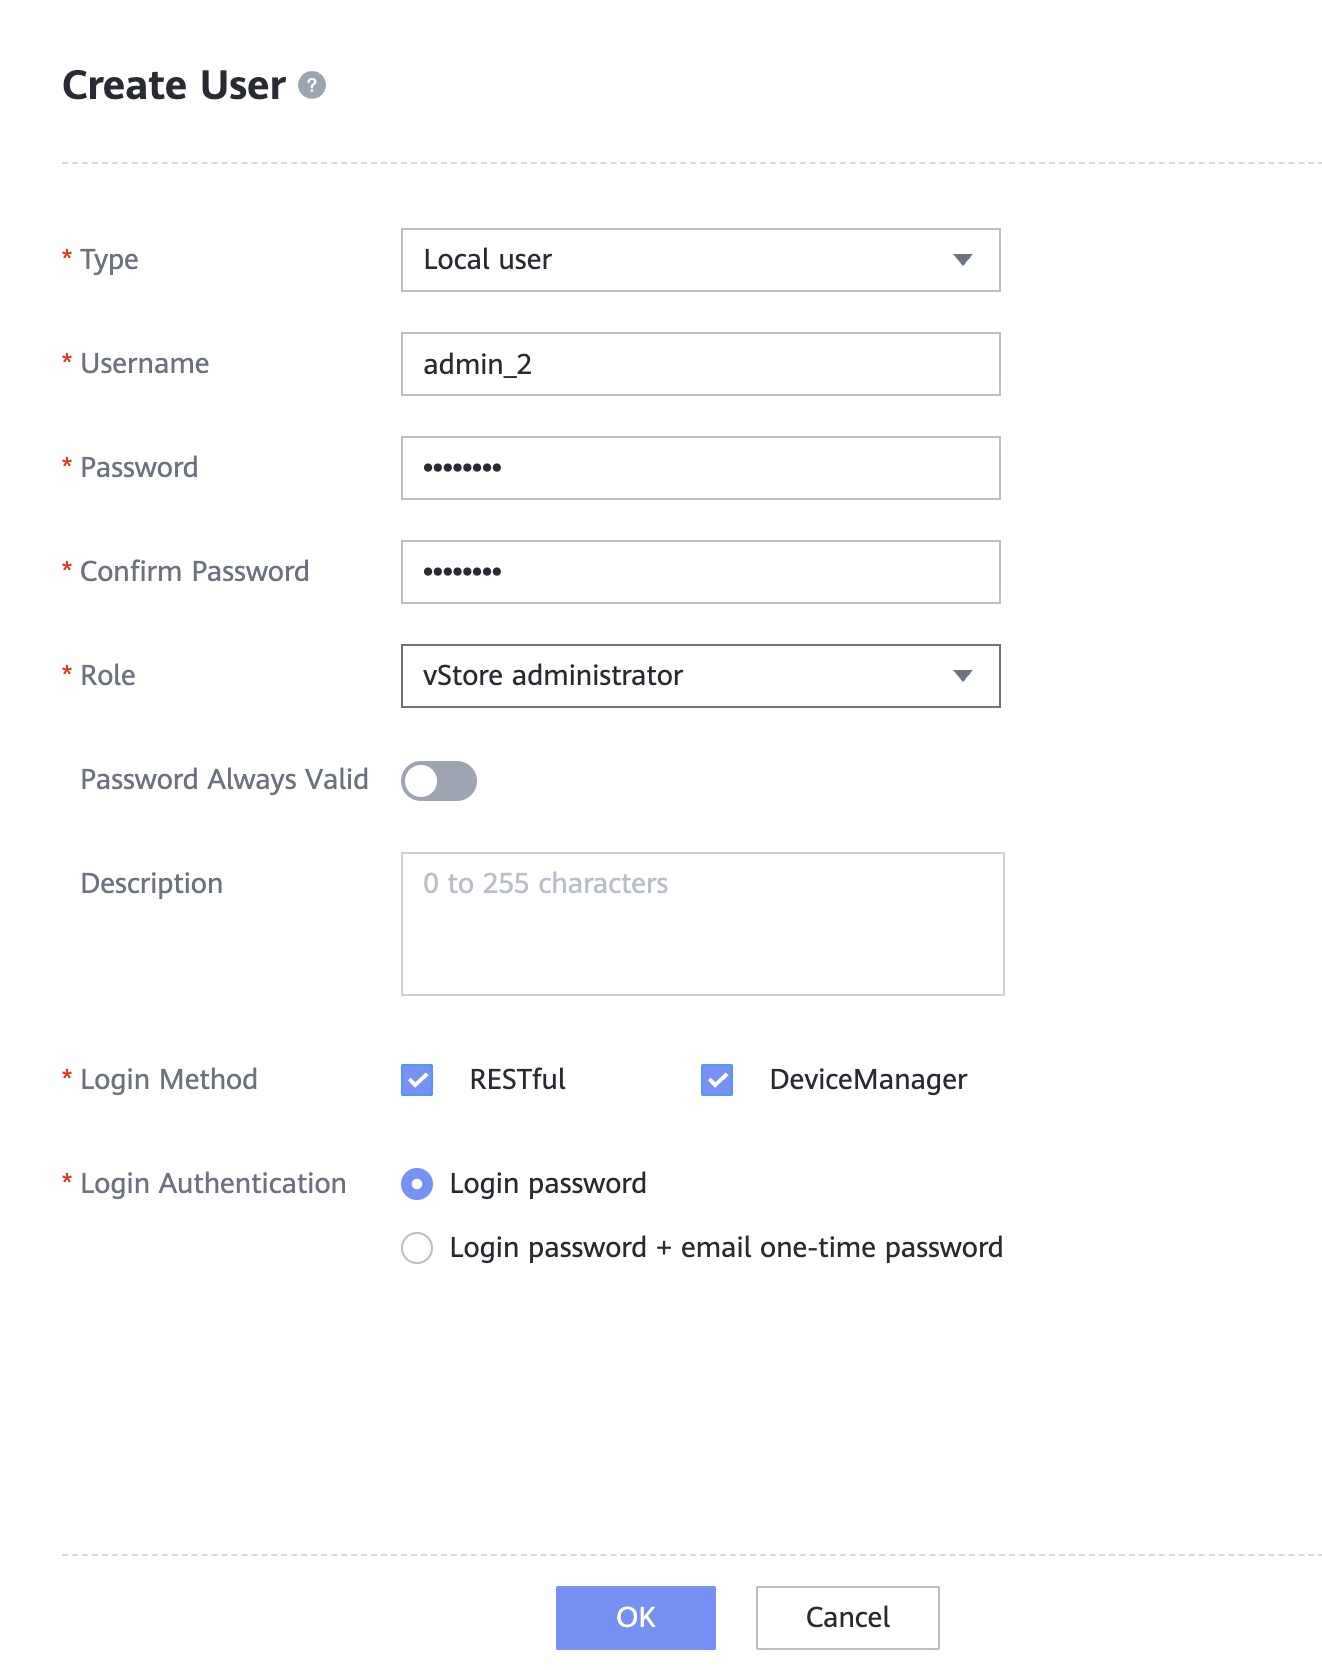
Where:
Username— user name (e.g.,admin_2),PasswordandConfirm Password— user password,Role— use vStore Administrator (user requires permissions to manage all the vStore resources).
Then click OK — the user is created.
-
Create a management port for the vStore
To connect to the vStore, it requires its own dedicated management port. System management ports cannot be used for vStore administrator logins.
Navigate to
Services > Logical ports, clickCreate, and fill out the form: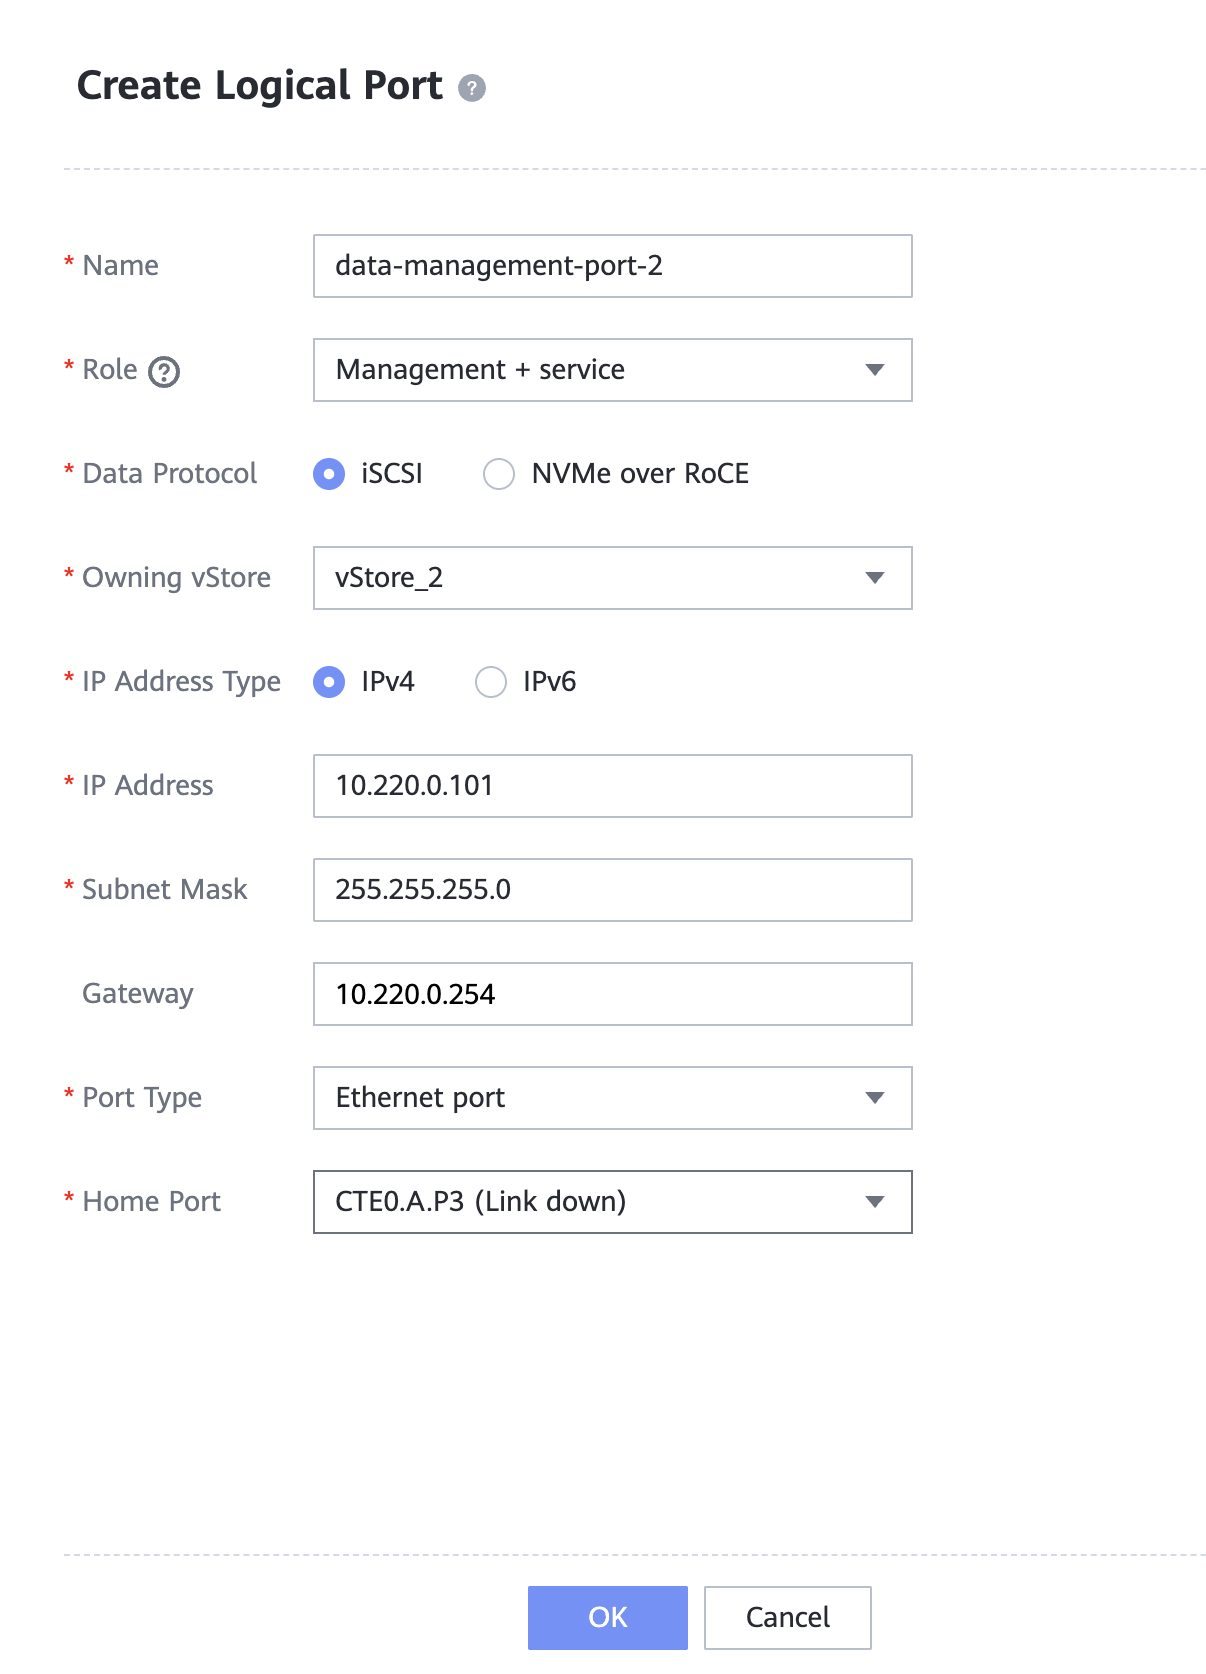
Where:
Name— port name (e.g., data-management-port-2),Role— management or service+management (management-only requires separate data plane port; service+management combines both control-plane and data-plane),Owning vStore— name of the vStore created earlier,IP address,subnet mask,gateway— network settings,Port type— Ethernet port/Bond/VLAN, we use Ethernet,Home port— physical storage port used for vStore management (and data if applicable).
Click OK — the port is created. You can now connect to the vStore management console.
-
Connect to the vStore management console
Open in your browser:
https://[logical-port-IP]:8088(e.g.,https://10.220.0.101:8088).Enter credentials of the created user. The system will prompt for password change — set a new permanent password for future logins.
Configuration complete.
Repeat the same steps to create a second vStore with a different name, user, and management port.
Connecting to the Storage System from the Cluster
Deploy the csi-huawei module in your cluster. See the csi-huawei setup guide.
Create a HuaweiStorageConnection, for example:
apiVersion: storage.deckhouse.io/v1alpha1
kind: HuaweiStorageConnection
metadata:
  name: hsconn-220
spec:
  storageType: OceanStorSAN
  pools:
    - prod # StoragePool name
  urls:
    - https://10.220.0.101:8088 # Logical port IP
  login: "admin_2" # vStore admin username
  password: '<your-password>' # Password
  protocol: ISCSI
  portals:
    - 10.220.0.101 # Data-plane address
  maxClientThreads: 30
Next, create a HuaweiStorageClass. After this, you can create pods and PVCs using the name of the StorageClass.
What to do if a volume does not mount because of filesystem errors?
Before mounting an already formatted volume, the driver checks the filesystem with e2fsck -p. If the check finds errors it cannot correct on its own, the volume is not mounted and the pod events show an error like the following:
device /dev/dm-11 carries filesystem errors that e2fsck could not correct on its own, exit code: 4This means the filesystem was damaged earlier — usually when the block device disappeared from under a mounted filesystem: SAN path loss, storage controller failover, power outage. Errors that e2fsck can fix on its own (an unfinished journal, for example) are repaired automatically and the volume is mounted.
The check is not performed for xfs filesystems and for volumes with the ReadWriteMany and ReadOnlyMany access modes.
To recover such a volume, the filesystem has to be checked while unmounted. The driver detaches the LUN from the node once the last pod using it stops, so a holder pod is needed to keep the volume attached:
Take a volume snapshot on the storage system before the repair: e2fsck may move damaged data to lost+found.
-
Stop the workload:
d8 k -n <namespace> scale deploy/<app> --replicas=0 -
Start a holder pod on a node you can reach over SSH. The
mountPropagation: HostToContainersetting is required: without it the container keeps its own copy of the mount and the filesystem stays mounted inside it.apiVersion: v1 kind: Pod metadata: name: fsck-holder namespace: <namespace> spec: nodeName: <worker-node> terminationGracePeriodSeconds: 1 containers: - name: holder image: <image with sleep> command: ["sleep", "infinity"] volumeMounts: - name: data mountPath: /data mountPropagation: HostToContainer volumes: - name: data persistentVolumeClaim: claimName: <pvc> -
On the node, find both mounts of the volume and save the
globalmountmount options:findmnt -rn -o TARGET,SOURCE,FSTYPE,OPTIONS | grep -F "<pv-name>" -
Unmount them and make sure nothing holds the device (the last command must print nothing):
umount /var/lib/kubelet/pods/<pod-uid>/volumes/kubernetes.io~csi/<pv-name>/mount umount /var/lib/kubelet/plugins/kubernetes.io/csi/csi.huawei.com/<hash>/globalmount grep -H " $(lsblk -no MAJ:MIN /dev/dm-11 | tr -d ' ') " /proc/*/mountinfo -
Check and repair the filesystem. A
Device or resource busymessage means it is still mounted somewhere — go back to the previous step:e2fsck -fy /dev/dm-11 dumpe2fs -h /dev/dm-11 | grep -iE 'state|error' -
Restore the
globalmountmount with the same options, delete the holder pod and start the workload:mount -t ext4 -o <saved options> /dev/dm-11 /var/lib/kubelet/plugins/kubernetes.io/csi/csi.huawei.com/<hash>/globalmount d8 k -n <namespace> delete pod fsck-holder d8 k -n <namespace> scale deploy/<app> --replicas=<N>
After the repair, check the lost+found directory on the volume and verify data integrity with the application’s own tools: e2fsck repairs filesystem metadata, not file contents.
Where do open-iscsi and multipath-tools on a node come from?
From the module itself. The NodeGroupConfiguration never asks the node’s package manager for them, so a node in a closed environment with no route to the distribution’s repositories is set up the same way as any other, and no bashible run waits on those repositories.
On every node it serves, bashible pulls the module’s package image iscsi-tools from the module’s registry, unpacks it and runs its install script. The stack is two pairs — iscsiadm with iscsid, and multipath with multipathd — and the script decides for each pair separately:
- a pair the host already has of its own stays the host’s, and the module only enables and configures the distribution’s unit for its daemon;
- a pair the host lacks lands under
/var/lib/deckhouse/sds/csi-huawei, every binary is started through its own dynamic loader with its own library path, and a unit of the module’s comes up for its daemon.
A client and its daemon always come from the same source, because iscsiadm of one version does not speak to iscsid of another. The two pairs do not talk to each other, so a node may well run the host’s iscsid next to the module’s multipathd.
Two things the install script arranges for the module’s pairs that are worth knowing about, because both are invisible until something does not mount.
The node plugin reaches the host’s iscsiadm by name, through nsenter, so the name is resolved against the container’s PATH inside the host’s mount namespace. When iscsiadm is the module’s, the script leaves a wrapper at /usr/local/sbin/iscsiadm for that, and the wrapper prefers a distribution iscsiadm the moment one appears.
And multipathd from the package reads its configuration under the prefix it was built with, not under /etc. When multipathd is the module’s, the script links multipath.conf and multipath from that prefix onto the node’s own, so the NodeGroupConfiguration’s deferred_remove/flush_on_last_del settings and the wwids the node plugin records reach the same daemon. The NodeGroupConfiguration writes those settings whichever multipathd runs on the node.
To tell which pair a node took from where, look at what is running on it:
# the distribution's daemons
systemctl is-active iscsid multipathd
# the module's daemons and binaries
systemctl is-active d8-csi-huawei-iscsid.service d8-csi-huawei-multipathd.service
ls /var/lib/deckhouse/sds/csi-huawei/bin
command -v iscsiadm
The module’s stack changes little on the host itself. Its libraries are never merged into the host’s /lib64 or /usr/lib; the only files it puts outside its own directory are the iscsiadm wrapper, the configuration links and the multipath path checkers in /usr/lib/multipath, where multipathd looks for them, and only those the host does not already have. When a pair becomes the host’s, the next version of the package takes its files back. And it does not touch /etc/iscsi/initiatorname.iscsi when the node already has one: the IQN is the node’s identity on the array, registered there in a host object, and a node that comes back under a different name is a node the array has never heard of.
sg3-utils is not installed at all: no code path in the driver invokes its tools.
How much of a volume is reserved for the superuser?
Nothing, by default: a volume formatted with ext4 gets -m 0, so the whole volume is available to the workload.
Where the classic 5% ext4 reserve is wanted — for example to keep a filesystem writable for a privileged process after a workload has filled it — annotate the HuaweiStorageClass with the percentage to reserve:
d8 k annotate huaweistorageclass <name> storage.deckhouse.io/ext4-reserved-percent=5The value is a whole number of percent between 0 and 50; an invalid one leaves the HuaweiStorageClass with Ready=False and the reason in its status, instead of breaking volume creation later.
The reserve applies only to volumes created after the annotation was set — filesystems that already exist keep the reserve they were created with. Only the ext filesystems keep blocks for the superuser, so a class with fsType: xfs ignores it.
Changing the annotation makes the controller recreate the StorageClass, because parameters of an existing StorageClass are immutable in Kubernetes. Existing volumes and PVCs are not affected.