This guide describes how to deploy a Deckhouse Kubernetes Platform cluster in a private environment with no direct access to the DKP container image registry (registry.deckhouse.io) and to external deb/rpm package repositories used on nodes running supported operating systems.
Note that installing DKP in a private environment is available in the following editions: SE, SE+, EE.
Private environment specifics
Deploying in a private environment is almost the same as deploying on bare metal.
Key specifics:
- Proxy server parameters set in the cluster configuration during installation are automatically propagated to the
HTTP_PROXY,HTTPS_PROXY, andNO_PROXYenvironment variables for cluster nodes and DKP components. User applications (pods) do not receive these variables from the cluster configuration automatically. To give them Internet access via a proxy, you must set the environment variables (HTTP_PROXY,HTTPS_PROXY, and, if needed,NO_PROXY) explicitly in manifests. Depending on corporate policy, application access may be arranged in other ways—for example, by allowing direct egress from nodes. - A container registry with DKP images is deployed separately with access from inside the perimeter, and the cluster is configured to use it with the required permissions.
Cluster nodes are usually accessed through a dedicated physical server or virtual machine called a bastion host. A proxy for access to external resources from the internal network is deployed according to your network policy and infrastructure architecture; depending on requirements, it may run on the bastion host or on a separate machine. A private container registry should preferably run on a separate VM or server in the internal network. Colocating the registry on the bastion host is not recommended for production. An exception may be lab or simplified stand-alone setups for limited use cases.
Depending on your organization’s security policies, access to external resources may be fully disabled. In that case, no proxy is used for outbound access to external networks. Required external artifacts (for example, an archive of DKP container images) are brought into the perimeter onto the target VM by any permitted means—for example, removable media.
Overall private environment diagram:
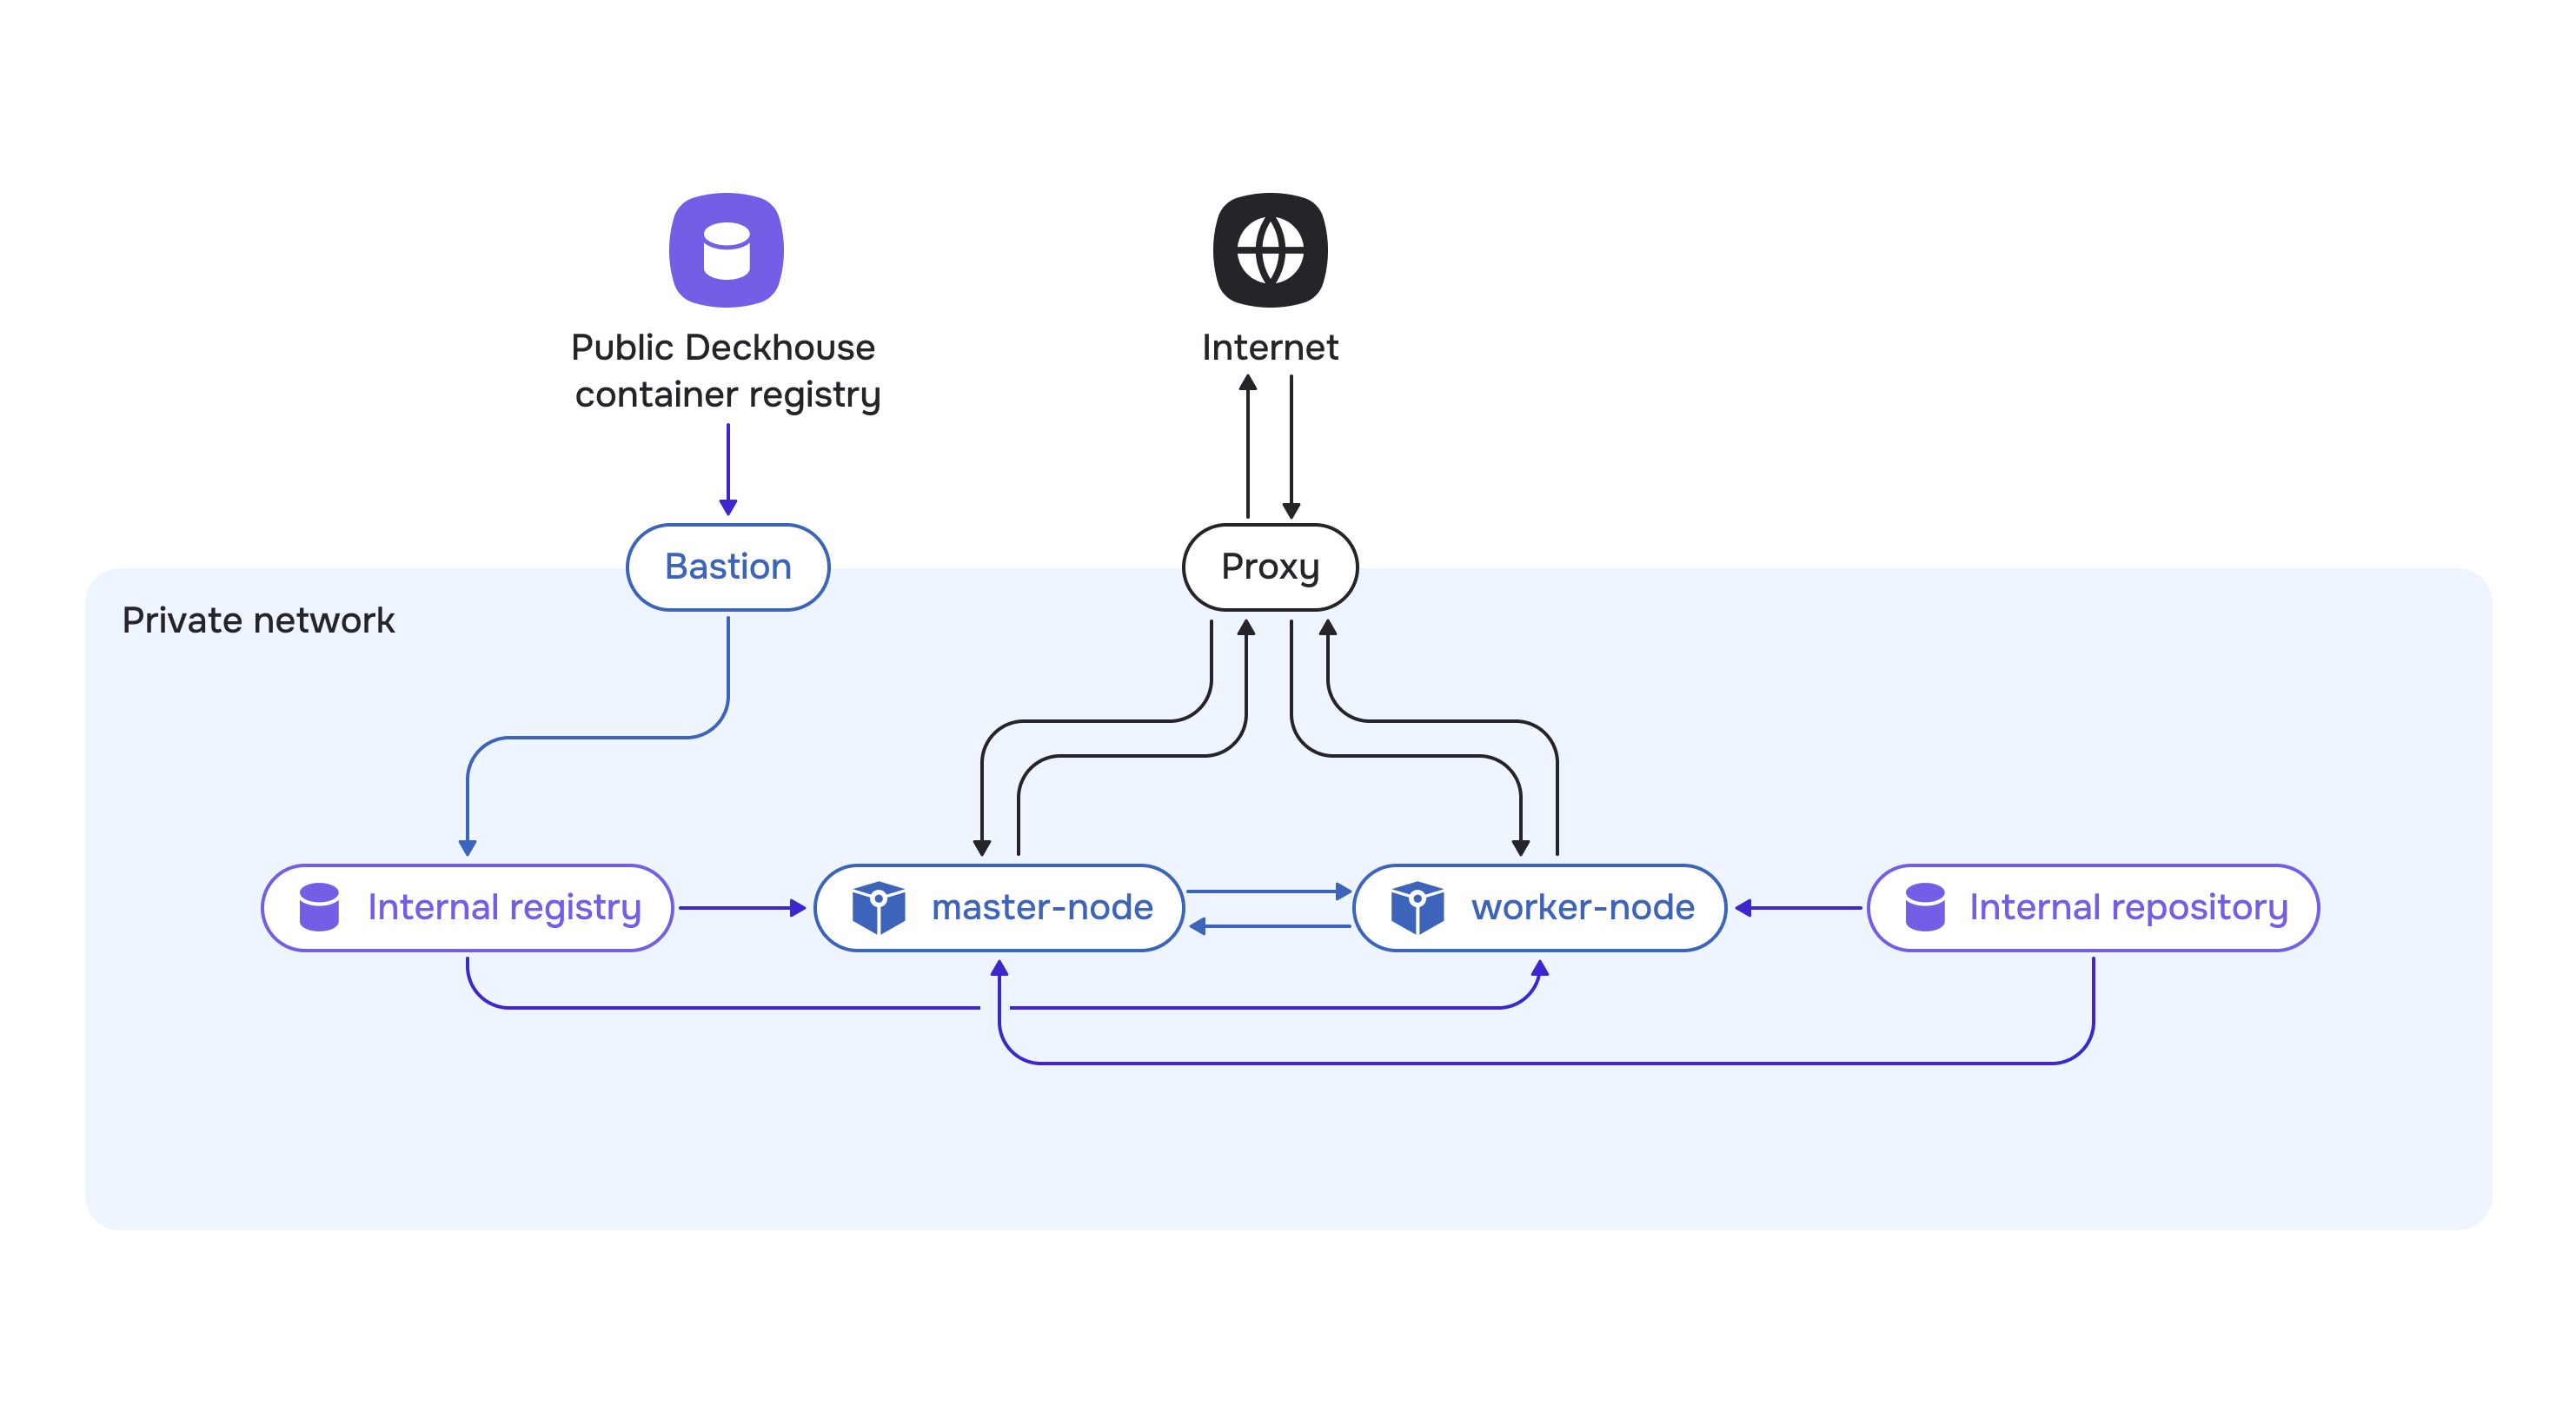
The diagram also shows an internal OS package repository. It is used to install packages on nodes when access to official repositories is not available even through a proxy. Many private environments already run internal OS package mirrors, and installation uses them—in that case, a proxy for package traffic is not required. A proxy server is used for other kinds of traffic:
- pulling container images from the public DKP registry to the bastion host
- DKP components and nodes calling external resources (if allowed by policy)
- optionally, pod applications accessing external services.
Infrastructure selection
This guide describes deploying a cluster in a private environment consisting of one master node and one worker node.
You will need:
- a personal computer from which you run operations
- a dedicated physical server or virtual machine for the bastion host
- a dedicated physical server or virtual machine for the container registry
- optionally, a physical server or virtual machine for the proxy server
- two physical servers or two virtual machines for the cluster nodes.
Server requirements:
- Bastion: at least 4 CPU cores, 8 GB RAM, and 150 GB on fast storage. That much disk space is needed because the bastion host temporarily holds all DKP images used for installation. Images are downloaded from the public DKP registry to the bastion host before being pushed to the private container registry and packed into archives; these steps require substantial free space.
- VM for the private registry: at least 4 CPU cores, 8 GB RAM, and at least 150 GB on fast storage for DKP images. Plan disk capacity with a margin, using the bundle size after
d8 mirror pushas a guide. - Cluster nodes: choose resources for future cluster nodes based on expected workload. For example, the minimum recommended configuration is 4 CPU cores, 8 GB RAM, and 60 GB on fast storage (400+ IOPS) per node.
Preparing a private container registry
DKP supports only the Bearer token authentication scheme for container registries.
You may use any supported private container registry. Compatibility has been tested and is guaranteed for the following: Nexus, Harbor, Artifactory, Docker Registry, and Quay.
This guide uses Harbor as an example. It supports policy configuration and role-based access control (RBAC), vulnerability scanning, and marking trusted artifacts. Harbor is a CNCF project.
Installing Harbor
Install the latest Harbor release from the project’s GitHub releases page. Download the installer archive from the desired release, selecting the asset with harbor-offline-installer in its name.
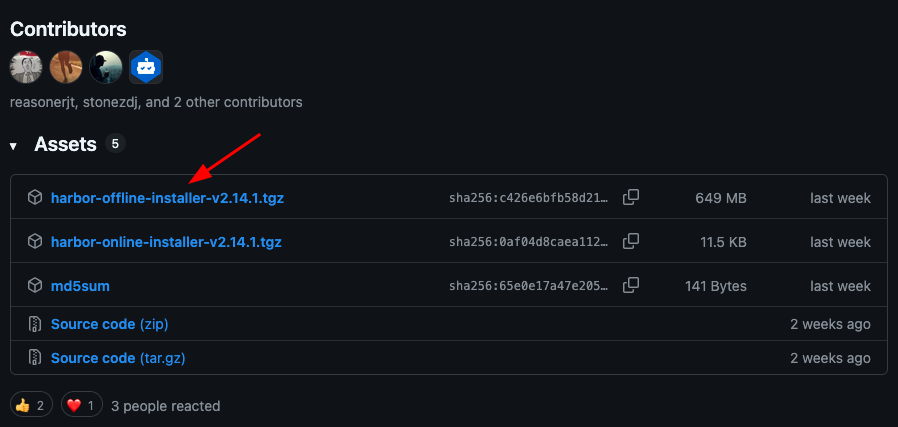
Copy the download URL. For example, for harbor-offline-installer-v2.14.1.tgz it will look like this: https://github.com/goharbor/harbor/releases/download/v2.14.1/harbor-offline-installer-v2.14.1.tgz.
Connect via SSH to the virtual machine where Harbor will run and download the archive using any convenient method. If that VM has no direct Internet access, download the archive on your workstation or on the bastion host, then copy it to the Harbor VM.
Extract the downloaded archive (specify the archive name):
tar -zxf ./harbor-offline-installer-v2.14.1.tgz
The extracted harbor directory contains the files required for installation.
On the same VM, install Docker and the Docker Compose plugin. You will need them to configure TLS access to the registry and to run the Harbor installer.
Before deploying the registry, generate a self-signed TLS certificate.
Due to access restrictions in a private environment, it is not possible to obtain certificates from services such as Let’s Encrypt, since the service will not be able to perform the validation required to issue a certificate.
There are several ways to generate certificates. This guide describes one of them. If needed, use any other suitable approach or provide an existing certificate.
Create the certs directory inside the harbor directory:
cd harbor/
mkdir certs
cd certs
Generate certificates for external access:
openssl genrsa -out ca.key 4096
openssl req -x509 -new -nodes -sha512 -days 3650 -subj "/C=US/ST=California/L=SanFrancisco/O=example/OU=Personal/CN=myca.local" -key ca.key -out ca.crt
Generate certificates for the internal domain name harbor.example so clients can reach the Harbor VM securely inside the private network.
In the commands below, replace <INTERNAL_IP_ADDRESS> with the Harbor VM’s internal IP address. Cluster nodes and other services use this address to reach the container registry from inside the private environment.
openssl genrsa -out harbor.example.key 4096
openssl req -sha512 -new -subj "/C=US/ST=California/L=SanFrancisco/O=example/OU=Personal/CN=harbor.example" -key harbor.example.key -out harbor.example.csr
cat > v3.ext <<-EOF
authorityKeyIdentifier=keyid, issuer
basicConstraints=CA:FALSE
keyUsage = digitalSignature, nonRepudiation, keyEncipherment, dataEncipherment
extendedKeyUsage = serverAuth
subjectAltName = @alt_names

[alt_names]
IP.1=<INTERNAL_IP_ADDRESS>
DNS.1=harbor.example
EOF
openssl x509 -req -sha512 -days 3650 -extfile v3.ext -CA ca.crt -CAkey ca.key -CAcreateserial -in harbor.example.csr -out harbor.example.crt
openssl x509 -inform PEM -in harbor.example.crt -out harbor.example.cert
Verify that all certificates were created successfully:
ls -la
Next, configure Docker to work with the private container registry over TLS. Create the harbor.example directory under /etc/docker/certs.d/:
sudo mkdir -p /etc/docker/certs.d/harbor.example
The
-poption tellsmkdirto create parent directories if they do not exist (in this case, thecerts.ddirectory).
Copy the generated certificates into it:
cp ca.crt /etc/docker/certs.d/harbor.example/
cp harbor.example.cert /etc/docker/certs.d/harbor.example/
cp harbor.example.key /etc/docker/certs.d/harbor.example/
These certificates will be used when accessing the registry via the harbor.example domain name.
Return to the harbor directory (installer root):
cd ..
Copy the configuration file template that comes with the installer:
cp harbor.yml.tmpl harbor.yml
Update the following parameters in harbor.yml:
hostname: set toharbor.example(the certificates were generated for this name)certificate: specify the path to the generated certificate in thecertsdirectory (for example,/home/ubuntu/harbor/certs/harbor.example.crt)private_key: specify the path to the private key (for example,/home/ubuntu/harbor/certs/harbor.example.key)harbor_admin_password: set a password for accessing the web UI.
Save the file.
Run the installation script:
./install.sh
Harbor installation will start: the required images will be prepared and the containers will be started.
Verify that Harbor is running successfully:
docker ps
On the Harbor VM, add an entry to /etc/hosts that maps the harbor.example domain name to localhost so you can open Harbor by that name from the same machine:
127.0.0.1 localhost harbor.example
In some cloud providers (for example, Yandex Cloud), changes to /etc/hosts may be reverted after a virtual machine reboot. A note about this is typically shown at the beginning of the /etc/hosts file.
# Your system has configured 'manage_etc_hosts' as True.
# As a result, if you wish for changes to this file to persist
# then you will need to either
# a.) make changes to the master file in /etc/cloud/templates/hosts.debian.tmpl
# b.) change or remove the value of 'manage_etc_hosts' in
#     /etc/cloud/cloud.cfg or cloud-config from user-data
If your provider uses the same mechanism, apply the corresponding changes to the template file referenced in the comment so that the settings persist after reboot.
Harbor installation is now complete! 🎉
Configuring Harbor
Create a project and credentials used to work with it.
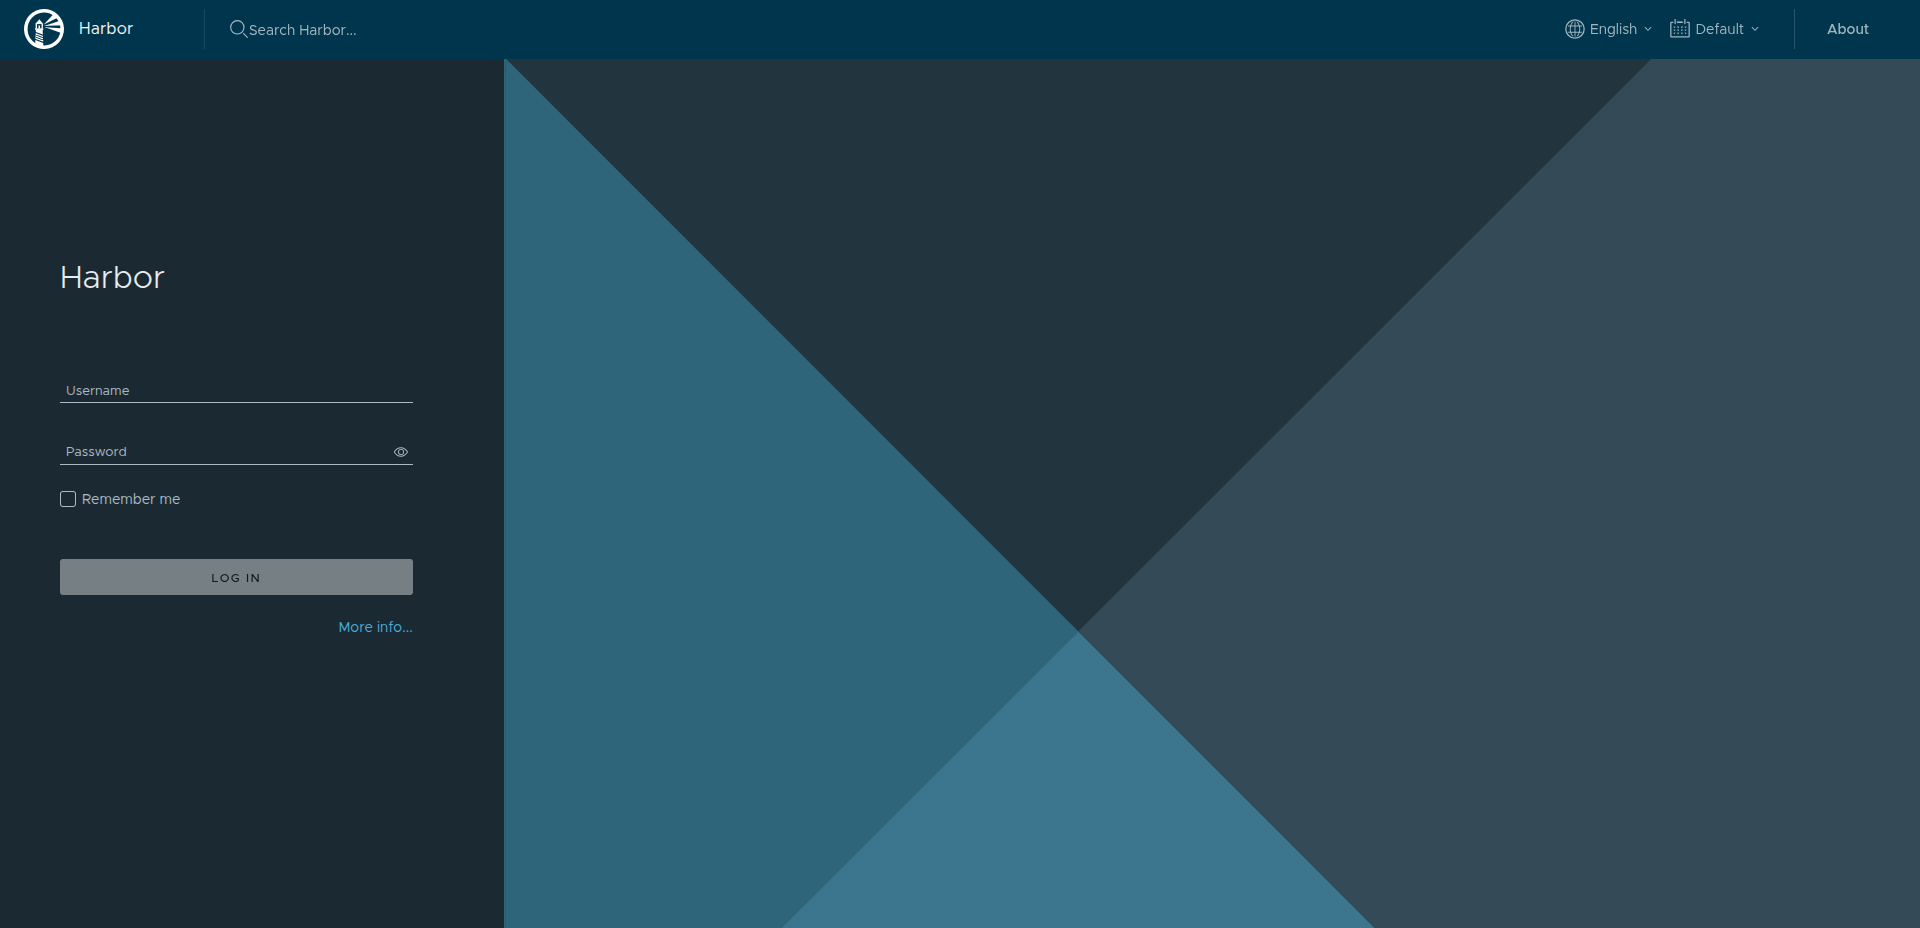
Open the Harbor web UI at harbor.example. Access to this UI from the public Internet is intentionally blocked; connect only from a host that has access to the internal network.
To open Harbor by the harbor.example domain name from your workstation, add a matching entry to /etc/hosts pointing to the Harbor VM’s internal IP address.
Sign in with the username and password from harbor.yml.
Your browser may warn about the self-signed certificate and mark the connection as “not secure”. In a private environment this is expected and acceptable. If needed, add the certificate to your browser or OS trust store to suppress the warning.
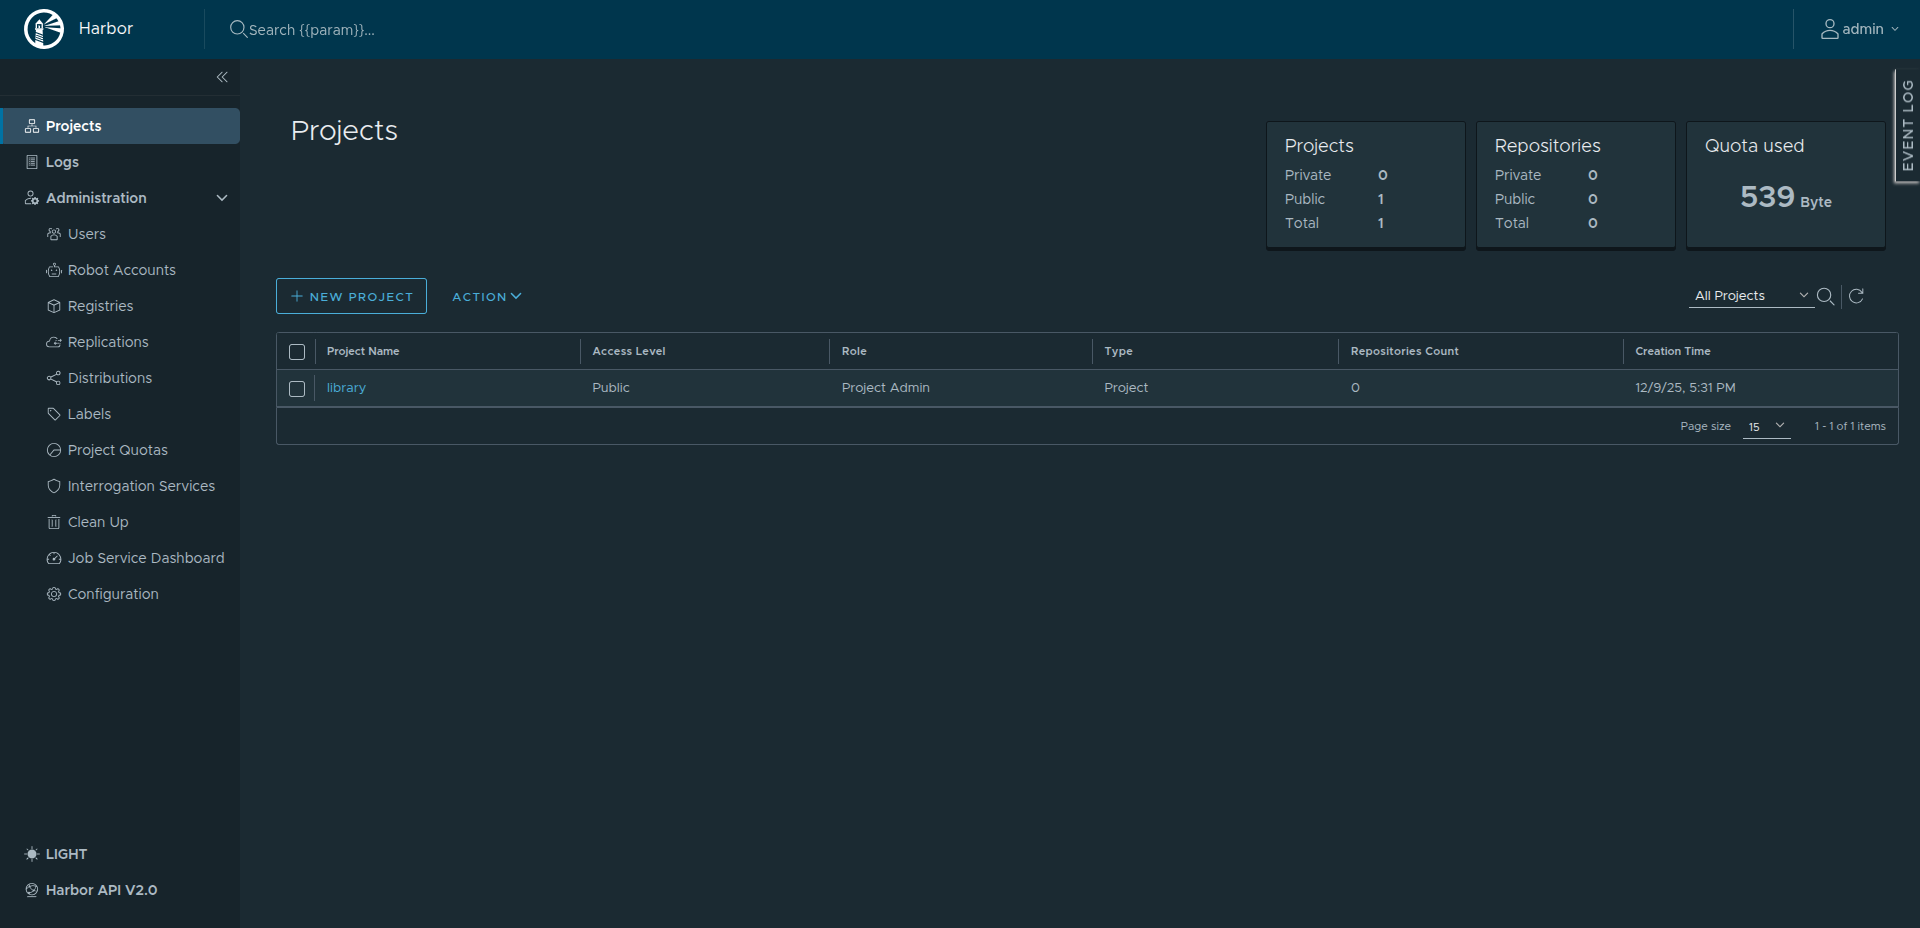
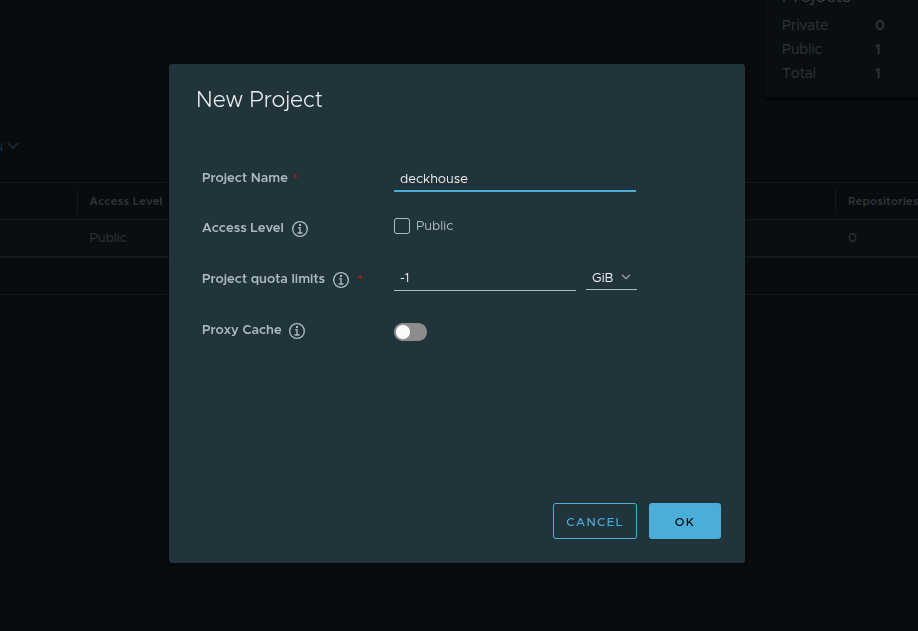
Create a new project: click New Project, set the name to deckhouse, and leave the other settings unchanged.
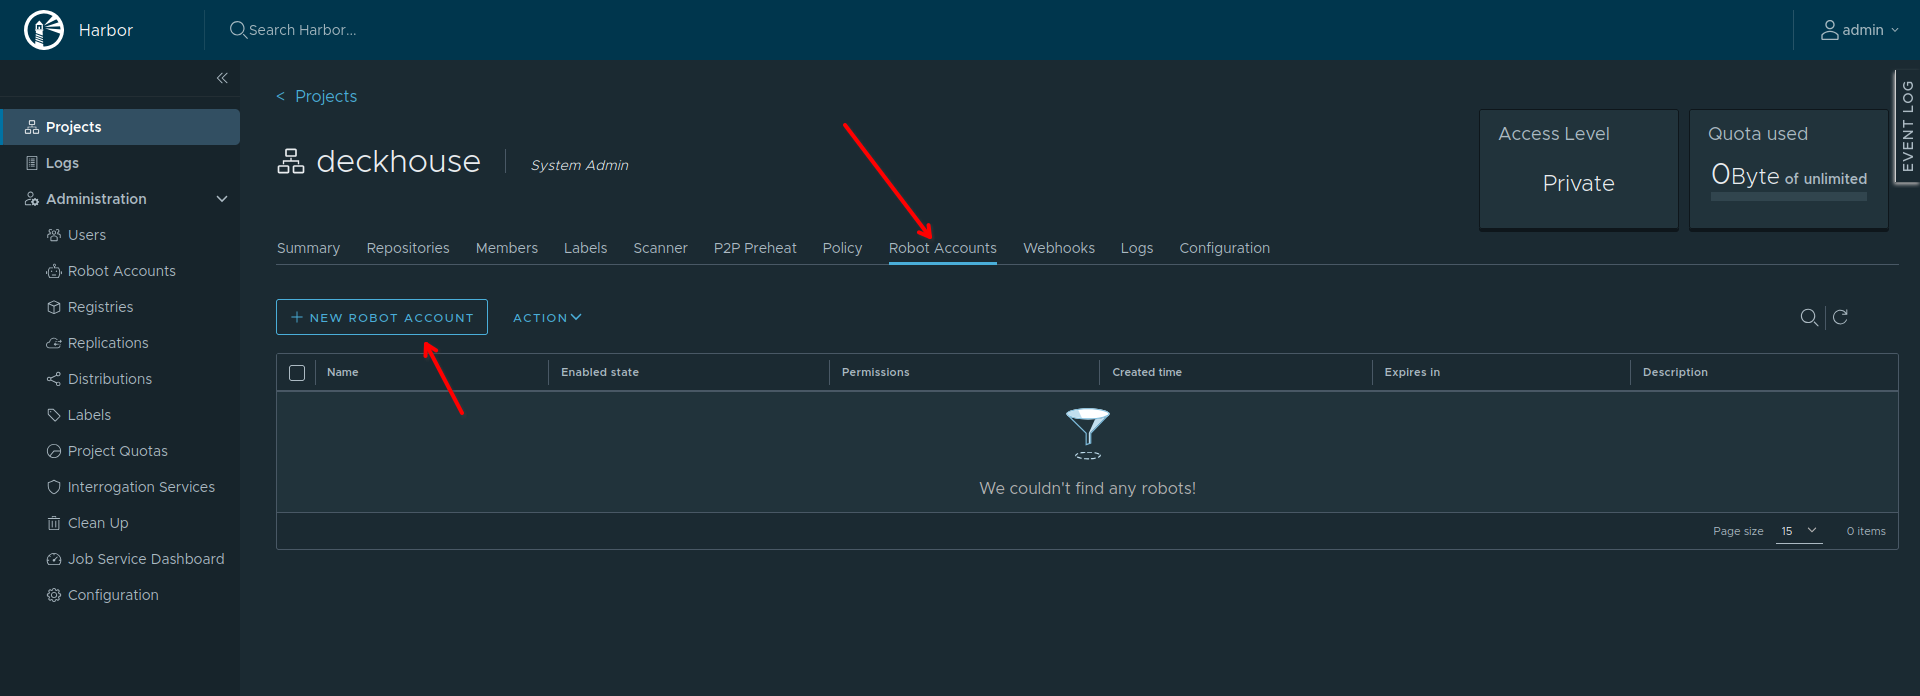
Create a robot account for this project. Robot accounts are tied to a project and meant for automation. They cannot use the web UI and are intended for Docker CLI or Helm CLI only.
Open the deckhouse project and go to the Robot Accounts tab. Click New Robot Account:
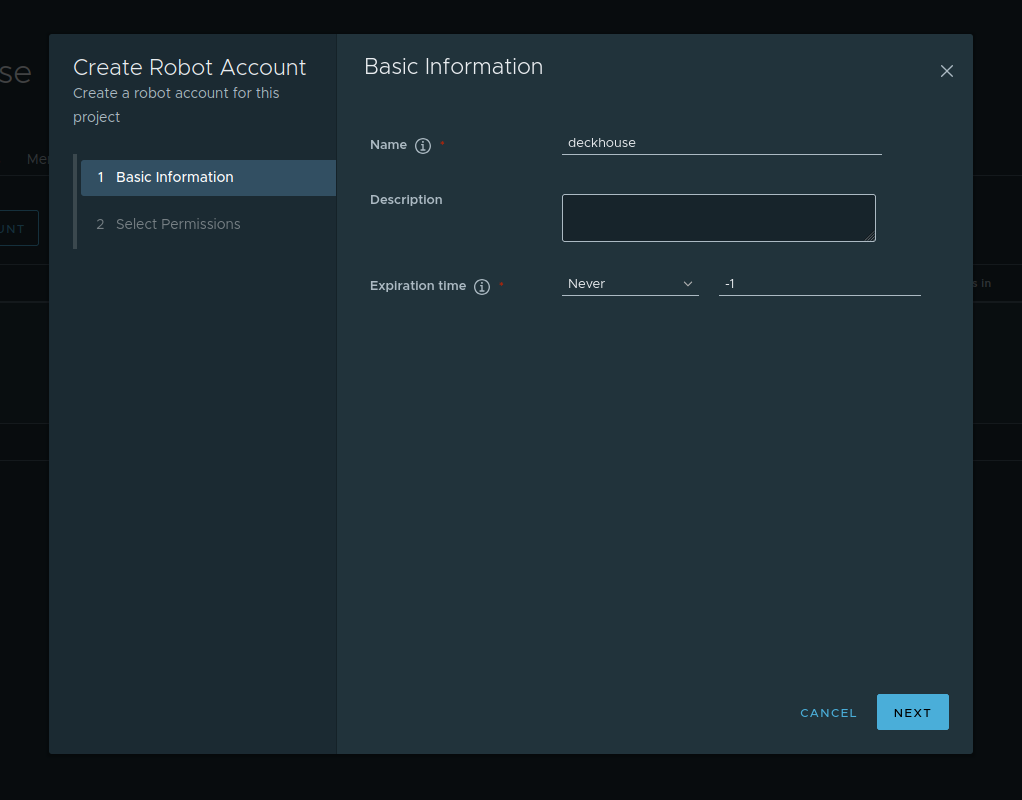
Set the account name, optional description, and expiration (days or never expire):
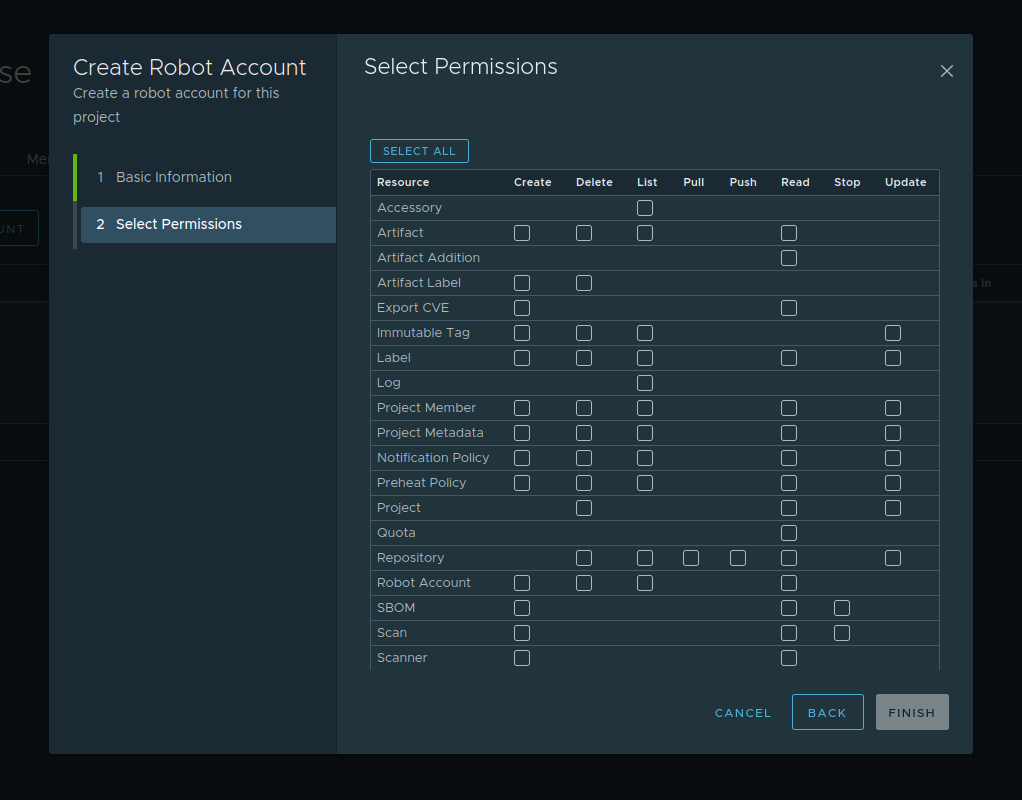
For correct operation, grant full access under Repository. Adjust other permissions as needed or per your security policy.
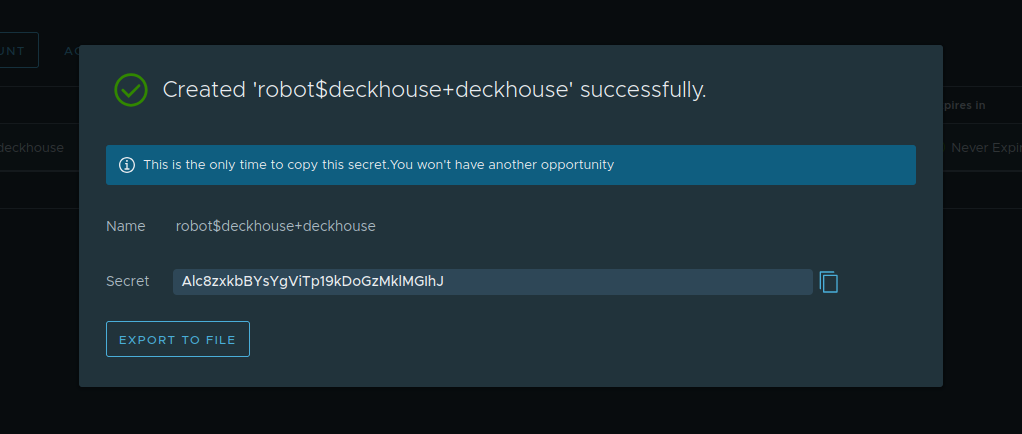
After creation, Harbor shows the robot account secret (token).
Save the secret immediately. Harbor will not show it again, and it cannot be retrieved later.
Harbor configuration is now complete! 🎉
Copying DKP images to a private container registry
The next step is to copy DKP component images from the public Deckhouse Kubernetes Platform registry to Harbor.
The steps in this section require the Deckhouse CLI. Install it on the host from which you will mirror images to the private registry — in this guide, the bastion host. For installation instructions, see the Deckhouse CLI documentation.
Downloading images takes a significant amount of time. To avoid losing progress if the SSH connection is interrupted, run the commands in a tmux or screen session. If the connection drops, you can reattach to the session and continue without starting over. Both utilities are typically available in Linux distribution repositories and can be installed using the package manager.
Download DKP images into a dedicated directory using d8 mirror pull.
By default, d8 mirror pull downloads current DKP releases, vulnerability scanner databases (if included in your edition), and officially shipped modules.
Run the following command to download current image versions. Replace the placeholders with your values: <EDITION>, <LICENSE_KEY>, and optionally the target directory path:
d8 mirror pull \
  --source='registry.deckhouse.io/deckhouse/<EDITION>' \
  --license='<LICENSE_KEY>' /home/ubuntu/d8-bundle
where:
--source— DKP image registry address<EDITION>— DKP edition code (for example,ee,se,se-plus). The default isee(Enterprise Edition), so--sourcemay be omitted--license— DKP license key for authentication to the official registry<LICENSE_KEY>— your license key/home/ubuntu/d8-bundle— directory for downloaded image bundles (created automatically if missing).
If the download is interrupted, run the command again to resume, as long as no more than 24 hours have passed since it stopped.
Depending on your Internet connection, the process may take 30 to 40 minutes.
Verify that the bundles were created (you should see platform.tar, security.tar, deckhousereleases.yaml, and multiple module-*.tar files):
$ ls -lh /home/ubuntu/d8-bundle
total 51G
-rw-rw-r-- 1 user user 4.8K Feb 26 17:19 deckhousereleases.yaml
-rw-rw-r-- 1 user user 4.9G Feb 26 18:30 module-code.tar
-rw-rw-r-- 1 user user  26G Feb 26 17:50 platform.tar
-rw-rw-r-- 1 user user 1.3G Feb 26 17:51 security.tar
Push the downloaded images to the private registry. Substitute the DKP edition and Harbor robot account credentials:
<ROBOT_ACCOUNT_NAME>— robot account name<PASSWORD>— token issued when the robot account was created.
d8 mirror push $(pwd)/d8-bundle 'harbor.example:443/deckhouse/<EDITION>' --registry-login='robot$<ROBOT_ACCOUNT_NAME>' --registry-password='<PASSWORD>' --tls-skip-verify
The
--tls-skip-verifyflag tells the CLI to trust the registry certificate and skip verification.
Images are read from the local bundles and pushed to the registry. This step is usually faster than download and often takes about 15 minutes.
To verify the push, open the deckhouse project in the Harbor web UI.
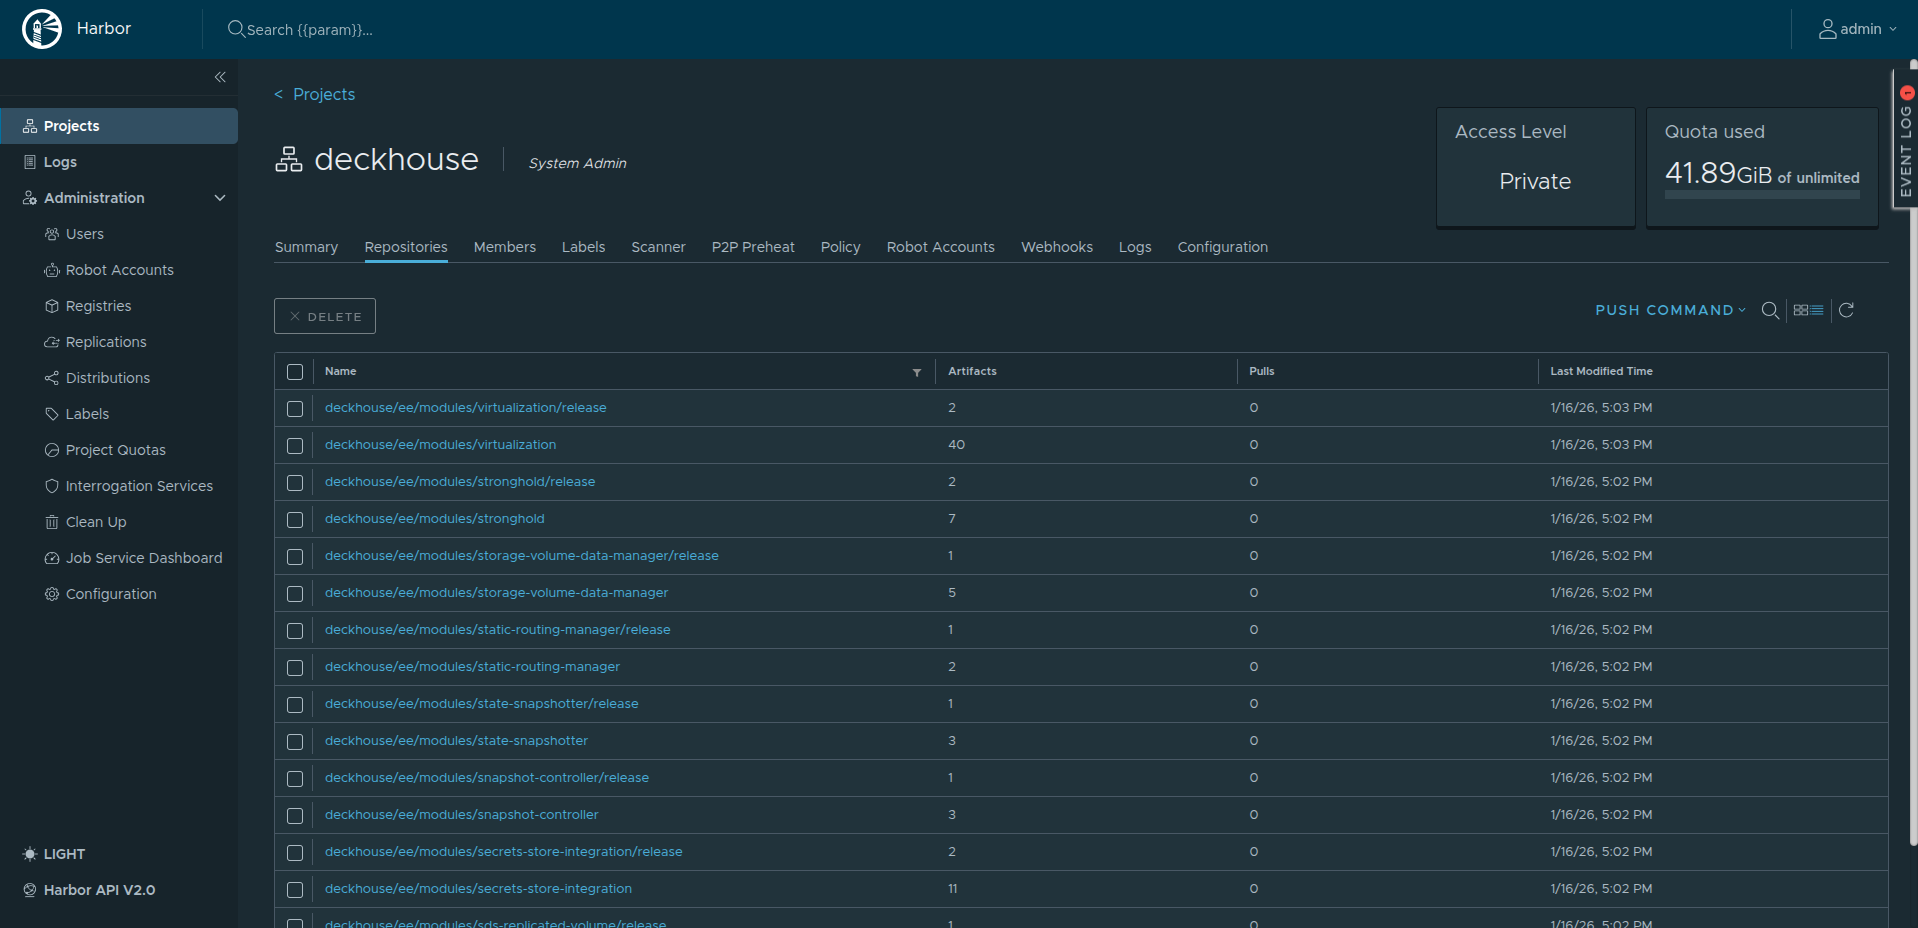
The images are now available and ready to use! 🎉
Signing in to the registry to run the installer
Use the host from which you will run the installer (in this guide, the bastion host). On that host, harbor.example must resolve to the Harbor VM (via /etc/hosts or DNS).
Configure Docker to trust the TLS registry the same way as on the Harbor host: create /etc/docker/certs.d/harbor.example/ and place the required certificates there (copy them from the Harbor VM or generate again).
Sign in to Harbor so Docker can pull the dhctl installer image:
docker login harbor.example
Preparing VMs for the future nodes
VM requirements
During installation, ContainerdV2 is used as the default container runtime on cluster nodes. To use it, the nodes must meet the following requirements:
CgroupsV2support;- systemd version
244; - support for the
erofskernel module.
Some distributions do not meet these requirements. Bring the node OS into compliance before installing Deckhouse Kubernetes Platform. For details, see the documentation.
Servers intended for future cluster nodes must meet the following requirements:
- at least 4 CPU cores;
- at least 8 GB RAM;
- at least 60 GB of disk space on fast storage (400+ IOPS);
- a supported OS;
- Linux kernel version
5.8or later; - a unique hostname across all cluster servers (physical servers and virtual machines)
-
one of the package managers available (
apt/apt-get,yum, orrpm). - Python installed
- access to the proxying registry or to the private container registry that holds Deckhouse images
- access to the standard OS package repositories for your distribution (via a proxy or an internal package mirror)
- SSH access from the bastion host using a key
- network access from the bastion host on port
22/TCP - no container runtime packages installed on the node (for example, no containerd or Docker).
For proper resource sizing, read the production preparation guide and the hardware requirements for node roles, node counts, and sizing based on workload and operations.
Mapping harbor.example to the Harbor VM
On the servers where the master and worker nodes will run, make the harbor.example hostname resolve to the Harbor VM’s internal IP address in the private network.
Connect to each server in turn and add a line to /etc/hosts (and, if your cloud provider manages the file, update the cloud template as well).
<INTERNAL-IP-ADDRESS> harbor.example proxy.local
Replace
<INTERNAL-IP-ADDRESS>with the Harbor VM’s actual internal IP address.
Creating a user for the master node
To install DKP, create a user on the future master node that will be used to connect to the node and perform the platform installation.
Run the commands as root (substitute the public part of your SSH key):
useradd deckhouse -m -s /bin/bash -G sudo
echo 'deckhouse ALL=(ALL) NOPASSWD: ALL' | sudo EDITOR='tee -a' visudo
mkdir /home/deckhouse/.ssh
export KEY='ssh-rsa AAAAB3NzaC1yc2EAAAADA...'
echo $KEY >> /home/deckhouse/.ssh/authorized_keys
chown -R deckhouse:deckhouse /home/deckhouse
chmod 700 /home/deckhouse/.ssh
chmod 600 /home/deckhouse/.ssh/authorized_keys
As a result of these commands:
- a new
deckhouseuser is created and added to thesudogroup; - passwordless privilege escalation is configured;
- the public SSH key is added so you can log in to the server as this user.
Verify that you can connect as the new user:
ssh -J ubuntu@<BASTION_IP> deckhouse@<NODE_IP>
If the login succeeds, the user has been created correctly.
Creating a user for the worker node
The following prepares the node for Cluster API Provider Static (CAPS). If you prefer to add static nodes manually with the bootstrap script, you can skip this subsection and the later CAPS steps: create a Static NodeGroup, take the script from the Secret, and run it on the server as described in the documentation (manual method).
On the master node, generate an SSH key with an empty passphrase:
ssh-keygen -t rsa -f /dev/shm/caps-id -C "" -N ""
On the worker node server, create the caps user. Run the following commands and set the public key from the previous step:
# Set the user’s public SSH key.
export KEY='<SSH-PUBLIC-KEY>'
useradd -m -s /bin/bash caps
usermod -aG sudo caps
echo 'caps ALL=(ALL) NOPASSWD: ALL' | sudo EDITOR='tee -a' visudo
mkdir /home/caps/.ssh
echo $KEY >> /home/caps/.ssh/authorized_keys
chown -R caps:caps /home/caps
chmod 700 /home/caps/.ssh
chmod 600 /home/caps/.ssh/authorized_keys
Preparing the configuration file
The configuration file for a private environment differs from bare metal in several ways. Take config.yml from step 4 of the bare metal guide and apply the changes below.
If cluster nodes need outbound access via a proxy, deploy the proxy ahead of time—preferably on a dedicated machine with Internet access.
-
In ClusterConfiguration, set proxy parameters if the environment uses a proxy for external access:
# Proxy server settings.
proxy:
  httpProxy: http://proxy.local:3128
  httpsProxy: https://proxy.local:3128
  noProxy: ["harbor.example", "proxy.local", "10.128.0.8", "10.128.0.32", "10.128.0.18"]
Here you specify:
- HTTP and HTTPS proxy addresses
- hostnames and IP addresses that must not use the proxy (internal names and internal IPs of your servers).
- In the
deckhouseModuleConfig:- Set
releaseChanneltoStableto use the stable release channel. -
In the
spec.settings.registrysection, specify access settings for the private container registry (Harbor in this guide):# Settings for accessing the container registry with DKP images. registry: mode: Unmanaged unmanaged: # Address of the registry. imagesRepo: <IMAGES_REPO_URI> # Username for authenticating with the registry. username: <REGISTRY_USERNAME> # Password for authenticating with the registry. password: <REGISTRY_PASSWORD> scheme: HTTPS # Root CA certificate in PEM format used to verify the registry server certificate. ca: <REGISTRY_CA>
- Set
-
In the global ModuleConfig, enable self-signed certificates for modules and set
publicDomainTemplatefor system application hostnames:settings: modules: # Template for system application URLs in the cluster. # With %s.test.local, Grafana is served at grafana.test.local. # MUST NOT match clusterDomain in ClusterConfiguration. # You may change this now or after installation. publicDomainTemplate: "%s.test.local" # How Deckhouse modules terminate HTTPS. https: certManager: clusterIssuerName: selfsignedThe
settings.modules.httpsblock in ModuleConfig/global supports several modes:CertManager(certificate from the chosenClusterIssuer— not necessarilyselfsigned; can be corporate CA, HashiCorp Vault, Venafi, etc., see the certificate overview);CustomCertificate(TLS Secret ind8-system); with an external TLS terminator,OnlyInURIis possible. Usingselfsignedtogether with disabling Let’s Encrypt below is a simple pattern for isolated environments without ACME. -
In the
user-authnModuleConfig, set dexCAMode toFromIngressSecret:settings: controlPlaneConfigurator: dexCAMode: FromIngressSecret -
Enable
cert-managerand disable Let’s Encrypt:apiVersion: deckhouse.io/v1alpha1 kind: ModuleConfig metadata: name: cert-manager spec: version: 1 enabled: true settings: disableLetsencrypt: true -
In StaticClusterConfiguration, set
internalNetworkCIDRsto the subnet of the nodes’ internal IPs. For example:internalNetworkCIDRs: - 10.128.0.0/24
The installation configuration file is ready.
Installing DKP
Copy the prepared configuration file to the host from which you run the installation (for example, ~/deckhouse on the bastion). Go to that directory and start the installer:
docker run --pull=always -it -v "$PWD/config.yml:/config.yml" -v "$HOME/.ssh/:/tmp/.ssh/" --network=host -v "$PWD/dhctl-tmp:/tmp/dhctl" harbor.example/deckhouse/<EDITION>/install:stable bash
If there is no internal DNS server and hostnames are only in /etc/hosts on the machine where you start the installer, use --network=host so Docker can resolve those names.
After the image is pulled and the container starts successfully, you will see a shell prompt inside the container:
[deckhouse] root@guide-bastion / #
Start the DKP installation with the following command (specify the master node’s internal IP address):
dhctl bootstrap --ssh-user=deckhouse --ssh-host=<master_ip> --ssh-agent-private-keys=/tmp/.ssh/id_rsa \
  --config=/config.yml \
  --ask-become-pass
Replace
id_rsawith the name of your private key file if it differs.
The installation process may take up to 30 minutes depending on the network speed.
If the installation completes successfully, you will see the following message:
┌ ⛵ ~ Bootstrap: Run post bootstrap actions
│ ┌ Set release channel to deckhouse module config
│ │ 🎉 Succeeded!
│ └ Set release channel to deckhouse module config (0.09 seconds)
└ ⛵ ~ Bootstrap: Run post bootstrap actions (0.09 seconds)

┌ ⛵ ~ Bootstrap: Clear cache
│ ❗ ~ Next run of "dhctl bootstrap" will create a new Kubernetes cluster.
└ ⛵ ~ Bootstrap: Clear cache (0.00 seconds)

🎉 Deckhouse cluster was created successfully!
Adding nodes to the cluster
Add a worker node to the cluster.
Perform the following steps:
-
Configure a StorageClass for local storage by running the following command on the master node:
sudo -i d8 k create -f - << EOF apiVersion: deckhouse.io/v1alpha1 kind: LocalPathProvisioner metadata: name: localpath spec: path: "/opt/local-path-provisioner" reclaimPolicy: Delete EOF -
Set the created StorageClass as the default StorageClass. To do this, run the following command on the master node:
sudo -i d8 k patch mc global --type merge \ -p "{\"spec\": {\"settings\":{\"defaultClusterStorageClass\":\"localpath\"}}}" -
Create the
workerNodeGroup and add a node using Cluster API Provider Static (CAPS):sudo -i d8 k create -f - <<EOF apiVersion: deckhouse.io/v1 kind: NodeGroup metadata: name: worker spec: nodeType: Static staticInstances: count: 1 labelSelector: matchLabels: role: worker EOF -
Create an SSHCredentials resource in the cluster. Run on the master node:
sudo -i d8 k create -f - <<EOF apiVersion: deckhouse.io/v1alpha2 kind: SSHCredentials metadata: name: caps spec: user: caps privateSSHKey: "`cat /dev/shm/caps-id | base64 -w0`" EOF -
Print the public SSH key (needed for verification). On the master node:
cat /dev/shm/caps-id.pub -
Create a StaticInstance for the node to add. On the master node, set the node IP and apply:
# Specify the IP address of the node to be added to the cluster. export NODE=<NODE-IP-ADDRESS> sudo -i d8 k create -f - <<EOF apiVersion: deckhouse.io/v1alpha2 kind: StaticInstance metadata: name: d8cluster-worker labels: role: worker spec: address: "$NODE" credentialsRef: kind: SSHCredentials name: caps EOF -
Make sure all cluster nodes are in the
Readystatus:$ sudo -i d8 k get no NAME STATUS ROLES AGE VERSION d8cluster Ready control-plane,master 30m v1.23.17 d8cluster-worker Ready worker 10m v1.23.17It may take some time for all DKP components to start after the installation completes.
Configuring the Ingress controller and creating a user
Installing the ingress controller
Make sure the Kruise controller manager Pod of the ingress-nginx module is running and in the Running status. To do this, run the following command on the master node:
$ sudo -i d8 k -n d8-ingress-nginx get po -l app=kruise
NAME                                         READY   STATUS    RESTARTS    AGE
kruise-controller-manager-7dfcbdc549-b4wk7   3/3     Running   0           15m
Create the ingress-nginx-controller.yml file on the master node containing the Ingress controller configuration:
# Ingress NGINX controller parameters.
# https://deckhouse.io/modules/ingress-nginx/cr.html
apiVersion: deckhouse.io/v1
kind: IngressNginxController
metadata:
  name: nginx
spec:
  # The name of the IngressClass served by the Ingress NGINX controller.
  ingressClass: nginx
  # How traffic enters from outside the cluster.
  inlet: HostPort
  hostPort:
    httpPort: 80
    httpsPort: 443
  # Defines which nodes will run the component.
  # You may want to adjust this.
  nodeSelector:
    node-role.kubernetes.io/control-plane: ""
  tolerations:
    - effect: NoSchedule
      key: node-role.kubernetes.io/control-plane
      operator: Exists
Apply it by running the following command on the master node:
sudo -i d8 k create -f $PWD/ingress-nginx-controller.yml
Starting the Ingress controller after DKP installation may take some time. Before you proceed, make sure the Ingress controller is running (run the following command on the master node):
$ sudo -i d8 k -n d8-ingress-nginx get po -l app=controller
NAME                                       READY   STATUS    RESTARTS   AGE
controller-nginx-r6hxc                     3/3     Running   0          5m
Creating a user to access the cluster web-interface
Create the user.yml file on the master node containing the user account definition and access rights:
# RBAC and authorization settings.
# https://deckhouse.io/modules/user-authz/cr.html#clusterauthorizationrule
apiVersion: deckhouse.io/v1
kind: ClusterAuthorizationRule
metadata:
  name: admin
spec:
  # List of Kubernetes RBAC subjects.
  subjects:
    - kind: User
      name: admin@deckhouse.io
  # A predefined access level template.
  accessLevel: SuperAdmin
  # Allow the user to use kubectl port-forward.
  portForwarding: true
---
# Static user data.
# https://deckhouse.io/modules/user-authn/cr.html#user
apiVersion: deckhouse.io/v1
kind: User
metadata:
  name: admin
spec:
  # User email.
  email: admin@deckhouse.io
  # This is the password hash for 3xqgv2auys, generated just now.
  # Generate your own or use this one for testing purposes only:
  # echo -n '3xqgv2auys' | htpasswd -BinC 10 "" | cut -d: -f2 | tr -d '\n' | base64 -w0; echo
  # You may want to change it.
  password: 'JDJhJDEwJGtsWERBY1lxMUVLQjVJVXoxVkNrSU8xVEI1a0xZYnJNWm16NmtOeng5VlI2RHBQZDZhbjJH'
Apply it by running the following command on the master node:
sudo -i d8 k create -f $PWD/user.yml
Configuring DNS records
To reach the cluster web UIs, make the hostnames below resolve to the master node’s internal IP address. Names must follow the publicDomainTemplate you configured (here, %s.test.local). Replace <MASTER_IP> with the master’s internal IP before running:
export PUBLIC_IP="<MASTER_IP>"
sudo -E bash -c "cat <<EOF >> /etc/hosts
$PUBLIC_IP api.test.local
$PUBLIC_IP code.test.local
$PUBLIC_IP commander.test.local
$PUBLIC_IP registry.test.local
$PUBLIC_IP console.test.local
$PUBLIC_IP dex.test.local
$PUBLIC_IP documentation.test.local
$PUBLIC_IP grafana.test.local
$PUBLIC_IP hubble.test.local
$PUBLIC_IP istio.test.local
$PUBLIC_IP istio-api-proxy.test.local
$PUBLIC_IP kubeconfig.test.local
$PUBLIC_IP openvpn-admin.test.local
$PUBLIC_IP prometheus.test.local
$PUBLIC_IP status.test.local
$PUBLIC_IP tools.test.local
$PUBLIC_IP upmeter.test.local
EOF
"
To confirm the cluster is healthy, open Grafana (built from publicDomainTemplate, e.g. grafana.test.local for %s.test.local) and sign in with the user you created earlier.
Where to go next?
Everything is installed and running. You can use the web UIs to manage the cluster:
- Deckhouse Console — cluster and core component management. URL: console.test.local.
- Documentation — documentation for the DKP version running in the cluster. URL: documentation.test.local.
- Monitoring — Grafana dashboards shipped with DKP. URL: grafana.test.local (Prometheus UI path: /prometheus/). More in the monitoring documentation.
- Status page — overall DKP and component status. URL: status.test.local.
- Upmeter — SLA tracking by component and period. URL: upmeter.test.local.
- Production readiness — follow the production preparation guide before taking real traffic.
Deploying your first application
- CI/CD access — create a ServiceAccount for deployments and grant RBAC to obtain a kubeconfig for automation. See CI/CD access section. URL: kubeconfig.test.local.
- Routing traffic to an app — create a Service and Ingress. See Ingress and incoming traffic section.
- Application monitoring — add annotations
prometheus.deckhouse.io/custom-target: "my-app"andprometheus.deckhouse.io/port: "80"to the Service. See Application and infrastructure monitoring section.
Learn more
More about Deckhouse Kubernetes Platform is in the documentation. For questions, join the community on Telegram.