Requirements
The provider supports working with only one disk in the virtual machine template. Make sure the template contains only one disk.
Before you begin, you must prepare the cloud environment and provide access to AWS resources for Deckhouse Kubernetes Platform (DKP) components that interact with the AWS API.
The cloud-init package must be installed on all virtual machines that will be part of the cluster.
After booting up, make sure the following services are running:
cloud-config.servicecloud-final.servicecloud-init.service
These services are required for correct EC2 instance initialization
and for integration with DKP infrastructure modules such as cloud-provider-aws and machine-controller-manager.
Accessing the AWS API
To access the AWS API, an IAM user with the required permissions is needed. You must create a JSON policy specification granting access to EC2, ELB, IAM, KMS, and other AWS services.
Example JSON policy with the required permission configuration:
{
    "Version": "2012-10-17",
    "Statement": [
        {
            "Sid": "VisualEditor0",
            "Effect": "Allow",
            "Action": [
                "autoscaling:DescribeAutoScalingGroups",
                "autoscaling:DescribeLaunchConfigurations",
                "autoscaling:DescribeTags",
                "ec2:AllocateAddress",
                "ec2:AssociateAddress",
                "ec2:AssociateRouteTable",
                "ec2:AttachInternetGateway",
                "ec2:AttachVolume",
                "ec2:AuthorizeSecurityGroupEgress",
                "ec2:AuthorizeSecurityGroupIngress",
                "ec2:CreateInternetGateway",
                "ec2:CreateKeyPair",
                "ec2:CreateNATGateway",
                "ec2:CreateRoute",
                "ec2:CreateRouteTable",
                "ec2:CreateSecurityGroup",
                "ec2:CreateSubnet",
                "ec2:CreateTags",
                "ec2:CreateVolume",
                "ec2:CreateVpc",
                "ec2:DeleteInternetGateway",
                "ec2:DeleteKeyPair",
                "ec2:DeleteNATGateway",
                "ec2:DeleteRoute",
                "ec2:DeleteRouteTable",
                "ec2:DeleteSecurityGroup",
                "ec2:DeleteSubnet",
                "ec2:DeleteTags",
                "ec2:DeleteVolume",
                "ec2:DeleteVpc",
                "ec2:DescribeAccountAttributes",
                "ec2:DescribeAddresses",
                "ec2:DescribeAvailabilityZones",
                "ec2:DescribeImages",
                "ec2:DescribeInstanceAttribute",
                "ec2:DescribeInstanceCreditSpecifications",
                "ec2:DescribeInstances",
                "ec2:DescribeInstanceTypes",
                "ec2:DescribeInstanceTopology",
                "ec2:DescribeInternetGateways",
                "ec2:DescribeKeyPairs",
                "ec2:DescribeNatGateways",
                "ec2:DescribeNetworkInterfaces",
                "ec2:DescribeRegions",
                "ec2:DescribeRouteTables",
                "ec2:DescribeSecurityGroups",
                "ec2:DescribeSecurityGroupRules",
                "ec2:DescribeSubnets",
                "ec2:DescribeTags",
                "ec2:DescribeVolumesModifications",
                "ec2:DescribeVolumes",
                "ec2:DescribeVpcAttribute",
                "ec2:DescribeVpcClassicLink",
                "ec2:DescribeVpcClassicLinkDnsSupport",
                "ec2:DescribeVpcs",
                "ec2:DetachInternetGateway",
                "ec2:DetachVolume",
                "ec2:DisassociateAddress",
                "ec2:DisassociateRouteTable",
                "ec2:ImportKeyPair",
                "ec2:ModifyInstanceAttribute",
                "ec2:ModifySubnetAttribute",
                "ec2:ModifyVolume",
                "ec2:ModifyVpcAttribute",
                "ec2:ReleaseAddress",
                "ec2:RevokeSecurityGroupEgress",
                "ec2:RevokeSecurityGroupIngress",
                "ec2:RunInstances",
                "ec2:TerminateInstances",
                "ec2:DescribeVpcPeeringConnections",
                "ec2:CreateVpcPeeringConnection",
                "ec2:DeleteVpcPeeringConnection",
                "ec2:AcceptVpcPeeringConnection",
                "ec2:CreateNetworkInterface",
                "ec2:DescribeNetworkInterfaceAttribute",
                "ec2:ModifyNetworkInterfaceAttribute",
                "ec2:DeleteNetworkInterface",
                "ec2:DescribeNetworkInterfaces",
                "elasticloadbalancing:AddTags",
                "elasticloadbalancing:ApplySecurityGroupsToLoadBalancer",
                "elasticloadbalancing:AttachLoadBalancerToSubnets",
                "elasticloadbalancing:ConfigureHealthCheck",
                "elasticloadbalancing:CreateListener",
                "elasticloadbalancing:CreateLoadBalancer",
                "elasticloadbalancing:CreateLoadBalancerListeners",
                "elasticloadbalancing:CreateLoadBalancerPolicy",
                "elasticloadbalancing:CreateTargetGroup",
                "elasticloadbalancing:DeleteListener",
                "elasticloadbalancing:DeleteLoadBalancer",
                "elasticloadbalancing:DeleteLoadBalancerListeners",
                "elasticloadbalancing:DeleteTargetGroup",
                "elasticloadbalancing:DeregisterInstancesFromLoadBalancer",
                "elasticloadbalancing:DeregisterTargets",
                "elasticloadbalancing:DescribeListeners",
                "elasticloadbalancing:DescribeLoadBalancerAttributes",
                "elasticloadbalancing:DescribeLoadBalancerPolicies",
                "elasticloadbalancing:DescribeLoadBalancers",
                "elasticloadbalancing:DescribeTargetGroups",
                "elasticloadbalancing:DescribeTargetHealth",
                "elasticloadbalancing:DetachLoadBalancerFromSubnets",
                "elasticloadbalancing:ModifyListener",
                "elasticloadbalancing:ModifyLoadBalancerAttributes",
                "elasticloadbalancing:ModifyTargetGroup",
                "elasticloadbalancing:RegisterInstancesWithLoadBalancer",
                "elasticloadbalancing:RegisterTargets",
                "elasticloadbalancing:SetLoadBalancerPoliciesForBackendServer",
                "elasticloadbalancing:SetLoadBalancerPoliciesOfListener",
                "iam:AddRoleToInstanceProfile",
                "iam:CreateInstanceProfile",
                "iam:CreateRole",
                "iam:CreateServiceLinkedRole",
                "iam:DeleteInstanceProfile",
                "iam:DeleteRole",
                "iam:DeleteRolePolicy",
                "iam:GetInstanceProfile",
                "iam:GetRole",
                "iam:GetRolePolicy",
                "iam:ListInstanceProfilesForRole",
                "iam:ListRolePolicies",
                "iam:ListAttachedRolePolicies",
                "iam:PassRole",
                "iam:PutRolePolicy",
                "iam:RemoveRoleFromInstanceProfile",
                "iam:TagRole",
                "kms:DescribeKey",
                "sts:GetCallerIdentity"
            ],
            "Resource": "*"
        }
    ]
}
Configuring IAM via the AWS web console
- Create policies:
- Go to Identity and Access Management (IAM) → Policies.
- Click Create policy.
- Switch to the JSON tab and paste the prepared JSON specification.
- Click Next: Tags, then Next: Review.
- Provide a name for the policy, for example, D8CloudProviderAWS.
- Click Create policy.
- Create a user:
- Go to IAM → Users.
- Click Add users.
- Enter a username, for example, deckhouse.
- Under Select AWS credential type, choose Access key → Programmatic access.
- Click Next: Permissions.
- Attach policies to the user:
- Choose Attach existing policies directly.
- Enter the name of the policy created earlier in the filter field and check the box next to it.
- Click Next: Tags, then Next: Review.
- Click Create user.
Save the generated Access key ID and Secret access key.
You will need these to configure DKP.
Ensure that your account (and the created user) has access to the required regions. To verify this, select the region from the dropdown menu in the upper-right corner. If the region switches successfully, access is available. If not, you may see a message like this:
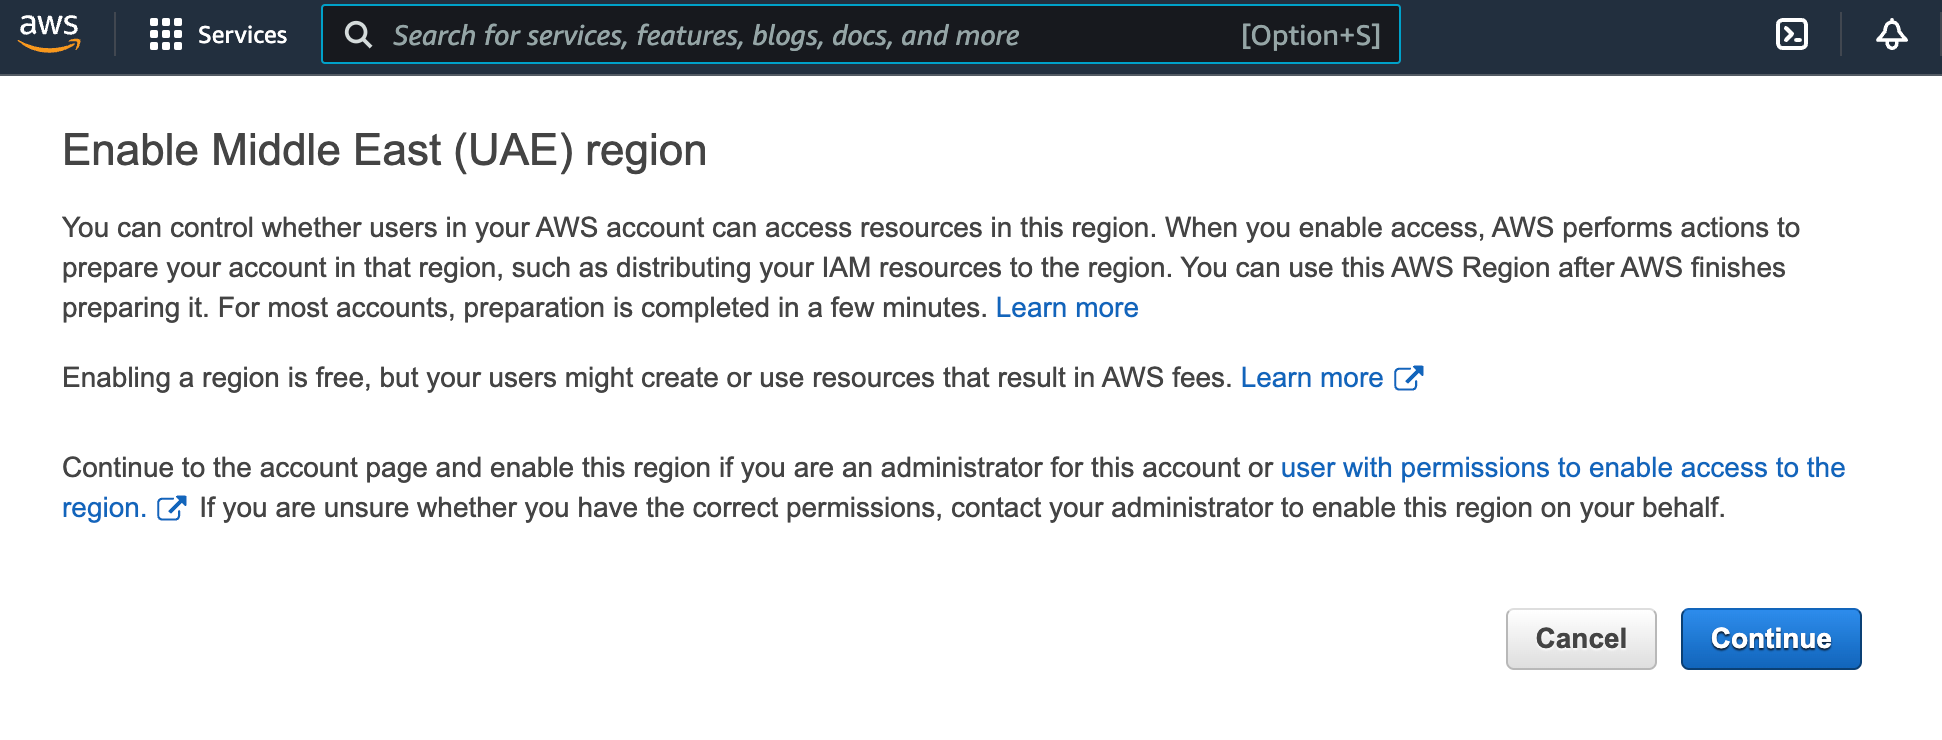
Click Continue to enable the region.
Configuring IAM via AWS CLI
You can also configure IAM using the command-line interface. Follow these steps:
-
Save the JSON specification to a file named
policy.json:cat > policy.json << EOF <Policy JSON spec> EOF -
Create a new policy named
D8CloudProviderAWSwith theARNdetails using the specification from thepolicy.json:aws iam create-policy --policy-name D8CloudProviderAWS --policy-document file://policy.jsonExample output:
{ "Policy": { "PolicyName": "D8CloudProviderAWS", "PolicyId": "AAA", "Arn": "arn:aws:iam::123:policy/D8CloudProviderAWS", "Path": "/", "DefaultVersionId": "v1", "AttachmentCount": 0, "PermissionsBoundaryUsageCount": 0, "IsAttachable": true, "CreateDate": "2020-08-27T02:52:06+00:00", "UpdateDate": "2020-08-27T02:52:06+00:00" } } -
Create a new user:
aws iam create-user --user-name deckhouseExample output:
{ "User": { "Path": "/", "UserName": "deckhouse", "UserId": "AAAXXX", "Arn": "arn:aws:iam::123:user/deckhouse", "CreateDate": "2020-08-27T03:05:42+00:00" } } -
Grant access to the API and save
AccessKeyIdandSecretAccessKey:aws iam create-access-key --user-name deckhouseExample output:
{ "AccessKey": { "UserName": "deckhouse", "AccessKeyId": "XXXYYY", "Status": "Active", "SecretAccessKey": "ZZZzzz", "CreateDate": "2020-08-27T03:06:22+00:00" } } -
Attach the policy to the user combining
UserandPolicy:aws iam attach-user-policy --user-name username --policy-arn arn:aws:iam::123:policy/D8CloudProviderAWS
Configuring IAM via Terraform
Example Terraform resource configuration:
resource "aws_iam_user" "user" {
  name = "deckhouse"
}

resource "aws_iam_access_key" "user" {
  user = aws_iam_user.user.name
}

resource "aws_iam_policy" "policy" {
  name        = "D8CloudProviderAWS"
  path        = "/"
  description = "Deckhouse policy"

  policy = <<EOF
<JSON policy specification>
EOF
}

resource "aws_iam_user_policy_attachment" "policy-attachment" {
  user       = aws_iam_user.user.name
  policy_arn = aws_iam_policy.policy.arn
}
Using a custom IAM role for nodes (iamNodeRole)
The iamNodeRole parameter in the AWSClusterConfiguration resource
lets you override the default IAM role that DKP assigns to all EC2 instances of the cluster nodes.
By default, DKP creates and assigns an IAM role named <prefix>-node,
where <prefix> is the value of the global cloud.prefix parameter.
This role includes the minimum permissions required for node operation.
You can specify the IAM role name in the iamNodeRole parameter if you want to:
- Use a pre-created IAM role managed manually.
- Grant additional permissions to nodes (for example, access to specific AWS services).
The specified role must include all permissions required by DKP.
Without them, the nodes will not function properly.
In particular, it must include the same permissions as the default <prefix>-node role, even if they are assigned manually.
For more information on IAM roles for AWS EC2, refer to the AWS documentation.