This page is under active development and may contain incomplete information. Below is an overview of the Deckhouse installation process. For more detailed instructions, we recommend visiting the Getting Started section, where step-by-step guides are available.
The Deckhouse installer is available as a container image and is based on the dhctl utility, which is responsible for:
- Creating and configuring cloud infrastructure objects using Terraform;
- Installing necessary OS packages on nodes (including Kubernetes packages);
- Installing Deckhouse;
- Creating and configuring nodes for the Kubernetes cluster;
- Maintaining the cluster state according to the defined configuration.
Deckhouse installation options:
-
In a supported cloud. The
dhctlutility automatically creates and configures all necessary resources, including virtual machines, deploys the Kubernetes cluster, and installs Deckhouse. A full list of supported cloud providers is available in the Kubernetes Cluster section. -
On bare-metal servers or in unsupported clouds. In this option,
dhctlconfigures the server or virtual machine, deploys the Kubernetes cluster with a single master node, and installs Deckhouse. Additional nodes can be added to the cluster using pre-existing setup scripts. -
In an existing Kubernetes cluster. If a Kubernetes cluster is already deployed,
dhctlinstalls Deckhouse and integrates it with the existing infrastructure.
Preparing the Infrastructure
Before installation, ensure the following:
-
For bare-metal clusters and unsupported clouds: The server is running an operating system from the supported OS list or a compatible version, and it is accessible via SSH using a key.
-
For supported clouds: Ensure that necessary quotas are available for resource creation and that access credentials to the cloud infrastructure are prepared (these depend on the specific provider).
-
For all installation options: Access to the container registry with Deckhouse images (
registry.deckhouse.ioorregistry.deckhouse.ru) is configured.
Preparing the Configuration
Before starting the Deckhouse installation, you need to prepare the configuration YAML file. This file contains the main parameters for configuring Deckhouse, including information about cluster components, network settings, and integrations, as well as a description of resources to be created after installation (node settings and Ingress controller).
Make sure that the configuration files meet the requirements of your infrastructure and include all the necessary parameters for a correct deployment.
Installation config
The installation configuration YAML file contains parameters for several resources (manifests):
-
InitConfiguration — initial parameters for Deckhouse configuration, necessary for the proper startup of Deckhouse after installation.
Key settings specified in this resource:
- Component placement parameters;
- The StorageClass (storage parameters);
- Access parameters for the container registry;
- Template for DNS names;
- Other essential parameters required for Deckhouse to function correctly.
- ClusterConfiguration — general cluster parameters, such as control plane version, network settings, CRI parameters, etc.
This resource is needed only when Deckhouse is being installed with a pre-deployed Kubernetes cluster. If Deckhouse is being installed in an already existing cluster, this resource is not required.
- StaticClusterConfiguration — parameters for Kubernetes clusters deployed on bare-metal servers or virtual machines in unsupported clouds.
This resource is needed only when Deckhouse is being installed with a pre-deployed Kubernetes cluster. If Deckhouse is being installed in an already existing cluster, this resource is not required.
<CLOUD_PROVIDER>ClusterConfiguration— a set of resources containing configuration parameters for supported cloud providers. These include:- Cloud infrastructure access settings (authentication parameters);
- Resource placement scheme type and parameters;
- Network settings;
- Node group creation settings.
List of cloud provider configuration resources:
- AWSClusterConfiguration — Amazon Web Services;
- AzureClusterConfiguration — Microsoft Azure;
- GCPClusterConfiguration — Google Cloud Platform;
- OpenStackClusterConfiguration — OpenStack;
- VsphereClusterConfiguration — VMware vSphere;
- VCDClusterConfiguration — VMware Cloud Director;
- YandexClusterConfiguration — Yandex Cloud;
- ZvirtClusterConfiguration — zVirt.
-
ModuleConfig— a set of resources containing configuration parameters for Deckhouse built-in modules.If the cluster is initially created with nodes dedicated to specific types of workloads (e.g., system nodes or monitoring nodes), it is recommended to explicitly set the
nodeSelectorparameter in the configuration of modules that use persistent storage volumes.For example, for the
prometheusmodule, the configuration is specified in the nodeSelector parameter. -
IngressNginxController— deploying the Ingress controller. -
NodeGroup— creating additional node groups. -
InstanceClass— adding configuration resources. ClusterAuthorizationRule,User— setting up roles and users.
Post-bootstrap script
After Deckhouse installation is complete, the installer offers the option to run a custom script on one of the master nodes. This script can be used for:
- Performing additional cluster configurations;
- Collecting diagnostic information;
- Integrating with external systems or other tasks.
The path to the post-bootstrap script can be specified using the --post-bootstrap-script-path parameter during the installation process.
Installing Deckhouse
When installing a commercial edition of Deckhouse Kubernetes Platform from the official container registry registry.deckhouse.io, you must first log in with your license key:
docker login -u license-token registry.deckhouse.io
The command to pull the installer container from the Deckhouse public registry and run it looks as follows:
docker run --pull=always -it [<MOUNT_OPTIONS>] registry.deckhouse.io/deckhouse/<DECKHOUSE_REVISION>/install:<RELEASE_CHANNEL> bash
Where:
<DECKHOUSE_REVISION>— the Deckhouse edition, such aseefor Enterprise Edition,cefor Community Edition, etc.<MOUNT_OPTIONS>— parameters for mounting files into the installer container, such as:- SSH access keys;
- Configuration file;
- Resource file, etc.
<RELEASE_CHANNEL>— the update channel in kebab-case format:alpha— for the Alpha update channel;beta— for the Beta update channel;early-access— for the Early Access update channel;stable— for the Stable update channel;rock-solid— for the Rock Solid update channel.
Here is an example of a command to run the installer container for Deckhouse CE:
docker run -it --pull=always \
  -v "$PWD/config.yaml:/config.yaml" \
  -v "$PWD/dhctl-tmp:/tmp/dhctl" \
  -v "$HOME/.ssh/:/tmp/.ssh/" registry.deckhouse.io/deckhouse/ce/install:stable bash
Deckhouse installation is performed within the installer container using the dhctl utility:
- To start the installation of Deckhouse with the deployment of a new cluster (for all cases except installing into an existing cluster), use the command
dhctl bootstrap. - To install Deckhouse into an already existing cluster, use the command
dhctl bootstrap-phase install-deckhouse.
Run dhctl bootstrap -h to learn more about the parameters available.
Example of running the Deckhouse installation with cloud cluster deployment:
dhctl bootstrap \
  --ssh-user=<SSH_USER> --ssh-agent-private-keys=/tmp/.ssh/id_rsa \
  --config=/config.yml
Where:
/config.yml— the installation configuration file;<SSH_USER>— the username for SSH connection to the server;--ssh-agent-private-keys— the private SSH key file for SSH connection.
Pre-Installation Checks
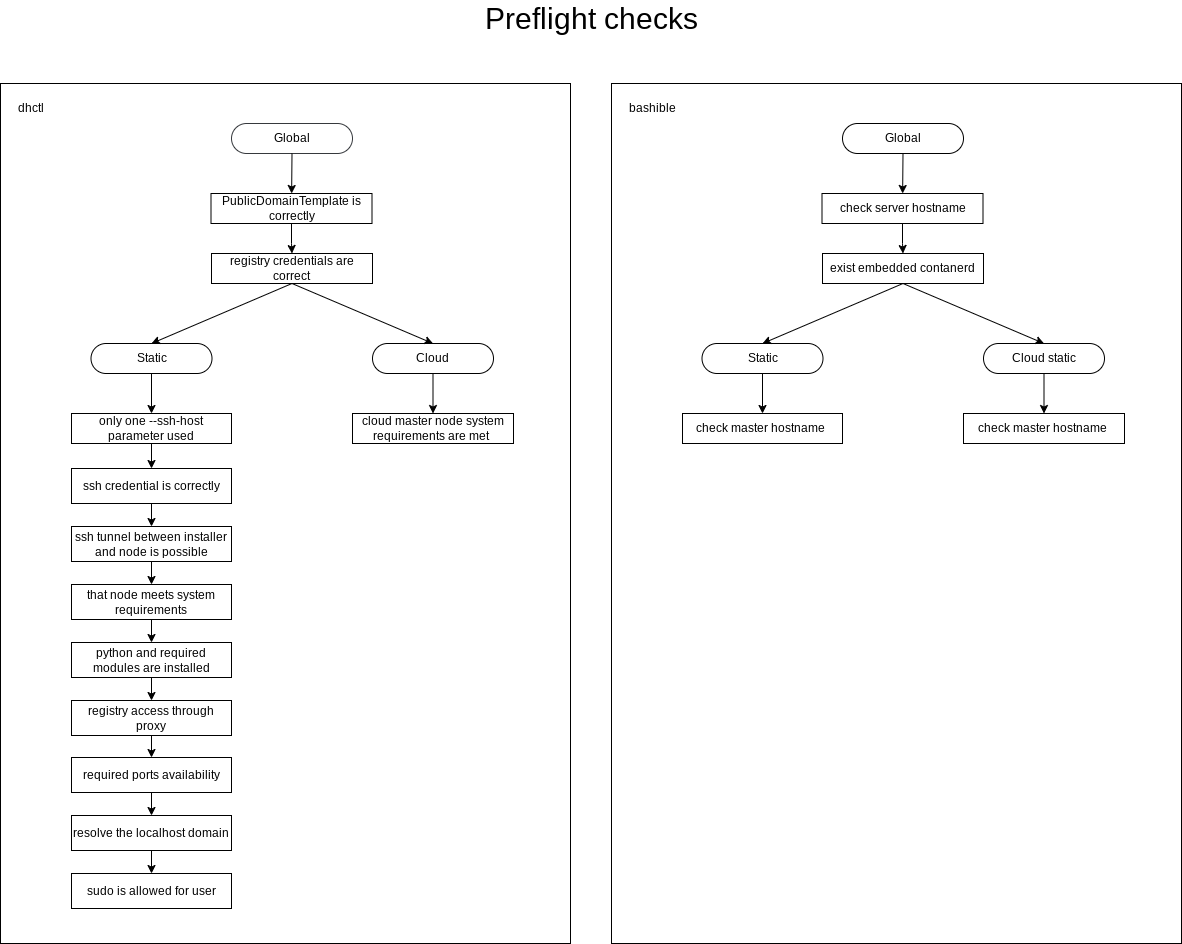
List of checks performed by the installer before starting Deckhouse installation:
- General checks:
- The values of the parameters PublicDomainTemplate and clusterDomain do not match.
- The authentication data for the container image registry specified in the installation configuration is correct.
- The host name meets the following requirements:
- The length does not exceed 63 characters;
- It consists only of lowercase letters;
- It does not contain special characters (hyphens
-and periods.are allowed, but they cannot be at the beginning or end of the name).
- The server (VM) has a supported container runtime (
containerd) installed. - The host name is unique within the cluster.
- The server’s system time is correct.
- The address spaces for Pods (
podSubnetCIDR) and services (serviceSubnetCIDR) do not intersect.
- Checks for static and hybrid cluster installation:
- Only one
--ssh-hostparameter is specified. For static cluster configuration, only one IP address can be provided for configuring the first master node. - SSH connection is possible using the specified authentication data.
- SSH tunneling to the master node server (or VM) is possible.
- The server (VM) selected for the master node installation must meet the minimum system requirements:
- at least 4 CPU cores;
- at least 8 GB of RAM;
- at least 60 GB of disk space with 400+ IOPS performance;
- Linux kernel version 5.7 or newer;
- one of the package managers installed:
apt,apt-get,yum, orrpm; - access to standard OS package repositories.
- Python is installed on the master node server (VM).
- The container image registry is accessible through a proxy (if proxy settings are specified in the installation configuration).
- Required installation ports are free on the master node server (VM) and the installer host.
- DNS must resolve
localhostto IP address 127.0.0.1. - The user has
sudoprivileges on the server (VM). - Required ports for the installation must be open:
- port 22322/TCP between the host running the installer and the server;
- no port conflicts with those used by the installation process.
- The server (VM) has the correct time.
- The user
deckhousemust not exist on the server (VM). - The address spaces for Pods (
podSubnetCIDR) services (serviceSubnetCIDR) and internal network (internalNetworkCIDRs) do not intersect.
- Only one
- Checks for cloud cluster installation:
- The configuration of the virtual machine for the master node meets the minimum requirements.
- The cloud provider API is accessible from the cluster nodes.
- For Yandex Cloud deployments with NAT Instance, the configuration for Yandex Cloud with NAT Instance is verified.
Aborting the installation
If the installation was interrupted or issues occurred during the installation process in a supported cloud, there might be leftover resources created during the installation. To remove them, use the dhctl bootstrap-phase abort command within the installer container.
The configuration file provided through the --config parameter when running the installer must be the same one used during the initial installation.