The module lifecycle stage: General Availability
Three layouts are supported. Below is more information about each of them.
Standard
In this placement strategy, nodes do not have public IP addresses allocated to them; they use NAT gateway service in Yandex Cloud to connect to the Internet. NAT Gateway uses random public IP addresses from dedicated ranges. Because of this, it is impossible to whitelist the IP addresses of cloud resources located behind a specific NAT gateway on the side of other services.
Because nodes are created without public IP addresses in this layout, the master node must be accessible over SSH from the machine where dhctl is running: either directly over a private network or through a bastion host. If the master node is not directly accessible, run the installation with the --ssh-bastion-host, --ssh-bastion-user, and, if needed, --ssh-bastion-port parameters.
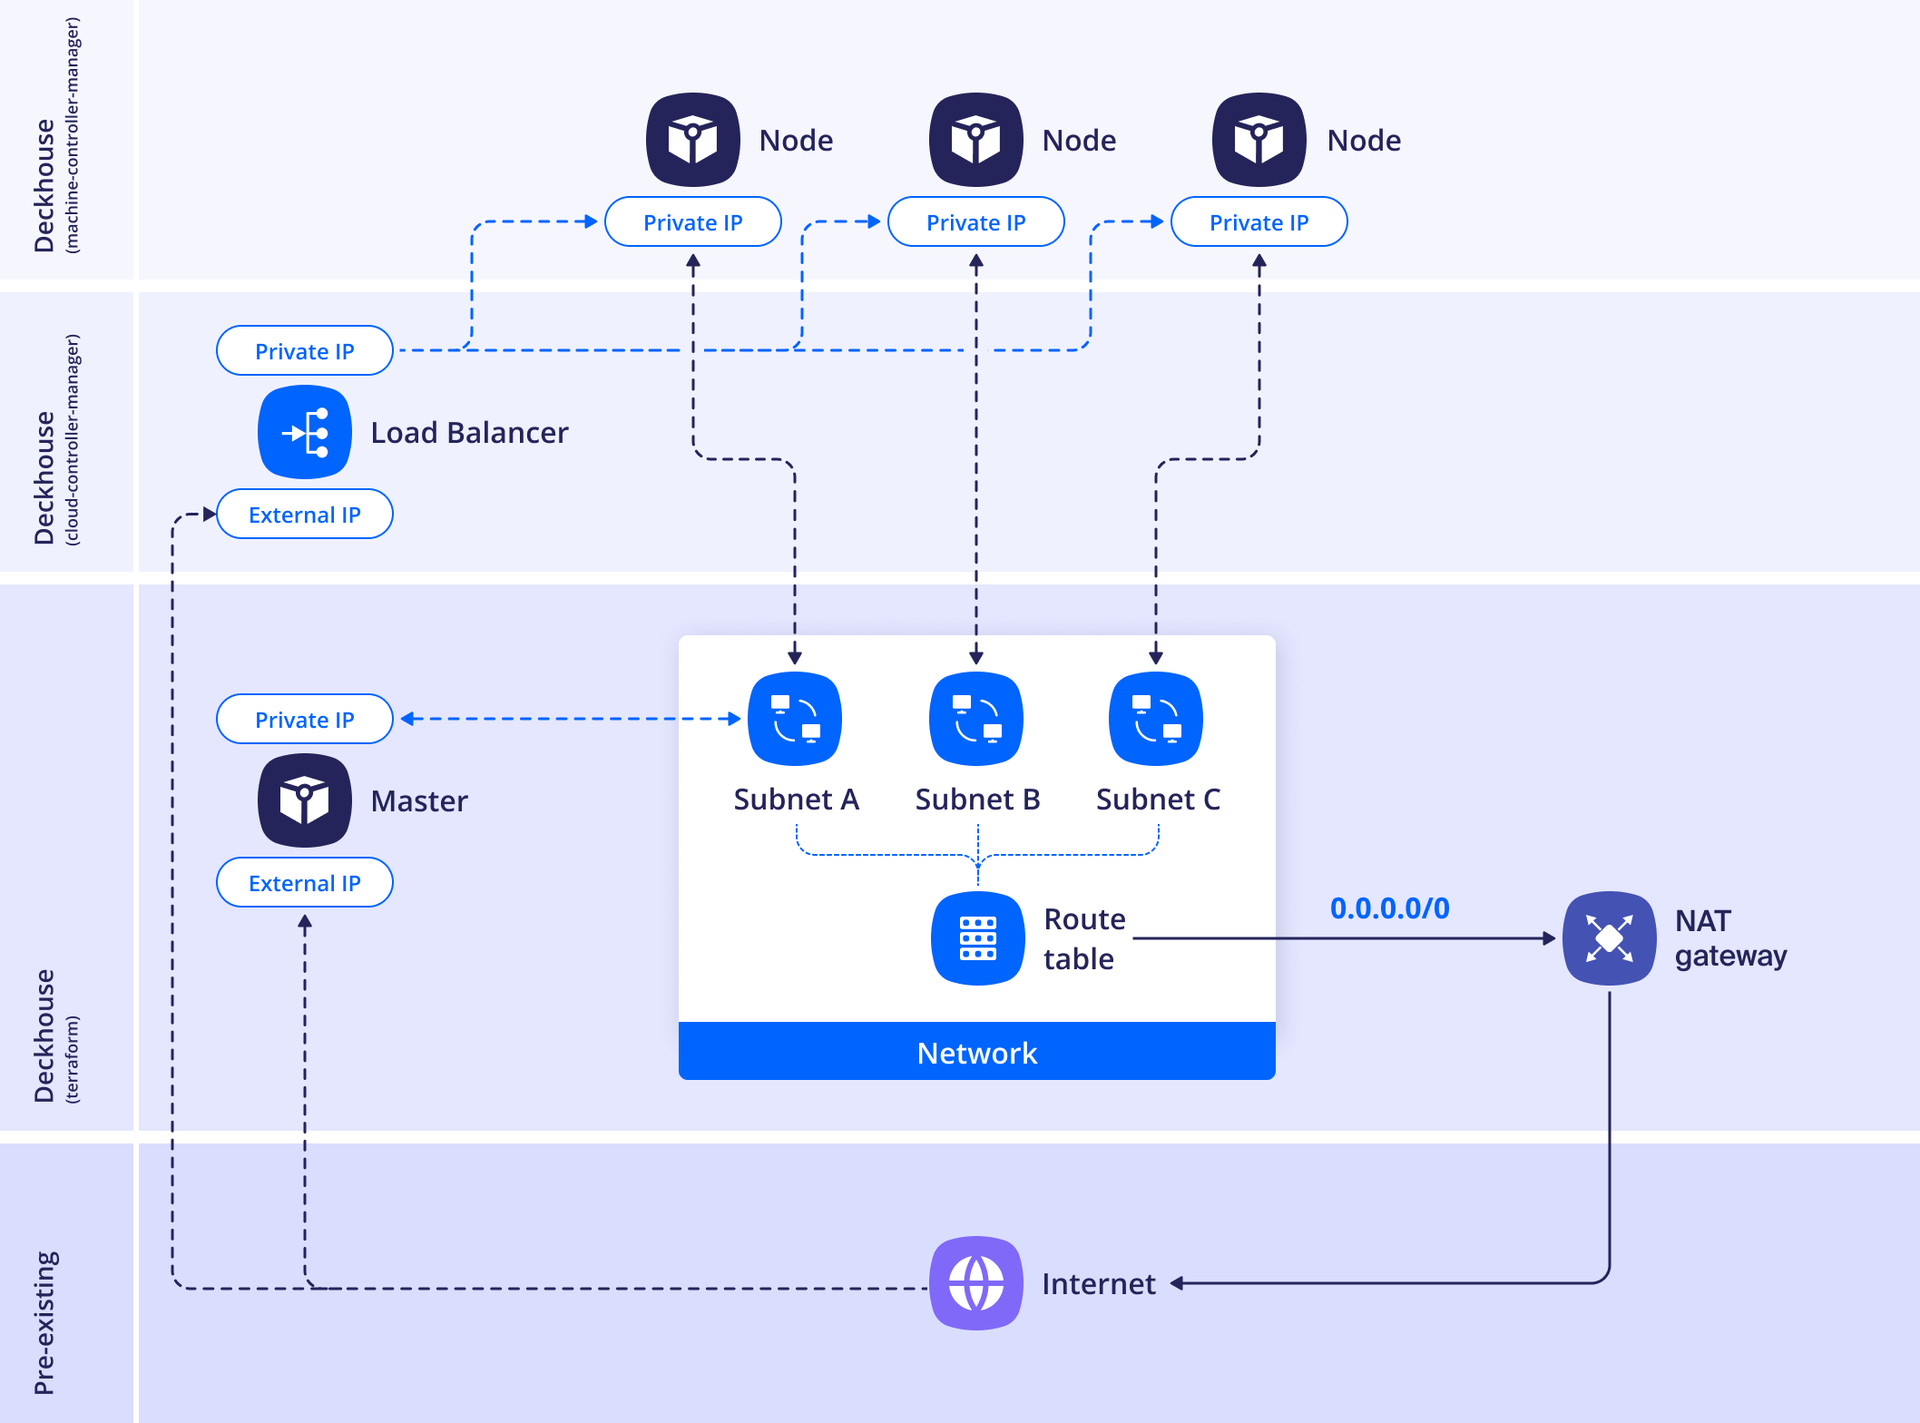
Example of the layout configuration:
apiVersion: deckhouse.io/v1
kind: YandexClusterConfiguration
layout: Standard
sshPublicKey: "<SSH_PUBLIC_KEY>"
nodeNetworkCIDR: 192.168.12.13/24
existingNetworkID: <EXISTING_NETWORK_ID>
provider:
  cloudID: <CLOUD_ID>
  folderID: <FOLDER_ID>
  serviceAccountJSON: |
    {
    "id": "id",
    "service_account_id": "service_account_id",
    "key_algorithm": "RSA_2048",
    "public_key": "-----BEGIN PUBLIC KEY-----\nMIIwID....AQAB\n-----END PUBLIC KEY-----\n",
    "private_key": "-----BEGIN PRIVATE KEY-----\nMIIE....1ZPJeBLt+\n-----END PRIVATE KEY-----\n"
    }
masterNodeGroup:
  replicas: 3
  zones:
  - ru-central1-a
  - ru-central1-b
  - ru-central1-d
  instanceClass:
    cores: 4
    memory: 8192
    imageID: <IMAGE_ID>
    # Optional: uncomment to assign public IP addresses to master nodes.
    # externalIPAddresses:
    # - "<ZONE_A_EXTERNAL_IP_MASTER_1>"
    # - "Auto"
    # - "Auto"
    # externalSubnetIDs:
    # - <ZONE_A_SUBNET_ID>
    # - <ZONE_B_SUBNET_ID>
    # - <ZONE_D_SUBNET_ID>
    additionalLabels:
      takes: priority
nodeGroups:
- name: worker
  replicas: 2
  zones:
  - ru-central1-a
  - ru-central1-b
  instanceClass:
    cores: 4
    memory: 8192
    imageID: <IMAGE_ID>
    coreFraction: 50
    # Optional: uncomment to assign public IP addresses to worker nodes.
    # externalIPAddresses:
    # - "Auto"
    # - "Auto"
    # externalSubnetIDs:
    # - <ZONE_A_SUBNET_ID>
    # - <ZONE_B_SUBNET_ID>
    additionalLabels:
      role: example
labels:
  billing: prod
dhcpOptions:
  domainName: test.local
  domainNameServers:
  - <DNS_SERVER_1>
  - <DNS_SERVER_2>
WithoutNAT
In this layout, NAT (of any kind) is not used, and each node is assigned a public IP.
Caution! The cloud-provider-yandex module does not support Security Groups, so all cluster nodes will be available without connection restrictions.
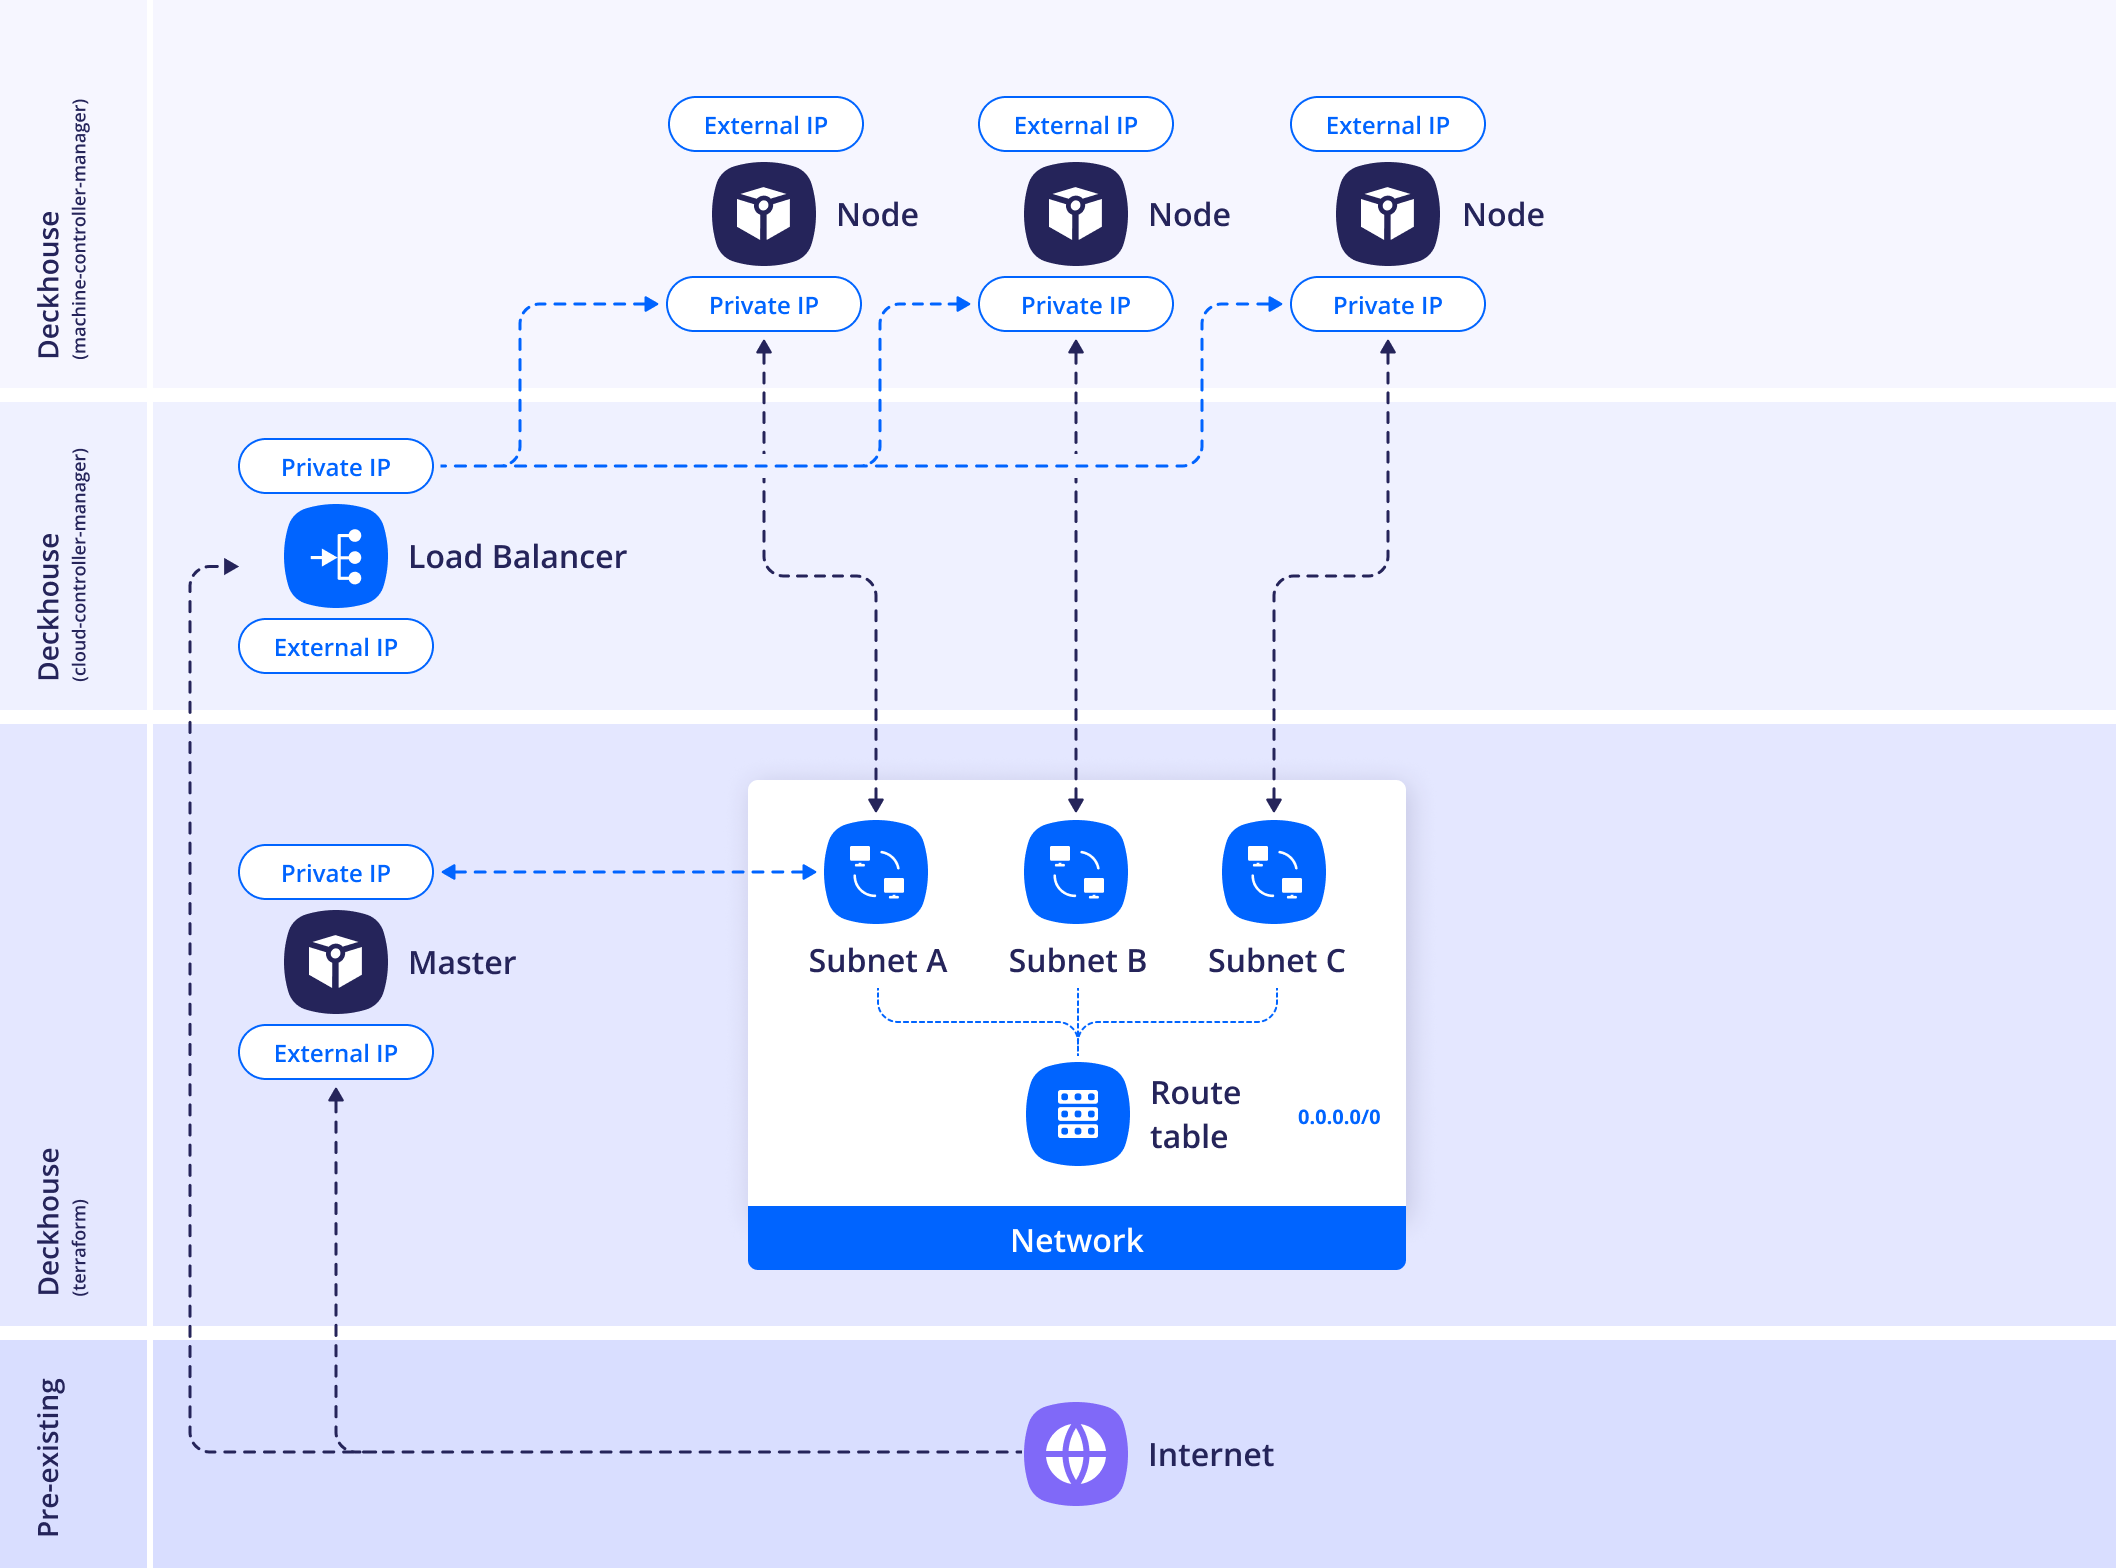
Example of the layout configuration:
apiVersion: deckhouse.io/v1
kind: YandexClusterConfiguration
layout: WithoutNAT
provider:
  cloudID: <CLOUD_ID>
  folderID: <FOLDER_ID>
  serviceAccountJSON: |
    {
    "id": "id",
    "service_account_id": "service_account_id",
    "key_algorithm": "RSA_2048",
    "public_key": "-----BEGIN PUBLIC KEY-----\nMIIwID....AQAB\n-----END PUBLIC KEY-----\n",
    "private_key": "-----BEGIN PRIVATE KEY-----\nMIIE....1ZPJeBLt+\n-----END PRIVATE KEY-----\n"
    }
masterNodeGroup:
  replicas: 3
  instanceClass:
    cores: 4
    memory: 8192
    imageID: <IMAGE_ID>
    externalIPAddresses:
    - "Auto"
    - "Auto"
    - "Auto"
    externalSubnetIDs:
    - <ZONE_A_SUBNET_ID>
    - <ZONE_B_SUBNET_ID>
    - <ZONE_D_SUBNET_ID>
    zones:
    - ru-central1-a
    - ru-central1-b
    - ru-central1-d
nodeGroups:
- name: worker
  replicas: 2
  instanceClass:
    cores: 4
    memory: 8192
    imageID: <IMAGE_ID>
    coreFraction: 50
    externalIPAddresses:
    - "<ZONE_A_EXTERNAL_IP_WORKER_1>"
    - "Auto"
    externalSubnetIDs:
    - <ZONE_A_SUBNET_ID>
    - <ZONE_B_SUBNET_ID>
    zones:
    - ru-central1-a
    - ru-central1-b
sshPublicKey: "<SSH_PUBLIC_KEY>"
nodeNetworkCIDR: 192.168.12.13/24
existingNetworkID: <EXISTING_NETWORK_ID>
dhcpOptions:
  domainName: test.local
  domainNameServers:
  - <DNS_SERVER_1>
  - <DNS_SERVER_2>
WithNATInstance
In this placement strategy, Deckhouse creates a NAT instance inside new separate subnet and adds a rule to a route table containing a route to 0.0.0.0/0 with a NAT instance as the next hop.
The subnet is allocated to prevent routing loops and must not overlap with other networks used in the cluster.
To place the NAT instance in an existing subnet, use the withNATInstance.internalSubnetID parameter — the instance will be created in the zone corresponding to that subnet.
If you need to create a new subnet, specify the withNATInstance.internalSubnetCIDR parameter — the NAT instance will be deployed in it.
One of the parameters — withNATInstance.internalSubnetID or withNATInstance.internalSubnetCIDR — is required.
When the withNATInstance.internalSubnetCIDR parameter is specified, the NAT instance will be created in a single instance in zone a.
When the withNATInstance.internalSubnetID parameter is specified, the NAT instance will be created in a single instance in the zone specified in the designated network settings.
If the withNATInstance.externalSubnetID is provided in addition to previous ones, the NAT instance will be attached to it via secondary interface.
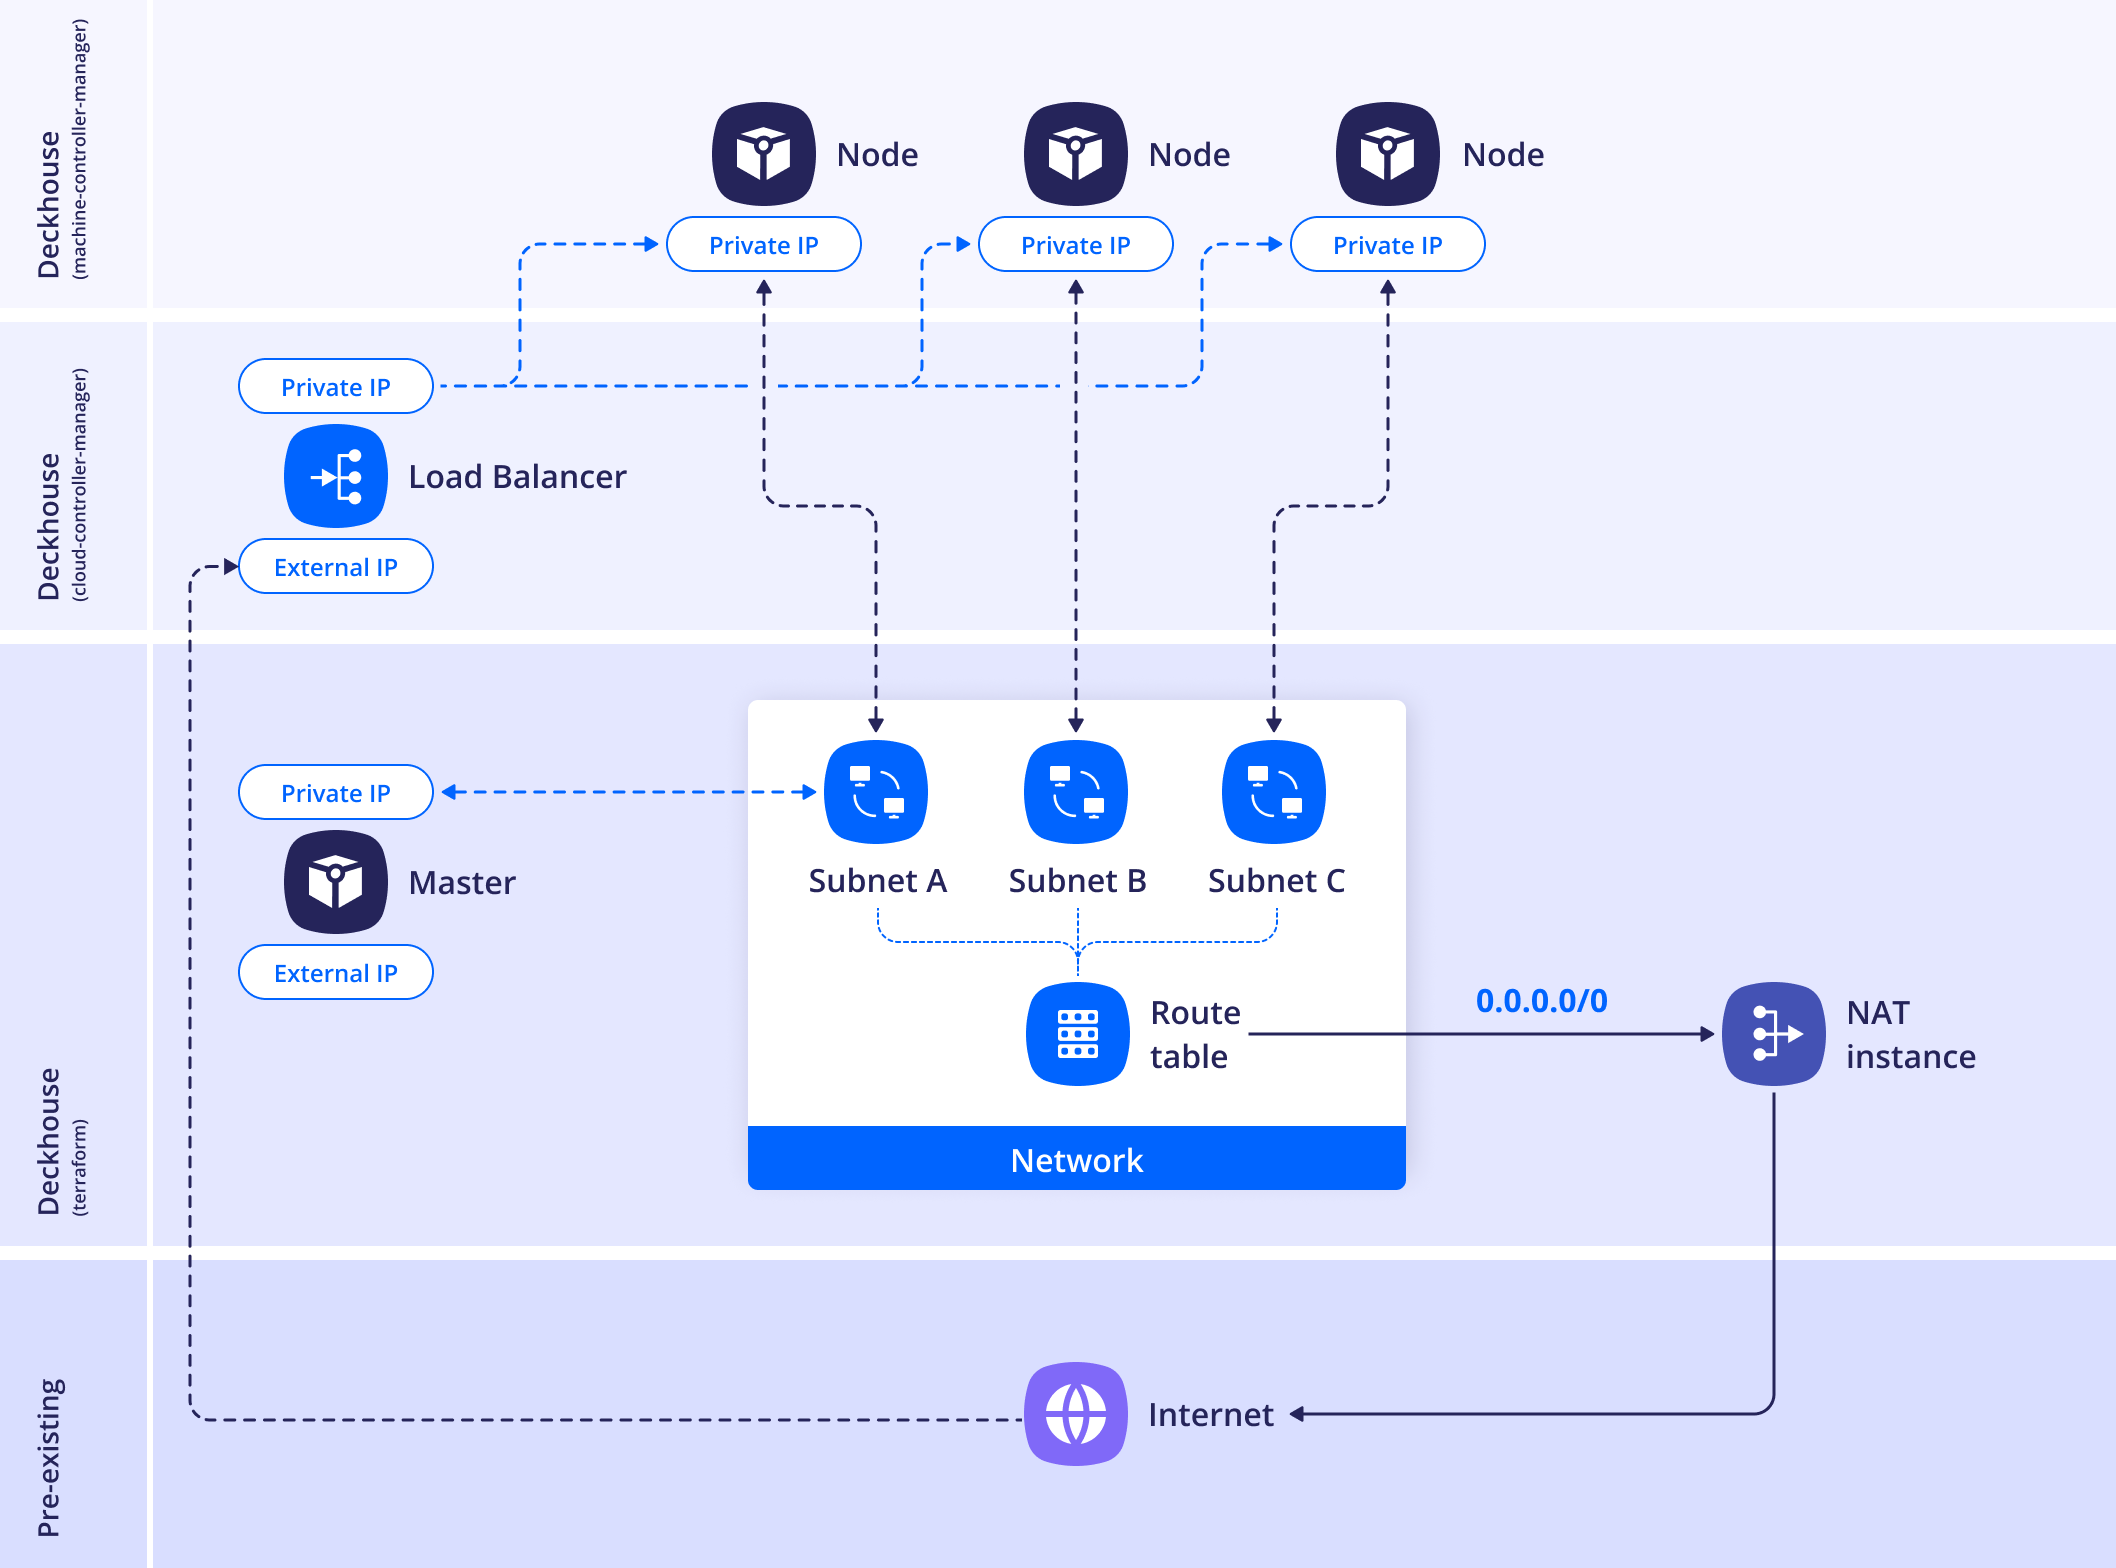
Example of the layout configuration:
apiVersion: deckhouse.io/v1
kind: YandexClusterConfiguration
layout: WithNATInstance
withNATInstance:
  natInstanceExternalAddress: <NAT_INSTANCE_EXTERNAL_ADDRESS>
  internalSubnetID: <INTERNAL_SUBNET_ID>
  externalSubnetID: <EXTERNAL_SUBNET_ID>
provider:
  cloudID: <CLOUD_ID>
  folderID: <FOLDER_ID>
  serviceAccountJSON: |
    {
    "id": "id",
    "service_account_id": "service_account_id",
    "key_algorithm": "RSA_2048",
    "public_key": "-----BEGIN PUBLIC KEY-----\nMIIwID....AQAB\n-----END PUBLIC KEY-----\n",
    "private_key": "-----BEGIN PRIVATE KEY-----\nMIIE....1ZPJeBLt+\n-----END PRIVATE KEY-----\n"
    }
masterNodeGroup:
  replicas: 1
  zones:
  - ru-central1-a
  instanceClass:
    cores: 4
    memory: 8192
    imageID: <IMAGE_ID>
nodeGroups:
- name: worker
  replicas: 1
  zones:
  - ru-central1-a
  instanceClass:
    cores: 4
    memory: 8192
    imageID: <IMAGE_ID>
    coreFraction: 50
sshPublicKey: "<SSH_PUBLIC_KEY>"
nodeNetworkCIDR: 192.168.12.13/24
existingNetworkID: <EXISTING_NETWORK_ID>
dhcpOptions:
  domainName: test.local
  domainNameServers:
  - <DNS_SERVER_1>
  - <DNS_SERVER_2>
In this example, master and worker nodes are created without public IP addresses and without additional external network interfaces. Outbound traffic from the cluster subnets goes through the NAT instance.
The NAT instance is not automatically used by the dhctl installer as a bastion host or jump host. To install the cluster, the master node must be accessible over SSH from the machine where dhctl is running: either directly or through a bastion host.
If the master node does not have a public IP address or is not directly accessible, run the installation with the --ssh-bastion-host and --ssh-bastion-user parameters.
If you need to connect to the master node directly using a public IP address, specify the externalIPAddresses and externalSubnetIDs parameters for it. Keep in mind that the interface from the network specified in externalSubnetIDs will be used as the node’s default gateway.