The module lifecycle stage: Preview
The module has requirements for installation
The module is only guaranteed to work if the system requirements are met. As for any other configurations, the module may work, but its smooth operation is not guaranteed.
What is difference between LVM and LVMThin?
- LVM is simpler and has high performance that is similar to that of native disk drives, but it does not support snapshots;
- LVMThin allows for snapshots and overprovisioning; however, it is slower than LVM.
Overprovisioning in LVMThin should be used with caution, monitoring the availability of free space in the pool (The cluster monitoring system generates separate events when the free space in the pool reaches 20%, 10%, 5%, and 1%).
In case of no free space in the pool, degradation in the module’s operation as a whole will be observed, and there is a real possibility of data loss!
Supported disk configurations and performance
Supported disk types
HDD — suitable for capacity-oriented workloads with moderate load.
SSD and NVMe — fully supported and recommended for high-performance workloads (databases, high-IOPS virtual machines, all-flash configurations).
The LINSTOR/DRBD architecture allows efficient use of SSD/NVMe block devices.
TRIM/Discard support
TRIM operations are passed transparently through DRBD (supported since DRBD 8.4.3). If the underlying disk (SSD/NVMe) supports TRIM, the feature works automatically — this speeds up initial synchronization, formatting, and general SSD maintenance.
Performance requirements
For storage disks, performance depends on disk type, network, and workload.
Recommendations for heavy workloads: SSD/NVMe with thousands of IOPS + 10+ Gbps network with latency <5 ms (ideally <1 ms). With NVMe, the network must match disk capabilities; otherwise it becomes the bottleneck.
For all-flash configurations, the general recommendation for aggregate network throughput is on the order of 25–100 GbE — depending on disk workload.
Additional recommendations
Avoid hardware RAID for disks used in the storage pool — prefer JBOD or direct disk access.
For capacity-oriented workloads — LVM + HDD mode.
For performance-oriented workloads and snapshots — LVMThin + SSD/NVMe (always monitor free space in the thin pool to avoid over-provisioning issues).
There are no architectural limitations for all-flash configurations.
Which Replication Modes to Use and When?
There are three replication modes in total:
- None – A single data replica. Equivalent to a regular PV resource, with no fault tolerance or availability.
- Availability – Two data replicas + one diskless replica (contains no data; when used, it accesses any available “full” replica over the network). Provides a certain level of availability if one replica fails but does not guarantee data consistency (integrity).
- ConsistencyAndAvailability – Three data replicas, full fault tolerance with guaranteed data preservation in case of failures.
By default, the ConsistencyAndAvailability mode is used when creating a ReplicatedStorageClass. It can be specified as follows:
apiVersion: storage.deckhouse.io/v1alpha1
kind: ReplicatedStorageClass
metadata:
  generation: 2
  name: test-rsc
spec:
  reclaimPolicy: Delete
  replication: ConsistencyAndAvailability
  storagePool: sample
  topology: Ignored
  volumeAccess: Local
When and Which Modes to Use?
- None – Suitable for test environments or clustered applications (e.g., if you deploy a multi-node cluster of RabbitMQ/MongoDB/MySQL/etc.).
- Availability – A compromise mode that ensures availability but, in case of network connectivity issues (one of the quorum replicas is diskless, and accessing data through it happens over the network), may lead to desynchronization and, optionally, data loss.
Best suited for non-critical data and applications that require some level of high availability (e.g., when nodes periodically go into maintenance) but do not have strict reliability or data integrity requirements. - ConsistencyAndAvailability – The most reliable replication mode, recommended for mission-critical applications, vital data, and deploying virtual machines in a DVP environment.
How do I get info about the space used?
There are two options:
-
Through the Grafana dashboard:
Navigate to “Dashboards” → “Storage” → “LINSTOR/DRBD” in the Grafana interface. The current space usage in the cluster is displayed in the top-right corner of the dashboard.
Note. This information reflects the total available space in the cluster. If volumes need to be created in two replicas, divide these values by two to understand how many such volumes can be accommodated in the cluster.
-
Using the command line:
kubectl exec -n d8-sds-replicated-volume deploy/linstor-controller -- linstor storage-pool list**Note. This information reflects the total available space in the cluster. When creating volumes with two replicas, these two replicas must fit entirely across two nodes of your cluster.
How do I set the default StorageClass?
Add corresponding StorageClass name to spec.settings.defaultClusterStorageClass of ModuleConfig/global config.
   apiVersion: deckhouse.io/v1alpha1
   kind: ModuleConfig
   metadata:
      name: global
   spec:
      version: 2
      settings:
         defaultClusterStorageClass: 'default-fast'
How do I add the existing LVM Volume Group or LVMThin pool?
-
Manually add the
storage.deckhouse.io/enabled=trueLVM tag to the Volume Group:vgchange myvg-0 --add-tag storage.deckhouse.io/enabled=trueThis VG will be automatically discovered and a corresponding LVMVolumeGroup resource will be created in the cluster for it.
-
Specify this resource in the ReplicatedStoragePool parameters in the
spec.lvmVolumeGroups[].namefield (note that for the LVMThin pool, you must additionally specify its name inspec.lvmVolumeGroups[].thinPoolName).
How to expand ReplicatedStoragePool to new cluster node?
To expand an existing ReplicatedStoragePool use new LVM Volume Group, follow these steps:
-
Create new LVMVolumeGroup with sds-node-configurator
-
Add the new Volume Group to the existing ReplicatedStoragePool by editing the resource:
kubectl edit replicatedstoragepool your-pool-nameAdd the new Volume Group to the
spec.lvmVolumeGroupssection:spec: lvmVolumeGroups: - name: existing-vg-name - name: new-vg-name # Add this line -
For LVMThin pools, additionally specify the thin pool name:
spec: lvmVolumeGroups: - name: existing-vg-name thinPoolName: existing-thin-pool - name: new-vg-name thinPoolName: new-thin-pool # Add this line -
Save the changes. The controller will automatically create a Storage Pool in LINSTOR for the new Volume Group and add it to the existing ReplicatedStoragePool.
-
Check the expansion status:
kubectl get replicatedstoragepool your-pool-name -o yamlInformation about the new Volume Group should be displayed in the status.
How to increase the DRBD device limit or change the ports used by DRBD clusters to communicate?
To increase the limit on the number of DRBD devices / change the ports through which DRBD clusters communicate with each other, you can use the drbdPortRange setting. By default, DRBD resources use TCP ports 7000-7999. These values can be redefined using minPort and maxPort.
Changing the drbdPortRange minPort/maxPort will not affect existing DRBD resources; they will continue to operate on their original ports.
After changing the drbdPortRange values, the linstor-controller needs to be restarted.
How to properly reboot a node with DRBD resources
For greater stability of the module, it is not recommended to reboot multiple nodes simultaneously.
-
Drain the node.
kubectl drain test-node-1 --ignore-daemonsets --delete-emptydir-data -
Check that there are no problematic resources in DRBD / resources in SyncTarget. If there are any, wait for synchronization / take measures to restore normal operation.
$ kubectl -n d8-sds-replicated-volume exec -t deploy/linstor-controller -- linstor r l --faulty Defaulted container "linstor-controller" out of: linstor-controller, kube-rbac-proxy +----------------------------------------------------------------+ | ResourceName | Node | Port | Usage | Conns | State | CreatedOn | |================================================================| +----------------------------------------------------------------+ -
Reboot the node and wait for the synchronization of all DRBD resources. Then uncordon the node. If another node needs to be rebooted, repeat the algorithm.
kubectl uncordon test-node-1
node/test-node-1 uncordoned
How do I free some space on storage pool by moving resources to another
-
Check the storage pool:
kubectl exec -n d8-sds-replicated-volume deploy/linstor-controller -- linstor storage-pool list -n OLD_NODE -
Check the volumes:
kubectl exec -n d8-sds-replicated-volume deploy/linstor-controller -- linstor volume list -n OLD_NODE -
Identify the resources you want to move:
kubectl exec -n d8-sds-replicated-volume deploy/linstor-controller -- linstor resource list-volumes -
Move resources to another node (no more than 1-2 resources at a time):
kubectl exec -n d8-sds-replicated-volume deploy/linstor-controller -- linstor --yes-i-am-sane-and-i-understand-what-i-am-doing resource create NEW_NODE RESOURCE_NAMEkubectl exec -n d8-sds-replicated-volume deploy/linstor-controller -- linstor resource-definition wait-sync RESOURCE_NAMEkubectl exec -n d8-sds-replicated-volume deploy/linstor-controller -- linstor --yes-i-am-sane-and-i-understand-what-i-am-doing resource delete OLD_NODE RESOURCE_NAME
Can I automate the management of replicas and monitoring of LINSTOR state?
Replica management and state monitoring are automated in the replicas_manager.sh script.
It checks the availability of the LINSTOR controller, identifies faulty or corrupted resources, creates database backups, and manages disk replicas, including configuring TieBreaker for quorum.
To check the existence of the replicas_manager.sh script, run the following command on any master node:
ls -l /var/lib/deckhouse/sbin/replicas_manager.shUpon execution, the script performs the following actions:
- Verifies the availability of the controller and connectivity to satellites
- Identifies faulty or corrupted resources
- Creates a backup of the database
- Manages the number of disk replicas, adding new ones as needed
- Configures TieBreaker for resources with two replicas
- Logs all actions to a file named linstor_replicas_manager_<date_time>.log
- Provides recommendations for resolving issues, such as stuck replicas
Configuration variables for replicas_manager.sh:
- NON_INTERACTIVE — enables non-interactive mode
- TIMEOUT_SEC — timeout between attempts, in seconds (default: 10)
- EXCLUDED_RESOURCES_FROM_CHECK — regular expression to exclude resources from checks
- CHUNK_SIZE — chunk size for processing resources (default: 10)
- NODE_FOR_EVICT — name of the node excluded from creating replicas
- LINSTOR_NAMESPACE — Kubernetes namespace (default: d8-sds-replicated-volume)
- DISKLESS_STORAGE_POOL — pool for diskless replicas (default: DfltDisklessStorPool)
How to evict DRBD resources from a node?
Eviction of DRBD resources from a node is performed using the evict.sh script. It can operate in two modes:
-
Node Deletion Mode – in this mode, the following actions are executed:
- Additional replicas are created for each resource hosted on the specified node;
- The node is removed from
LINSTOR; - The node is removed from
Kubernetes;
-
Resource Deletion Mode – in this mode, the following actions are executed:
- Additional replicas are created for each resource hosted on the specified node;
- The resources hosted on the specified node are removed from
LINSTOR;
Before proceeding with the eviction, the following steps must be performed:
-
Check existence of
evict.shscript on any master node:ls -l /var/lib/deckhouse/sbin/evict.sh -
Fix all faulty resources in the cluster. Run the following command to filter them:
kubectl -n d8-sds-replicated-volume exec -ti deploy/linstor-controller -- linstor resource list --faulty -
Check that all the pods in the
d8-sds-replicated-volumenamespace are in the Running state:kubectl -n d8-sds-replicated-volume get pods | grep -v Running
Example of removing a node from LINSTOR and Kubernetes
Run the evict.sh script on any master node in interactive mode by specifying the delete mode --delete-node:
/var/lib/deckhouse/sbin/evict.sh --delete-nodeTo run the evict.sh script in non-interactive mode, you need to add the --non-interactive flag when invoking it, as well as the name of the node from which you want to evict the resources. In this mode, the script will execute all actions without asking for user confirmation.
Example invocation:
/var/lib/deckhouse/sbin/evict.sh --non-interactive --delete-node --node-name "worker-1"Example of removing resources from a node without removing the node itself
-
Run the
evict.shscript on any master node in interactive mode (--delete-resources-only):/var/lib/deckhouse/sbin/evict.sh --delete-resources-onlyTo run the
evict.shscript in non-interactive mode, add the--non-interactiveflag followed by the name of the node to evict the resources from. In this mode, the script will perform all the necessary actions automatically (no user confirmation is required).Example:
/var/lib/deckhouse/sbin/evict.sh --non-interactive --delete-resources-only --node-name "worker-1"Caution! After the script finishes its job, the node will still be in the Kubernetes cluster albeit in SchedulingDisabled status. In LINSTOR, the AutoplaceTarget=false property will be set for this node, preventing the its scheduler from creating resources on this node.
-
Run the following command to allow DRBD resources and pods to be scheduled on the node again:
alias linstor='kubectl -n d8-sds-replicated-volume exec -ti deploy/linstor-controller -- linstor' linstor node set-property "worker-1" AutoplaceTarget kubectl uncordon "worker-1" -
Run the following command to check the
AutoplaceTargetproperty for all nodes (the AutoplaceTarget field will be empty for nodes that are allowed to host LINSTOR resources):alias linstor='kubectl -n d8-sds-replicated-volume exec -ti deploy/linstor-controller -- linstor' linstor node list -s AutoplaceTarget
Description of the evict.sh script parameters
--delete-node— Removes the node from LINSTOR and Kubernetes after first creating additional replicas for all resources hosted on that node.--delete-resources-only— Removes the resources from the node without deleting the node from LINSTOR and Kubernetes, after first creating additional replicas for all resources hosted on that node.--non-interactive— Runs the script in non-interactive mode.--node-name— Specifies the name of the node from which resources should be evicted. This parameter is mandatory when using non-interactive mode.--skip-db-backup— Skips creating a backup of the LINSTOR database before executing the operations.--ignore-advise— Proceeds with the operations despite warnings from thelinstor advise resourcecommand. Use if the script was interrupted and the number of replicas for some resources does not match the value specified in theReplicatedStorageClass.--exclude-resources-from-check— Excludes from checks the resources listed using the|(vertical bar) as a separator.
Troubleshooting
Problems can occur at different levels of component operation. This cheat sheet will help you quickly navigate through the diagnosis of various problems with the LINSTOR-created volumes:
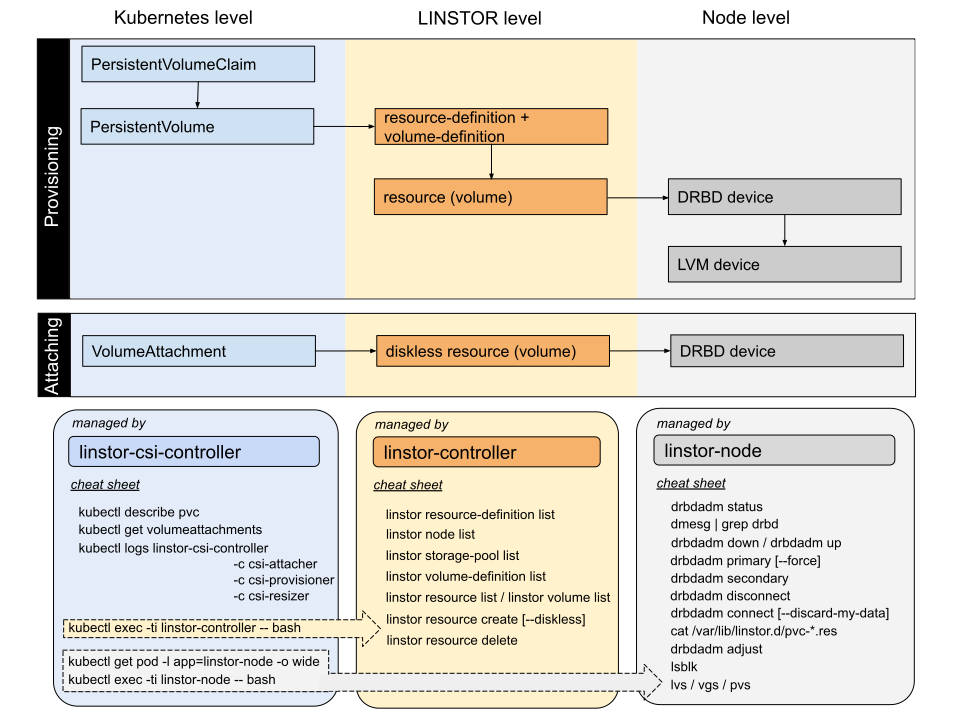
Some common problems are described below.
linstor-node fail to start because the drbd module cannot be loaded
-
Check the status of the
linstor-nodepods:kubectl get pod -n d8-sds-replicated-volume -l app=linstor-node -
If some of those pods got stuck in
Initstate, check the DRBD version as well as the bashible logs on the node:cat /proc/drbd journalctl -fu bashible
The most likely reasons why bashible is unable to load the kernel module:
-
You have the in-tree version of the DRBDv8 module preloaded, whereas DRBDv9 is required. Verify the preloaded module version using the following command:
cat /proc/drbd. If the file is missing, then the module is not preloaded and this is not your case. -
You have Secure Boot enabled. Since the DRBD module is compiled dynamically for your kernel (similar to dkms), it is not digitally signed. Currently, running the DRBD module with a Secure Boot enabled is not supported.
The Pod cannot start due to the FailedMount error
The Pod is stuck at the ContainerCreating phase
If the Pod is stuck at the ContainerCreating phase, and if the errors like those shown below are displayed when the kubectl describe pod command is invoked, then it means that the device is mounted on one of the nodes.
rpc error: code = Internal desc = NodePublishVolume failed for pvc-b3e51b8a-9733-4d9a-bf34-84e0fee3168d: checking
for exclusive open failed: wrong medium type, check device health
Use the command below to see if this is the case:
alias linstor='kubectl -n d8-sds-replicated-volume exec -ti deploy/linstor-controller -- linstor'
linstor resource list -r pvc-b3e51b8a-9733-4d9a-bf34-84e0fee3168d
The InUse flag will point to the node on which the device is being used. You will need to manually unmount the disk on that node.
Errors of the Input/output error type
These errors usually occur during the file system (mkfs) creation.
Check dmesg on the node where the pod is being run:
dmesg | grep 'Remote failed to finish a request within'If the command output is not empty (the dmesg output contains lines like “Remote failed to finish a request within … “), most likely your disk subsystem is too slow for DRBD to run properly.
Diagnosing DRBD out-of-sync data or lost quorum (new control plane)
This section applies to clusters running the new control plane of sds-replicated-volume (its own controller, without LINSTOR). In this mode there is no LINSTOR client: DRBD resources are managed directly with drbdsetup, and the per-node agent runs in the agent DaemonSet (label app=agent). The agent container is distroless — it has no shell, so the drbd* binaries are invoked directly (exec ... -- drbdsetup ..., not -- bash).
The DRBD alerts (D8DrbdPeerDeviceIsOutOfSync, D8DrbdDeviceHasNoQuorum, D8DrbdDeviceIsNotConnected) carry two useful labels:
name— the DRBD resource name; use it as the<resource>argument below;conn_name— the affected peer connection, shown aspeer-N, whereNis the peer node-id used bydrbdsetup(confirm it indrbdsetup status --verbose, which printspeer-N node-id:X).
All commands below use d8 k as the kubectl entry point.
Inspect a resource
Find the agent Pod on the node and print the resource status (replace <node> and <resource>):
POD=$(d8 k -n d8-sds-replicated-volume get pod --field-selector=spec.nodeName=<node> -l app=agent -o name)
d8 k --as=system:sudouser -n d8-sds-replicated-volume exec -t $POD -c agent -- drbdsetup status <resource> --verbose --statistics
Note: drbdadm status <resource> does not work here (the new control plane does not write /etc/drbd.d/*.res files), always use drbdsetup.
Restore a lost quorum (D8DrbdDeviceHasNoQuorum)
A diskless Primary suspends its I/O when it loses quorum. A common cause is a diskful replica stuck resyncing near completion (replication:SyncTarget with out-of-sync/received not moving, sometimes a corrupt done: value far above 100%), so too few replicas are UpToDate.
Reconnect the stalled peer connection on the stalled (Inconsistent) node to restart the resync. <peer-node-id> is the node-id of the up-to-date source:
d8 k --as=system:sudouser -n d8-sds-replicated-volume exec -t $POD -c agent -- drbdsetup disconnect <resource> <peer-node-id>The connection re-establishes automatically. When a second replica reaches UpToDate, quorum is restored and the Primary resumes I/O (drbdsetup status <resource> shows quorum:yes, blocked:no).
This is safe: the up-to-date source is untouched, an Inconsistent replica does not count toward quorum, and the Primary I/O is already suspended, so reconnecting introduces no new disruption and cannot lose data.
Clear out-of-sync data (D8DrbdPeerDeviceIsOutOfSync)
When both ends of a connection are UpToDate but residual out-of-sync bytes stay frozen, DRBD will not resync them on its own (matching generation UUIDs mean no resync is triggered). Reconnecting the peer forces a bitmap-based resync of exactly those extents:
d8 k --as=system:sudouser -n d8-sds-replicated-volume exec -t $POD -c agent -- drbdsetup disconnect <resource> <peer-node-id>
# out-of-sync should become 0:
d8 k --as=system:sudouser -n d8-sds-replicated-volume exec -t $POD -c agent -- drbdsetup status <resource> --statistics
If a small residual persists:
-
Run an online verification of that connection (reads both disks and reconciles matching/differing blocks):
d8 k --as=system:sudouser -n d8-sds-replicated-volume exec -t $POD -c agent -- drbdsetup verify <resource> <peer-node-id> 0 -
If it still persists and the peer disk is
UpToDate, fully re-mirror the peer copy. On the peer node (the one named byconn_name), invalidate its local copy — it becomesInconsistentand does a full resync from an up-to-date replica. Quorum is held by the remaining up-to-date replicas during the resync:PEER_POD=$(d8 k -n d8-sds-replicated-volume get pod --field-selector=spec.nodeName=<peer-node> -l app=agent -o name) MIN=$(d8 k --as=system:sudouser -n d8-sds-replicated-volume exec -t $PEER_POD -c agent -- drbdsetup status <peer-resource> --verbose | grep -oE 'minor:[0-9]+' | head -1 | cut -d: -f2) d8 k --as=system:sudouser -n d8-sds-replicated-volume exec -t $PEER_POD -c agent -- drbdsetup invalidate $MIN
Phantom counter. If, after a full re-mirror, a Primary still reports a tiny out-of-sync toward a peer whose data was just re-read bit-for-bit, this is a stale accounting artifact on the Primary side, not a real divergence — the data on all replicas is identical. Reconnect, verify and re-mirror will not clear it, it resets only on a disruptive action (a failover or a reboot of the Primary node). For a live volume it is safe to leave it until the next maintenance window.
I deleted a ReplicatedStoragePool resource, but its Storage Pool in the backend is still there. Is that expected?
Yes, this is the expected behavior. Currently, the sds-replicated-volume module does not process operations when deleting the ReplicatedStoragePool resource.
I am unable to update the fields in the ReplicatedStorageClass resource spec. Is this the expected behavior?
Partly. Most spec fields are immutable after creation, and updates to them are rejected with an error that names the field. The replication settings (replication, failuresToTolerate, guaranteedMinimumDataRedundancy), the configurationRolloutStrategy/eligibleNodesConflictResolutionStrategy fields and reclaimPolicy (the StorageClass is recreated with the new policy) can be changed on an existing resource. Editing replication is how volumes are migrated between layouts — for example from ConsistencyAndAvailability (3D) to Availability (2D+1TB); see the “Updating the ReplicatedStorageClass resource” section of the usage guide. All other fields (storage, topology, zones, volumeAccess, nodeLabelSelector, and so on) remain immutable — to change them, recreate the resource.
Deleting a ReplicatedStorageClass resource does not delete its child StorageClass in Kubernetes. What can I do?
The child StorageClass is only deleted if the status of the ReplicatedStorageClass resource is Created. Otherwise, you will need to either restore the ReplicatedStorageClass resource to a working state or delete the StorageClass yourself.
An error occurred while creating a Storage Pool or StorageClass, but the entity was created anyway. Is that acceptable?
This is the expected behavior. The module will automatically retry the unsuccessful operation if the error was caused by circumstances beyond the module’s control (for example, a momentary disruption in the Kubernetes API).
CLI commands fail with “You’re not allowed to change state of linstor cluster manually. Please contact tech support”
In the sds-replicated-volume module, we have restricted the list of commands that are allowed to be run in LINSTOR, because we plan to automate all manual operations. Some of them are already automated, e.g., creating a Tie-Breaker in cases when it doesn’t create them for resources with 2 replicas. Use the command below to see the list of allowed commands:
alias linstor='kubectl -n d8-sds-replicated-volume exec -ti deploy/linstor-controller -- linstor'
linstor --help
How do I restore DB from backup?
The backups of LINSTOR resources are stored in Custom Resources replicatedstoragemetadatabackups.storage.deckhouse.io and have a segmented format. Backup occurs automatically on a schedule.
An example of a correctly formatted backup looks like this:
sds-replicated-volume-daily-backup-20241112130501-backup-0    97m     completed=true,sds-replicated-volume.deckhouse.io/sds-replicated-volume-db-backup=20241112130501
sds-replicated-volume-daily-backup-20241112130501-backup-1    97m     completed=true,sds-replicated-volume.deckhouse.io/sds-replicated-volume-db-backup=20241112130501
sds-replicated-volume-daily-backup-20241112140501-backup-0    37m     completed=true,sds-replicated-volume.deckhouse.io/sds-replicated-volume-db-backup=20241112140501
sds-replicated-volume-daily-backup-20241112140501-backup-1    37m     completed=true,sds-replicated-volume.deckhouse.io/sds-replicated-volume-db-backup=20241112140501
sds-replicated-volume-weekly-backup-20241112130400-backup-0   98m     completed=true,sds-replicated-volume.deckhouse.io/sds-replicated-volume-db-backup=20241112130400
sds-replicated-volume-weekly-backup-20241112130400-backup-1   98m     completed=true,sds-replicated-volume.deckhouse.io/sds-replicated-volume-db-backup=20241112130400
The backup is stored in encoded segments in Custom Resources replicatedstoragemetadatabackups.storage.deckhouse.io of the form sds-replicated-volume-{daily|weekly}-backup-%date_time%-backup-{0..2}.
Restoration process
Set the environment variables:
NAMESPACE="d8-sds-replicated-volume"
BACKUP_NAME="linstor_db_backup"
Check for the presence of backup copies:
kubectl get rsmb --show-labelsExample output:
sds-replicated-volume-daily-backup-20241112130501-backup-0    97m     completed=true,sds-replicated-volume.deckhouse.io/sds-replicated-volume-db-backup=20241112130501
sds-replicated-volume-daily-backup-20241112130501-backup-1    97m     completed=true,sds-replicated-volume.deckhouse.io/sds-replicated-volume-db-backup=20241112130501
sds-replicated-volume-daily-backup-20241112140501-backup-0    37m     completed=true,sds-replicated-volume.deckhouse.io/sds-replicated-volume-db-backup=20241112140501
sds-replicated-volume-daily-backup-20241112140501-backup-1    37m     completed=true,sds-replicated-volume.deckhouse.io/sds-replicated-volume-db-backup=20241112140501
sds-replicated-volume-weekly-backup-20241112130400-backup-0   98m     completed=true,sds-replicated-volume.deckhouse.io/sds-replicated-volume-db-backup=20241112130400
sds-replicated-volume-weekly-backup-20241112130400-backup-1   98m     completed=true,sds-replicated-volume.deckhouse.io/sds-replicated-volume-db-backup=20241112130400
Each backup has its own label with the creation time. Choose the desired one and copy its label into an environment variable. For example, let’s take the label of the most recent copy from the output above:
LABEL_SELECTOR="sds-replicated-volume.deckhouse.io/linstor-db-backup=20240425074718"Create a temporary directory to store archive parts:
TMPDIR=$(mktemp -d)
echo "Temporary directory: $TMPDIR"
Next, create an empty archive and combine the secret data into one file:
COMBINED="${BACKUP_NAME}_combined.tar"
> "$COMBINED"
Then, retrieve the list of secrets by label, decrypt the data, and place the backup data into the archive:
MOBJECTS=$(kubectl get rsmb -l "$LABEL_SELECTOR" --sort-by=.metadata.name -o jsonpath="{.items[*].metadata.name}")

for MOBJECT in $MOBJECTS; do
  echo "Process: $MOBJECT"
  kubectl get rsmb "$MOBJECT" -o jsonpath="{.spec.data}" | base64 --decode >> "$COMBINED"
done
Unpack the combined tar file to obtain the backup resources:
mkdir -p "./backup"
tar -xf "$COMBINED" -C "./backup --strip-components=2
Check the contents of the backup:
ls ./backupebsremotes.yaml layerdrbdvolumedefinitions.yaml layerwritecachevolumes.yaml propscontainers.yaml satellitescapacity.yaml secidrolemap.yaml trackingdate.yaml
files.yaml layerdrbdvolumes.yaml linstorremotes.yaml resourceconnections.yaml schedules.yaml secobjectprotection.yaml volumeconnections.yaml
keyvaluestore.yaml layerluksvolumes.yaml linstorversion.yaml resourcedefinitions.yaml secaccesstypes.yaml secroles.yaml volumedefinitions.yaml
layerbcachevolumes.yaml layeropenflexresourcedefinitions.yaml nodeconnections.yaml resourcegroups.yaml secaclmap.yaml sectyperules.yaml volumegroups.yaml
layercachevolumes.yaml layeropenflexvolumes.yaml nodenetinterfaces.yaml resources.yaml secconfiguration.yaml sectypes.yaml volumes.yaml
layerdrbdresourcedefinitions.yaml layerresourceids.yaml nodes.yaml rollback.yaml secdfltroles.yaml spacehistory.yaml
layerdrbdresources.yaml layerstoragevolumes.yaml nodestorpool.yaml s3remotes.yaml secidentities.yaml storpooldefinitions.yamlIf everything is fine, restore the desired entity by applying the YAML file:
kubectl apply -f %something%.yamlOr apply bulk-apply if full restoration is needed:
kubectl apply -f ./backup/Service pods of sds-replicated-volume components fail to be created on the node I need
Most likely this is due to node labels.
-
Check dataNodes.nodeSelector in the module settings:
kubectl get mc sds-replicated-volume -o=jsonpath={.spec.settings.dataNodes.nodeSelector} -
Check the selectors that
sds-replicated-volume-controlleruses:kubectl -n d8-sds-replicated-volume get secret d8-sds-replicated-volume-controller-config -o jsonpath='{.data.config}' | base64 --decode -
The
d8-sds-replicated-volume-controller-configsecret should contain the selectors that are specified in the module settings, as well as thekubernetes.io/os: linuxselector. -
Make sure that the target node has all the labels specified in the
d8-sds-replicated-volume-controller-configsecret:kubectl get node worker-0 --show-labels -
If there are no labels, add them to the NodeGroup or to the node via templates.
-
If there are labels, check if the target node has the
storage.deckhouse.io/sds-replicated-volume-node=label attached. If there is no label, check if the sds-replicated-volume-controller is running and if it is running, examine its logs:kubectl -n d8-sds-replicated-volume get po -l app=sds-replicated-volume-controller kubectl -n d8-sds-replicated-volume logs -l app=sds-replicated-volume-controller
I have not found an answer to my question and am having trouble getting the module to work. What do I do?
Information about the reasons for the failure is saved to the Status.Reason field of the ReplicatedStoragePool and ReplicatedStorageClass resources.
If the information provided is not enough to identify the problem, refer to the sds-replicated-volume-controller logs.
Migrating from the Deckhouse Kubernetes Platform linstor built-in module to sds-replicated-volume
Note that the LINSTOR control-plane and its CSI will be unavailable during the migration process. This will make it impossible to create/expand/delete PVs and create/delete pods using its PV during the migration.
Please note! User data will not be affected by the migration. Basically, the migration to a new namespace will take place. Also, new components will be added (in the future, they will take over all volume management functionality).
Migration steps
-
Make sure there are no faulty resources in the module’s backend. The command below should return an empty list:
alias linstor='kubectl -n d8-linstor exec -ti deploy/linstor-controller -- linstor'
linstor resource list --faulty
Caution! You should fix all resources before migrating.
-
Disable the
linstormodule:kubectl patch moduleconfig linstor --type=merge -p '{"spec": {"enabled": false}}' -
Wait for the
d8-linstornamespace to be deleted:kubectl get namespace d8-linstor -
Create a ModuleConfig resource for
sds-node-configurator:kubectl apply -f -<<EOF apiVersion: deckhouse.io/v1alpha1 kind: ModuleConfig metadata: name: sds-node-configurator spec: enabled: true version: 1 EOF -
Wait for the
sds-node-configuratormodule to becomeReady:kubectl get moduleconfig sds-node-configurator -
Create a ModuleConfig resource for
sds-replicated-volume.Caution. Failing to specify the
settings.dataNodes.nodeSelectorparameter in thesds-replicated-volumemodule settings would result in the value for this parameter to be derived from thelinstormodule when installing thesds-replicated-volumemodule. If this parameter is not defined there as well, it will remain empty and all the nodes in the cluster will be treated as storage nodes.kubectl apply -f - <<EOF apiVersion: deckhouse.io/v1alpha1 kind: ModuleConfig metadata: name: sds-replicated-volume spec: enabled: true version: 2 EOF -
Wait for the
sds-replicated-volumemodule to becomeReady:kubectl get moduleconfig sds-replicated-volume -
Check the
sds-replicated-volumemodule settings:kubectl get moduleconfig sds-replicated-volume -oyaml -
Wait for all pods in the
d8-sds-replicated-volumeandd8-sds-node-configuratornamespaces to becomeReadyorCompleted:kubectl get po -n d8-sds-node-configurator kubectl get po -n d8-sds-replicated-volume -
Override the
linstorcommand alias and check the resources:
alias linstor='kubectl -n d8-sds-replicated-volume exec -ti deploy/linstor-controller -- linstor'
linstor resource list --faulty
If there are no faulty resources, then the migration was successful.
Migrating to ReplicatedStorageClass
Note that StorageClasses in this module are managed via the ReplicatedStorageClass resource. StorageClasses should not be created manually.
When migrating from the linstor module, delete old StorageClasses and create new ones via the ReplicatedStorageClass resource (refer to the table below).
Note that in the old StorageClasses, you should pick up the option from the parameter section of the StorageClass itself, while for the new StorageClass, you should specify the corresponding option in ReplicatedStorageClass.
| StorageClass parameter | ReplicatedStorageClass | Default parameter | Notes |
|---|---|---|---|
| linstor.csi.linbit.com/placementCount: “1” | replication: “None” | A single volume replica with data will be created | |
| linstor.csi.linbit.com/placementCount: “2” | replication: “Availability” | Two volume replicas with data will be created | |
| linstor.csi.linbit.com/placementCount: “3” | replication: “ConsistencyAndAvailability” | Yes | Three volume replicas with data will be created |
| linstor.csi.linbit.com/storagePool: “name” | storagePool: “name” | Name of the storage pool to use for storage | |
| linstor.csi.linbit.com/allowRemoteVolumeAccess: “false” | volumeAccess: “Local” | Pods are not allowed to access data volumes remotely (only local access to the disk within the Node is allowed) |
On top of these, the following parameters are available:
reclaimPolicy(Delete, Retain) — corresponds to the reclaimPolicy parameter of the old StorageClass.zones— list of zones to be used for hosting resources ( the actual names of the zones in the cloud). Please note that remote access to a volume with data is only possible within a single zone!volumeAccesscan beLocal(access is strictly within the node),EventuallyLocal(the data replica will be synchronized on the node with the running pod a while after the start),PreferablyLocal(remote access to the volume with data is allowed, volumeBindingMode: WaitForFirstConsumer),Any(remote access to the volume with data is allowed, volumeBindingMode: Immediate).- If you need to use
volumeBindingMode: Immediate, set the volumeAccess parameter of the ReplicatedStorageClass toAny.
You can read more about working with ReplicatedStorageClass resources in the documentation.
Migrating to ReplicatedStoragePool
The ReplicatedStoragePool resource allows you to create a Storage Pool in the modules’s backend. It is recommended to create this resource for the Storage Pools that already exist and specify the existing LVMVolumeGroups in this resource. In this case, the controller will see that the corresponding Storage Pool has been created and leave it unchanged, while the status.phase field of the created resource will be set to Created. Refer to the sds-node-configurator documentation to learn more about LVMVolumeGroup resources. To learn more about working with ReplicatedStoragePool resources, refer to the module usage documentation.
Migrating from sds-drbd module to sds-replicated-volume
Note that the module control-plane and its CSI will be unavailable during the migration process. This will make it impossible to create/expand/delete PVs and create/delete pods using DRBD PV during the migration.
Note. User data will not be affected by the migration. Basically, the migration to a new namespace will take place. Also, new components will be added (in the future, they will take over all module volume management functionality).
Procedure for migration
-
Make sure there are no faulty DRBD resources in the cluster. The command below should return an empty list:
alias linstor='kubectl -n d8-sds-drbd exec -ti deploy/linstor-controller -- linstor'
linstor resource list --faulty
Caution. You should fix all DRBD resources before migrating.
-
Disable the
sds-drbdmodule:kubectl patch moduleconfig sds-drbd --type=merge -p '{"spec": {"enabled": false}}' -
Wait for the
d8-sds-drbdnamespace to be deleted.kubectl get namespace d8-sds-drbd -
Create a ModuleConfig resource for
sds-replicated-volume.Caution. Failing to specify the
settings.dataNodes.nodeSelectorparameter in thesds-replicated-volumemodule settings would result in the value for this parameter to be derived from thesds-drbdmodule when installing thesds-replicated-volumemodule. If this parameter is not defined there as well, it will remain empty and all the nodes in the cluster will be treated as storage nodes.kubectl apply -f - <<EOF apiVersion: deckhouse.io/v1alpha1 kind: ModuleConfig metadata: name: sds-replicated-volume spec: enabled: true version: 2 EOF -
Wait for the
sds-replicated-volumemodule to becomeReady.kubectl get moduleconfig sds-replicated-volume `` -
Check the
sds-replicated-volumemodule settings.kubectl get moduleconfig sds-replicated-volume -oyaml -
Wait for all pods in the
d8-sds-replicated-volumenamespaces to becomeReadyorCompleted.kubectl get po -n d8-sds-replicated-volume -
Override the
linstorcommand alias and check the DRBD resources:alias linstor='kubectl -n d8-sds-replicated-volume exec -ti deploy/linstor-controller -- linstor' linstor resource list --faulty
If there are no faulty resources, then the migration was successful.
Caution. The resources DRBDStoragePool and DRBDStorageClass will be automatically migrated to ReplicatedStoragePool and ReplicatedStorageClass during the process, no user intervention is required for this. The functionality of these resources will not change. However, it is worth checking if there are any DRBDStoragePool or DRBDStorageClass left in cluster. If they exist after the migration, please inform our support team.
Why is it not recommended to use RAID for disks that are used by the sds-replicated-volume module?
DRBD with a replica count greater than 1 provides de facto network RAID. Using RAID locally may be inefficient because:
-
Redundant RAID dramatically increases the overhead in terms of space utilization. Here is an example: Suppose, a ReplicatedStorageClass is used with
replicationset toConsistencyAndAvailability. With this setting, DRBD will store data in three replicas (one replica per three different hosts). If RAID1 is used on these hosts, a total of 6 GB of disk space will be required to store 1 GB of data. Redundant RAID is worth using for easier server maintenance when the storage costs are irrelevant. RAID1 in this case will allow you to change disks on servers without having to move data replicas from the “problem” disk. -
As for RAID0, the performance gain will be unnoticeable, since data replication will be performed over the network and the network is likely to be the bottleneck. On top of that, decreased storage reliability on the host will potentially lead to data unavailability given that in DRBD, switching from a faulty replica to a healthy one is not instantaneous.
Why do you recommend using local disks (and not NAS)?
DRBD uses the network for data replication. When using NAS, network load will increase significantly because nodes will synchronize data not only with NAS but also between each other. Similarly, read/write latency will also increase. NAS typically involves using RAID on its side, which also adds overhead.
How are the module certificates renewed?
The module certificates are renewed automatically, no operator action is required.
Certificates are grouped by the CA signing them. Every group keeps its CA, both the certificate and the private key, in a dedicated secret:
| CA secret | Certificates signed by it |
|---|---|
linstor-ca |
linstor-controller-https-cert, linstor-client-https-cert, linstor-controller-ssl-cert, linstor-node-ssl-cert |
webhooks-ca |
webhooks-https-certs |
spaas-ca |
spaas-certs |
linstor-scheduler-extender-ca |
linstor-scheduler-extender-https-certs |
A CA is issued for ten years, the certificates it signs for one year. A certificate is re-signed by the same CA 45 days before it expires, and the workloads consuming it are restarted on the convergence that follows, once the renewed certificate is in its secret. The restarts need no coordination, and the delay is harmless: the CA does not change, so a component trusts both the old and the new certificate, and the old one stays valid for the remaining 45 days.
The whole group, its CA included, is re-issued only when the CA itself is missing or is about to
expire. That invalidates every certificate of the group at once, so all its consumers are
restarted. For the LINSTOR group this means the LINSTOR control plane is unavailable until the
linstor-controller Deployment and the linstor-node DaemonSet are rolled out; data access is not
affected, since DRBD devices keep working without the control plane.
To inspect the expiration dates:
kubectl -n d8-sds-replicated-volume get secret -l 'heritage=deckhouse,module=sds-replicated-volume' \
  -o custom-columns='NAME:.metadata.name,CERT:.data.tls\.crt,CA:.data.ca\.crt' --no-headers \
  | while read -r name cert ca; do
      for data in "$cert" "$ca"; do
        [ "$data" = '<none>' ] && continue
        echo "$name $(echo "$data" | base64 -d | openssl x509 -noout -subject -enddate | tr '\n' ' ')"
      done
    done
The monitoring system alerts about a certificate which is about to expire but has not been renewed,
see the D8LinstorCertificateExpiringIn30d alert. Such an alert means the renewal is blocked:
inspect the Deckhouse log and queue for errors reported by the module hooks.
How to renew the module certificates manually?
Renewing a certificate manually is only needed when the automatic renewal is blocked and the cause cannot be fixed.
To re-sign a single certificate by the CA of its group, delete its secret:
kubectl -n d8-sds-replicated-volume delete secret <secret name>To re-issue a whole group, delete the secret with its CA as well, for example:
kubectl -n d8-sds-replicated-volume delete secret linstor-caDeleting a secret is not enough on its own: the module keeps the certificate in its values and restores the deleted secret unchanged. Restart Deckhouse, which makes the module mint the certificate anew before deploying the module, and wait until the queue is empty:
kubectl -n d8-system rollout restart deployment deckhouse
kubectl -n d8-system exec -ti deployments/deckhouse -- deckhouse-controller queue main
# Queue 'main': length 0, status: 'waiting for task 16s'
The workloads consuming the re-created certificates are restarted by the module itself, on the next convergence rather than on the one that re-created them. Restart them manually if the new certificate has to take effect right away:
kubectl -n d8-sds-replicated-volume rollout restart deployment
kubectl -n d8-sds-replicated-volume rollout restart daemonset
How much of a volume is reserved for the superuser?
Nothing, by default: a volume of this module is formatted with -m 0, so the whole volume is available to the workload.
Where the classic 5% ext4 reserve is wanted — for example to keep a filesystem writable for a privileged process after a workload has filled it — annotate the ReplicatedStorageClass with the percentage to reserve:
d8 k annotate replicatedstorageclass <name> storage.deckhouse.io/ext4-reserved-percent=5The value is a whole number of percent between 0 and 50; an invalid one is rejected by the validating webhook.
The reserve applies only to volumes created after the annotation was set — filesystems that already exist keep the reserve they were created with. Only the ext filesystems keep blocks for the superuser, so the annotation is ignored for XFS volumes.
Changing the annotation makes the controller recreate the StorageClass, because parameters of an existing StorageClass are immutable in Kubernetes. Existing volumes and PVCs are not affected.
On the legacy LINSTOR control plane the same annotation is honoured through the FileSystem/MkfsParameters property of the LINSTOR resource definition. The one exception there is the rescue path that formats a volume when LINSTOR did not: it always uses the module default of 0%, because the percentage does not reach it.