The following recommendations may be of less importance for a test or development cluster, but they may be critical for a production one.
Release channel and update mode
Use the EarlyAccess or Stable release channel. Configure auto-update window or select manual mode.
Select the release channel and update mode that suit your needs. The more stable the release channel is, the later you will have the chance to use the new features.
If possible, use different release channels for clusters. Use a less stable update channel for a development cluster than for a testing cluster or stage (pre-production) cluster.
Use the EarlyAccess or Stable release channel for production clusters.
If you have more than one cluster in a production environment, make sure that the clusters update at different times. In this case, a new version is installed in one cluster first, and you have time to check it before the other clusters update. To spread the updates over time, set non-overlapping update windows for the clusters or connect them to different release channels. For example, if one cluster gets updates from the EarlyAccess channel and another one from the Stable channel, a new version reaches the second cluster later.
Even in very busy and critical clusters, it is not a good idea to disable the use of the release channel. The best strategy is a scheduled update. If you are using a Deckhouse Platform release in your cluster that has not received an update in over six months, you will have a hard time getting help quickly should a problem arise.
The update windows management allows you to schedule automatic platform release updates when your cluster is not experiencing peak load.
Kubernetes version
Use the automatic Kubernetes version selection or set the version explicitly.
In most cases, opt for the automatic selection of the Kubernetes version. In Deckhouse Platform, this behavior is set by default, but it can be changed with the kubernetesVersion parameter. Upgrading the Kubernetes version in the cluster has no effect on applications and is done in a consistent and secure fashion.
If the automatic Kubernetes version selection is enabled, the platform can upgrade the Kubernetes version in the cluster together with the platform update (when upgrading a minor version). If the Kubernetes version in the kubernetesVersion parameter is set explicitly, the platform may not upgrade to a newer version at some point if the Kubernetes version used in the cluster is no longer supported.
You must decide for yourself whether to use automatic version selection or set a specific version and update it manually every now and then.
If your application uses outdated versions of resources or depends on a particular version of Kubernetes for some other reason, check whether it is supported and set it explicitly.
Resource requirements
For production, use a cluster with three master nodes or a cluster with role separation. Choose node resources according to the resource requirements for the selected deployment option and workload type.
The resource requirements for each deployment option are listed on the “System requirements” page. The values in the tables cover only the load of Deckhouse Platform components.
When preparing a production cluster, consider the following:
- Do not use a single-node cluster or a single-master cluster: they are not fault-tolerant.
- For master nodes and monitoring nodes, use fast disks with performance of at least 400 IOPS.
- Set up a dedicated StorageClass on fast disks for Deckhouse Platform components.
- Add resources for the user workload to the resources of worker nodes.
- Run load tests of your applications and adjust node resources based on the results.
For details on choosing resources depending on the load, see the Picking resources for a bare metal cluster guide.
Things to consider when configuring
Master nodes
Three master nodes with fast 400+ IOPS disks are highly recommended for a cluster.
Use three master nodes in all cases, as they are sufficient for fault tolerance. Also, with three nodes, you can safely update the cluster’s control plane as well as the master nodes. Extra master nodes are not needed, while 2 nodes (or any even number) do not make a quorum.
The master node configuration for cloud clusters can be configured using the masterNodeGroup parameter.
Reference:
Frontend nodes
Use two or more frontend nodes.
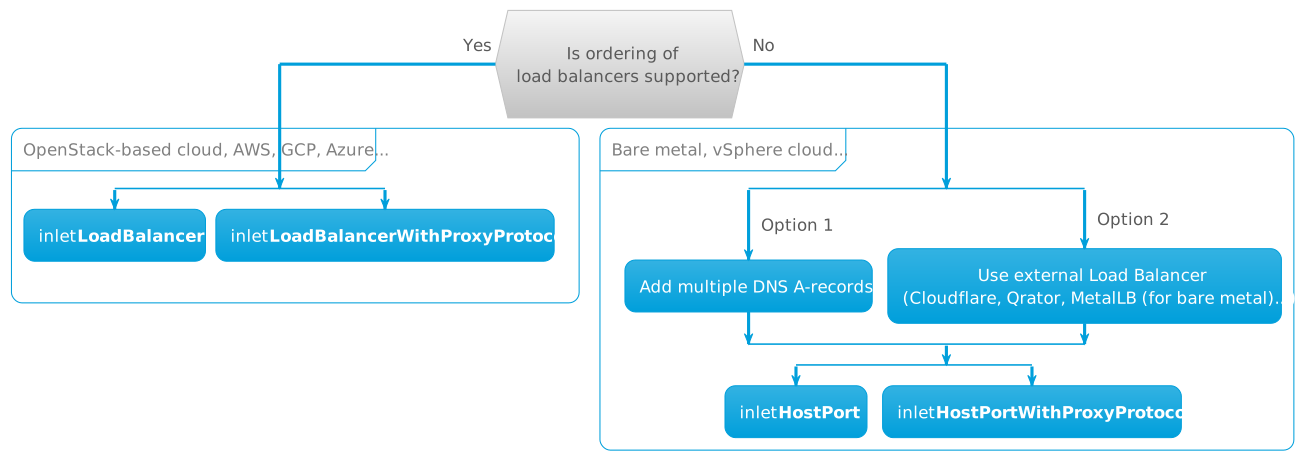
Use inlet LoadBalancer for OpenStack-based clouds and cloud services where automatic balancer ordering is not supported (AWS, GCP, Azure, etc.). Use inlet HostPort with an external load balancer for bare metal or vSphere.
Frontend nodes are used for balancing incoming traffic. Such nodes are allocated for Ingress controllers. The NodeGroup of the frontend nodes has a node-role.deckhouse.io/frontend label. Read more about allocating nodes for specific load types…
Use more than one frontend node. Frontend nodes must be able to still handle traffic even if one of the frontend nodes fails.
For example, if the cluster has two frontend nodes, each frontend node must be able to handle the entire cluster load in case the second frontend node fails. If the cluster has three frontend nodes, each frontend node must be able to handle a load that is at least one and a half times higher.
Select the inlet type (it defines the way the traffic comes in).
When deploying the platform in a cloud infrastructure where provisioning of load balancers is supported (e.g., OpenStack-based clouds, AWS, GCP, Azure, etc.), use the LoadBalancer or LoadBalancerWithProxyProtocol inlet.
In environments where automatic load balancer provisioning is not supported (bare metal clusters, vSphere, custom OpenStack solutions), use the HostPort or HostPortWithProxyProtocol inlet. In this case, you can either add some A‑records to DNS for the corresponding domain or use an external load-balancing service (e.g., Cloudflare, Qrator solutions, or configure metallb).
The HostWithFailover inlet is suitable for clusters with a single frontend node. It reduces the time that the Ingress controller is unavailable during updates. This type of inlet is suitable for important development environments, but not recommended for production.
The algorithm for choosing an inlet:
Monitoring nodes
For high-load clusters, use two monitoring nodes equipped with fast disks.
Monitoring nodes are used to run Grafana, Prometheus, and other monitoring components. The NodeGroup for monitoring nodes has the node-role.deckhouse.io/monitoring label attached.
In high-load clusters, where many alerts are generated and many metrics are collected, allocate dedicated nodes for monitoring. If not, monitoring components will be deployed to system nodes.
When allocating monitoring nodes, it is important to allocate fast disks to them. You can do so by providing a dedicated storageClass on fast disks for all platform components (global parameter storageClass) or allocate a dedicated storageClass to monitoring components only storageClass and longtermStorageClass parameters of the prometheus module.
If the cluster is initially created with nodes allocated for a specific type of workload (system nodes, nodes for monitoring, etc.), explicitly specify the corresponding nodeSelector parameter in the module configuration for modules that use persistent storage volumes (for example, for the prometheus module). For the prometheus module, this parameter is nodeSelector.
System nodes
Dedicate two system nodes.
System nodes are used to run platform modules. Their NodeGroup has the node-role.deckhouse.io/system label.
Set two nodes to be system nodes. This way, platform modules will run on them without interfering with user applications in the cluster. Read more about allocating nodes to specific load types….
Provide the platform components with fast disks (the storageClass global parameter).
Cluster subnets
Plan the cluster subnets before installation, because you cannot change them afterwards.
You set the pod subnet (podSubnetCIDR), the service subnet (serviceSubnetCIDR), and the node subnet size (podSubnetNodeCIDRPrefix) when you install the cluster. Select the pod and service subnets so that they do not overlap with each other or with the node network. Changing these parameters in a running cluster can break it, so the platform blocks such changes. If you need other subnets, recreate the cluster.
The node subnet size defines how many pods fit on a node. By default, the pod limit per node, the kubelet.maxPods parameter of the node group, is calculated from this size. The mapping between the subnet size and the pod limit is listed in the Pod limit per node section.
Storage
Use replicated storage for production data and set a default StorageClass.
Workloads keep persistent data in PersistentVolume volumes, so connect at least one of the supported storage types to the cluster. For production, use storage with data replication between nodes, for example, replicated storage based on DRBD, so the data stays available if a node fails. If you use software-defined storage (SDS), add dedicated disks for data to its nodes.
Set the default StorageClass in the defaultClusterStorageClass global parameter. Volumes that do not specify a storage class explicitly get this class.
Virtualization
If virtual machines (VMs) will run in the cluster, follow the recommendations in this section together with the other recommendations of this guide.
Node requirements for VMs
A cluster with VMs must meet the following requirements:
- VMs run on physical servers (bare metal).
- CPUs of nodes for VMs support Intel-VT (VMX) or AMD-V (SVM) instructions, and hardware virtualization is enabled in BIOS or UEFI settings.
- All cluster nodes run the same Linux kernel version.
The same kernel version is necessary for stable VM live migration, because system calls and resource handling differ between kernel versions.
Use virtual machines instead of physical servers as nodes only for demonstration purposes. In this case, enable nested virtualization.
Number of VMs per node
The number of VMs per node is limited by the pod limit, which VMs, containers, and system components share. A running VM with disks usually occupies two pods, because besides the VM pod, a service pod runs on the node and attaches the VM disks and images. It serves disks added with the VirtualMachineBlockDeviceAttachment resource and all disks of a VM with paravirtualization enabled (the .spec.enableParavirtualization parameter, enabled by default). During live migration, the same pods start on the target node, so take them into account when you select the node subnet size.
VM subnets
VMs get IP addresses in the main cluster network from the subnets listed in the virtualMachineCIDRs parameter of the virtualization module. Select these subnets so that they do not overlap with the node network or the cluster subnets, otherwise address conflicts occur.
Specify a subnet by its start address aligned to the mask, for example, 192.168.1.192/27, not 192.168.1.190/27. You can specify several subnets and add new ones later, but you cannot delete a subnet while VirtualMachineIPAddress resources hold addresses from it.
The virtualMachineCIDRs parameter is optional. Without it, VMs cannot work in the main cluster network or get addresses with the VirtualMachineIPAddress resource, so you can connect them only to additional networks. VM network configuration is described in the Virtual machine networking section.
Live migration network
By default, live migration traffic goes through the main node network, competes with workloads for bandwidth, and is limited to 640 MiB/s per migration. To keep migrations from affecting workloads and to make them faster, send them to a dedicated network in the liveMigration.network parameter of the virtualization module, where the platform does not limit the speed by default. This requires the sdn module to be enabled and the SystemNetwork resource to be in the Ready state. The configuration is described in the Dedicated migration network section.
Running VMs on master nodes
You need to run VMs on master nodes if the cluster has no separate nodes for workloads, for example, in a single-node cluster. To run VMs on master nodes, remove the taints from the master node group in the nodeTemplate.taints parameter or set tolerations for the selected VMs. Set tolerations in a VM with the .spec.tolerations parameter or in a VM class with the .spec.tolerations parameter. Removing the taints lets any workload run on master nodes, and tolerations let only the VMs that have them run there.
Storage for VM disks
VM disks and images are stored in PersistentVolume volumes, so select storage for them according to the recommendations in the Storage section. If VM disks will be stored in software-defined storage, take their size into account when you add disks to the nodes of this storage.
Live migration of VMs with local disks is available only in commercial Deckhouse Platform editions, where the disks move together with the VM. In Deckhouse Platform Open, a VM with a local disk cannot move to another node, so you have to stop it during node maintenance.
Image storage
The platform stores VM images in the internal image storage (DVCR), which runs as a single instance on one persistent volume. The storage class and size of this volume are set in the dvcr.storage parameter of the virtualization module. After the volume is created, you can only increase its size, and you cannot change its storage class, so select the class in advance. Use replicated storage for DVCR so that the images stay available if a node fails.
VM classes
Create your own VM classes (the VirtualMachineClass resource) and do not use the generic class for production workloads. The platform creates the generic class during installation with the Nehalem CPU model. This model supports the smallest instruction set, so VMs of the generic class start on any node but do not get the instructions of modern CPUs.
Mark your main class with the virtualmachineclass.virtualization.deckhouse.io/is-default-class annotation set to true, and the platform will set it for VMs that do not specify a class. Do not set this annotation on the generic class, because it can be lost when the module is updated.
The CPU type of a class is set by the .spec.cpu.type parameter and defines the nodes between which VMs can migrate. You cannot change it after you create the class, so select the type in advance:
Hostgives a VM an instruction set close to the node CPU. VMs migrate only between nodes with similar CPUs. Migration between Intel and AMD CPUs or between different CPU generations is not possible.HostPassthroughpasses the node CPU to a VM without changes. VMs migrate only to nodes with exactly the same CPU.Discoverybuilds a common instruction set for the selected nodes and suits a cluster with different CPUs. The set is fixed when the class is created and does not change when nodes are added to the cluster.
The other CPU types are described in the Virtual processor of virtual machines section.
The .spec.sizingPolicies parameter sets the sizing policies of a class. The policies limit the number of cores, the memory size, and the core fraction for VMs of this class. The core fraction is the part of physical core CPU time that the platform guarantees to a VM. The allowed fraction values in the coreFractions parameter define how strong CPU oversubscription can be. Oversubscription configuration is described in the CPU oversubscription for virtual machines section.
Access control
Configure user authentication and grant permissions with the granular role-based model. Create projects for teams.
You can create users and groups in the cluster with the User and Group resources of the user-authn module or get them from external authentication providers. The platform supports providers that use OIDC, SAML, and LDAP, as well as GitHub, GitLab, Atlassian Crowd, and Bitbucket Cloud. You can connect several providers to the cluster at the same time. Provider configuration is described in the Integration with external authentication providers section, and creating users in the cluster is described in the Local authentication section.
To isolate team workloads from each other, create projects for the teams (the Project resource of the multitenancy-manager module). A project is created from a template that sets resource limits, network isolation, and a security profile. Project management is described in the Project management section.
Grant permissions with the granular role-based model of the user-authz module. The model uses standard Kubernetes RBAC resources and the roles that the module creates. Each role acts in one of four scopes:
- Namespace. The
d8:namespace:<LEVEL>roles grant permissions to application users in one namespace and are assigned with a RoleBinding resource. - Project. The
d8:project:<LEVEL>roles grant permissions to teams in all namespaces of a project at once and are assigned with a ProjectRoleBinding resource. - Subsystem. The
d8:subsystem:<SUBSYSTEM>:<LEVEL>roles grant permissions to administrators of a part of the platform, for example, the network, and are assigned with a ClusterRoleBinding resource. - Entire platform. The
d8:system:<LEVEL>roles grant permissions to platform administrators and are assigned with a ClusterRoleBinding resource.
Here, <LEVEL> is the access level, for example, viewer or manager, and <SUBSYSTEM> is the subsystem name.
The basic role-based model, built on the ClusterAuthorizationRule and AuthorizationRule resources, still works, but its support will be discontinued in future releases.
Configuring alerts
Monitoring will work once the platform is installed, however, it is not enough for production clusters. Configure the Alertmanager built in the platform or connect your own Alertmanager to receive incident notifications.
Using the CustomAlertmanager custom resource, you can configure sending alerts to an e-mail, Slack, Telegram, via the webhook, or by other means.
For the list of all available alerts in the Deckhouse Platform monitoring system, refer to the corresponding documentation page.
Collecting logs
Configure centralized log collection.
Set up centralized log collection from system and user applications using the log-shipper module.
All you have to do is to create a custom resource specifying what to collect: ClusterLoggingConfig or PodLoggingConfig; and create a custom resource that specifies where to send the collected logs: ClusterLogDestination.
Reference:
Backups
Set up etcd backups. Have a backup plan ready at all times.
At a minimum, set up etcd backups. This will be your last chance to restore the cluster should things go awry. Keep these backups as away from your cluster as possible.
The backups won’t help if they don’t work or if you don’t know how to use them to recover the cluster. Compile a Disaster Recovery Plan (DRP) with specific steps and commands to restore the cluster from a backup. The restore procedures are described in the Backup and restore section.
This plan should be periodically updated and tested in drills.
Community
Follow the project channel on Telegram for news and updates.
Join the community to keep up with important news and developments. This will help you to share experiences with people who are doing the same thing as you are and avoid typical problems.
Running production in Kubernetes takes effort. Share your experience with Deckhouse Platform in the community to help others switch to Kubernetes.