The module lifecycle stage: General Availability
To use ContainerdV2 as the container runtime on cluster nodes, the operating systems on virtual machines must meet the following requirements:
- Linux kernel version 5.8 or newer, except for the ranges 6.12.0–6.12.28 or 6.14.0–6.14.6 (these versions are affected by CVE-2025-37999 in EROFS).
CgroupsV2support.- Systemd version
244or newer. erofskernel module support.
For more information, see the documentation.
The cloud-init package must be installed on the VMs. After the virtual machine is started, the following services associated with this package must be started:
cloud-config.service;cloud-final.service;cloud-init.service.
The provider supports working with only one disk in the virtual machine template. Make sure the template contains only one disk.
Creating a service account
You need to create a service account with the editor role with the cloud provider so that Deckhouse Kubernetes Platform can manage cloud resources. The detailed instructions for creating a service account with Yandex Cloud are available in the provider’s documentation. Below, we will provide a brief overview of the necessary actions:
-
Create a user named
deckhouse. The command response will contain its parameters:yc iam service-account create --name deckhouse id: <userID> folder_id: <folderID> created_at: "YYYY-MM-DDTHH:MM:SSZ" name: deckhouse -
Assign the required roles to the newly created user for your cloud:
yc resource-manager folder add-access-binding --id <folderID> --role compute.editor --subject serviceAccount:<userID> yc resource-manager folder add-access-binding --id <folderID> --role vpc.admin --subject serviceAccount:<userID> yc resource-manager folder add-access-binding --id <folderID> --role load-balancer.editor --subject serviceAccount:<userID> -
Create a JSON file containing the parameters for user authorization in the cloud. These parameters will be used to log in to the cloud:
yc iam key create --service-account-name deckhouse --output deckhouse-sa-key.json
You may need to increase quotas.
Reserve a public IP address if necessary.
Quotas
Note that you need to increase the quotas using the Yandex console when provisioning a new cluster.
Recommended quotas for a new cluster:
- The number of virtual processors: 64.
- The total volume of SSD disks: 2000 GB.
- The number of virtual machines: 25.
- The total amount of RAM of virtual machines: 256 GB.
Yandex Cloud integration
Configuring security groups
When creating a cloud network, Yandex Cloud creates a default security group for all networks, including the Deckhouse Kubernetes Platform cluster network. The default security group contains rules that allow for any traffic to pass in any direction (inbound and outbound) and applies to all subnets within the cloud network, unless an object (VM interface) is explicitly assigned to a different security group. You can change the default security group rules if you need to control traffic in your cluster.
Do not delete the default rules that allow for traffic to pass in any direction before finishing configuring all the other rules for the security group. Doing so may disrupt the performance of the cluster.
This section provides general guidelines for setting up a security group. Incorrect configuration of security groups may affect the performance of the cluster. Please consult security group usage details in Yandex Cloud before using it in production environments.
-
Find out in which cloud network the Deckhouse Kubernetes Platform cluster is running.
The network name matches the
prefixfield of the ClusterConfiguration resource. It can be retrieved using the following command:d8 k get secrets -n kube-system d8-cluster-configuration -ojson | \ jq -r '.data."cluster-configuration.yaml"' | base64 -d | grep prefix | cut -d: -f2 -
In the Yandex Cloud console, select the Virtual Private Cloud service and navigate to the Security Groups section. You should see a single security group labeled
Default.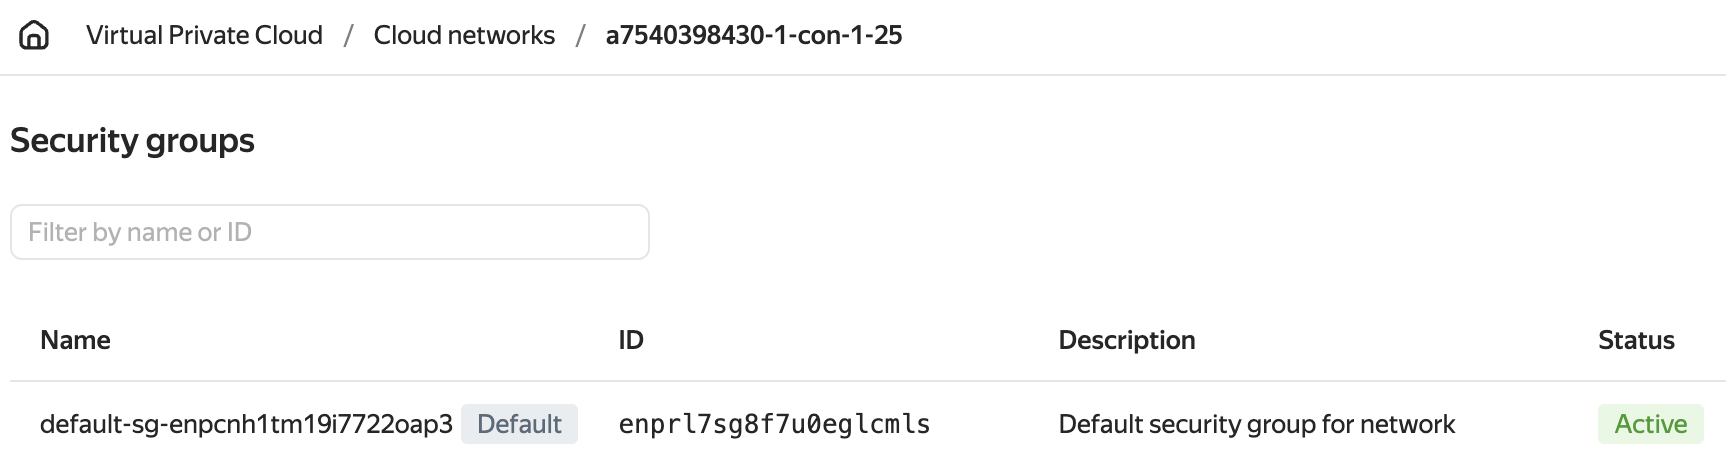
-
Create rules as described in Yandex Cloud instructions.
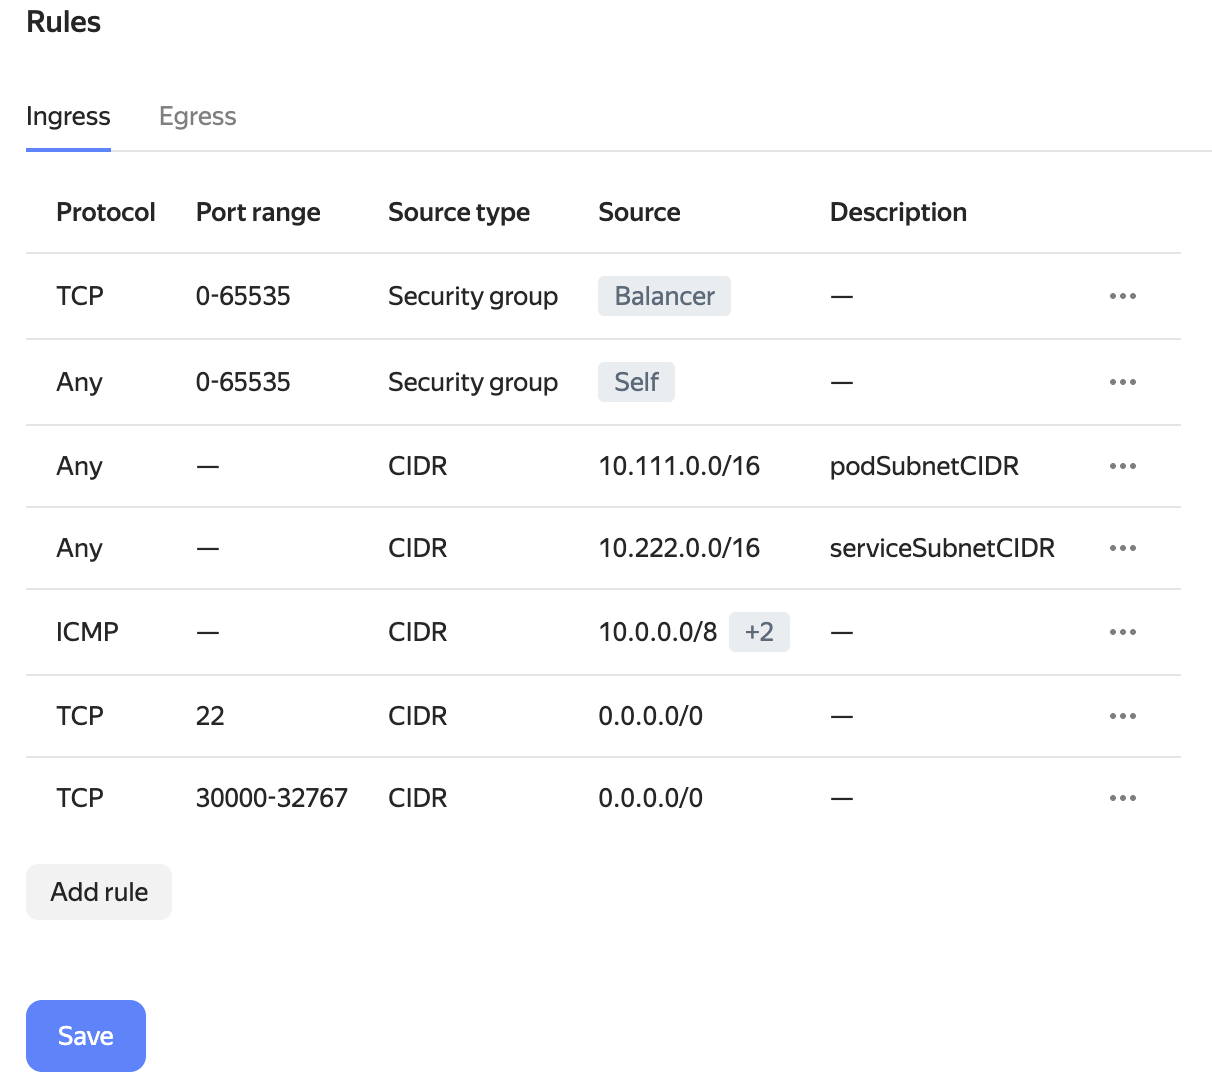
-
Delete the rule that allows for any inbound traffic (in the screenshot above it has already been deleted), and save the changes.
Yandex Lockbox integration
The External Secrets Operator allows you to synchronize Yandex Lockbox secrets with the Deckhouse Kubernetes Platform cluster secrets.
The instructions below are meant to be viewed as a Quick Start guide. To use integration in production environments, please review the following resources:
Deployment instructions
-
Create a service account required for the External Secrets Operator:
yc iam service-account create --name eso-service-account -
Create an authorized key for the service account and save it to a file:
yc iam key create --service-account-name eso-service-account --output authorized-key.json -
Assign
lockbox.editor,lockbox.payloadViewer, andkms.keys.encrypterDecrypterroles to a service account to access all catalog secrets:folder_id=<folder id> yc resource-manager folder add-access-binding --id=${folder_id} --service-account-name eso-service-account --role lockbox.editor yc resource-manager folder add-access-binding --id=${folder_id} --service-account-name eso-service-account --role lockbox.payloadViewer yc resource-manager folder add-access-binding --id=${folder_id} --service-account-name eso-service-account --role kms.keys.encrypterDecrypterFor advanced customization, check out access control in Yandex Lockbox.
-
Install the External Secrets Operator using the Helm chart according to instructions.
Note that you may need to set
nodeSelector,tolerationsand other parameters. To do this, use the./external-secrets/values.yamlfile after unpacking the Helm chart.Pull and extract the chart:
helm pull oci://cr.yandex/yc-marketplace/yandex-cloud/external-secrets/chart/external-secrets \
  --version 0.5.5 \
  --untar
Install the Helm chart:
helm install -n external-secrets --create-namespace \
  --set-file auth.json=authorized-key.json \
  external-secrets ./external-secrets/
Where:
authorized-key.json— the name of the file with the authorized key from step 2.
-
Create a SecretStore with the
sa-credssecret in it:d8 k -n external-secrets apply -f - <<EOF apiVersion: external-secrets.io/v1alpha1 kind: SecretStore metadata: name: secret-store spec: provider: yandexlockbox: auth: authorizedKeySecretRef: name: sa-creds key: key EOFWhere:
sa-creds— the name of theSecretthat contains the authorized key. This secret should show up after the Helm chart has been installed.key— the name of the key in the.datafield of the secret above.
Checking that everything works as expected
-
Check the status of the External Secrets Operator and the secrets store you created:
$ d8 k -n external-secrets get po NAME READY STATUS RESTARTS AGE external-secrets-55f78c44cf-dbf6q 1/1 Running 0 77m external-secrets-cert-controller-78cbc7d9c8-rszhx 1/1 Running 0 77m external-secrets-webhook-6d7b66758-s7v9c 1/1 Running 0 77m $ d8 k -n external-secrets get secretstores.external-secrets.io NAME AGE STATUS secret-store 69m Valid -
Create a Yandex Lockbox secret with the following parameters:
- Name —
lockbox-secret. - Key — enter the non-confidential identifier
password. - Value — enter the confidential data to store
p@$$w0rd.
- Name —
-
Create an ExternalSecret object that refers to the
lockbox-secretsecret in thesecret-store:d8 k -n external-secrets apply -f - <<EOF apiVersion: external-secrets.io/v1alpha1 kind: ExternalSecret metadata: name: external-secret spec: refreshInterval: 1h secretStoreRef: name: secret-store kind: SecretStore target: name: k8s-secret data: - secretKey: password remoteRef: key: <SECRET_ID> property: password EOFWhere:
spec.target.name— the name of the new secret. The External Secrets Operator will create this secret in the Deckhouse Kubernetes Platform cluster and populate it with the parameters of the Yandex Lockbox’slockbox-secret.spec.data[].secretKey— the name of the key in the.datafield of the secret that the External Secrets Operator will create.spec.data[].remoteRef.key— identifier of the Yandex Lockbox’slockbox-secretcreated earlier, e.g.,e6q28nvfmhu539******.spec.data[].remoteRef.property— the key you specified earlier for the Yandex Lockbox’slockbox-secret.
-
Make sure that the new
k8s-secretkey contains thelockbox-secretvalue:d8 k -n external-secrets get secret k8s-secret -ojson | jq -r '.data.password' | base64 -dThe output of the command should contain the value of the
passwordkey of thelockbox-secretcreated earlier:p@$$w0rd
Yandex Managed Service for Prometheus integration
This integration lets you use the Yandex Managed Service for Prometheus as an external metrics repository, e.g., for long-term metrics storage.
Writing metrics
- Create a service account with the
monitoring.editorrole. - Create an API key for the service account.
-
Create a PrometheusRemoteWrite resource:
d8 k apply -f - <<EOF
apiVersion: deckhouse.io/v1
kind: PrometheusRemoteWrite
metadata:
  name: yc-remote-write
spec:
  url: <URL_TO_WRITE_METRICS>
  bearerToken: <API_KEY>
EOF
Where:
<URL_TO_WRITE_METRICS>— URL from the Yandex Monitoring/Prometheus/Writing Metrics page.<API_KEY>— the API key you created in the previous step, e.g.,AQVN1HHJRSrfo9jU3aopsXrJyfq_UHs********.
You may also specify additional parameters; refer to the documentation.
More details about this feature can be found in Yandex Cloud documentation.
Reading metrics with Grafana
- Create a service account with the
monitoring.viewerrole. - Create an API key for the service account.
-
Create a GrafanaAdditionalDatasource resource:
d8 k apply -f - <<EOF

apiVersion: deckhouse.io/v1
kind: GrafanaAdditionalDatasource
metadata:
  name: managed-prometheus
spec:
  type: prometheus
  access: Proxy
  url: <URL_READING_METRICS_WITH_GRAFANA>
  basicAuth: false
  jsonData:
    timeInterval: 30s
    httpMethod: POST
    httpHeaderName1: Authorization
  secureJsonData:
    httpHeaderValue1: Bearer <API_KEY>
EOF
Where:
<URL_READING_METRICS_WITH_GRAFANA>— URL from the Yandex Monitoring/Prometheus/Reading Metrics with Grafana page.<API_KEY>— the API key you created in the previous step, e.g.,AQVN1HHJReSrfo9jU3aopsXrJyfq_UHs********.
You may also specify additional parameters; refer to the documentation.
More details about this feature can be found in Yandex Cloud documentation.