Available with limitations in: Certified Core/CSE Lite (1.73), Certified Pro/CSE Pro (1.73)
Available without limitations in: Ultimate/EE
Included in extensions: Storage Integration
The module lifecycle stage: Generally available version
The module has requirements for installation
How much of a volume is reserved for the superuser?
Nothing, by default: the module tells Trident to format with -m0, so the whole volume is available to the workload.
Where the classic 5% ext4 reserve is wanted — for example to keep a filesystem writable for a privileged process after a workload has filled it — annotate the NetappStorageConnection with the percentage to reserve:
d8 k annotate netappstorageconnection <name> storage.deckhouse.io/ext4-reserved-percent=5Note the resource: unlike the other storage modules, the percentage is set per connection, not per StorageClass. Trident keeps the mkfs options on the backend, so the value applies to every StorageClass served by that connection.
The value is a whole number of percent between 0 and 50; an invalid one leaves the NetappStorageConnection with Ready=False and the reason in its status, instead of breaking volume creation later.
The reserve applies only to volumes created after the annotation was set — filesystems that already exist keep the reserve they were created with.
Where do open-iscsi and multipath-tools on a node come from?
From the module itself. The NodeGroupConfiguration never asks the node’s package manager for them, so a node in a closed environment with no route to the distribution’s repositories is set up the same way as any other, and no bashible run waits on those repositories.
On every node it serves — those carrying storage.deckhouse.io/csi-netapp-node — bashible pulls the module’s package image iscsi-tools from the module’s registry, unpacks it and runs its install script. The stack is two pairs — iscsiadm with iscsid, and multipath with multipathd — and the script decides for each pair separately:
- a pair the host already has of its own stays the host’s, and the module only enables and configures the distribution’s unit for its daemon;
- a pair the host lacks lands under
/var/lib/deckhouse/sds/csi-netapp, every binary is started through its own dynamic loader with its own library path, and a unit of the module’s comes up for its daemon.
A client and its daemon always come from the same source, because iscsiadm of one version does not speak to iscsid of another. The two pairs do not talk to each other, so a node may well run the host’s iscsid next to the module’s multipathd.
Everything else the NodeGroupConfiguration does runs the same whichever pair came from where: the find_multipaths no override, the NetApp ONTAP device block, the kernel modules, and the storage.deckhouse.io/csi-netapp-node-ready label the CSI node waits for.
Two things the install script arranges for a pair it lands that are worth knowing about, because both are invisible until something does not mount.
Trident reaches iscsiadm, multipath and multipathd on the host by name, through nsenter, so each name is resolved against the container’s PATH inside the host’s mount namespace. The script leaves a wrapper in /usr/local/sbin for each of these tools that comes from the module, and each wrapper prefers a distribution binary the moment one appears.
And multipathd from the package reads its configuration under the prefix it was built with, not under /etc. The script links multipath.conf and multipath from that prefix onto the node’s own. Without that link Trident’s own pre-flight checks see find_multipaths: yes and refuse to stage a volume at all.
To tell which pair a node took from where, look at what is running on it:
# the distribution's daemons
systemctl is-active iscsid multipathd
# the module's daemons and binaries
systemctl is-active d8-csi-netapp-iscsid.service d8-csi-netapp-multipathd.service
ls /var/lib/deckhouse/sds/csi-netapp/bin
multipathd show config | grep find_multipaths
The module’s stack changes little on the host itself. Its libraries are never merged into the host’s /lib64 or /usr/lib. The only files it puts outside its own directory are the wrappers and links described above and the multipath path checkers in /usr/lib/multipath, where multipathd looks for them; each of them only where the host has no file of its own, and each taken back once the host has the pair it belongs to. And it does not touch /etc/iscsi/initiatorname.iscsi when the node already has one: the IQN is the node’s identity on the array, registered there in a host object, and a node that comes back under a different name is a node the array has never heard of.
How to explicitly enable or disable the module…
You may explicitly enable or disable the module in one of the following ways:
-
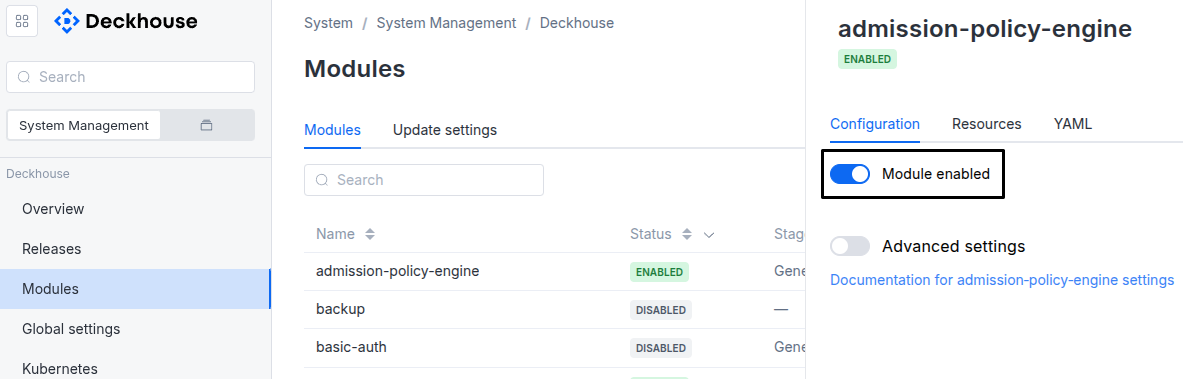
Via Deckhouse web UI. In the “System” → “System Management” → “Deckhouse” → “Modules” section, open the
csi-netappmodule and enable (or disable) the “Module enabled” toggle. Save changes.Example:
-
Via Deckhouse CLI (d8).
Use the d8 system module enable command for enabling, or d8 system module disable command for disabling the module (you need Deckhouse CLI (d8), configured to work with the cluster).
Example of enabling the module:
d8 system module enable csi-netapp -
Using ModuleConfig
csi-netapp.Set
spec.enabledtotrueorfalsein ModuleConfigcsi-netapp(create it if necessary).Example of a manifest to enable module
csi-netapp:apiVersion: deckhouse.io/v1alpha1 kind: ModuleConfig metadata: name: csi-netapp spec: enabled: true
You can configure the module in one of the following ways:
-
Via Deckhouse web UI.
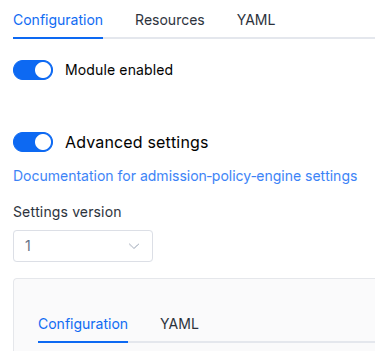
In the “System” → “System Management” → “Deckhouse” → “Modules” section, open the
csi-netappmodule and enable the “Advanced Settings” toggle. Fill in the required fields in the “Configuration” tab or specify the module settings in YAML format on the “YAML” tab, without the top-levelsettingskey. Save the changes.Example:
You can also edit the ModuleConfig object
csi-netappon the “YAML” tab in the module settings window (“System” → “System Management” → “Deckhouse” → “Modules”, open the modulecsi-netapp) by specifying the schema version in thespec.versionparameter and the necessary module parameters in thespec.settingssection. -
Via Deckhouse CLI (d8) (requires Deckhouse CLI (d8) configured to work with the cluster).
Edit the existing ModuleConfig
csi-netapp(for more details on configuring Deckhouse Platform, see the documentation) by executing the following command:d8 k edit mc csi-netappMake the necessary changes in the
spec.settingssection. If necessary, specify the schema version in thespec.versionparameter. Save the changes.You can also create a manifest file for ModuleConfig
csi-netappusing the example below. Fill in thespec.settingssection with the required module parameters. If necessary, specify the schema version in thespec.versionparameter.Apply the manifest using the following command (indicate the manifest file name):
d8 k apply -f <FILENAME>Example of a manifest for ModuleConfig
csi-netapp:apiVersion: deckhouse.io/v1alpha1 kind: ModuleConfig metadata: name: csi-netapp spec: version: 1 enabled: true settings: # Module parameters from the "Parameters" section below.
Requirements
To the Deckhouse Platform version: 1.72 and above.
Parameters
Schema version: 1
-
-
stringsettings.logLevelThe verbosity level of the module’s log output.
Default:
INFOAllowed values:
ERROR,WARN,INFO,DEBUG,TRACE -
objectsettings.nodeSelectorSpecifies where shares can be mounted. Works the same way as the
spec.nodeSelectorparameter in Kubernetes Pods. If this parameter is omitted, NetApp shares can be mounted on any node in the cluster running theLinuxOS.Default:
{ "kubernetes.io/os": "linux" } -
array of stringssettings.storageClassLabelIgnoredPrefixes
List of label-key prefixes that MUST NOT be propagated from a NetappStorageClass to the managed Kubernetes StorageClass.
The controller treats this list as a complement to a built-in (system) list and drops any NetappStorageClass label whose key starts with any prefix from either list.
The defaults cover labels typically added by GitOps tooling (Argo CD, Flux, Rancher Fleet) so that their reconcilers do not fight the storage controller over labels on the managed StorageClass.
Default:
[
 "argocd.argoproj.io/",
 "kustomize.toolkit.fluxcd.io/",
 "helm.toolkit.fluxcd.io/",
 "fleet.cattle.op/"
]
-