The module lifecycle stage: General Availability
The module has requirements for installation
Circuit Breaker
The outlierDetection settings in the DestinationRule custom resource help to determine whether some endpoints do not behave as expected.
Refer to the Envoy documentation for more details on the Outlier Detection algorithm.
Example:
apiVersion: networking.istio.io/v1beta1
kind: DestinationRule
metadata:
  name: reviews-cb-policy
spec:
  host: reviews.prod.svc.cluster.local
  trafficPolicy:
    connectionPool:
      tcp:
        maxConnections: 100 # The maximum number of connections to the host (cumulative for all endpoints)
      http:
        maxRequestsPerConnection: 10 # The connection will be re-established after every 10 requests
    outlierDetection:
      consecutive5xxErrors: 7 # Seven consecutive errors are allowed (including 5XX, TCP and HTTP timeouts)
      interval: 5m            # over 5 minutes.
      baseEjectionTime: 15m   # Upon reaching the error limit, the endpoint will be excluded from balancing for 15 minutes.
Additionally, the VirtualService resource is used to configure the HTTP timeouts. These timeouts are also taken into account when calculating error statistics for endpoints.
Example:
apiVersion: networking.istio.io/v1beta1
kind: VirtualService
metadata:
  name: my-productpage-rule
  namespace: myns
spec:
  hosts:
  - productpage
  http:
  - timeout: 5s
    route:
    - destination:
        host: productpage
gRPC balancing
Assign a name with the grpc prefix or value to the port in the corresponding service to make gRPC service balancing start automatically.
Locality Failover
Read the Istio Locality Failover documentation if needed.
Istio allows you to configure a priority-based locality (geographic location) failover between endpoints. Istio uses node labels with the appropriate hierarchy to define the zone:
topology.istio.io/subzonetopology.kubernetes.io/zonetopology.kubernetes.io/region
This comes in handy for inter-cluster failover when used together with a multicluster.
The Locality Failover can be enabled using the DestinationRule CR. Note that you also have to configure the outlierDetection.
Example:
apiVersion: networking.istio.io/v1beta1
kind: DestinationRule
metadata:
  name: helloworld
spec:
  host: helloworld
  trafficPolicy:
    loadBalancer:
      localityLbSetting:
        enabled: true # Locality Failover is enabled
    outlierDetection: # outlierDetection must be enabled
      consecutive5xxErrors: 1
      interval: 1s
      baseEjectionTime: 1m
Retry
You can use the VirtualService resource to configure Retry for requests.
All requests (including POST ones) are retried three times by default.
Example:
apiVersion: networking.istio.io/v1beta1
kind: VirtualService
metadata:
  name: ratings-route
spec:
  hosts:
  - ratings.prod.svc.cluster.local
  http:
  - route:
    - destination:
        host: ratings.prod.svc.cluster.local
    retries:
      attempts: 3
      perTryTimeout: 2s
      retryOn: gateway-error,connect-failure,refused-stream
Canary
Istio is only responsible for flexible request routing that relies on special request headers (such as cookies) or simply randomness. The CI/CD system is responsible for customizing this routing and switching between canary versions.
The idea is that two Deployments with different versions of the application are deployed in the same namespace. The Pods of different versions have different labels (version: v1 and version: v2).
You have to configure two custom resources:
- A DestinationRule – defines how to identify different versions of your application (subsets);
- A VirtualService – defines how to balance traffic between different versions of your application.
Example:
apiVersion: networking.istio.io/v1beta1
kind: DestinationRule
metadata:
  name: productpage-canary
spec:
  host: productpage
  # subsets are only available when accessing the host via the VirtualService from a Pod managed by Istio.
  # These subsets must be defined in the routes.
  subsets:
  - name: v1
    labels:
      version: v1
  - name: v2
    labels:
      version: v2
Cookie-based routing
apiVersion: networking.istio.io/v1beta1
kind: VirtualService
metadata:
  name: productpage-canary
spec:
  hosts:
  - productpage
  http:
  - match:
    - headers:
       cookie:
         regex: "^(.*;?)?(canary=yes)(;.*)?"
    route:
    - destination:
        host: productpage
        subset: v2 # The reference to the subset from the DestinationRule.
  - route:
    - destination:
        host: productpage
        subset: v1
Probability-based routing
apiVersion: networking.istio.io/v1beta1
kind: VirtualService
metadata:
  name: productpage-canary
spec:
  hosts:
  - productpage
  http:
  - route:
    - destination:
        host: productpage
        subset: v1 # The reference to the subset from the DestinationRule.
      weight: 90 # Percentage of traffic that the Pods with the version: v1 label will be getting.
  - route:
    - destination:
        host: productpage
        subset: v2
      weight: 10
Ingress to publish applications
Istio Ingress Gateway
The IngressIstioController custom resource spins up a dedicated Istio Ingress Gateway proxy. Each controller instance gets its own gateway class, and you select the instance from an Istio Gateway resource by referencing the matching istio.deckhouse.io/ingress-gateway-class label. The module manages the gateway workload and its Service, while the Gateway and routing resources (VirtualService) remain yours to manage.
Start by creating an IngressIstioController. In the example below, HTTP and HTTPS are exposed on the selected frontend nodes using host ports:
apiVersion: deckhouse.io/v1alpha1
kind: IngressIstioController
metadata:
  name: main
spec:
  # The value selected by Gateway resources via the istio.deckhouse.io/ingress-gateway-class label.
  ingressGatewayClass: istio-hp
  # IngressIstioController works with LoadBalancer, NodePort, and HostPort inlets.
  inlet: HostPort
  hostPort:
    httpPort: 80
    httpsPort: 443
  nodeSelector:
    node-role.deckhouse.io/frontend: ""
  tolerations:
    - effect: NoExecute
      key: dedicated.deckhouse.io
      operator: Equal
      value: frontend
  resourcesRequests:
    mode: VPA
Note that the TLS secret for an ingress gateway must be created in the d8-ingress-istio namespace, not in your application’s namespace — this is an easy detail to miss.
apiVersion: v1
kind: Secret
metadata:
  name: app-tls-secret
  namespace: d8-ingress-istio # note the namespace isn't app-ns
type: kubernetes.io/tls
data:
  tls.crt: |
    <tls.crt data>
  tls.key: |
    <tls.key data>
apiVersion: networking.istio.io/v1beta1
kind: Gateway
metadata:
  name: gateway-app
  namespace: app-ns
spec:
  selector:
    # label selector for using the Istio Ingress Gateway main-hp
    istio.deckhouse.io/ingress-gateway-class: istio-hp
  servers:
    - port:
        # standard template for using the HTTP protocol
        number: 80
        name: http
        protocol: HTTP
      hosts:
        - app.example.com
    - port:
        # standard template for using the HTTPS protocol
        number: 443
        name: https
        protocol: HTTPS
      tls:
        mode: SIMPLE
        # a secret with a certificate and a key, which must be created in the d8-ingress-istio namespace
        # supported secret formats can be found at https://istio.io/latest/docs/tasks/traffic-management/ingress/secure-ingress/#key-formats
        credentialName: app-tls-secret
      hosts:
        - app.example.com
apiVersion: networking.istio.io/v1beta1
kind: VirtualService
metadata:
  name: vs-app
  namespace: app-ns
spec:
  gateways:
    - gateway-app
  hosts:
    - app.example.com
  http:
    - route:
        - destination:
            host: app-svc
For the full list of controller settings — load-balancer annotations, network topology, scheduling, and resource management — see the IngressIstioController custom resource reference.
Preserving client attributes behind external proxies
When the gateway is deployed behind other proxies or load balancers (for example, a cloud load balancer or a reverse proxy), configure spec.networkTopology so that the gateway can correctly extract the client’s original attributes, such as the source IP address. See Configuring Gateway Network Topology in the Istio documentation for details.
Use numTrustedProxies when the upstream proxies pass the client IP address in the X-Forwarded-For header. Set it to the number of trusted proxies deployed in front of the gateway so that Istio extracts the correct client address and populates the X-Envoy-External-Address header for upstream services. For example, if a cloud load balancer and a reverse proxy sit in front of the gateway, set the value to 2:
apiVersion: deckhouse.io/v1alpha1
kind: IngressIstioController
metadata:
  name: main
spec:
  ingressGatewayClass: istio-hp
  inlet: LoadBalancer
  networkTopology:
    numTrustedProxies: 2
  nodeSelector:
    node-role.deckhouse.io/frontend: ""
  resourcesRequests:
    mode: VPA
Use proxyProtocol when an upstream L4/TCP load balancer forwards the client attributes via the PROXY protocol instead of HTTP headers. When this parameter is enabled, the gateway starts parsing the PROXY protocol header on incoming TCP connections:
apiVersion: deckhouse.io/v1alpha1
kind: IngressIstioController
metadata:
  name: main
spec:
  ingressGatewayClass: istio-hp
  inlet: LoadBalancer
  networkTopology:
    proxyProtocol: true
  nodeSelector:
    node-role.deckhouse.io/frontend: ""
  resourcesRequests:
    mode: VPA
numTrustedProxies and proxyProtocol can be used together. When both are configured and an incoming request contains an X-Forwarded-For header, Istio uses the trusted X-Forwarded-For chain in preference to the PROXY protocol attributes.
Managing gateway resource requests
Use spec.resourcesRequests to control CPU and memory requests for the ingress gateway pods. Two modes are available:
-
Static— requests are specified directly and stay fixed:apiVersion: deckhouse.io/v1alpha1 kind: IngressIstioController metadata: name: main spec: ingressGatewayClass: istio-hp inlet: HostPort hostPort: httpPort: 80 httpsPort: 443 resourcesRequests: mode: Static static: cpu: 100m memory: 128Mi -
VPA— a Vertical Pod Autoscaler adjusts requests within the configuredmin/maxbounds. Starting from DP version 1.75, the recommended VPA mode isInPlaceOrRecreate, which updates pod resources in place when the cluster supports it and falls back to recreating the pod otherwise (the legacyAutomode always recreates the pod):apiVersion: deckhouse.io/v1alpha1 kind: IngressIstioController metadata: name: main spec: ingressGatewayClass: istio-hp inlet: HostPort hostPort: httpPort: 80 httpsPort: 443 resourcesRequests: mode: VPA vpa: mode: InPlaceOrRecreate cpu: min: 100m max: 1000m memory: min: 128Mi max: 2000Mi
Ingress NGINX
To use Ingress, you need to:
- Configure the Ingress controller by adding Istio sidecar to it. In our case, you need to enable the
enableIstioSidecarparameter in the ingress-nginx module’s IngressNginxController custom resource. - Set up an Ingress that refers to the Service. The following annotations are mandatory for Ingress:
nginx.ingress.kubernetes.io/service-upstream: "true"— using this annotation, the Ingress controller sends requests to a single ClusterIP (from Service CIDR) while envoy load balances them. Ingress controller’s sidecar is only catching traffic directed to Service CIDR.nginx.ingress.kubernetes.io/upstream-vhost: myservice.myns.svc— using this annotation, the sidecar container can identify the application service that serves requests.
Examples:
apiVersion: networking.k8s.io/v1
kind: Ingress
metadata:
  name: productpage
  namespace: bookinfo
  annotations:
    # Nginx proxies traffic to the ClusterIP instead of pods' own IPs.
    nginx.ingress.kubernetes.io/service-upstream: "true"
    # In Istio, all routing is carried out based on the `Host:` headers.
    # Instead of letting Istio know about the `productpage.example.com` external domain,
    # we use the internal domain of which Istio is aware.
    nginx.ingress.kubernetes.io/upstream-vhost: productpage.bookinfo.svc
spec:
  rules:
    - host: productpage.example.com
      http:
        paths:
        - path: /
          pathType: Prefix
          backend:
            service:
              name: productpage
              port:
                number: 9080
apiVersion: v1
kind: Service
metadata:
  name: productpage
  namespace: bookinfo
spec:
  ports:
  - name: http
    port: 9080
  selector:
    app: productpage
  type: ClusterIP
Authorization configuration examples
Decision-making algorithm
The following algorithm for deciding the fate of a request becomes active after AuthorizationPolicy is created for the application:
- The request is denied if it falls under the DENY policy;
- The request is allowed if there are no ALLOW policies for the application;
- The request is allowed if it falls under the ALLOW policy.
- All other requests are denied.
In other words, if you explicitly deny something, then only this restrictive rule will work. If you explicitly allow something, only explicitly authorized requests will be allowed (however, restrictions will stay in force and have precedence).
The policies based on high-level parameters like namespace or principal require enabling Istio for all involved applications. Also, there must be organized Mutual TLS between applications.
Examples:
-
Let’s deny POST requests for the myapp application. Since a policy is defined, only POST requests to the application are denied (as per the algorithm above).
apiVersion: security.istio.io/v1beta1 kind: AuthorizationPolicy metadata: name: deny-post-requests namespace: foo spec: selector: matchLabels: app: myapp action: DENY rules: - to: - operation: methods: ["POST"] -
Below, the ALLOW policy is defined for the application. It only allows requests from the
barnamespace (other requests are denied).apiVersion: security.istio.io/v1beta1 kind: AuthorizationPolicy metadata: name: deny-all namespace: foo spec: selector: matchLabels: app: myapp action: ALLOW # The default value, can be skipped. rules: - from: - source: namespaces: ["bar"] -
Below, the ALLOW policy is defined for the application. Note that it does not have any rules, so not a single request matches it (still, the policy exists). Thus, our decision-making algorithm suggests that if something is allowed, then everything else is denied. In this case, “everything else” includes all the requests.
apiVersion: security.istio.io/v1beta1 kind: AuthorizationPolicy metadata: name: deny-all namespace: foo spec: selector: matchLabels: app: myapp action: ALLOW # The default value, can be skipped. rules: [] -
Below, the (default) ALLOW policy is defined for the application. Note that it has an empty rule. Any request matches this rule, so it is naturally approved.
apiVersion: security.istio.io/v1beta1
kind: AuthorizationPolicy
metadata:
  name: allow-all
  namespace: foo
spec:
  selector:
    matchLabels:
      app: myapp
  rules:
  - {}
Deny all actions for the foo namespace
There are two ways you can do that:
-
Explicitly. Here, the DENY policy is created. It has a single
{}rule that covers all the requests:apiVersion: security.istio.io/v1beta1 kind: AuthorizationPolicy metadata: name: deny-all namespace: foo spec: action: DENY rules: - {} -
Implicitly. Here, the (default) ALLOW policy is created that does not have any rules. Thus, no requests will match it, and the policy will deny all of them.
apiVersion: security.istio.io/v1beta1
kind: AuthorizationPolicy
metadata:
  name: deny-all
  namespace: foo
spec: {}
Deny requests from the foo NS only
apiVersion: security.istio.io/v1beta1
kind: AuthorizationPolicy
metadata:
 name: deny-from-ns-foo
 namespace: myns
spec:
 action: DENY
 rules:
 - from:
   - source:
       namespaces: ["foo"]
Allow requests for the foo NS only
apiVersion: security.istio.io/v1beta1
kind: AuthorizationPolicy
metadata:
 name: allow-intra-namespace-only
 namespace: foo
spec:
 action: ALLOW
 rules:
 - from:
   - source:
       namespaces: ["foo"]
Allow requests from anywhere in the cluster
apiVersion: security.istio.io/v1beta1
kind: AuthorizationPolicy
metadata:
 name: allow-all-from-my-cluster
 namespace: myns
spec:
 action: ALLOW
 rules:
 - from:
   - source:
       principals: ["mycluster.local/*"]
Allow any requests for foo or bar clusters
apiVersion: security.istio.io/v1beta1
kind: AuthorizationPolicy
metadata:
 name: allow-all-from-foo-or-bar-clusters-to-ns-baz
 namespace: baz
spec:
 action: ALLOW
 rules:
 - from:
   - source:
       principals: ["foo.local/*", "bar.local/*"]
Allow any requests only from entities in the baz namespace of the foo or bar clusters
apiVersion: security.istio.io/v1beta1
kind: AuthorizationPolicy
metadata:
 name: allow-all-from-foo-or-bar-clusters-to-ns-baz
 namespace: baz
spec:
 action: ALLOW
 rules:
 - from:
   - source: # Logical conjunction is used for the rules below.
       namespaces: ["baz"]
       principals: ["foo.local/*", "bar.local/*"]
Allow from any cluster (via mTLS)
The denying rules (if they exist) have priority over any other rules. For details, refer to Decision-making algorithm.
Example:
apiVersion: security.istio.io/v1beta1
kind: AuthorizationPolicy
metadata:
 name: allow-all-from-any-cluster-with-mtls
 namespace: myns
spec:
 action: ALLOW
 rules:
 - from:
   - source:
       principals: ["*"] # To force the mTLS usage.
Allow all requests from anywhere (including no mTLS - plain text traffic)
apiVersion: security.istio.io/v1beta1
kind: AuthorizationPolicy
metadata:
 name: allow-all-from-any
 namespace: myns
spec:
 action: ALLOW
 rules: [{}]
Setting up federation for two clusters using the IstioFederation CR
Available in Enterprise Edition and DP Ultimate only.
Federation covers sidecar-mode workloads only. For details, refer to Ambient mesh limitations.
Cluster A:
apiVersion: deckhouse.io/v1alpha1
kind: IstioFederation
metadata:
  name: cluster-b
spec:
  metadataEndpoint: https://istio.k8s-b.example.com/metadata/
  trustDomain: cluster-b.local
Cluster B:
apiVersion: deckhouse.io/v1alpha1
kind: IstioFederation
metadata:
  name: cluster-a
spec:
  metadataEndpoint: https://istio.k8s-a.example.com/metadata/
  trustDomain: cluster-a.local
Setting up multicluster for two clusters using the IstioMulticluster CR
Available in Enterprise Edition and DP Ultimate only.
Multicluster covers sidecar-mode workloads only. For details, refer to Ambient mesh limitations.
Cluster A:
apiVersion: deckhouse.io/v1alpha1
kind: IstioMulticluster
metadata:
  name: cluster-b
spec:
  metadataEndpoint: https://istio.k8s-b.example.com/metadata/
Cluster B:
apiVersion: deckhouse.io/v1alpha1
kind: IstioMulticluster
metadata:
  name: cluster-a
spec:
  metadataEndpoint: https://istio.k8s-a.example.com/metadata/
Ambient mesh
Available in Enterprise Edition and DP Ultimate only.
Ambient mesh support is experimental and not recommended for production use.
Ambient-mode workloads cannot take part in federation or multicluster. For details, refer to Ambient mesh limitations.
The ambient mesh components mentioned in this section are described on the module overview page.
Enabling ambient mesh
Ambient mode requires the CNIPlugin traffic redirection mode and Istio 1.25 or newer.
The following is a module configuration example with the ambient mode enabled:
apiVersion: deckhouse.io/v1alpha1
kind: ModuleConfig
metadata:
  name: istio
spec:
  enabled: true
  version: 2
  settings:
    dataPlane:
      trafficRedirectionSetupMode: CNIPlugin
    ambient:
      enabled: true
Once enabled, the module runs the ztunnel DaemonSet and the waypoint controller. To enroll workloads into the ambient mesh, follow the steps below.
Enrolling workloads into the ambient (L4) mesh
Add the istio.io/dataplane-mode=ambient label to a namespace to capture the traffic of its pods with ztunnel. This provides L4 features (mutual TLS, identity, L4 authorization) without a sidecar:
d8 k label namespace myns istio.io/dataplane-mode=ambient
Adding a waypoint for L7 features
To get L7 features (HTTP routing, L7 authorization, richer telemetry), create a WaypointInstance resource in the namespace:
The following is a WaypointInstance resource example, which creates a waypoint for all workloads and services in a namespace:
apiVersion: network.deckhouse.io/v1alpha1
kind: WaypointInstance
metadata:
  name: main
  namespace: myns
spec:
  waypointFor: All
  replicasManagement:
    mode: Static
    static:
      replicas: 2
  resourcesManagement:
    mode: VPA
    vpa:
      mode: InPlaceOrRecreate
      cpu:
        min: 100m
        max: 1000m
      memory:
        min: 128Mi
        max: 2000Mi
The controller provisions the waypoint infrastructure (Deployment, Service, Gateway, VPA, and a PDB — when the effective replica count is >= 2). The controller does not attach workloads to the waypoint. You can do that with the istio.io/use-waypoint label.
To attach all workloads and services in the namespace to the waypoint, run the following command:
d8 k label namespace myns istio.io/use-waypoint=main
To attach a single service or workload, run the following command:
d8 k -n myns label service myservice istio.io/use-waypoint=main
Disabling ambient mesh
Before disabling ambient mode, delete all WaypointInstance resources. With ambient mode disabled, the waypoint controller is not running and cannot reconcile or clean up waypoint resources. This leaves orphaned waypoints, which are reported by Deckhouse Platform (DP) in the D8IstioActiveWaypointsWithAmbientDisabled alert.
To disable the ambient mode, follow these steps:
-
Check if any WaypointInstance resources remain and delete them as necessary using the following commands:
d8 k get waypointinstance -A d8 k -n myns delete waypointinstance main -
Disable the ambient mode by setting
ambient.enabledtofalsein the module configuration.
Control the data-plane behavior
Prevent istio-proxy from terminating before the main application’s connections are closed
By default, during termination, all containers in a Pod, including istio-proxy one, receive SIGTERM signal simultaneously. But some applications need time to properly handle the termination and sometimes they need to do some network requests. It isn’t possible when the istio-proxy stops before the application do. The solution is to add a preStop hook which evaluates the application’s activity via discovering application’s network sockets and let the sidecar stop when they aren’t in the network namespace.
The annotation below adds the preStop hook to istio-proxy container in application’s Pod:
annotations:
  inject.istio.io/templates: "sidecar,d8-hold-istio-proxy-termination-until-application-stops"
Telemetry API for mesh metrics and access logs
Istio Telemetry API (telemetry.istio.io) is the recommended way to configure the collection of data on the operation of services (metrics, access logs, tracing providers) together with meshConfig.
The module can run in two modes, controlled by telemetryAPI.enabled:
| Mode | Behaviour |
|---|---|
false (default) |
Classic path: full telemetry.v2 in the Istio Operator / Istio resource (including Sail’s telemetry.v2.prometheus). The module always deploys Telemetry d8-main in d8-istio for stdout access logs only; there is no spec.metrics / spec.tracing on that object and no defaultProviders.metrics |
true |
Telemetry API path: meshConfig.defaultProviders.metrics selects the built-in Prometheus provider; telemetry.v2 integrations are toggled off; the same Telemetry d8-main gains spec.metrics (and optional spec.tracing via deckhouse-tracing when tracing.collector is configured). Access log format comes from dataPlane.accessLog |
Enabling Telemetry API mode
Apply a ModuleConfig for the Istio module (or the same structure in the cluster config):
apiVersion: deckhouse.io/v1alpha1
kind: ModuleConfig
metadata:
  name: istio
spec:
  version: 1
  enabled: true
  settings:
    telemetryAPI:
      enabled: true
Wait until the Istio / IstioOperator resource in d8-istio reconciles and workloads have picked up the new config (restart application pods if dashboards stay empty after traffic was sent).
Verifying metrics and logs
Generate traffic between meshed pods, then on a pod with istio-proxy:
# Prometheus text from the sidecar admin API (istio-proxy has pilot-agent, not curl).
istio_proxy_pod="$(
  d8 k -n my-namespace get pods -l app=my-app -o jsonpath='{.items[0].metadata.name}'
)"
d8 k exec -n my-namespace "${istio_proxy_pod}" -c istio-proxy -- \
  /usr/local/bin/pilot-agent request GET stats/prometheus | head
Example of successful output:
# TYPE istio_requests_total counter
istio_requests_total{...} 12
istio_request_duration_milliseconds_bucket{...} 12
istio_request_bytes_bucket{...} 12
istio_response_bytes_bucket{...} 12
If you see series such as istio_requests_total, metrics are wired correctly.
Prometheus scraping and Grafana
The module creates a PodMonitor for sidecar metrics when the operator-prometheus module is enabled. Monitored namespaces are derived automatically from mesh membership (istio-injected workloads); you can exclude a namespace from scraping with label istio.deckhouse.io/discard-metrics: "true" on the Namespace.
If workload dashboards stay empty while control plane dashboards work, confirm that:
- workloads run with the Istio sidecar and label
service.istio.io/canonical-nameis present on pods; - the namespace is not marked with
istio.deckhouse.io/discard-metrics: "true".
Extra Telemetry policies (optional)
Prefer additional Telemetry objects that use a workload selector (or targetRef) to pin policies to matching pods. Two or more selector‑less Telemetry resources in the same namespace are invalid—Istio reports IST0160 because the effective policy becomes ambiguous rather than cleanly “merged”. The module already ships d8-main in d8-istio as the single mesh‑wide defaults object; avoid placing another selector‑less Telemetry there unless you are intentionally replacing chart output.
Beyond that, scoped policies—for example metrics per namespace—look like:
apiVersion: telemetry.istio.io/v1alpha1
kind: Telemetry
metadata:
  name: team-a-prometheus-defaults
  namespace: team-a
spec:
  metrics:
  - providers:
    - name: prometheus
For tag removal, disabling specific metrics or modes, follow Customizing Istio metrics with Telemetry API.
Tracing with Telemetry API
tracing.collector is the single ModuleConfig entry for mesh-wide trace export (Zipkin or OpenTelemetry).
telemetryAPI.enabled: falseplustracing.enabledtrue: Legacy only:meshConfig.defaultConfig.tracing.zipkinfromtracing.collector.zipkin.address(host:port, Jaeger Zipkin port9411). OTLP (OpenTelemetry Protocol) export requires Telemetry API mode.telemetryAPI.enabled: trueplustracing.enabled: true: The module registersdeckhouse-tracingwhentracing.collector.opentelemetryhasserviceandport, or whentracing.collector.zipkin.addressis set (OpenTelemetry wins if both are configured). LegacydefaultConfig.tracingis omitted; mesh-wideTelemetryd8-maingetsspec.tracing(tracing.sampling→randomSamplingPercentage, default1.0).
Exporters the module does not model (SkyWalking, custom TLS stacks, extra provider names) still need namespace-scoped Telemetry with selector—not a second selector-less CR in d8-istio (IST0160). See Distributed tracing with Telemetry API.
Example — Telemetry API bundle + bundled Zipkin/Jaeger collector
apiVersion: deckhouse.io/v1alpha1
kind: ModuleConfig
metadata:
  name: istio
spec:
  version: 1
  enabled: true
  settings:
    telemetryAPI:
      enabled: true
    tracing:
      enabled: true
      sampling: 25
      collector:
        zipkin:
          address: "jaeger-collector.observability.svc.cluster.local:9411"
Roll out the Istio/IstioOperator manifests in d8-istio; confirm workloads pick up telemetry before blaming dashboards.
Kiali
To see traces inside Kiali UI, configure tracing.kiali (Jaeger URL + cluster‑internal gRPC endpoint) whenever Kiali is enabled.
Example — mesh-wide OTLP via ModuleConfig
OpenTelemetry export in the chart follows Distributed tracing with OpenTelemetry on Istio 1.25+. On Istio 1.21 use Zipkin/Jaeger via tracing.collector.zipkin or upgrade the control-plane revision.
Deploy a Collector reachable from the mesh, then enable Telemetry API mode and point tracing.collector.opentelemetry at it. The module adds extension provider deckhouse-tracing and spec.tracing on d8-main—do not patch the generated Istio / IstioOperator meshConfig for mesh-wide OTLP.
apiVersion: deckhouse.io/v1alpha1
kind: ModuleConfig
metadata:
  name: istio
spec:
  version: 1
  enabled: true
  settings:
    telemetryAPI:
      enabled: true
    tracing:
      enabled: true
      sampling: 10
      collector:
        opentelemetry:
          service: opentelemetry-collector.observability.svc.cluster.local
          port: 4317
For HTTP OTLP, add collector.opentelemetry.http.path (and optional timeout) per tracing.collector.opentelemetry.http.
Per-workload overrides still use namespaced Telemetry with selector referencing deckhouse-tracing (or another provider you define yourself outside d8-istio). Do not add a second selector-less Telemetry in d8-istio (IST0160).
Example — tracing only for selected workloads
Use selector (or targetRef) so Telemetry targets only matching pods—the pattern below is IST0160-safe. Within a single namespace, Telemetry without selectors can still exist at most once; do not pile multiple selector-less manifests there.
apiVersion: telemetry.istio.io/v1alpha1
kind: Telemetry
metadata:
  name: checkout-tracing
  namespace: shop
spec:
  selector:
    matchLabels:
      app: checkout
  tracing:
  - providers:
    - name: jaeger-zipkin
    randomSamplingPercentage: 100.0
Example — disable span export for ingress-only namespaces
In DP, when the ingress-nginx module is enabled, the Istio chart creates Telemetry ingress-nginx-disable-span-reporting in d8-ingress-nginx with tracing.disableSpanReporting so Ingress controller pods with istio-proxy stop exporting spans. For other namespaces:
apiVersion: telemetry.istio.io/v1alpha1
kind: Telemetry
metadata:
  name: no-tracing-example
  namespace: my-namespace
spec:
  tracing:
  - disableSpanReporting: true
Rolling back to the legacy telemetry stack
spec:
  settings:
    telemetryAPI:
      enabled: false
The module-managed Telemetry objects for this mode disappear on the next sync; Istio restores the full telemetry.v2 configuration.
Debugging Istio with istioctl from the debug container
The DP debug container includes versioned istioctl binaries. Use it when you need to inspect Istio configuration, run analyzers, or retrieve Envoy proxy configuration from application Pods.
Before starting the debug container, create a dedicated ServiceAccount and grant it the permissions required by the istioctl commands you want to run. For example, the following manifest grants permissions that allow running the istioctl proxy-config commands for Pods in a single application namespace:
apiVersion: v1
kind: ServiceAccount
metadata:
  name: istioctl-debug
  namespace: <debug-namespace>
---
apiVersion: rbac.authorization.k8s.io/v1
kind: Role
metadata:
  name: istioctl-debug
  namespace: <target-namespace>
rules:
  - apiGroups: [""]
    resources:
      - pods
    verbs:
      - get
      - list
  - apiGroups: [""]
    resources:
      - pods/portforward
    verbs:
      - create
---
apiVersion: rbac.authorization.k8s.io/v1
kind: RoleBinding
metadata:
  name: istioctl-debug
  namespace: <target-namespace>
subjects:
  - kind: ServiceAccount
    name: istioctl-debug
    namespace: <debug-namespace>
roleRef:
  apiGroup: rbac.authorization.k8s.io
  kind: Role
  name: istioctl-debug
Replace <debug-namespace> with the namespace where the temporary debug Pod will be created, and <target-namespace> with the namespace of the application Pod you want to inspect. Create the Role and RoleBinding resources for every target namespace where istioctl must access Pods.
This RBAC manifest is intended for commands that address a Pod directly, for example, to a resource like <pod-name>.<target-namespace>. If you use typed resource names such as deployment/<name>, grant additional read access to those resource types so istioctl can resolve them to Pods.
Creating Pods in system namespaces such as d8-system and using system ServiceAccounts such as deckhouse usually requires the cluster-admin level of privileges. Use a dedicated ServiceAccount with the minimum required permissions instead.
Start a temporary debug Pod with the built-in debug image:
IMG="$(d8 k -n d8-system get cm debug-container -o jsonpath='{.data.image}')"

d8 k -n <debug-namespace> run istioctl-debug \
  --rm -it \
  --restart=Never \
  --image="$IMG" \
  --overrides='{"spec":{"serviceAccountName":"istioctl-debug","automountServiceAccountToken":true}}' \
  -- bash
Select the minor version of Istio used by the target control plane:
export ISTIOCTL_VERSION=1.21
Available values are 1.21, 1.25, and 1.27. You can also run a specific binary directly: istioctl-1.21, istioctl-1.25, or istioctl-1.27.
Example:
istioctl pc all <pod-name>.<target-namespace>
The istioctl pc commands require a target Pod with an injected istio-proxy sidecar. If the target Pod has no sidecar, Envoy admin port 15000 will not be available.
The RBAC manifest above is not enough to run istioctl analyze or istioctl analyze -A. These commands require additional read-only access to namespaces and to the Kubernetes and Istio resources covered by the analyzers. Grant such access separately according to your security policy.
CNIPlugin application traffic redirection mode restrictions
Unlike the InitContainer mode, the redirection setting is done at the moment of Pod creating, not at the moment of triggering the istio-init init-container. This means that application init-containers will not be able to interact with other services because all traffic will be redirected to the istio-proxy sidecar container, which is not yet running. Workarounds:
- Run the application init container from the user with uid
1337. Requests from this user are not intercepted under Istio control. - Exclude a service IP address or port from Istio control using the
traffic.sidecar.istio.io/excludeOutboundIPRangesortraffic.sidecar.istio.io/excludeOutboundPortsannotations.
Each of the workarounds removes traffic from Istio’s control and disables encryption between application services.
UID 1337 is reserved by Istio for the istio-proxy sidecar container. Do not run application containers with this UID — their traffic bypasses Istio entirely (no routing rules, mTLS, or telemetry). Use UID 1337 only in init containers when network requests are required before the sidecar is ready.
Upgrading Istio
Upgrading Istio control-plane
- DP allows you to install different control-plane versions simultaneously:
- A single global version to handle namespaces or Pods with indifferent version (namespace label
istio-injection: enabled). It is configured by the globalVersion parameter. - Additional versions handle namespaces or Pods with explicitly configured versions (
istio.io/rev: v1x25label for namespace or Pod). They are configured by theadditionalVersionsparameter.
- A single global version to handle namespaces or Pods with indifferent version (namespace label
- Istio declares backward compatibility between data-plane and control-plane in the range of two minor versions:
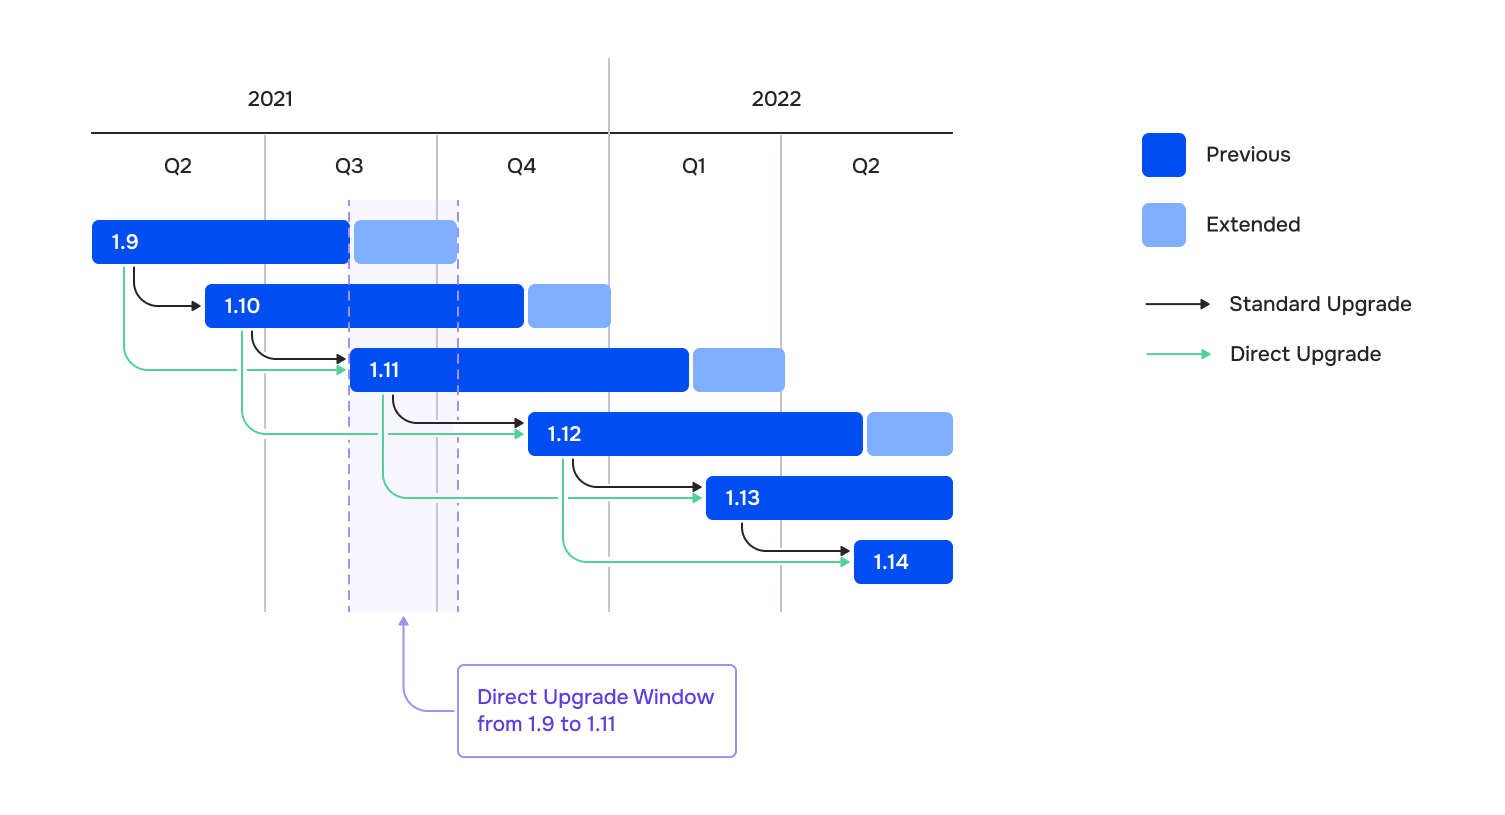
- Upgrade algorithm (i.e. from
1.21to1.25):- Configure additional version in the additionalVersions parameter (
additionalVersions: ["1.25"]).
- Configure additional version in the additionalVersions parameter (
- Wait for the corresponding pod
istiod-v1x25-xxx-yyyto appear ind8-istionamespace. - For every application namespace with istio enabled:
- Change
istio-injection: enabledlabel toistio.io/rev: v1x25. - Recreate the Pods in namespace (one at a time), simultaneously monitoring the application’s workability.
- Change
- Reconfigure
globalVersionto1.25and remove theadditionalVersionsconfiguration. - Make sure, the old
istiodpod has gone. - Change application namespace labels to
istio-injection: enabled.
To find all Pods with old Istio revision (in the example — version 21), execute the command:
d8 k get pods -A -o json | jq --arg revision "v1x21" \
  '.items[] | select(.metadata.annotations."sidecar.istio.io/status" // "{}" | fromjson |
   .revision == $revision) | .metadata.namespace + "/" + .metadata.name'
Upgrading to Istio 1.25 is only possible from version 1.21.
Auto upgrading istio data-plane
Available in Enterprise Edition and DP Ultimate only.
To automate istio-sidecar upgrading, set a label istio.deckhouse.io/auto-upgrade="true" on the application Namespace or on the individual resources — Deployment, DaemonSet or StatefulSet.
Automatic upgrading is triggered when the current data-plane version of a Pod with an istio-sidecar differs from the desired version. Adding a version to the additionalVersions parameter does not restart application Pods by itself. A mismatch usually appears in the following cases:
- The
globalVersionparameter changed for a namespace that uses the global Istio version (istio-injection=enabledoristio.io/rev=default). - The
istio.io/revlabel changed on a Namespace or on a Pod. - The patch version of the installed control plane was updated.
Before restarting a workload, the module checks that the corresponding control plane is installed and ready. Then the module adds or updates the istio.deckhouse.io/full-version annotation in spec.template.metadata.annotations, and Kubernetes performs a regular rollout. Within the same namespace, the module does not start upgrading the next workload until the previously upgraded workload is ready.
The istio.deckhouse.io/auto-upgrade="true" label must be set on the same entity that defines Istio usage for the workload:
- If injection is enabled at the namespace level with
istio-injection=enabled,istio.io/rev=<REVISION>, oristio.io/rev=default, you can setistio.deckhouse.io/auto-upgrade="true"on the same Namespace. - If sidecar injection is enabled at the workload or pod template level, for example with
sidecar.istio.io/inject="true", setistio.deckhouse.io/auto-upgrade="true"on the corresponding Deployment, DaemonSet, or StatefulSet. - A namespace with only the
istio.deckhouse.io/auto-upgrade="true"label does not enable automatic upgrading for a workload if injection is configured only at the workload or pod template level.
Automatic upgrading is supported only for Deployment, DaemonSet, and StatefulSet resources. Job, CronJob, standalone Pod, and custom controllers, including Kruise AdvancedDaemonSet, are not handled. If an ingress controller is managed by an AdvancedDaemonSet, the istio.deckhouse.io/auto-upgrade="true" label on that resource is ignored. Upgrade such ingress controllers manually following the “Istio control plane upgrade” procedure and the “Ingress NGINX integration” section.
Use the D8IstioDataPlaneVersionMismatch alert to detect Pods whose patch data-plane version differs from the control plane version — the scenario that automatic upgrading addresses. The D8IstioActualDataPlaneVersionNotEqualDesired alert indicates a revision mismatch and usually requires changing namespace or Pod labels before sidecars can be updated.
Do not delete the old Istio control plane manually during an upgrade. The old istiod and related resources are removed automatically after there are no sidecars connected to the old revision left in the cluster. Manual deletion can break the regular upgrade automation.
Customizing istio-proxy sidecar resource management
You can override the global istio-proxy sidecar resource limits for specific workloads by adding annotations to your application Pods.
Supported annotations
Use these Pod annotations to customize sidecar resources:
| Annotation | Description | Example Value |
|---|---|---|
sidecar.istio.io/proxyCPU |
CPU request for sidecar | 200m |
sidecar.istio.io/proxyCPULimit |
CPU limit for sidecar | "1" |
sidecar.istio.io/proxyMemory |
Memory request for sidecar | 128Mi |
sidecar.istio.io/proxyMemoryLimit |
Memory limit for sidecar | 512Mi |
Configuration Examples
For Deployments:
apiVersion: apps/v1
kind: Deployment
metadata:
# ...
spec:
  template:
    metadata:
      annotations:
          sidecar.istio.io/proxyCPU: 200m
          sidecar.istio.io/proxyCPULimit: "1"
          sidecar.istio.io/proxyMemory: 128Mi
          sidecar.istio.io/proxyMemoryLimit: 512Mi
# ... rest of your deployment spec
For ReplicaSets:
apiVersion: apps/v1
kind: ReplicaSet
metadata:
# ...
spec:
  template:
    metadata:
      annotations:
          sidecar.istio.io/proxyCPU: 200m
          sidecar.istio.io/proxyCPULimit: "1"
          sidecar.istio.io/proxyMemory: 128Mi
          sidecar.istio.io/proxyMemoryLimit: 512Mi
# ... rest of your deployment spec
For Pod:
apiVersion: v1
kind: Pod
metadata:
  annotations:
    sidecar.istio.io/proxyCPU: 200m
    sidecar.istio.io/proxyCPULimit: "1"
    sidecar.istio.io/proxyMemory: 128Mi
    sidecar.istio.io/proxyMemoryLimit: 512Mi
# ... rest of your pod spec
All four parameters must be defined together - if you set any of these annotations, you must specify all four (sidecar.istio.io/proxyCPU, sidecar.istio.io/proxyCPULimit, sidecar.istio.io/proxyMemory, and sidecar.istio.io/proxyMemoryLimit).