The module lifecycle stage: General Availability
How to secure my application?
To enable Dex authentication for your application, follow these steps:
-
Create a DexAuthenticator custom resource.
When you create a DexAuthenticator in a cluster, an instance of oauth2-proxy is created and connected to Dex. The Deployment, Service, Ingress, and Secret objects will be created in the specified namespace.
Example of the DexAuthenticator custom resource:
apiVersion: deckhouse.io/v1 kind: DexAuthenticator metadata: # Dex authenticator pod name prefix. # For example, if the name prefix is `app-name`, then Dex authenticator pods will look like `app-name-dex-authenticator-7f698684c8-c5cjg`. name: app-name # Namespace to deploy Dex authenticator to. namespace: app-ns spec: # Your application's domain. Requests to it will be redirected for Dex authentication. applicationDomain: "app-name.kube.my-domain.com" # A parameter that determines whether to send the `Authorization: Bearer` header to the application. # This one is useful in combination with auth_request in NGINX. # If sendAuthorizationHeader is set to true, add the Authorization header to to nginx.ingress.kubernetes.io/auth-response-headers annotation of the application's Ingress. sendAuthorizationHeader: false # The name of the Secret containing the SSL certificate. applicationIngressCertificateSecretName: "ingress-tls" # The name of the Ingress class to use in the Ingress resource created for the Dex authenticator. applicationIngressClassName: "nginx" # The duration of the active user session. keepUsersLoggedInFor: "720h" # The list of groups whose users are allowed to authenticate. allowedGroups: - everyone - admins # The list of addresses and networks for which authentication is allowed. whitelistSourceRanges: - 1.1.1.1/32 - 192.168.0.0/24 -
Connect your application to Dex.
To do this, add annotations to the resource through which the app is published. The set of annotations depends on how the application is published. Choose the relevant option:
- Through an Ingress resource
- Through ALBInstance or ClusterALBInstance
Add the following annotations to the application’s Ingress resource:
nginx.ingress.kubernetes.io/auth-signin: https://$host/dex-authenticator/sign_innginx.ingress.kubernetes.io/auth-response-headers: X-Auth-Request-User,X-Auth-Request-Emailnginx.ingress.kubernetes.io/auth-url: https://<SERVICE_NAME>.<NS>.svc.{{ C_DOMAIN }}/dex-authenticator/auth, where:SERVICE_NAME: Name of the authenticator’s Service. Usually, it is<NAME>-dex-authenticator(<NAME>is themetadata.nameof the DexAuthenticator).NS: Value of themetadata.namespaceparameter of the DexAuthenticator.C_DOMAIN: Cluster domain (the clusterDomain parameter of the ClusterConfiguration resource).
If the DexAuthenticator <NAME> is too long, the Service name may be truncated. To find the correct service name, use the following command (specify the namespace name and DexAuthenticator name):
d8 k get service -n <NS> -l "deckhouse.io/dex-authenticator-for=<NAME>" -o jsonpath='{.items[0].metadata.name}'
Example of annotations for an application’s Ingress resource for connecting to Dex:
annotations:
  nginx.ingress.kubernetes.io/auth-signin: https://$host/dex-authenticator/sign_in
  nginx.ingress.kubernetes.io/auth-url: https://app-name-dex-authenticator.app-ns.svc.cluster.local/dex-authenticator/auth
  nginx.ingress.kubernetes.io/auth-response-headers: X-Auth-Request-User,X-Auth-Request-Email
If the application is published through an ALBInstance or ClusterALBInstance resource (for details, see the alb module documentation), add the following annotations to the application’s HTTPRoute resource:
alb.network.deckhouse.io/auth-signin: https://<application-domain>/dex-authenticator/sign_in— unlike nginx, thealbcontroller does not support the$hostvariable, so the application’s domain must be specified explicitly.alb.network.deckhouse.io/auth-response-headers: X-Auth-Request-User,X-Auth-Request-Email.alb.network.deckhouse.io/auth-url: https://<SERVICE_NAME>.<NS>.svc.<C_DOMAIN>/dex-authenticator/auth, whereSERVICE_NAME,NS, andC_DOMAINare determined the same way as for an Ingress resource.
Example of annotations for an application’s HTTPRoute resource for connecting to Dex:
annotations:
  alb.network.deckhouse.io/auth-signin: https://app-name.kube.my-domain.com/dex-authenticator/sign_in
  alb.network.deckhouse.io/auth-url: https://app-name-dex-authenticator.app-ns.svc.cluster.local/dex-authenticator/auth
  alb.network.deckhouse.io/auth-response-headers: X-Auth-Request-User,X-Auth-Request-Email
Also, in the DexAuthenticator resource, specify the same ListenerSet used to publish the application’s domain:
spec:
  gatewayAPI:
    applicationHTTPRouteListenerSetName: my-listenerset
When setting sendAuthorizationHeader: true, list all necessary headers in the Ingress (or in the HTTPRoute, if the alb module is used) in the corresponding annotation, since the Authorization header is not transmitted by default:
For details on what is passed in the Authorization header and how to specify it in the annotation, see How to pass the user’s login and groups to an application.
The application Ingress must have TLS configured. DexAuthenticator does not support HTTP-only Ingress resources.
Setting up CIDR-based restrictions
DexAuthenticator does not have a built-in system for managing authentication based on user IP address. Instead, you can use Ingress resource annotations:
-
To restrict access by IP and keep Dex authentication, add the annotation with a comma-separated list of allowed CIDRs:
nginx.ingress.kubernetes.io/whitelist-source-range: 192.168.0.0/32,1.1.1.1 -
To allow access without Dex authentication for users from specified networks while requiring authentication for others, add the annotation:
nginx.ingress.kubernetes.io/satisfy: "any"
How to pass the user’s login and groups to an application?
By default DexAuthenticator passes only two headers to the application: X-Auth-Request-User (based on the opaque sub claim) and X-Auth-Request-Email. The user’s groups are not passed as a header. It grows unboundedly with the number of groups, so it is disabled in DP, and it cannot be enabled.
To give the application full information about the user, including groups, enable sendAuthorizationHeader:
apiVersion: deckhouse.io/v1
kind: DexAuthenticator
metadata:
  name: app-name
  namespace: app-ns
spec:
  applicationDomain: "app-name.kube.my-domain.com"
  applicationIngressClassName: "nginx"
  applicationIngressCertificateSecretName: "ingress-tls"
  sendAuthorizationHeader: true
In this case, the application receives the Authorization: Bearer <id_token> header, where <id_token> is a JWT signed by Dex (for details on the token contents and how to process it in your application, see JWT token contents and processing considerations).
Regardless of how the application is published, this header is not passed to the application automatically. It must be explicitly listed in the annotation of the resource through which the application is published. Choose the relevant option depending on how the application is published:
- Through an Ingress resource
- Through ALBInstance or ClusterALBInstance
If the application is published through an Ingress resource (for details, see the ingress-nginx module documentation), when setting sendAuthorizationHeader: true, you need to:
- Specify the headers to pass to the application in the
nginx.ingress.kubernetes.io/auth-response-headersannotation. - Also increase the buffer size using the
nginx.ingress.kubernetes.io/proxy-buffer-sizeannotation, since a JWT with many groups does not fit into the default buffer.
Example of specifying the headers and buffer size using the corresponding annotations:
annotations:
  nginx.ingress.kubernetes.io/auth-signin: https://$host/dex-authenticator/sign_in
  nginx.ingress.kubernetes.io/auth-url: https://app-name-dex-authenticator.app-ns.svc.cluster.local/dex-authenticator/auth
  nginx.ingress.kubernetes.io/auth-response-headers: X-Auth-Request-User,X-Auth-Request-Email,Authorization
  nginx.ingress.kubernetes.io/proxy-buffer-size: 32k
If the Authorization header is not listed in auth-response-headers, the application won’t receive it. If proxy-buffer-size is not increased, requests will fail with a 500 error, and the Ingress controller log will show upstream sent too big header while reading response header from upstream.
If the application is published through an ALBInstance or ClusterALBInstance resource (for details, see the alb module documentation), when setting sendAuthorizationHeader: true, specify the headers to pass to the application in the alb.network.deckhouse.io/auth-response-headers annotation of the HTTPRoute resource:
annotations:
  alb.network.deckhouse.io/auth-signin: https://app-name.kube.my-domain.com/dex-authenticator/sign_in
  alb.network.deckhouse.io/auth-url: https://app-name-dex-authenticator.app-ns.svc.cluster.local/dex-authenticator/auth
  alb.network.deckhouse.io/auth-response-headers: Authorization
For the alb.network.deckhouse.io/auth-response-headers annotation, it is enough to specify only Authorization, since it already passes the base set of headers by default.
Also, in the DexAuthenticator resource, specify the same ListenerSet used to publish the application’s domain:
spec:
  gatewayAPI:
    applicationHTTPRouteListenerSetName: my-listenerset
JWT token contents and processing considerations
Example of the JWT payload for a static user (the User and Group resources):
{
  "iss": "https://dex.kube.my-domain.com/",
  "sub": "Cg1qb2huLmRvZUBleGFtcGxlEgVsb2NhbA",
  "aud": "app-name-app-ns-dex-authenticator",
  "exp": 1757000600,
  "iat": 1757000000,
  "email": "john.doe@example.com",
  "email_verified": true,
  "name": "john-doe",
  "preferred_username": "",
  "groups": ["everyone", "developers"]
}
When parsing the token in your application, keep in mind the following:
- Use the
emailfield to identify the user. Thesubfield is opaque (it is not predictable and cannot be used as a meaningful user identifier outside the context of a specific system), andpreferred_usernameis empty for static users (external authentication providers may populate it). - The
namefield contains the object’s name (from themetadata.namefield of the User object), not the user’s display name. - The
audfield contains the authenticator client identifier (<name>-<namespace>-dex-authenticator), not your application’s own OIDC client identifier. An application that validatesaudagainst its ownclient_idwill reject such a token. - Verify the signature using the JWKS endpoint
https://dex.<modules.publicDomainTemplate>/keys. - The token’s lifetime is defined by the
idTokenTTLparameter (10 minutes by default). DexAuthenticator refreshes the token on its own, so the application always gets a current one.
If the application supports OIDC on its own, use the DexClient resource instead of DexAuthenticator: the application will request the required scope itself and get a refresh_token in addition to the id_token.
DexAuthenticator does not have a built-in system for managing authentication based on user IP address. Instead, you can use Ingress resource annotations:
-
To restrict access by IP and keep Dex authentication, add the annotation with a comma-separated list of allowed CIDRs:
nginx.ingress.kubernetes.io/whitelist-source-range: 192.168.0.0/32,1.1.1.1 -
To allow access without Dex authentication for users from specified networks while requiring authentication for others, add the annotation:
nginx.ingress.kubernetes.io/satisfy: "any"
Authentication flow with DexAuthenticator
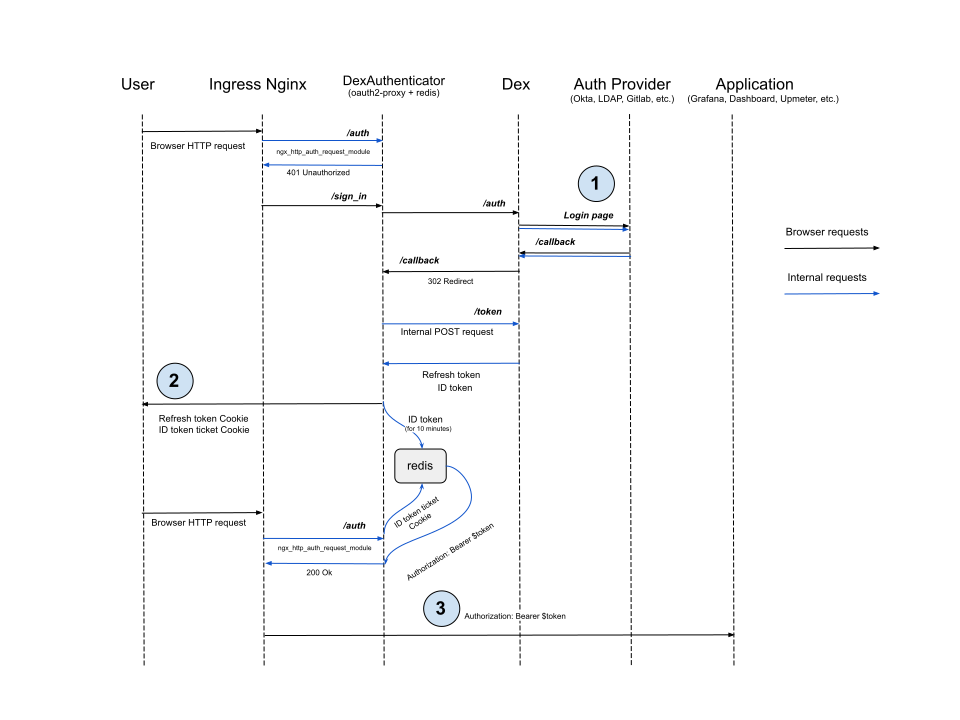
DexAuthenticator only works with HTTPS. It does not support Ingress resources configured for HTTP only.
Authentication cookies are set with the Secure attribute, which means they are only sent over encrypted HTTPS connections.
Make sure your application Ingress has TLS configured before integrating with DexAuthenticator.
-
Dex redirects the user to the provider’s login page in most cases and waits for the user to be redirected back to the
/callbackURL. However, some providers like LDAP or Atlassian Crowd do not support this flow. The user must enter credentials in the Dex login form instead, and Dex will validate them by making a request to the provider’s API. -
DexAuthenticator sets the cookie with the full refresh token (instead of issuing a ticket as for the ID token) because Redis does not persist data. If no ID token is found in Redis by the ticket, the user can request a new ID token by providing the refresh token from the cookie.
-
DexAuthenticator sets the
AuthorizationHTTP header to the ID token value from Redis. This is not required for services likeupmeter, asupmeterpermissions are less granular. For the Kubernetes Dashboard, it is critical: the Dashboard passes the ID token on to access the Kubernetes API.
How to generate a kubeconfig and access Kubernetes API?
- For DKP version 1.76 and earlier
- For DKP version 1.77 and later
kubeconfig for remote access to the cluster via kubectl can be generated in the kubeconfigurator web interface.
Configure the publishAPI parameter:
-
Open the
user-authnmodule settings (create the ModuleConfiguser-authnresource if there is none):d8 k edit mc user-authn -
Add the following section to the
settingsblock and save:publishAPI: enabled: true
The name kubeconfig is reserved for the kubeconfig generation web interface. The URL depends on the publicDomainTemplate parameter (for example, for the template that looks like %s.kube.my, the kubeconfig generation web interface will be available at kubeconfig.kube.my, and for %s-kube.company.my — at kubeconfig-kube.company.my).
For a cluster running DKP version 1.77 and later, refer to the «How to generate a kubeconfig to access the Kubernetes API?» section of the control-plane-manager module documentation.
Configuring kube-apiserver
Using the control-plane-manager module, DP automatically configures kube-apiserver with the following flags so that the dashboard and kubeconfig-generator modules can work in the cluster.
The flow of accessing Kubernetes API with generated kubeconfig
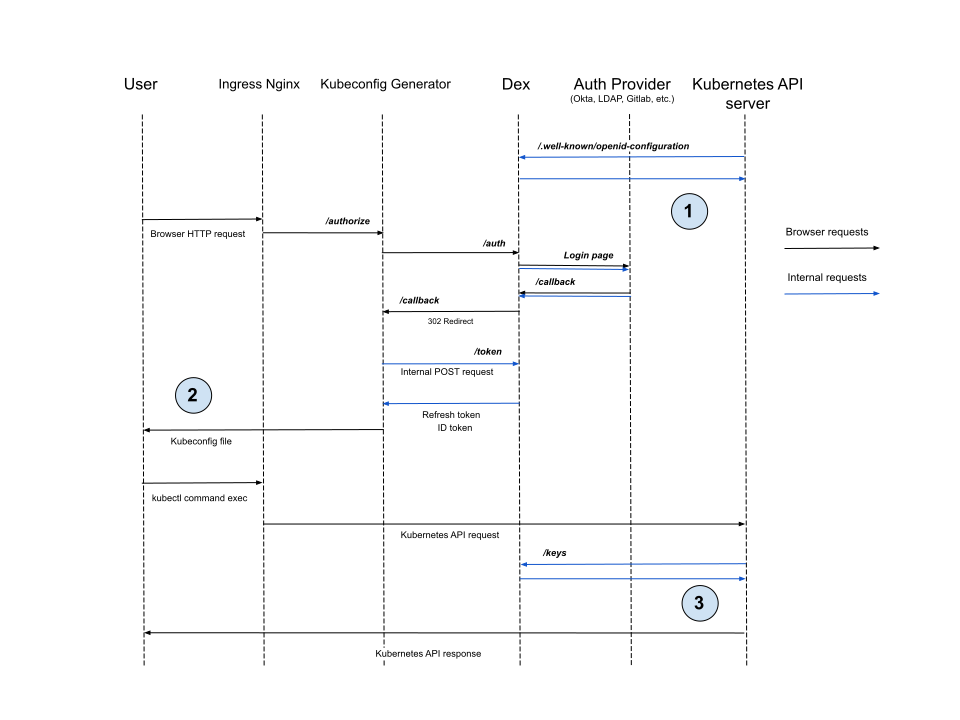
-
Before
kube-apiserverstarts, it must request the OIDC provider’s configuration endpoint (Dex in our case) to get the issuer and JWKS endpoint settings. -
Kubeconfig generator stores the ID token and refresh token in the
kubeconfigfile. -
After receiving a request with an ID token,
kube-apiserververifies that the token is signed by the provider configured in step 1 using keys from the JWKS endpoint. It then compares the token’sissandaudclaim values with the configuration.
How to rotate the secret of the kubernetes OAuth2 client?
The secret of the privileged kubernetes OAuth2 client is stored in the kubernetes-dex-client-app-secret Secret of the d8-user-authn namespace. The same value is used by the kubeconfig-generator, kubeconfig-publish-api and kubeconfig-<slug> OAuth2 clients, and is passed to basic-auth-proxy as --ldap-client-secret.
Deleting the Secret does not rotate the value: while it is still present in the module’s values, the owning hook renders the very same one back.
To rotate the secret, do the following:
-
If a GitOps tool controls the
d8-user-authnnamespace, exclude thekubernetes-dex-client-app-secretSecret from syncing. Otherwise the GitOps tool will restore the previous value. -
Empty the
secretfield:d8 k -n d8-user-authn patch secret kubernetes-dex-client-app-secret --type merge -p '{"data":{"secret":""}}' -
Restart DP so that the hook picks the empty field up and generates a new value:
d8 k -n d8-system rollout restart deployment/deckhouse -
Verify that the secret value changed:
d8 k -n d8-user-authn get secret kubernetes-dex-client-app-secret -o jsonpath='{.data.secret}'If it did not, repeat the steps 2 and 3. The module may have restored the previous before DP was restarted.
One the secret has been rotated, the configuration of components that use it will be updated automatically and the corresponding pods will be restarted.
Kubeconfig files downloaded from the kubeconfig generator earlier carry the old client secret and stop refreshing tokens. Download these files again. ID tokens issued before the rotation keep working until they expire, which is configured via settings.idTokenTTL (10 minutes by default).
How to enable Kerberos (SPNEGO) SSO for LDAP?
If clients run in a corporate SSO environment (browser trusts the Dex host), Dex can accept Kerberos tickets via Authorization: Negotiate and log in without the password form.
Enabling Kerberos (SPNEGO) SSO for LDAP:
- In AD/KDC, create/provision an SPN
HTTP/<dex-fqdn>for a service account and generate akeytab. - In the cluster, create a Secret in the
d8-user-authnnamespace with thekrb5.keytabdata key. - In the LDAP DexProvider resource, enable
spec.ldap.kerberos:enabled: truekeytabSecretName: <secret name>- optional:
expectedRealm,usernameFromPrincipal,fallbackToPassword
Dex will mount the keytab automatically and start accepting SPNEGO. A server‑side krb5.conf is not required — tickets are validated using the keytab.
How to configure Basic Authentication for accessing Kubernetes API via LDAP?
- For DKP version 1.76 and earlier
- For DKP version 1.77 and later
- Enable the
publishAPIparameter in theuser-authnmodule configuration. - Create a DexProvider resource of type
LDAPand setenableBasicAuth: true. - Configure RBAC for groups obtained from LDAP.
- Provide users with a
kubeconfigconfigured for Basic Authentication (LDAP username and password).
Only one authentication provider in the cluster can have enableBasicAuth enabled.
A detailed example is described in the Usage section.
For a cluster running DKP version 1.77 and later, use the control-plane-manager module settings:
- Enable the
apiserver.publishAPIparameter in thecontrol-plane-managermodule configuration. - Create a DexProvider resource of type
LDAPand setenableBasicAuth: true. - Configure RBAC for groups obtained from LDAP.
- Provide users with a
kubeconfigconfigured for Basic Authentication (LDAP username and password).
Only one authentication provider in the cluster can have enableBasicAuth enabled.
A detailed example is described in the Usage section.
How is Dex protected against credential brute-forcing?
Each user is allowed no more than 20 login attempts. After the limit is exhausted, one additional attempt is added every 6 seconds.