
The module lifecycle stage: General Availability
How to secure my application?
To enable Dex authentication for your application, follow these steps:
-
Create a DexAuthenticator.
When you create a DexAuthenticator in a cluster, an instance of oauth2-proxy is created and connected to Dex. A Deployment, a Service and a Secret are created in the specified namespace, plus an Ingress if
applicationIngressClassNameis set and an HTTPRoute ifgatewayAPIis set.Example of the DexAuthenticator custom resource:
apiVersion: deckhouse.io/v1
kind: DexAuthenticator
metadata:
  # Dex authenticator pod name prefix.
  # For example, if the name prefix is `app-name`, then Dex authenticator pods will look like `app-name-dex-authenticator-7f698684c8-c5cjg`.
  name: app-name
  # Namespace to deploy Dex authenticator to.
  namespace: app-ns
spec:
  # Your application's domain. Requests to it will be redirected for Dex authentication.
  applicationDomain: "app-name.kube.my-domain.com"
  # A parameter that determines whether to send the `Authorization: Bearer` header to the application.
  # This one is useful in combination with auth_request in NGINX.
  # If sendAuthorizationHeader is true, add Authorization to the nginx.ingress.kubernetes.io/auth-response-headers annotation of the application's Ingress or to the alb.network.deckhouse.io/auth-response-headers annotation of its HTTPRoute.
  sendAuthorizationHeader: false
  # The name of the Secret containing the SSL certificate.
  applicationIngressCertificateSecretName: "ingress-tls"
  # The name of the Ingress class to use in the Ingress resource created for the Dex authenticator.
  applicationIngressClassName: "nginx"
  # The duration of the active user session.
  keepUsersLoggedInFor: "720h"
  # The list of groups whose users are allowed to authenticate.
  allowedGroups:
  - everyone
  - admins
  # The list of addresses and networks for which authentication is allowed.
  whitelistSourceRanges:
  - 1.1.1.1/32
  - 192.168.0.0/24
To add labels and annotations to the
dex-authenticatorpods, for example to disable Istio sidecar injection, usespec.podMetadata:spec: podMetadata: annotations: sidecar.istio.io/inject: "false" -
Connect your application to Dex.
To do this, add annotations to the resource through which the app is published. The set of annotations depends on how the application is published. Choose the relevant option:
- Through an Ingress resource
- Through ALBInstance or ClusterALBInstance
Add the following annotations to the application’s Ingress resource:
nginx.ingress.kubernetes.io/auth-signin: https://$host/dex-authenticator/sign_innginx.ingress.kubernetes.io/auth-response-headers: X-Auth-Request-User,X-Auth-Request-Emailnginx.ingress.kubernetes.io/auth-url: https://<SERVICE_NAME>.<NS>.svc.{{ C_DOMAIN }}/dex-authenticator/auth, where:SERVICE_NAME: Name of the authenticator’s Service. Usually, it is<NAME>-dex-authenticator(<NAME>is themetadata.nameof the DexAuthenticator).NS: Value of themetadata.namespaceparameter of the DexAuthenticator.C_DOMAIN: Cluster domain (theclusterDomainparameter of thecontrol-plane-managermodule).
If the DexAuthenticator <NAME> is too long, the Service name may be truncated. To find the correct service name, use the following command (specify the namespace name and DexAuthenticator name):
d8 k get service -n <NS> -l "deckhouse.io/dex-authenticator-for=<NAME>" -o jsonpath='{.items[0].metadata.name}'
Example of annotations for an application’s Ingress resource for connecting to Dex:
annotations:
  nginx.ingress.kubernetes.io/auth-signin: https://$host/dex-authenticator/sign_in
  nginx.ingress.kubernetes.io/auth-url: https://app-name-dex-authenticator.app-ns.svc.cluster.local/dex-authenticator/auth
  nginx.ingress.kubernetes.io/auth-response-headers: X-Auth-Request-User,X-Auth-Request-Email
An application that specifies only applicationIngressClassName gets no HTTPRoute. If Ingress publication is turned off with global.modules.ingress.enabled, it gets no Ingress either. The application itself stays reachable through the route you publish it with, but none of its /dex-authenticator endpoints are, so the redirect to sign in lands on the application and no one can log in. Other applications are unaffected.
If the application is published through an ALBInstance or ClusterALBInstance resource (for details, see the alb module documentation), add the following annotations to the application’s HTTPRoute resource:
alb.network.deckhouse.io/auth-signin: https://<application-domain>/dex-authenticator/sign_in— unlike nginx, thealbcontroller does not support the$hostvariable, so the application’s domain must be specified explicitly.alb.network.deckhouse.io/auth-response-headers: X-Auth-Request-User,X-Auth-Request-Email.alb.network.deckhouse.io/auth-url: https://<SERVICE_NAME>.<NS>.svc.<C_DOMAIN>/dex-authenticator/auth, whereSERVICE_NAME,NS, andC_DOMAINare determined the same way as for an Ingress resource.
Example of annotations for an application’s HTTPRoute resource for connecting to Dex:
annotations:
  alb.network.deckhouse.io/auth-signin: https://app-name.kube.my-domain.com/dex-authenticator/sign_in
  alb.network.deckhouse.io/auth-url: https://app-name-dex-authenticator.app-ns.svc.cluster.local/dex-authenticator/auth
  alb.network.deckhouse.io/auth-response-headers: X-Auth-Request-User,X-Auth-Request-Email
Also, in the DexAuthenticator resource, specify the same ListenerSet used to publish the application’s domain:
spec:
  gatewayAPI:
    applicationHTTPRouteListenerSetName: my-listenerset
The HTTPRoute created for the DexAuthenticator attaches to that same ListenerSet, so the ListenerSet must accept routes from the namespace of the DexAuthenticator.
An application that specifies only gatewayAPI gets no Ingress. If Gateway API is turned off with global.modules.gatewayAPI.enabled, or the cluster serves no HTTPRoute API, it gets no HTTPRoute either, with the same result: the application stays reachable, its /dex-authenticator endpoints do not, and no one can log in. Other applications are unaffected.
When setting sendAuthorizationHeader: true, list all necessary headers in the Ingress (or in the HTTPRoute, if the alb module is used) in the corresponding annotation, since the Authorization header is not transmitted by default.
For details on what is passed in the Authorization header and how to specify it in the annotation, see How to pass the user’s login and groups to an application.
The application Ingress must have TLS configured. DexAuthenticator does not support HTTP-only Ingress resources.
Setting up CIDR-based restrictions
To allow authentication only from specific networks, list them in whitelistSourceRanges. The limit applies to the /dex-authenticator endpoints. To restrict access to the application itself, or to let some networks in without authentication, use the annotations of the application’s Ingress:
-
To restrict access by IP and keep Dex authentication, add the annotation with a comma-separated list of allowed CIDRs:
nginx.ingress.kubernetes.io/whitelist-source-range: 192.168.0.0/32,1.1.1.1 -
To allow access without Dex authentication for users from specified networks while requiring authentication for others, add the annotation:
nginx.ingress.kubernetes.io/satisfy: "any"
How to pass the user’s login and groups to an application?
By default DexAuthenticator passes only two headers to the application: X-Auth-Request-User (based on the opaque sub claim) and X-Auth-Request-Email. The user’s groups are not passed as a header. It grows unboundedly with the number of groups, so it is disabled in DP, and it cannot be enabled.
To give the application full information about the user, including groups, enable sendAuthorizationHeader:
apiVersion: deckhouse.io/v1
kind: DexAuthenticator
metadata:
  name: app-name
  namespace: app-ns
spec:
  applicationDomain: "app-name.kube.my-domain.com"
  applicationIngressClassName: "nginx"
  applicationIngressCertificateSecretName: "ingress-tls"
  sendAuthorizationHeader: true
In this case, the application receives the Authorization: Bearer <id_token> header, where <id_token> is a JWT signed by Dex (for details on the token contents and how to process it in your application, see JWT token contents and processing considerations).
Regardless of how the application is published, this header is not passed to the application automatically. It must be explicitly listed in the annotation of the resource through which the application is published. Choose the relevant option depending on how the application is published:
- Through an Ingress resource
- Through ALBInstance or ClusterALBInstance
If the application is published through an Ingress resource (for details, see the ingress-nginx module documentation), when setting sendAuthorizationHeader: true, you need to:
- Specify the headers to pass to the application in the
nginx.ingress.kubernetes.io/auth-response-headersannotation. - Also increase the buffer size using the
nginx.ingress.kubernetes.io/proxy-buffer-sizeannotation, since a JWT with many groups does not fit into the default buffer.
Example of specifying the headers and buffer size using the corresponding annotations:
annotations:
  nginx.ingress.kubernetes.io/auth-signin: https://$host/dex-authenticator/sign_in
  nginx.ingress.kubernetes.io/auth-url: https://app-name-dex-authenticator.app-ns.svc.cluster.local/dex-authenticator/auth
  nginx.ingress.kubernetes.io/auth-response-headers: X-Auth-Request-User,X-Auth-Request-Email,Authorization
  nginx.ingress.kubernetes.io/proxy-buffer-size: 32k
If the Authorization header is not listed in auth-response-headers, the application won’t receive it. If proxy-buffer-size is not increased, requests will fail with a 500 error, and the Ingress controller log will show upstream sent too big header while reading response header from upstream.
If the application is published through an ALBInstance or ClusterALBInstance resource (for details, see the alb module documentation), when setting sendAuthorizationHeader: true, specify the headers to pass to the application in the alb.network.deckhouse.io/auth-response-headers annotation of the HTTPRoute resource:
annotations:
  alb.network.deckhouse.io/auth-signin: https://app-name.kube.my-domain.com/dex-authenticator/sign_in
  alb.network.deckhouse.io/auth-url: https://app-name-dex-authenticator.app-ns.svc.cluster.local/dex-authenticator/auth
  alb.network.deckhouse.io/auth-response-headers: Authorization
For the alb.network.deckhouse.io/auth-response-headers annotation, it is enough to specify only Authorization, since it already passes the base set of headers by default.
Also, in the DexAuthenticator resource, specify the same ListenerSet used to publish the application’s domain:
spec:
  gatewayAPI:
    applicationHTTPRouteListenerSetName: my-listenerset
JWT token contents and processing considerations
Example of the JWT payload for a static user (the User and Group resources):
{
  "iss": "https://dex.kube.my-domain.com/",
  "sub": "Cg1qb2huLmRvZUBleGFtcGxlEgVsb2NhbA",
  "aud": "dex-authenticator-app-name@app-ns",
  "exp": 1757000600,
  "iat": 1757000000,
  "email": "john.doe@example.com",
  "email_verified": true,
  "name": "john-doe",
  "preferred_username": "",
  "groups": ["everyone", "developers"]
}
When parsing the token in your application, keep in mind the following:
- Use the
emailfield to identify the user. Thesubfield is opaque (it is not predictable and cannot be used as a meaningful user identifier outside the context of a specific system), andpreferred_usernameis empty for static users (external authentication providers may populate it). - The
namefield contains the object’s name (from themetadata.namefield of the User object), not the user’s display name. - The
audfield contains the authenticator client identifier (dex-authenticator-<name>@<namespace>), not your application’s own OIDC client identifier. An application that validatesaudagainst its ownclient_idwill reject such a token. - Verify the signature with the JWKS endpoint
https://<DEX_DOMAIN>/keys, where<DEX_DOMAIN>is thepublicDomainTemplatevalue with%sreplaced bydex. - The token’s lifetime is defined by the
idTokenTTLparameter (10 minutes by default). DexAuthenticator refreshes the token on its own, so the application always gets a current one.
If the application supports OIDC on its own, use the DexClient resource instead of DexAuthenticator: the application will request the required scope itself and get a refresh_token in addition to the id_token.
Authentication flow with DexAuthenticator
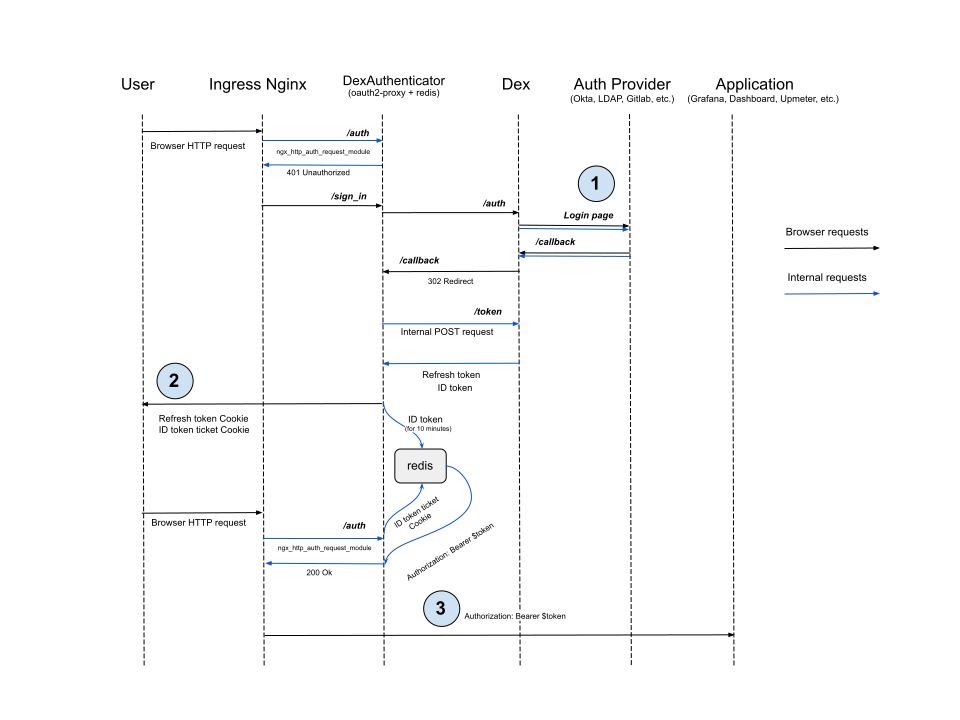
DexAuthenticator sets its cookies with the Secure attribute, so they are sent only over HTTPS.
-
Dex redirects the user to the provider’s login page in most cases and waits for the user to be redirected back to the
/callbackURL. However, some providers like LDAP or Atlassian Crowd do not support this flow. The user must enter credentials in the Dex login form instead, and Dex will validate them by making a request to the provider’s API. -
DexAuthenticator starts the sign-in with Proof Key for Code Exchange (PKCE) using the
S256method and gets the tokens and the signing keys from thedexService in thed8-user-authnnamespace. It checks the certificate of Dex against the certificate authority (CA) of the internal Dex certificate.user-authnadds this CA to the Secret of every DexAuthenticator. -
DexAuthenticator sets the cookie with the full refresh token (instead of issuing a ticket as for the ID token) because Redis does not persist data. If no ID token is found in Redis by the ticket, the user can request a new ID token by providing the refresh token from the cookie.
-
DexAuthenticator sets the
AuthorizationHTTP header to the ID token value from Redis. This is not required for services likeupmeter, asupmeterpermissions are less granular. For the Kubernetes Dashboard, it is critical: the Dashboard passes the ID token on to access the Kubernetes API.
Handling an expired session in a single-page application
Without a session, a request to the application is redirected to the sign-in page from the auth-signin annotation (/dex-authenticator/sign_in). DexAuthenticator sends the user to Dex only when the browser navigates to that page. A request with the Sec-Fetch-Mode: navigate header is a navigation. If the browser does not send Sec-Fetch-Mode, a request without the Accept: application/json and X-Requested-With: XMLHttpRequest headers is a navigation. A script request (fetch, XHR) gets the 401 status code with the {} body instead of a redirect to Dex, which the browser would block as a cross-origin request.
To send the user to sign in, reload the page when a script request gets 401:
const response = await fetch("/api/items");
if (response.status === 401) {
  window.location.reload();
}
A sign-in that took longer than 10 minutes
The system stores the temporary login state (a one-time authentication request) for 10 minutes. If the user does not complete it within this time (for example, due to slow entry of the login/password on the external provider’s page, a long wait for the code during MFA, a lengthy recovery of a forgotten password, etc.), the login must be started over.
Ending a DexAuthenticator session
DexAuthenticator ends the sessions of a user within seconds after a Lock, ResetPassword, Reset2FA or Logout operation and after the user is deleted. A request with an ended session gets the same answer as a request without a session.
DexAuthenticator receives the revocations from the revocation-feed Service in the d8-user-authn namespace. If a NetworkPolicy restricts egress traffic in the namespace of a DexAuthenticator, allow traffic to the pods with the app: user-authn-controller label in the d8-user-authn namespace on port 8443. Without the revocations, DexAuthenticator checks every session older than 30 seconds with Dex, and the D8UserAuthnRevocationFeedNotConsumed alert fires after 15 minutes.
When a user signs out of an application, DexAuthenticator revokes the refresh token of the session in Dex. A copy of the session cookie stops working too.
With the browser sessions of Dex enabled, DexAuthenticator then sends the browser to Dex to end the session of Dex, and the browser is signed out of the other applications it signed in to through this session. Sign the user out with a navigation, not with a script request, which does not follow the redirect to Dex:
window.location.assign("/dex-authenticator/sign_out");
How to generate a kubeconfig and access Kubernetes API?
To generate a kubeconfig, refer to the «How to generate a kubeconfig to access the Kubernetes API?» section of the control-plane-manager module documentation.
Configuring kube-apiserver
Using the control-plane-manager module, DP passes kube-apiserver an AuthenticationConfiguration with a JWT authenticator for Dex: issuer https://<DEX_DOMAIN>/ (where <DEX_DOMAIN> is the publicDomainTemplate value with %s replaced by dex), audience kubernetes, the username from the email claim and the groups from the groups claim. If controlPlaneConfigurator.dexCAMode provides a CA, it is embedded in the configuration. Usernames and groups that start with system: are rejected.
The flow of accessing Kubernetes API with generated kubeconfig
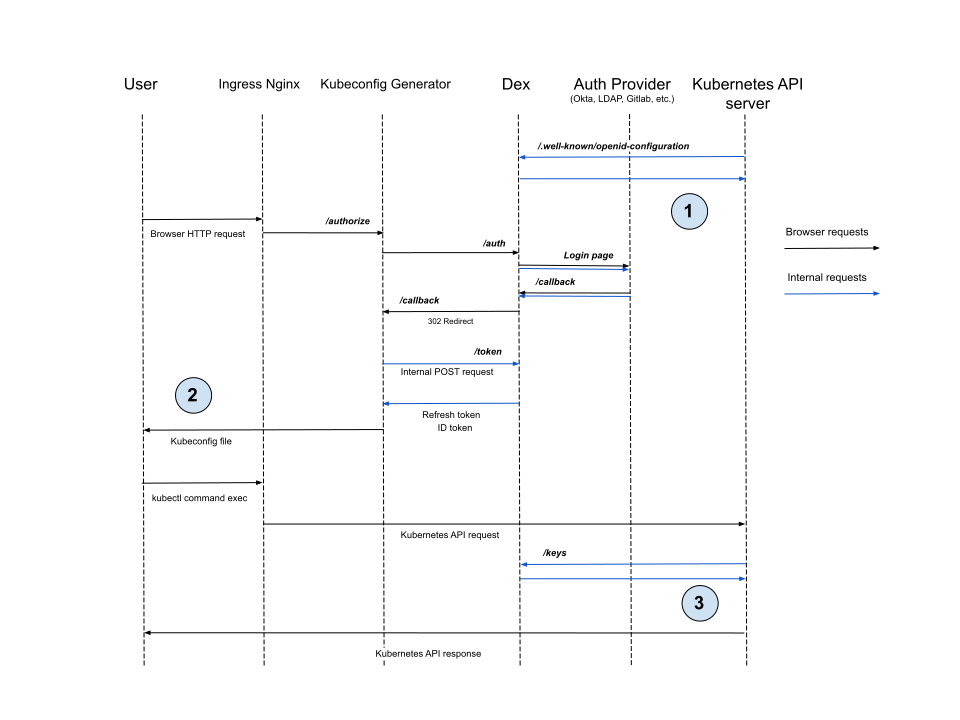
-
kube-apiserverreads the Dex configuration (issuer and JWKS endpoint). In Kubernetes 1.30 and later, it reads it through the Dex Service inside the cluster. -
The kubeconfig generated in the Deckhouse web UI contains the ID token and the refresh token.
-
After receiving a request with an ID token,
kube-apiserververifies that the token is signed by the provider configured in step 1 using keys from the JWKS endpoint. It then compares the token’sissandaudclaim values with the configuration.
How to rotate the secret of the kubernetes OAuth2 client?
The secret of the privileged kubernetes OAuth2 client is stored in the kubernetes-dex-client-app-secret Secret of the d8-user-authn namespace. The same value is used by the kubeconfig-generator, kubeconfig-generator-<index>, kubeconfig-publish-api and kubeconfig-<slug> OAuth2 clients, and by basic-auth-proxy when basic authentication is enabled for an LDAP provider.
Deleting the Secret does not rotate the value: while it is still present in the module’s values, the owning hook renders the very same one back.
To rotate the secret, do the following:
-
If a GitOps tool controls the
d8-user-authnnamespace, exclude thekubernetes-dex-client-app-secretSecret from syncing. Otherwise the GitOps tool will restore the previous value. -
Empty the
secretfield:d8 k -n d8-user-authn patch secret kubernetes-dex-client-app-secret --type merge -p '{"data":{"secret":""}}' -
Restart DP so that the hook picks the empty field up and generates a new value:
d8 k -n d8-system rollout restart deployment/deckhouse -
Verify that the secret value changed:
d8 k -n d8-user-authn get secret kubernetes-dex-client-app-secret -o jsonpath='{.data.secret}'If it did not, repeat the steps 2 and 3. The module may have restored the previous value before DP was restarted.
Once the secret has been rotated, the configuration of components that use it will be updated automatically and the corresponding pods will be restarted.
Kubeconfig files generated in the Deckhouse web UI before the rotation carry the old client secret and stop refreshing tokens. Generate them again. ID tokens issued before the rotation keep working until they expire, which is configured via settings.idTokenTTL (10 minutes by default).
How to enable Kerberos (SPNEGO) SSO for LDAP?
If clients run in a corporate SSO environment (browser trusts the Dex host), Dex can accept Kerberos tickets via Authorization: Negotiate and log in without the password form.
Enabling Kerberos (SPNEGO) SSO for LDAP:
- In AD/KDC, create/provision an SPN
HTTP/<DEX_FQDN>for a service account and generate akeytab. - In the cluster, create a Secret in the
d8-user-authnnamespace with thekrb5.keytabdata key. - In the LDAP DexProvider resource, enable
spec.ldap.kerberos:enabled: truekeytabSecretName: <secret name>- optional:
expectedRealm,usernameFromPrincipal,fallbackToPassword
Dex will mount the keytab automatically and start accepting SPNEGO. A server‑side krb5.conf is not required — tickets are validated using the keytab.
How to configure Basic Authentication for accessing Kubernetes API via LDAP?
Use the control-plane-manager module settings:
- Enable the
apiserver.publishAPIparameter in thecontrol-plane-managermodule configuration. - Create a DexProvider of type
LDAPand setenableBasicAuth: true. - Grant the LDAP groups access with a RoleBinding or ClusterRoleBinding of the granular role-based model.
- Provide users with a kubeconfig configured for Basic Authentication (LDAP username and password).
Only one authentication provider in the cluster can have enableBasicAuth enabled.
A detailed example is described in the Usage section.
How is Dex protected against credential brute-forcing?
Dex limits failed sign-in attempts per client IP address on the sign-in form, the token endpoint, the password change page and the 2FA steps. Configure the limit with the rateLimit parameter. It is turned off by default.
Dex also locks an account after failed sign-in attempts. Configure the lockout with the passwordPolicy.lockout parameter. It applies to local users, and to LDAP and Crowd users if their types are listed in applyToConnectors.
Which client address does Dex see?
Dex uses the address of the client in three places:
- the limit of failed attempts per address (
rateLimit); - the sign-in log (the
client_remote_addrkey); - the devices of a user (
ipAddressin the UserAccount object).
Dex takes the address that the Ingress controller of the platform passes on (see rateLimit for the headers it trusts). So the address is right only when the Ingress controller sees the address of the client itself. A balancer in front of the Ingress controller that replaces the address of the client with its own hides it. Then Dex sees the address of the balancer for every user:
- the limit counts the failed attempts of all users together, so the failures of one user can make Dex refuse the sign-ins of the others;
- the sign-in log and the devices of a user show the address of the balancer.
To pass the address of the client to the Ingress controller, configure the IngressNginxController object:
- if the balancer supports the PROXY protocol, use an inlet with it, such as
LoadBalancerWithProxyProtocolorHostPortWithProxyProtocol; - if the requests come through an HTTP proxy that adds the
X-Forwarded-Forheader, enablebehindL7Proxyfor the inlet and list the addresses of the proxy inacceptClientIPHeadersFrom. TherealIPHeaderparameter selects another header and works only withbehindL7Proxy.
To check the address Dex sees, sign in and compare the client_remote_addr key of the login successful line in the Dex log with the address of your computer.
How to find out why a sign-in was refused?
Dex logs every sign-in in JSON. A refused sign-in is logged at the WARN level with the reason field:
invalid_credentials: The login or the password is wrong, or the password change page was opened outside the sign-in that led to it.invalid_totp: The 2FA code is wrong or has already been used.not_in_allowed_groups: The user is not in the groups that the provider settings require.not_allowed: The user is not on an allow-list. Therulefield names the list.account_locked: The user is locked.rate_limited: Too many failed attempts came from the client IP address. The line contains the requestedpathinstead of the provider, the client and the user.upstream_refused: The provider refused to extend the session because the user no longer exists in the provider or has lost access.revoked: The refresh token, the authorization code or the browser session was issued before aLock,ResetPassword,Reset2FAorLogoutoperation or before the user was deleted.login_expired: The sign-in request expired or was not found (the sign-in already finished, or it never existed, including a forged or replayedstate). The line contains the requestedpathand, if the request path contains the provider ID,connector_idinstead of the client and the user.
The line also contains connector_id, client_id and the known user attributes, such as username and email. A group refusal also contains user_groups and allowed_groups. A failure of Dex or of the provider is logged at the ERROR level.
To find the refusals in the Dex logs, run:
d8 k -n d8-user-authn logs -l app=dex -c dex --tail=-1 | grep '"reason"'
A UserOperation is in the Failed status — what should I do?
Check the status.message field of the UserOperation for the error description:
d8 k get useroperation <name> -o jsonpath='{.status.message}'
Fix the cause (for example, an invalid password hash or a non-existent user), then create a new UserOperation. A UserOperation runs once, and changes to its spec after creation are ignored.
How do I unlock a user?
Use the command:
d8 iam user unlock <USERNAME>
The command unlocks a local user. To unlock a user of an external provider, create a UserOperation with type: Unlock and spec.target as described in Operations on external users. A UserOperation with spec.user unlocks a local user as well. The Lock operation has already ended the sessions of the user, and Unlock does not restore them, so the user signs in again. Only Reset2FA removes the user’s 2FA secret.
A user was locked automatically — why?
The number of failed login attempts exceeded passwordPolicy.lockout.maxAttempts. The user is locked for the duration specified in passwordPolicy.lockout.lockDuration and is unlocked automatically afterwards. Local users are always covered. LDAP and Crowd users are locked only if their type is listed in passwordPolicy.lockout.applyToConnectors. Dex stores the lock itself and does not create a UserOperation. An administrator can also unlock the user manually with d8 iam user unlock <USERNAME> (local users) or by creating a UserOperation with type: Unlock (with spec.user for local users, with spec.target for LDAP and Crowd users).
The Locked and LockedUntil columns of d8 k get useraccounts show whether a user is locked and until when. The module keeps a UserAccount object for each local user and for each user who has signed in through an external provider.
Can I delete a UserIdentity object?
No. Dex keeps the 2FA secret, the lock and the last sign-in of an account in a UserIdentity object in the d8-user-authn namespace. The object also holds the generation of the account in the user-authn.deckhouse.io/generation annotation, which the module uses to revoke the account’s tokens. The module refuses a request to delete a UserIdentity. To remove a local user, delete the User. To reset 2FA or a lock, use a UserOperation of the Reset2FA or Unlock type.
Can I cancel a UserOperation?
No. A UserOperation runs once. To reverse its effect, create an opposite operation, for example a UserOperation with type: Unlock after a Lock operation.