Available in: Open/CE, SE, SE+, Ultimate/EE
Included in extensions: Advanced Storage, Core Storage
The module lifecycle stage: Generally available version
The module has requirements for installation
The module is guaranteed to work only with stock kernels that are shipped with the supported distributions.
The module may work with other kernels or distributions, but its stable operation and availability of all features is not guaranteed.
How to explicitly enable or disable the module…
You may explicitly enable or disable the module in one of the following ways:
-
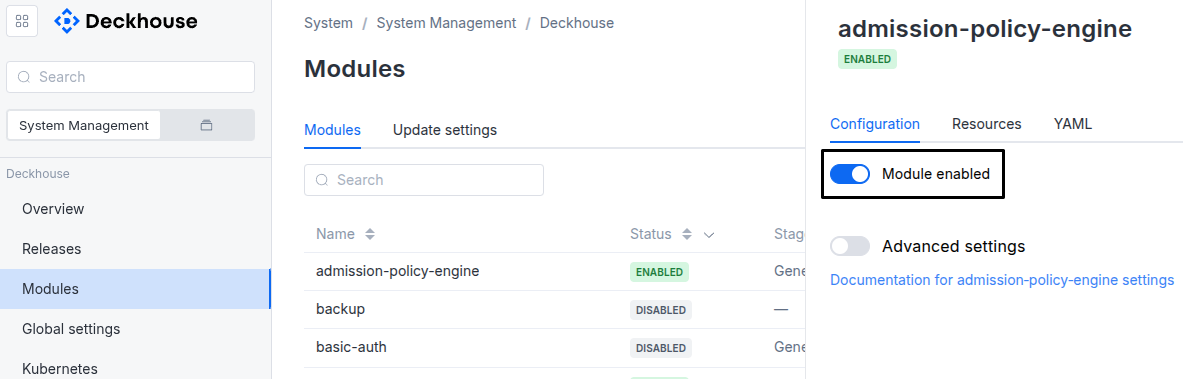
Via Deckhouse web UI. In the “System” → “System Management” → “Deckhouse” → “Modules” section, open the
sds-node-configuratormodule and enable (or disable) the “Module enabled” toggle. Save changes.Example:
-
Via Deckhouse CLI (d8).
Use the d8 system module enable command for enabling, or d8 system module disable command for disabling the module (you need Deckhouse CLI (d8), configured to work with the cluster).
Example of enabling the module:
d8 system module enable sds-node-configurator -
Using ModuleConfig
sds-node-configurator.Set
spec.enabledtotrueorfalsein ModuleConfigsds-node-configurator(create it if necessary).Example of a manifest to enable module
sds-node-configurator:apiVersion: deckhouse.io/v1alpha1 kind: ModuleConfig metadata: name: sds-node-configurator spec: enabled: true
You can configure the module in one of the following ways:
-
Via Deckhouse web UI.
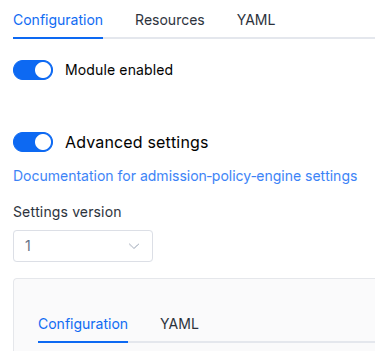
In the “System” → “System Management” → “Deckhouse” → “Modules” section, open the
sds-node-configuratormodule and enable the “Advanced Settings” toggle. Fill in the required fields in the “Configuration” tab or specify the module settings in YAML format on the “YAML” tab, without the top-levelsettingskey. Save the changes.Example:
You can also edit the ModuleConfig object
sds-node-configuratoron the “YAML” tab in the module settings window (“System” → “System Management” → “Deckhouse” → “Modules”, open the modulesds-node-configurator) by specifying the schema version in thespec.versionparameter and the necessary module parameters in thespec.settingssection. -
Via Deckhouse CLI (d8) (requires Deckhouse CLI (d8) configured to work with the cluster).
Edit the existing ModuleConfig
sds-node-configurator(for more details on configuring Deckhouse Platform, see the documentation) by executing the following command:d8 k edit mc sds-node-configuratorMake the necessary changes in the
spec.settingssection. If necessary, specify the schema version in thespec.versionparameter. Save the changes.You can also create a manifest file for ModuleConfig
sds-node-configuratorusing the example below. Fill in thespec.settingssection with the required module parameters. If necessary, specify the schema version in thespec.versionparameter.Apply the manifest using the following command (indicate the manifest file name):
d8 k apply -f <FILENAME>Example of a manifest for ModuleConfig
sds-node-configurator:apiVersion: deckhouse.io/v1alpha1 kind: ModuleConfig metadata: name: sds-node-configurator spec: version: 1 enabled: true settings: # Module parameters from the "Parameters" section below.
Requirements
To the Deckhouse Platform version: 1.72 and above.
Parameters
Schema version: 1
-
-
booleansettings.disableDsDisable
sds-node-configuratorDaemonSet.Default:
false -
booleansettings.enableNetlinkBlockDeviceDiscoveryUse netlink/sysfs instead of
lsblkas the data source for block device discovery on the agent. When disabled, the agent discovers block devices vialsblk.Default:
false -
booleansettings.enableThinProvisioningEnable support of thin LVM volumes.
Default:
true -
stringsettings.fileDevicesDirectory
Base directory on each node under which the agent is allowed to create backing files for file-backed LVM devices (
spec.fileDevices).Every
spec.fileDevices[].directorymust be this directory or a subdirectory of it; the agent rejects backing files outside this subtree to prevent an arbitrary host path (for example/etcor/var/lib/kubelet) from being filled up. Override it to point at a dedicated data disk mounted on the node when the default location does not have enough space — the default shares a filesystem with/var/lib/kubeletand/var/lib/containerdon a standard node layout.The previous default,
/opt/deckhouse/sds/file-devices, is accepted in addition to whatever is configured here.spec.fileDevices[].directoryis immutable, so entries created before the module’s node tree moved keep naming it and cannot be edited; they go on working where they are.The filesystem root (
/) is not accepted: it would make every absolute path a valid subdirectory and disable the restriction entirely.Default:
/var/lib/deckhouse/sds/file-devicesPattern:
^/[^/]+(/[^/]+)*$ -
integersettings.fileDevicesMinFreeSpacePercent
Share of the backing-file filesystem, in percent, that the agent keeps free when creating or growing a file-backed LVM device (
spec.fileDevices).Backing files are preallocated, and by default they live on the node’s root filesystem. Allocating down to the last free byte is what causes a node-level outage rather than a mere provisioning error: kubelet starts evicting pods at
nodefs.available<10%, long before the filesystem is actually full. The default of 15% matches kubelet’s stricterimagefs.availablethreshold and leaves a margin above thenodefsone.An entry that does not fit within this limit is not provisioned and is reported on the LVMVolumeGroup’s
VGConfigurationAppliedcondition; the Volume Group itself keeps working.Lower it only when
fileDevicesDirectorypoints at a dedicated disk that nothing else on the node depends on.0disables the reserve entirely.Default:
15Allowed values:
0 <= X <= 90 -
stringsettings.logLevelModule application log level.
Default:
INFOAllowed values:
ERROR,WARN,INFO,DEBUG,TRACE -
integersettings.missingBlockDeviceRetentionHours
How long, in hours, a BlockDevice resource whose device has disappeared from the node is kept before the agent deletes it.
A BlockDevice that is not consumable (typically one already used as an LVM Physical Volume) is not deleted when its device disappears: it gets the
Missingcondition instead,Unknownat first andTrueonce the device has been absent for 10 minutes. On a node where LUNs are mapped and unmapped dynamically (a virtualization hypervisor, a node attaching disks for virtual machines) every such device would otherwise leave a resource behind forever.The retention is counted from the moment
MissingbecameTrue. A resource is deleted only if no LVMVolumeGroup lists it instatus.nodesand itsstatus.lvmVolumeGroupNamedoes not name an existing LVMVolumeGroup, so a Physical Volume lost from under a live Volume Group stays visible. If the device returns later, the agent creates the resource again.0disables the deletion: the resources are kept until removed manually.Default:
24Allowed values:
0 <= X <= 8760
-