The functionality of the module might change, but the main features will remain. Compatibility with future versions is guaranteed, but might require additional migration steps.
Quick start
Example of creating a virtual machine with Ubuntu 22.04.
- Create a namespace for virtual machines using the commands:
kubectl create ns vms
- Let’s create a virtual image from an external source:
apiVersion: virtualization.deckhouse.io/v1alpha2
kind: VirtualImage
metadata:
  name: ubuntu
  namespace: vms
spec:
  storage: ContainerRegistry
  dataSource:
    type: HTTP
    http:
      url: "https://cloud-images.ubuntu.com/minimal/releases/jammy/release-20230615/ubuntu-22.04-minimal-cloudimg-amd64.img"
- Let’s create a virtual disk from created image:
apiVersion: virtualization.deckhouse.io/v1alpha2
kind: VirtualDisk
metadata:
  name: linux-disk
  namespace: vms
spec:
  persistentVolumeClaim:
    size: 10Gi
    storageClassName: linstor-thin-r2
  dataSource:
    type: ObjectRef
    objectRef:
      kind: VirtualImage
      name: ubuntu
After creating a VirtualDisk in the vms namespace, a pod named vd-importer-* will start, which will load the specified image.
- View the current status of the resource using the command:
kubectl -n vms get virtualdisk -o wide

# NAME         PHASE   CAPACITY   PROGRESS   STORAGECLASS        TARGETPVC                                            AGE
# linux-disk   Ready   10Gi       100%       linstor-thin-r2   vd-linux-disk-2ee8a41a-a0ed-4a65-8718-c18c74026f3c   5m59s
- Create a virtual machine from the following specification:
apiVersion: virtualization.deckhouse.io/v1alpha2
kind: VirtualMachine
metadata:
  name: linux-vm
  namespace: vms
  labels:
    vm: linux
spec:
  virtualMachineClassName: generic # Virtual machine class that defines the vCPU tp, resource sizing policy, and placement of the virtual machine on cluster nodes.
  runPolicy: AlwaysOn # The virtual machine must always be powered on.
  enableParavirtualization: true # Use paravirtualization (virtio).
  osType: Generic
  bootloader: BIOS
  cpu:
    cores: 1
    coreFraction: 10% # Request 10% of one core's CPU time.
  memory:
    size: 1Gi
  provisioning: # Example cloud-init script to create a `cloud` user with the password `cloud`.
    type: UserData
    userData: |
      #cloud-config
      users:
      - name: cloud
        passwd: $6$rounds=4096$vln/.aPHBOI7BMYR$bBMkqQvuGs5Gyd/1H5DP4m9HjQSy.kgrxpaGEHwkX7KEFV8BS.HZWPitAtZ2Vd8ZqIZRqmlykRCagTgPejt1i.
        shell: /bin/bash
        sudo: ALL=(ALL) NOPASSWD:ALL
        chpasswd: { expire: False }
        lock_passwd: false
        ssh_authorized_keys:
          - ssh-rsa AAAAB3NzaC1yc2EAAAADAQABAAABAQDTXjTmx3hq2EPDQHWSJN7By1VNFZ8colI5tEeZDBVYAe9Oxq4FZsKCb1aGIskDaiAHTxrbd2efoJTcPQLBSBM79dcELtqfKj9dtjy4S1W0mydvWb2oWLnvOaZX/H6pqjz8jrJAKXwXj2pWCOzXerwk9oSI4fCE7VbqsfT4bBfv27FN4/Vqa6iWiCc71oJopL9DldtuIYDVUgOZOa+t2J4hPCCSqEJK/r+ToHQbOWxbC5/OAufXDw2W1vkVeaZUur5xwwAxIb3wM3WoS3BbwNlDYg9UB2D8+EZgNz1CCCpSy1ELIn7q8RnrTp0+H8V9LoWHSgh3VCWeW8C/MnTW90IR
  blockDeviceRefs:
    - kind: VirtualDisk
      name: linux-disk
- Check with the command that the virtual machine is created and running:
kubectl -n vms get virtualmachine -o wide

# NAME       PHASE     CORES   COREFRACTION   MEMORY   NODE           IPADDRESS    AGE
# linux-vm   Running   1       10%            1Gi      virtlab-pt-1   10.66.10.2   61s
- Connect to the virtual machine using the console (press
Ctrl+]to exit the console):
d8 v console -n vms linux-vm

# Successfully connected to linux-vm console. The escape sequence is ^]
#
# linux-vm login: cloud
# Password: cloud
# ...
# cloud@linux-vm:~$
Images
VirtualImage and ClusterVirtualImage are intended to store virtual machine disk images or installation images in iso format to create and replicate virtual machine disks in the same way. When connected to a virtual machine, these images are read-only and the iso format installation image will be attached as a cdrom device.
The VirtualImage resource is only available in the namespace in which it was created, while ClusterVirtualImage is available for all namespaces within the cluster.
Depending on the configuration, the VirtualImage resource can store data in DVCR or use platform-provided disk storage (PV). On the other hand, ClusterVirtualImage stores data only in DVCR, providing a single access to all images for all namespaces in the cluster.
Creating and using an image from an HTTP
- Create
VirtualImage:
apiVersion: virtualization.deckhouse.io/v1alpha2
kind: VirtualImage
metadata:
  name: ubuntu-img
  namespace: vms
spec:
  storage: ContainerRegistry
  dataSource:
    type: HTTP
    http:
      url: "https://cloud-images.ubuntu.com/minimal/releases/jammy/release-20230615/ubuntu-22.04-minimal-cloudimg-amd64.img"
- Check the result with the command:
kubectl -n vms get virtualimage -o wide

# NAME         PHASE   CDROM   PROGRESS   STOREDSIZE   UNPACKEDSIZE   REGISTRY URL                                   AGE
# ubuntu-img   Ready   false   100%       285.9Mi      2.2Gi          dvcr.d8-virtualization.svc/vi/vms/ubuntu-img   29s
- The
ClusterVirtualImageresource is created similarly, but does not require thestorageparameters to be specified:
apiVersion: virtualization.deckhouse.io/v1alpha2
kind: ClusterVirtualImage
metadata:
  name: ubuntu-img
spec:
  dataSource:
    type: HTTP
    http:
      url: "https://cloud-images.ubuntu.com/minimal/releases/jammy/release-20230615/ubuntu-22.04-minimal-cloudimg-amd64.img"
- Check the status of
ClusterVirtualImagewith the command:
kubectl get clustervirtualimage -o wide

# NAME          PHASE   CDROM   PROGRESS   STOREDSIZE   UNPACKEDSIZE   REGISTRY URL                                 AGE
# ubuntu-img    Ready   false   100%       285.9Mi      2.2Gi          dvcr.d8-virtualization.svc/cvi/ubuntu-img    52s
Creating and using an image from container registry
- Create an image to store in the
container registry.
Below is an example of creating an image with an Ubuntu 22.04 disk.
- Download the image locally:
curl -L https://cloud-images.ubuntu.com/minimal/releases/jammy/release-20230615/ubuntu-22.04-minimal-cloudimg-amd64.img -o ubuntu2204.img
- Create a Dockerfile with the following contents:
FROM scratch
COPY ubuntu2204.img /disk/ubuntu2204.img
- Build the image and load it into the
container registry. Thecontainer registryin the example below usesdocker.io. To execute, you must have a user account and a configured environment.
docker build -t docker.io/username/ubuntu2204:latest
where username is the username specified when registering with docker.io.
- Load the created image into the
container registryusing the command:
docker push docker.io/username/ubuntu2204:latest
- To use this image, create a
ClusterVirtualImageresource as an example:
apiVersion: virtualization.deckhouse.io/v1alpha2
kind: ClusterVirtualImage
metadata:
  name: ubuntu-2204
spec:
  dataSource:
    type: ContainerImage
    containerImage:
      image: docker.io/username/ubuntu2204:latest
- To view the resource and its status, run the command:
kubectl get clustervirtualimage
Downloading the image from the command line
- To load an image from the command line, first create the following resource as shown below with the
ClusterVirtualImageexample:
apiVersion: virtualization.deckhouse.io/v1alpha2
kind: ClusterVirtualImage
metadata:
  name: some-image
spec:
  dataSource:
    type: Upload
- After the resource is created, check its status using the command:
kubectl get clustervirtualimages some-image -o json | jq .status.uploadCommand -r

> uploadCommand: curl https://virtualization.example.com/upload/dSJSQW0fSOerjH5ziJo4PEWbnZ4q6ffc -T example.iso
ClusterVirtualImage with the Upload type waits for the image to start downloading for 15 minutes after creation. After this time has elapsed, the resource will enter the Failed state.
- Upload the Cirros image (shown as an example):
curl -L http://download.cirros-cloud.net/0.5.1/cirros-0.5.1-x86_64-disk.img -o cirros.img
- Download the image:
curl https://virtualization.example.com/upload/dSJSQW0fSOerjH5ziJo4PEWbnZ4q6ffc -T cirros.img
After the curl command completes, the image should be created.
- Check that the status of the created image is
Ready:
kubectl get clustervirtualimages -o wide

# NAME          PHASE   CDROM   PROGRESS   STOREDSIZE   UNPACKEDSIZE   REGISTRY URL                                 AGE
# some-image    Ready   false   100%       285.9Mi      2.2Gi          dvcr.d8-virtualization.svc/cvi/some-image    2m21s
Disks
The disks in virtual machines are required to write and store data, allowing applications and operating systems to function fully. Under the hood of these disks is the storage provided by the platform.
To find out the available storage on the platform, run the following command:
kubectl get storageclass

# NAME                  PROVISIONER                           RECLAIMPOLICY   VOLUMEBINDINGMODE      ALLOWVOLUMEEXPANSION   AGE
# ceph-pool-r2-csi-rbd  rbd.csi.ceph.com                      Delete          Immediate              true                   85d
# i-linstor-thin-r1     replicated.csi.storage.deckhouse.io   Delete          Immediate              true                   19d
# i-linstor-thin-r2     replicated.csi.storage.deckhouse.io   Delete          Immediate              true                   19d
# i-linstor-thin-r3     replicated.csi.storage.deckhouse.io   Delete          Immediate              true                   19d
# linstor-thin-r1       replicated.csi.storage.deckhouse.io   Delete          WaitForFirstConsumer   true                   19d
# linstor-thin-r2       replicated.csi.storage.deckhouse.io   Delete          WaitForFirstConsumer   true                   19d
# linstor-thin-r3       replicated.csi.storage.deckhouse.io   Delete          WaitForFirstConsumer   true                   19d
# nfs-4-1-wffc          nfs.csi.k8s.io                        Delete          WaitForFirstConsumer   true                   24h
Creating a blank disk
It is possible to create blank disks.
- Create a disk:
apiVersion: virtualization.deckhouse.io/v1alpha2
kind: VirtualDisk
metadata:
  name: vd-blank
  namespace: vms
spec:
  persistentVolumeClaim:
    storageClassName: linstor-thin-r2 # Substitute your SC name `kubectl get storageclass`.
    size: 100M
The created disk can be used to connect to the virtual machine.
- Check the status of the created resource using the command:
kubectl -n vms  get virtualdisk -o wide

#NAME         PHASE   CAPACITY   PROGRESS   STORAGECLASS        TARGETPVC                                            AGE
#vd-blank     Ready   97657Ki    100%       linstor-thin-r1     vd-vd-blank-f2284d86-a3fc-40e4-b319-cfebfefea778     46s
Creating a disk from an image
You can create disks from existing disk images as well as from external resources such as images.
When creating a disk share, you can specify the desired size. If no size is specified, a disk will be created with a size corresponding to the original disk image stored in the VirtualImage or ClusterVirtualImage resource. If you want to create a larger disk, specify the required size.
As an example, the previously created ClusterVirtualImage with the name ubuntu-2204 is considered:
apiVersion: virtualization.deckhouse.io/v1alpha2
kind: VirtualDisk
metadata:
  name: ubuntu-root
  namespace: vms
spec:
  persistentVolumeClaim:
    size: 10Gi
    storageClassName: linstor-thin-r2 # Substitute your SC name `kubectl get storageclass`.
  dataSource:
    type: ObjectRef
    objectRef:
      kind: ClusterVirtualImage
      name: ubuntu-img
Change disk size
Disks can only be resized upwards, even if they are attached to a virtual machine. To do this, edit the spec.persistentVolumeClaim.size field:
Check the size before the change:
kubectl -n vms  get virtualdisk ubuntu-root -o wide

# NAME          PHASE   CAPACITY   PROGRESS   STORAGECLASS      TARGETPVC                                             AGE
# ubuntu-root   Ready   10Gi       100%       linstor-thin-r2   vd-ubuntu-root-bef82abc-469d-4b31-b6c4-0a9b2850b956   2m25s
Let’s apply the changes:
kubectl -n vms patch virtualdisk ubuntu-root --type merge -p '{"spec":{"persistentVolumeClaim":{"size":"11Gi"}}}'
Let’s check the size after the change:
kubectl -n vms get virtualdisk ubuntu-root -o wide

# NAME          PHASE   CAPACITY   PROGRESS   STORAGECLASS      TARGETPVC                                             AGE
# ubuntu-root   Ready   11Gi       100%       linstor-thin-r2   vd-ubuntu-root-bef82abc-469d-4b31-b6c4-0a9b2850b956   4m13s
Connecting disks to running virtual machines
Disks can be attached in a running virtual machine using the VirtualMachineBlockDeviceAttachment resource:
apiVersion: virtualization.deckhouse.io/v1alpha2
kind: VirtualMachineBlockDeviceAttachment
metadata:
  name: vd-blank-attachment
  namespace: vms
spec:
  virtualMachineName: linux-vm # The name of the virtual machine to which the disk will be attached.
  blockDeviceRef:
    kind: VirtualDisk
    name: vd-blank # The name of the disk to be attached.
If you delete the VirtualMachineBlockDeviceAttachment resource, the disk will be disconnected from the virtual machine.
To see the list of attached disks in a running virtual machine, run the command:
kubectl -n vms get virtualmachineblockdeviceattachments

# NAME                       PHASE
# vd-blank-attachment       Attached
Virtual Machines
So, now we have disks and images, let’s move on to the most important thing - creating a virtual machine.
To create a virtual machine, the VirtualMachine resource is used, its parameters allow you to configure:
- the resources required for the virtual machine (processor, memory, disks and images);
- rules of virtual machine placement on cluster nodes;
- boot loader settings and optimal parameters for the guest OS;
- virtual machine startup policy and policy for applying changes;
- initial configuration scenarios (cloud-init).
Creating a disk for the virtual machine
The first thing we need to do before creating a virtual machine resource is to create a disk with the installed OS.
Let’s create a disk for the virtual machine:
apiVersion: virtualization.deckhouse.io/v1alpha2
kind: VirtualDisk
metadata:
  name: ubuntu-2204-root
  namespace: vms
spec:
  persistentVolumeClaim:
    size: 10Gi
  dataSource:
    type: HTTP
    http:
      url: "https://cloud-images.ubuntu.com/minimal/releases/jammy/release-20230615/ubuntu-22.04-minimal-cloudimg-amd64.img"
Creating a virtual machine
Below is an example of a simple virtual machine configuration running Ubuntu 22.04. The example uses the cloud-init script, which installs the nginx package and creates the user cloud, with the password cloud:
apiVersion: virtualization.deckhouse.io/v1alpha2
kind: VirtualMachine
metadata:
  name: linux-vm
  namespace: vms
  labels:
    vm: linux
spec:
  virtualMachineClassName: generic
  runPolicy: AlwaysOn
  provisioning:
    type: UserData
    userData: |
      #cloud-config
      package_update: true
      packages:
        - nginx
      run_cmd:
        - systemctl daemon-relaod
        - systemctl enable --now nginx
      users:
      - name: cloud
        # password: cloud
        passwd: $6$rounds=4096$vln/.aPHBOI7BMYR$bBMkqQvuGs5Gyd/1H5DP4m9HjQSy.kgrxpaGEHwkX7KEFV8BS.HZWPitAtZ2Vd8ZqIZRqmlykRCagTgPejt1i.
        shell: /bin/bash
        sudo: ALL=(ALL) NOPASSWD:ALL
        chpasswd: { expire: False }
        lock_passwd: false
  cpu:
    cores: 1
  memory:
    size: 2Gi
  blockDeviceRefs:
    # The order of disks and images in this block determines the boot priority.
    - kind: VirtualDisk
      name: ubuntu-2204-root
If there is some private data, the initial initial initialization script of the virtual machine can be created in secret.
Example of a secret:
apiVersion: v1
kind: Secret
metadata:
  name: linux-vm-cloud-init
  namespace: vms
data:
  userData: # Here's the cloud-init-config in Base64.
type: Opaque
What it would look like in a virtual machine specification:
spec:
  provisioning:
    type: UserDataRef
    userDataRef:
      kind: Secret
      name: linux-vm-cloud-init
- Let’s create the virtual machine from the manifest above.
After startup, the virtual machine must be in Ready status.
kubectl -n vms get virtualmachine

# NAME       PHASE     NODE          IPADDRESS     AGE
# linux-vm   Running   node-name-x   10.66.10.1    5m
After creation, the virtual machine will automatically get an IP address from the range specified in the module settings (virtualMachineCIDRs block).
- To commit the IP address of the virtual machine before it starts, perform the following steps:
- Create a
VirtualMachineIPAddressresource that commits the desired IP address of the virtual machine. The requested address must be from the address range specified in thekubectl get mc virtualization -o jsonpath=“{.spec.settings.virtualMachineCIDRs}”module settings.
apiVersion: virtualization.deckhouse.io/v1alpha2
kind: VirtualMachineIPAddress
metadata:
  name: <ip-address-name>
  namespace: <namespace>
spec:
  type: Static
  staticIP: "W.X.Y.Z"
- Commit the changes to the virtual machine specification accordingly:
spec:
  virtualMachineIPAddressName: <ip-address-name>
2. Configuring virtual machine placement rules
- Let’s assume that we need the virtual machine to run on a given set of nodes, for example on the
systemnode group, the following configuration fragment will help us to do this:
spec:
  tolerations:
    - key: "node-role.kubernetes.io/system"
      operator: Exists
      effect: NoSchedule
  nodeSelector:
    node-role.kubernetes.io/system: ""
- Make changes to the previously created virtual machine specification.
3. Configuring how changes are applied
Changes made to the virtual machine configuration will not be displayed because the Manual change policy is applied by default. The virtual machine must be rebooted to apply the changes.
- To check the status of the virtual machine, enter the command:
kubectl -n vms get linux-vm -o jsonpath='{.status}'
The .status.restartAwaitingChanges field will display the changes that need to be confirmed.
- Create and apply the resource that is responsible for the declarative way of managing the state of the virtual machine, as presented in the example below:
cat <<EOF | kubectl apply -f -
apiVersion: virtualization.deckhouse.io/v1alpha2
kind: VirtualMachineOperation
metadata:
  name: restart-linux-vm
  namespace: vms
spec:
  virtualMachineName: linux-vm
  type: Restart
EOF
- Check the status of the created resource:
kubectl -n vms get virtualmachineoperations restart-linux-vm

# NAME                PHASE       VM         AGE
# restart-linux-vm    Completed   linux-vm   1m
If the created resource is in the Completed state, the virtual machine restart has completed and the new virtual machine configuration settings have been applied.
To apply changes to the virtual machine configuration automatically when the virtual machine restarts, configure the change application policy as follows (example below):
spec:
  disruptions:
    approvalMode: Automatic
4. Virtual machine startup policy
- Connect to the virtual machine using the serial console using the command:
d8 v console -n vms linux-vm
- Terminate the virtual machine using the command:
cloud@linux-vm$ sudo poweroff
Next, look at the status of the virtual machine using the command:
kubectl -n vms get virtualmachine

# NAME       PHASE     NODE           IPADDRESS   AGE
# linux-vm   Running   node-name-x    10.66.10.1  5m
Even though the virtual machine was shut down, it restarted again. Reason for restarting:
Unlike traditional virtualization systems, we use a run policy to define the state of the virtual machine, which defines the required state of the virtual machine at any time.
When a virtual machine is created, the
runPolicy: AlwaysOnparameter is used. This means that the virtual machine will run even if for some reason there is a shutdown, restart, or failure that causes the virtual machine to stop running.
To shut down the virtual machine, change the policy value to AlwaysOff. This will correctly shut down the virtual machine.
Virtual Machine Classes
The VirtualMachineClass resource is designed for centralized configuration of preferred virtual machine settings. It allows you to define CPU instructions and configuration policies for CPU and memory resources for virtual machines, as well as define ratios of these resources. In addition, VirtualMachineClass provides management of virtual machine placement across platform nodes. This allows administrators to effectively manage virtualization platform resources and optimally place virtual machines on platform nodes.
The virtualization platform provides 3 predefined VirtualMachineClass resources:
kubectl get virtualmachineclass
NAME               PHASE   AGE
host               Ready   6d1h
host-passthrough   Ready   6d1h
generic            Ready   6d1h
host- this class uses a virtual CPU that is as close as possible to the platform node’s CPU in terms of instruction set. This provides high performance and functionality, as well as compatibility with live migration for nodes with similar processor types. For example, VM migration between nodes with Intel and AMD processors will not work. This is also true for different generations of processors, as their instruction set is different.host-passthrough- uses the physical CPU of the platform node directly without any modifications. When using this class, the guest VM can only be migrated to a target node that has a CPU that exactly matches the CPU of the source node.genericis a universal CPU model that uses a fairly old, but supported by most modern CPUs, Nehalem model. This allows VMs to run on any nodes in the cluster with live migration capability.
VirtualMachineClass is mandatory to be specified in the virtual machine configuration, an example of how to specify the class in the VM specification:
apiVersion: virtualization.deckhouse.io/v1alpha2
kind: VirtualMachine
metadata:
  name: linux-vm
spec:
  virtualMachineClassName: generic # the name of the resource VirtualMachineClass
  ...
Platform administrators can create the required classes of VMs according to their needs, but it is recommended to create the required minimum. Let’s consider the following example:
VirtualMachineClass configuration example
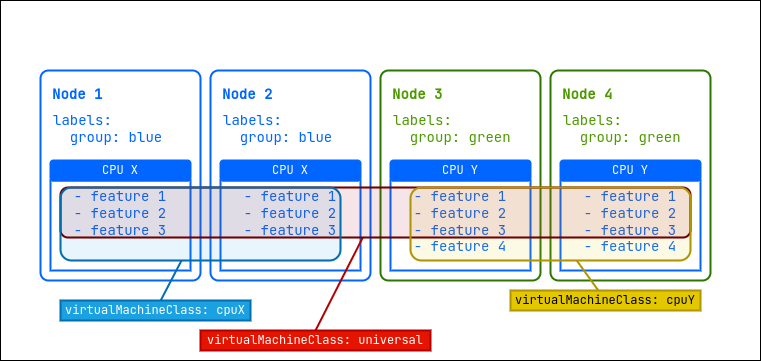
Let’s imagine we have a cluster of four nodes. Two of these nodes labeled group=blue have a “CPU X” processor with three instruction sets, and the other two nodes labeled group=green have a newer “CPU Y” processor with four instruction sets.
To optimally utilize the resources of this cluster, it is recommended to create three additional virtual machine classes (VirtualMachineClass):
- universal: This class will allow virtual machines to run on all nodes in the platform and migrate between them. It will use the instruction set for the lowest CPU model to ensure the greatest compatibility.
- cpuX: This class will be for virtual machines that should only run on nodes with a “CPU X” processor. VMs will be able to migrate between these nodes using the available “CPU X” instruction sets.
- cpuY: This class is for VMs that should only run on nodes with a “CPU Y” processor. VMs will be able to migrate between these nodes using the available “CPU Y” instruction sets.
CPU instruction sets are a list of all the instructions that a processor can execute, such as addition, subtraction, or memory operations. They determine what operations are possible, affect program compatibility and performance, and can change from one generation of processors to the next.
Sample resource configurations for a given cluster:
---
apiVersion: virtualization.deckhouse.io/v1alpha2
kind: VirtualMachineClass
metadata:
  name: universal
spec:
  cpu:
    discovery: {}
    type: Discovery
  sizingPolicies: { ... }
---
apiVersion: virtualization.deckhouse.io/v1alpha2
kind: VirtualMachineClass
metadata:
  name: cpuX
spec:
  cpu:
    discovery: {}
    type: Discovery
  nodeSelector:
    matchExpressions:
      - key: group
        operator: In
        values: ["blue"]
  sizingPolicies: { ... }
---
apiVersion: virtualization.deckhouse.io/v1alpha2
kind: VirtualMachineClass
metadata:
  name: cpuY
spec:
  cpu:
    discovery:
      matchExpressions:
        - key: group
          operator: In
          values: ["green"]
    type: Discovery
  sizingPolicies: { ... }
Other configuration options
Example of VirtualMachineClass resource configuration:
apiVersion: virtualization.deckhouse.io/v1alpha2
kind: VirtualMachineClass
metadata:
  name: discovery
spec:
  cpu:
    # configure a generic vCPU for a given set of nodes
    discovery:
      matchExpressions:
        - key: node-role.kubernetes.io/control-plane
          operator: DoesNotExist
    type: Discovery
  # allow VMs with this class to run only on nodes in the worker group
  nodeSelector:
    matchExpressions:
      - key: node.deckhouse.io/group
        operator: In
        values:
          - worker
  # resource configuration policy
  sizingPolicies:
    # for a range of 1 to 4 cores, it is possible to use 1 to 8GB of RAM in 512Mi increments
    # i.e. 1GB, 1.5GB, 2GB, 2.5GB etc.
    # no dedicated cores allowed
    # and all corefraction options are available
    - cores:
        min: 1
        max: 4
      memory:
        min: 1Gi
        max: 8Gi
        step: 512Mi
      dedicatedCores: [false]
      coreFractions: [5, 10, 20, 50, 100]
    # for a range of 5 to 8 cores, it is possible to use 5 to 16GB of RAM in 1GB increments
    # i.e. 5GB, 6GB, 7GB, etc.
    # it is not allowed to use dedicated cores
    # and some corefraction options are available
    - cores:
        min: 5
        max: 8
      memory:
        min: 5Gi
        max: 16Gi
        step: 1Gi
      dedicatedCores: [false]
      coreFractions: [20, 50, 100]
    # for a range of 9 to 16 cores, it is possible to use 9 to 32GB of RAM in 1GB increments
    # it is possible to use dedicated cores (or not)
    # and some variants of the corefraction parameter are available
    - cores:
        min: 9
        max: 16
      memory:
        min: 9Gi
        max: 32Gi
        step: 1Gi
      dedicatedCores: [true, false]
      coreFractions: [50, 100]
    # for the range from 17 to 1024 cores it is possible to use from 1 to 2 GB of RAM per core
    # only dedicated cores are available for use
    # and the only parameter corefraction = 100%
    - cores:
        min: 17
        max: 1024
      memory:
        perCore:
          min: 1Gi
          max: 2Gi
      dedicatedCores: [true]
      coreFractions: [100]
The following are fragments of VirtualMachineClass configurations for different tasks:
- a class with a vCPU with the required set of processor instructions, for this we use
type: Featuresto specify the required set of supported instructions for the processor:
spec:
  cpu:
    features:
      - vmx
    type: Features
- class c universal vCPU for a given set of nodes, for this we use
type: Discovery:
spec:
  cpu:
    discovery:
      matchExpressions:
        - key: node-role.kubernetes.io/control-plane
          operator: DoesNotExist
    type: Discovery
- to create a vCPU of a particular processor with a predefined set of instructions, we use
type: Model. In advance, to get a list of supported CPU names for a cluster node, run the command:
kubectl get nodes <node-name> -o json | jq '.metadata.labels | to_entries[] | select(.key | test("cpu-model")) | .key | split("/")[1]'' -r

# Sample output:
#
# IvyBridge
# Nehalem
# Opteron_G1
# Penryn
# SandyBridge
# Westmere
further specify in the VirtualMachineClass resource specification:
spec:
  cpu:
    model: IvyBridge
    type: Model