Reliability mechanisms
Migration and maintenance mode
Virtual machine migration is an important feature in virtualized infrastructure management. It allows you to move running virtual machines from one physical node to another without shutting them down. Virtual machine migration is required for a number of tasks and scenarios:
- Load balancing: Moving virtual machines between nodes allows you to evenly distribute the load on servers, ensuring that resources are utilized in the best possible way.
- Node maintenance: Virtual machines can be moved from nodes that need to be taken out of service to perform routine maintenance or software upgrade.
- Upgrading a virtual machine firmware: The migration allows you to upgrade the firmware of virtual machines without interrupting their operation.
Live migration has the following limitations:
- By default, each node prepares and transfers the memory of only one virtual machine at a time, and accepts the memory of only one incoming migration at a time. See the “Tuning live migration concurrency” section to change these limits.
- The total number of concurrent migrations in the cluster cannot exceed the number of nodes where running virtual machines is permitted.
- The bandwidth for a single migration is limited to 5 Gbps.
Tuning live migration concurrency
A live migration goes through two phases that matter for throughput:
- Preparation: The target pod is scheduled and its devices are attached, up to the
TargetReadystate. No memory is transferred yet. - Sync: The memory of the virtual machine is copied to the target over the network. This is the phase that consumes migration bandwidth.
Concurrency is bounded by three independent limits, each counted per node and defaulting to 1. They are configured with annotations on the virtualization ModuleConfig:
| Limit | Annotation | Counted per | Bounds |
|---|---|---|---|
| Preparation pool | virtualization.deckhouse.io/parallel-outbound-migrations-per-node |
source node | migrations being prepared in parallel |
| Outbound sync pool | virtualization.deckhouse.io/parallel-sync-migrations-per-node |
source node | migrations transferring memory out of the node |
| Inbound sync pool | virtualization.deckhouse.io/parallel-inbound-migrations-per-node |
target node | migrations transferring memory into the node |
A migration starts transferring memory only when a sync slot is free on its source node and an inbound slot is free on its target node. Until then it stays prepared and parked at TargetReady, and its VirtualMachineOperation stays in the Pending phase:
- waiting for a source-node sync slot — reason
WaitingForSyncSlot; - waiting for a target-node inbound slot — message
Target node has no free inbound migration slots.
Speeding up a node drain. With every limit at the default 1, a drain migrates virtual machines strictly one at a time: prepare one, transfer it, then start the next. Raising only the preparation pool turns the drain into a pipeline — the next virtual machines prepare their targets while the current one transfers memory, and each starts its transfer as soon as the previous one finishes. Because the sync pools stay at 1, at most one memory transfer runs per node at a time, so no extra network contention is introduced.
Example — pipeline a drain while keeping memory transfers serialized:
apiVersion: deckhouse.io/v1alpha1
kind: ModuleConfig
metadata:
  name: virtualization
  annotations:
    # Prepare up to 3 migrations per source node in parallel.
    virtualization.deckhouse.io/parallel-outbound-migrations-per-node: "3"
    # Transfer the memory of one migration at a time out of a node.
    virtualization.deckhouse.io/parallel-sync-migrations-per-node: "1"
    # Transfer the memory of one migration at a time into a node.
    virtualization.deckhouse.io/parallel-inbound-migrations-per-node: "1"
To disable a sync limiter entirely, so that concurrency is bounded only by the preparation pool and by KubeVirt’s own limits, set the corresponding annotation to disabled:
virtualization.deckhouse.io/sync-migration-limit: "disabled"
virtualization.deckhouse.io/inbound-migration-limit: "disabled"
Start migration of an arbitrary machine
The following is an example of migrating a selected virtual machine.
-
Before starting the migration, check the current status of the virtual machine:
d8 k get vmExample output:
NAME                                   PHASE     NODE           IPADDRESS     AGE
linux-vm                              Running   virtlab-pt-1   10.66.10.14   79m
We can see that it is currently running on the
virtlab-pt-1node. -
To migrate a virtual machine from one node to another taking into account the virtual machine placement requirements, the VirtualMachineOperation (
vmop) resource with theEvicttype is used. Create this resource following the example:d8 k create -f - <<EOF apiVersion: virtualization.deckhouse.io/v1alpha2 kind: VirtualMachineOperation metadata: generateName: evict-linux-vm- spec: # Virtual machine name. virtualMachineName: linux-vm # An operation for the migration. type: Evict EOF -
Immediately after creating the
vmopresource, run the following command:d8 k get vm -wExample output:
NAME PHASE NODE IPADDRESS AGE linux-vm Running virtlab-pt-1 10.66.10.14 79m linux-vm Migrating virtlab-pt-1 10.66.10.14 79m linux-vm Migrating virtlab-pt-1 10.66.10.14 79m linux-vm Running virtlab-pt-2 10.66.10.14 79m -
If you need to abort the migration, delete the corresponding
vmopresource while it is in thePendingorInProgressphase.
How to start VM migration in the web interface:
- Go to the “Projects” tab and select the desired project.
- Go to the “Virtualization” → “Virtual Machines” section.
- Select the desired virtual machine from the list and click the ellipsis button.
- Select
Migratefrom the pop-up menu. - Confirm or cancel the migration in the pop-up window.
Dedicated migration network
By default, live migration traffic flows over the node’s default network and competes with workload traffic. You can also route it over a dedicated VLAN provisioned by the sdn module.
Prerequisites:
- The
sdnmodule is enabled. - A SystemNetwork resource exists and is in the
Readystate.
To enable the feature, set spec.settings.liveMigration.network on the virtualization ModuleConfig: use type: SystemNetwork and specify the name of the prepared SystemNetwork under systemNetwork.name. Once configured, every VM migration in the cluster runs over the specified SystemNetwork VLAN.
spec:
  settings:
    liveMigration:
      network:
        type: SystemNetwork
        systemNetwork:
          name: migration-net
To route migration traffic back over the default node network, remove the network block (it is the implicit default when unset).
Maintenance mode
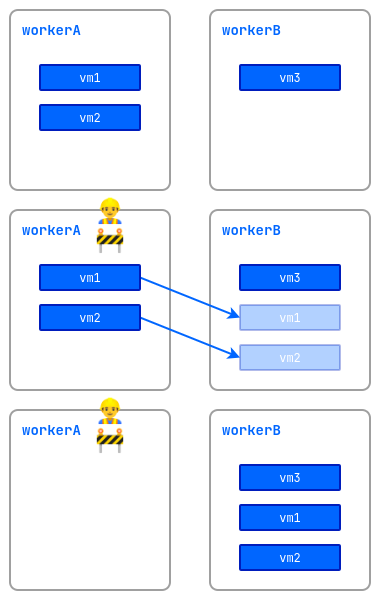
When working on nodes with virtual machines running, there is a risk of disrupting their performance. To avoid this, you can put a node into the maintenance mode and migrate the virtual machines to other free nodes.
To do this, run the following command:
d8 k drain <nodename> --ignore-daemonsets --delete-emptydir-data
Where <nodename> is a node scheduled for maintenance, which needs to be freed from all resources (including system resources).
If you need to evict only virtual machines off the node, run the following command:
d8 k drain <nodename> --pod-selector vm.kubevirt.internal.virtualization.deckhouse.io/name --delete-emptydir-data
After running the d8 k drain command, the node will enter maintenance mode and no virtual machines will be able to start on it.
To take it out of maintenance mode, stop the drain command (Ctrl+C), then execute:
d8 k uncordon <nodename>
How to perform the operation in the web interface:
- Go to the “System” tab, then to the “Nodes” section→ “Nodes of all groups”.
- Select the desired node from the list and click the “Cordon + Drain” button.
- To remove it from maintenance mode, click the “Uncordon” button.
VM Rebalancing
The platform allows you to automatically manage the placement of running virtual machines in the cluster. To enable this feature, activate the descheduler module.
Live migration of virtual machines between cluster nodes is used for rebalancing.
After the module is enabled, the system automatically monitors the distribution of virtual machines and maintains optimal node utilization. The main features of the module are:
- Load balancing: The system monitors CPU reservation on each node. If more than 80% of CPU resources are reserved on a node, some virtual machines will be automatically migrated to less-loaded nodes. This helps avoid overloads and ensures stable VM operation.
- Correct placement: The system checks whether the current node meets the mandatory requirements of the virtual machine’s requests, as well as rules regarding their relative placement. For example, if rules prohibit placing certain VMs on the same node, the module will automatically move them to a suitable server.
ColdStandby
ColdStandby provides a mechanism to recover a virtual machine from a failure on a node it was running on.
The following requirements must be met for this mechanism to work:
- The virtual machine startup policy (
.spec.runPolicy) must be set to one of the following values:AlwaysOnUnlessStoppedManually,AlwaysOn. - The Fencing mechanism must be enabled on nodes running the virtual machines.
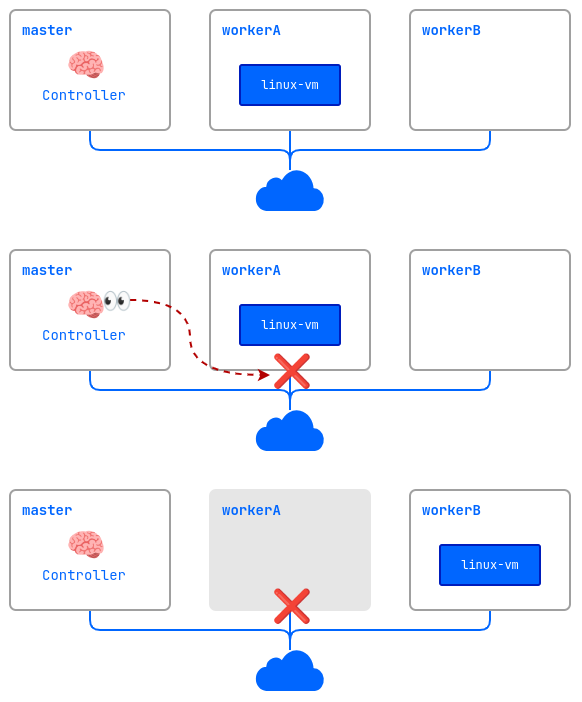
Let’s see how it works on the example:
- A cluster consists of three nodes:
master,workerA, andworkerB. The worker nodes have the Fencing mechanism enabled. Thelinux-vmvirtual machine is running on theworkerAnode. - A problem occurs on the
workerAnode (power outage, no network connection, etc.). - The controller checks the node availability and finds that
workerAis unavailable. - The controller removes the
workerAnode from the cluster. - The
linux-vmvirtual machine is started on another suitable node (workerB).