Virtual machine disks are used to write and store data required for operating systems and applications to run. Various types of storage can be used for this purpose.
The disk specification contains two main blocks:
persistentVolumeClaim: Disk storage parameters (StorageClass and size).dataSource: The source used to create the disk (image, another disk, snapshot).
If dataSource is not specified, an empty disk is created. In this case, you must specify at least the size and StorageClass in persistentVolumeClaim.
If dataSource is specified, you can omit persistentVolumeClaim. Then:
- The disk size is determined automatically based on the source.
- The StorageClass is determined from the source. If it cannot be derived, the cluster default StorageClass is used, or the value configured for disks in the module settings.
Depending on the storage properties, the behavior of disks during creation of virtual machines during operation may differ:
The behavior of disks during their creation depends on the VolumeBindingMode parameter, which defines when exactly the disk is created and on which node:
- Volume type: A storage class can support filesystem volumes (
FileSystem, for example NFS) or block volumes (Block, for example iSCSI, Ceph RBD). ForFileSystemvolumes, a VM disk is created in theqcow2format. Some storage classes support both volume types. VolumeBindingMode:-
Immediate— the disk is created right after the resource is created (the disk is expected to be attachable to a VM on any node in the cluster).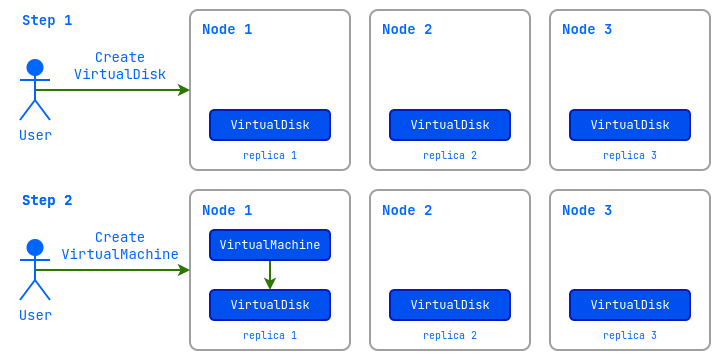
-
WaitForFirstConsumer— the disk is created only after it is attached to a VM and is provisioned on the node where the VM will run.
-
When a disk is created, all parameters (volume type, disk format, volume binding mode, and other settings) are determined automatically based on the capabilities of the selected StorageClass.
Creating disks from ISO images is not supported.
To find out the available storage options, run the following command:
d8 k get storageclass
Example output:
NAME                                 PROVISIONER                           RECLAIMPOLICY   VOLUMEBINDINGMODE      ALLOWVOLUMEEXPANSION   AGE
i-sds-replicated-thin-r1 (default)   replicated.csi.storage.deckhouse.io   Delete          Immediate              true                   48d
i-sds-replicated-thin-r2             replicated.csi.storage.deckhouse.io   Delete          Immediate              true                   48d
i-sds-replicated-thin-r3             replicated.csi.storage.deckhouse.io   Delete          Immediate              true                   48d
sds-replicated-thin-r1               replicated.csi.storage.deckhouse.io   Delete          WaitForFirstConsumer   true                   48d
sds-replicated-thin-r2               replicated.csi.storage.deckhouse.io   Delete          WaitForFirstConsumer   true                   48d
sds-replicated-thin-r3               replicated.csi.storage.deckhouse.io   Delete          WaitForFirstConsumer   true                   48d
rv-thin-r1 (default)                 replicated.csi.storage.deckhouse.io   Delete          Immediate              true                   48d
rv-thin-r2                           replicated.csi.storage.deckhouse.io   Delete          Immediate              true                   48d
nfs-4-1-wffc                         nfs.csi.k8s.io                        Delete          WaitForFirstConsumer   true                   30d
A full description of the disk configuration settings can be found at VirtualDisk resource documentation.
How to find out the available storage options in the DVP web interface:
- Go to the “System” tab, then to the “Storage” section → “Storage Classes”.
Create an empty disk
Empty disks are usually used to install an OS on them, or to store some data.
Create a disk:
d8 k apply -f - <<EOF
apiVersion: virtualization.deckhouse.io/v1alpha2
kind: VirtualDisk
metadata:
  name: blank-disk
spec:
  # Disk storage parameter settings.
  persistentVolumeClaim:
    # Substitute your StorageClass name.
    storageClassName: rv-thin-r2
    size: 100Mi
EOF
After creation, the VirtualDisk resource can be in the following phase:
Pending: Waiting for all dependent resources required for disk creation to be ready.Provisioning: Disk creation process is in progress.Resizing: Process of resizing the disk is in progress.WaitForFirstConsumer: Disk is waiting for the virtual machine that will use it to be created.WaitForUserUpload: Disk is waiting for the user to upload an image (type: Upload).Ready: Disk has been created and is ready for use.Migrating: Live migration of a disk is in progress.Exporting: The disk export process is in progress.Failed: An error occurred during the creation process.PVCLost: System error, PVC with data has been lost.Terminating: Disk is being deleted. The disk may “hang” in this state if it is still connected to the virtual machine.
As long as the disk has not reached the Ready phase, you can modify any fields in the .spec block. When changes are made, the disk creation process is restarted.
After the disk reaches the Ready phase, you can still change .spec.persistentVolumeClaim.size and .spec.persistentVolumeClaim.storageClassName. All other .spec fields are immutable.
If the .spec.persistentVolumeClaim.storageClassName parameter is not specified, the default StorageClass at the cluster level will be used, or for images if specified in module settings.
Diagnosing problems with a resource is done by analyzing the information in the .status.conditions block
Check the status of the disk after creation with the command:
d8 k get vd blank-disk
Example output:
NAME       PHASE   CAPACITY   AGE
blank-disk   Ready   100Mi      1m2s
How to create an empty disk in the web interface (this step can be skipped and performed when creating a VM):
- Go to the “Projects” tab and select the desired project.
- Go to the “Virtualization” → “VM Disks” section.
- Click “Create Disk”.
- In the form that opens, enter
blank-diskin the “Disk Name” field. - In the “Size” field, set the size with the measurement units
100Mi. - In the “StorageClass Name” field, you can select a StorageClass or leave the default selection.
- Click the “Create” button.
- The disk status is displayed at the top left, under the disk name.
Creating a disk from an image
A disk can also be created and populated with data from previously created ClusterVirtualImage and VirtualImage images.
When creating a disk, you can specify its desired size, which must be equal to or larger than the size of the extracted image. If no size is specified, a disk will be created with the size corresponding to the original disk image.
Using the example of the previously created image VirtualImage, let’s consider the command that allows you to determine the size of the unpacked image:
d8 k get vi ubuntu-24-04 -o wide
Example output:
NAME           PHASE   CDROM   PROGRESS   STOREDSIZE   UNPACKEDSIZE   REGISTRY URL                                                                       AGE
ubuntu-24-04   Ready   false   100%       285.9Mi      2.5Gi          dvcr.d8-virtualization.svc/cvi/ubuntu-24-04:eac95605-7e0b-4a32-bb50-cc7284fd89d0   122m
The size you are looking for is specified in the UNPACKEDSIZE column and is 2.5Gi.
Let’s create a disk from this image:
d8 k apply -f - <<EOF
apiVersion: virtualization.deckhouse.io/v1alpha2
kind: VirtualDisk
metadata:
  name: linux-vm-root
spec:
  # Disk storage parameter settings.
  persistentVolumeClaim:
    # Specify a size larger than the value of the unpacked image.
    size: 10Gi
    # Substitute your StorageClass name.
    storageClassName: rv-thin-r2
  # The source from which the disk is created.
  dataSource:
    type: ObjectRef
    objectRef:
      kind: VirtualImage
      name: ubuntu-24-04
EOF
Now create a disk, without explicitly specifying the size:
d8 k apply -f - <<EOF
apiVersion: virtualization.deckhouse.io/v1alpha2
kind: VirtualDisk
metadata:
  name: linux-vm-root-2
spec:
  # Disk storage settings.
  persistentVolumeClaim:
    # Substitute your StorageClass name.
    storageClassName: rv-thin-r2
  # The source from which the disk is created.
  dataSource:
    type: ObjectRef
    objectRef:
      kind: VirtualImage
      name: ubuntu-24-04
EOF
Check the status of the disks after creation:
d8 k get vd
Example output:
NAME           PHASE   CAPACITY   AGE
linux-vm-root    Ready   10Gi       7m52s
linux-vm-root-2  Ready   2590Mi     7m15s
How to create a disk from an image in the web interface (this step can be skipped and performed when creating a VM):
- Go to the “Projects” tab and select the desired project.
- Go to the “Virtualization” → “VM Disks” section.
- Click “Create Disk”.
- In the form that opens, enter
linux-vm-rootin the “Disk Name” field. - In the “Source” field, make sure that the “Project” checkbox is selected.
- Select the image you want from the drop-down list.
- In the “Size” field, you can change the size to a larger one or leave the default selection.
- In the “StorageClass Name” field, you can select a StorageClass or leave the default selection.
- Click the “Create” button.
- The disk status is displayed at the top left, under the disk name.
Upload a disk from the command line
To upload a disk from the command line, first create the VirtualDisk resource as shown in the following example:
d8 k apply -f - <<EOF
apiVersion: virtualization.deckhouse.io/v1alpha2
kind: VirtualDisk
metadata:
  name: uploaded-disk
spec:
  dataSource:
    type: Upload
EOF
Once created, the resource enters the WaitForUserUpload phase, which means it is ready to accept a disk upload.
Two upload options are available: from a cluster node and from any node outside the cluster:
d8 k get vd uploaded-disk -o jsonpath="{.status.imageUploadURLs}" | jq
Example output:
{
  "external": "https://virtualization.example.com/upload/<secret-url>",
  "inCluster": "http://10.222.165.239/upload"
}
Upload the disk using the following command:
curl https://virtualization.example.com/upload/<secret-url> --progress-bar -T <image.name> | cat
After the upload completes, the disk should be created and enter the Ready phase:
d8 k get vd uploaded-disk
Example output:
NAMESPACE   NAME                  PHASE   CAPACITY    AGE
default     uploaded-disk         Ready   3Gi         7d23h
Change disk size
You can increase the size of disks even if they are already attached to a running virtual machine. To do this, edit the spec.persistentVolumeClaim.size field:
Check the size before the change:
d8 k get vd linux-vm-root
Example output:
NAME          PHASE   CAPACITY   AGE
linux-vm-root   Ready   10Gi       10m
Let’s apply the changes:
d8 k patch vd linux-vm-root --type merge -p '{"spec":{"persistentVolumeClaim":{"size":"11Gi"}}}'

# Alternatively, apply the changes by editing the resource.

d8 k edit vd linux-vm-root
Let’s check the size after the change:
d8 k get vd linux-vm-root
Example output:
NAME          PHASE   CAPACITY   AGE
linux-vm-root   Ready   11Gi       12m
How to change the disk size in the web interface:
Method #1:
- Go to the “Projects” tab and select the desired project.
- Go to the “Virtualization” → “VM Disks” section.
- Select the desired disk and click on the pencil icon in the “Size” column.
- In the pop-up window, you can change the size to a larger one.
- Click on the “Apply” button.
- The disk status is displayed in the “Status” column.
Method #2:
- Go to the “Projects” tab and select the desired project.
- Go to the “Virtualization” → “VM Disks” section.
- Select the desired disk and click on its name.
- In the form that opens, on the “Configuration” tab, in the “Size” field, you can change the size to a larger one.
- Click on the “Save” button that appears.
- The disk status is displayed at the top left, under its name.
Migrating disks to other storage
In commercial editions, you can migrate (move) a virtual machine disk to another storage by changing its StorageClass.
Migration is supported for both statically attached disks and dynamically attached (hotplug) disks.
Limitations of disk migration between storage:
- Migration is only available for virtual machines in the
Runningstate. - Migration is only supported between disks of the same type:
Block↔Block,FileSystem↔FileSystem; conversion between different types is not possible.
Example of migrating a disk to the new-storage-class-name StorageClass:
d8 k patch vd disk --type=merge --patch '{"spec":{"persistentVolumeClaim":{"storageClassName":"new-storage-class-name"}}}'
Alternatively, apply the changes by editing the resource:
d8 k edit vd disk
After the disk configuration is updated, a live migration of the VM is triggered, during which the VM disk is moved to the new storage.
If a VM has multiple disks attached, and you need to change the storage class for several of them, this operation must be performed sequentially:
d8 k patch vd disk1 --type=merge --patch '{"spec":{"persistentVolumeClaim":{"storageClassName":"new-storage-class-name"}}}'
d8 k patch vd disk2 --type=merge --patch '{"spec":{"persistentVolumeClaim":{"storageClassName":"new-storage-class-name"}}}'
If migration fails, retry attempts are performed with increasing delays (exponential backoff algorithm). The maximum delay is 300 seconds (5 minutes). Delays are: 5 seconds (1st attempt), 10 seconds (2nd), then each delay doubles until it reaches 300 seconds (7th and subsequent attempts). The first attempt is performed without delay.
To cancel migration, the StorageClass in the specification must be reverted to its original value.