Providing public access using services
It is often necessary to enable access to virtual machines from outside the cluster, for example, for remote administration or connecting to services hosted on the virtual machine. For these purposes, Kubernetes provides special services that route traffic from external networks to the internal resources of the cluster. Let’s explore a few options.
Before proceeding, label the previously created VM:
d8 k label vm linux-vm app=nginx
Example output:
virtualmachine.virtualization.deckhouse.io/linux-vm labeled
Using NodePort service
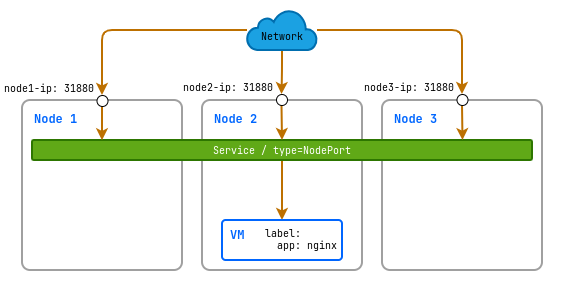
The NodePort service opens a specific port on all nodes in the cluster and redirects the traffic to a designated internal port of the service.
In this example, we will create a NodePort service that will open an external port 31880 on all nodes in the cluster and direct incoming traffic to the internal port 80 of a virtual machine running an Nginx application.
d8 k apply -f - <<EOF
apiVersion: v1
kind: Service
metadata:
  name: linux-vm-nginx-nodeport
spec:
  type: NodePort
  selector:
    # Label by which the service determines which virtual machine to route traffic to.
    app: nginx
  ports:
    - protocol: TCP
      port: 80
      targetPort: 80
      nodePort: 31880
EOF

Using a LoadBalancer service
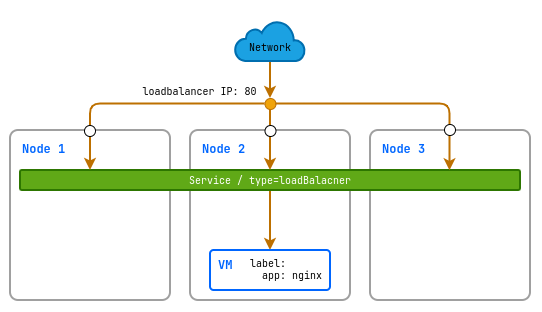
When using the LoadBalancer service type, the cluster creates an external load balancer that distributes incoming traffic across all instances of your virtual machine.
d8 k apply -f - <<EOF
apiVersion: v1
kind: Service
metadata:
  name: linux-vm-nginx-lb
spec:
  type: LoadBalancer
  selector:
    # Label by which the service determines which virtual machine to route traffic to.
    app: nginx
  ports:
    - protocol: TCP
      port: 80
      targetPort: 80
EOF

Using services with active health checks
Warning. This feature is in testing phase and will be available in upcoming versions.
The ServiceWithHealthchecks resource allows you to configure active health checks for a service on specified TCP ports. If the health checks for virtual machines are unsuccessful, those machines will not be included in the traffic balancing.
The following types of health checks are supported:
TCP— A standard check using a TCP connection attempt.HTTP— Sending an HTTP request and expecting a specific response code.PostgreSQL— Sending a SQL query and expecting a successful execution.
Example of a service with an HTTP health check:
d8 k apply -f - <<EOF
apiVersion: network.deckhouse.io/v1alpha1
kind: ServiceWithHealthchecks
metadata:
  name: linux-vm-active-http-check
spec:
  ports:
  - port: 80
    protocol: TCP
    targetPort: 8080
  selector:
    # Label by which the service determines which virtual machine to route traffic to.
    app: nginx
  healthcheck:
    probes:
    - mode: HTTP
      http:
        targetPort: 8080
        method: GET
        path: /healthz
EOF
Example of a service with a TCP health check:
d8 k apply -f - <<EOF
apiVersion: network.deckhouse.io/v1alpha1
kind: ServiceWithHealthchecks
metadata:
  name:  linux-vm-active-tcp-check
spec:
  ports:
  - port: 25
    protocol: TCP
    targetPort: 2525
  selector:
    # Label by which the service determines which virtual machine to route traffic to.
    app: nginx
  healthcheck:
    probes:
    - mode: TCP
      http:
        targetPort: 2525
EOF
Example of a service with a PostgreSQL health check:
d8 k apply -f - <<EOF
apiVersion: network.deckhouse.io/v1alpha1
kind: ServiceWithHealthchecks
metadata:
  name: postgres-read
spec:
  ports:
  - port: 5432
    protocol: TCP
    targetPort: 5432
  selector:
    app: postgres
  healthcheck:
    probes:
    - mode: PostgreSQL
      postgreSQL:
        targetPort: 5432
        dbName: postgres
        authSecretName: cred-secret
        query: "SELECT 1"
EOF
Example of a service with a PostgreSQL health check for write operations:
d8 k apply -f - <<EOF
apiVersion: network.deckhouse.io/v1alpha1
kind: ServiceWithHealthchecks
metadata:
  name: postgres-write
spec:
  ports:
  - port: 5432
    protocol: TCP
    targetPort: 5432
  selector:
    app: postgres
  healthcheck:
    probes:
    - mode: PostgreSQL
      postgreSQL:
        targetPort: 5432
        dbName: postgres
        authSecretName: cred-secret
        query: "SELECT NOT pg_is_in_recovery()"
EOF
Where authSecretName refers to the name of the Secret that contains the credentials for accessing PostgreSQL.
Example of creating a Secret:
d8 k create secret generic cred-secret --from-literal=user=postgres --from-literal=password=example cred-secret
Providing public access to virtual machine services using Ingress
Ingress allows managing incoming HTTP/HTTPS requests and routing them to different servers within your cluster. This is the most suitable method if you want to use domain names and SSL termination for accessing your virtual machines.
To publish a virtual machine service via Ingress, you need to create the following resources:
-
Internal service to bind with`Ingress. Example:
d8 k apply -f - <<EOF apiVersion: v1 kind: Service metadata: name: linux-vm-nginx spec: selector: # Label by which the service determines which virtual machine to route traffic to. app: nginx ports: - protocol: TCP port: 80 targetPort: 80 EOF -
Ingress resource for publishing. Example:
d8 k apply -f - <<EOF
apiVersion: networking.k8s.io/v1
kind: Ingress
metadata:
  name: linux-vm
spec:
  rules:
    - host: linux-vm.example.com
      http:
        paths:
          - path: /
            pathType: Prefix
            backend:
              service:
                name: linux-vm-nginx
                port:
                  number: 80
EOF
How to secure an application published via Ingress
To enable authentication through Dex for your application, follow these steps:
-
Create a custom resource DexAuthenticator. This will create an instance of oauth2-proxy connected to
Dex. After theDexAuthenticatorcustom resource is created, the required objects such as Deployment, Service, Ingress, and Secret will appear in the specifiednamespace.Example of a
DexAuthenticatorresource:apiVersion: deckhouse.io/v1 kind: DexAuthenticator metadata: # Prefix for the Dex authenticator pod names. # For example, if the name prefix is `app-name`, the Dex authenticator pods will have names like `app-name-dex-authenticator-7f698684c8-c5cjg`. name: app-name # Namespace where the Dex authenticator will be deployed. namespace: app-ns spec: # The domain of your application. Requests to this domain will be redirected for authentication through Dex. applicationDomain: "app-name.kube.my-domain.com" # Whether to send the `Authorization: Bearer` header to the application. Useful with `auth_request` in NGINX. sendAuthorizationHeader: false # The name of the Secret with the SSL certificate. applicationIngressCertificateSecretName: "ingress-tls" # The name of the Ingress class to use for the Ingress resource created for the Dex authenticator. applicationIngressClassName: "nginx" # The duration for which the user's session will be considered active. keepUsersLoggedInFor: "720h" # List of groups allowed to authenticate. allowedGroups: - everyone - admins # List of addresses and networks allowed to authenticate. whitelistSourceRanges: - 1.1.1.1/32 - 192.168.0.0/24 -
Connect the application to
Dex. To do this, add the following annotations to the application’s Ingress resource:nginx.ingress.kubernetes.io/auth-signin: https://$host/dex-authenticator/sign_innginx.ingress.kubernetes.io/auth-response-headers: X-Auth-Request-User,X-Auth-Request-Emailnginx.ingress.kubernetes.io/auth-url: https://<NAME>-dex-authenticator.<NS>.svc.{{ C_DOMAIN }}/dex-authenticator/auth, where:NAMEis the value of themetadata.nameparameter of the DexAuthenticator resource;NSis the value of themetadata.namespaceparameter of the DexAuthenticator resource;C_DOMAINis the cluster domain (theclusterDomainparameter) from the ClusterConfiguration resource.
Example annotations in the application’s Ingress resource to connect it to
Dex:annotations: nginx.ingress.kubernetes.io/auth-signin: https://$host/dex-authenticator/sign_in nginx.ingress.kubernetes.io/auth-url: https://app-name-dex-authenticator.app-ns.svc.cluster.local/dex-authenticator/auth nginx.ingress.kubernetes.io/auth-response-headers: X-Auth-Request-User,X-Auth-Request-Email
Configuring CIDR-based restrictions
DexAuthenticator does not have a built-in system for managing authentication permissions based on the user’s IP address. Instead, you can use annotations for Ingress resources:
-
If you need to restrict access by IP while still allowing authentication through Dex, add an annotation with the allowed CIDRs, separated by commas:
nginx.ingress.kubernetes.io/whitelist-source-range: 192.168.0.0/32,1.1.1.1 -
If you need users from the specified networks to be exempt from authentication in Dex, while users from other networks must authenticate through Dex, add the following annotation:
nginx.ingress.kubernetes.io/satisfy: "any"