The VirtualMachineClass resource is intended for centralized configuration of preferred virtual machine parameters. It allows setting parameters for CPU, including instructions and resource configuration policies, as well as defining the ratio between CPU and memory resources. Additionally, VirtualMachineClass manages the placement of virtual machines across the platform nodes, helping administrators efficiently distribute resources and optimally place virtual machines.
During installation, a single VirtualMachineClass generic resource is automatically created. It represents a universal CPU type based on the older, but widely supported, Nehalem architecture. This enables running VMs on any nodes in the cluster and allows live migration.
The administrator can modify the parameters of the generic VirtualMachineClass resource (except for the .spec.cpu section) or delete this resource.
It is not recommended to use the generic VirtualMachineClass for running workloads in production environments, since this class corresponds to a CPU with the smallest feature set.
After all nodes are configured and added to the cluster, it is recommended to create at least one VirtualMachineClass resource of the Discovery type. This ensures that the best available CPU configuration compatible with all CPUs in your cluster is selected, allows virtual machines to make full use of CPU capabilities, and enables seamless migration between nodes.
For a configuration example, see vCPU Discovery configuration example.
To list all VirtualMachineClass resources, run the following command:
d8 k get virtualmachineclass
Example output:
NAME               PHASE   AGE
generic            Ready   6d1h
Make sure to specify the VirtualMachineClass resource in the virtual machine configuration. The following is an example of specifying a class in the VM specification:
apiVersion: virtualization.deckhouse.io/v1alpha2
kind: VirtualMachine
metadata:
  name: linux-vm
spec:
  virtualMachineClassName: generic # VirtualMachineClass resource name.
  ...
Default VirtualMachineClass
For convenience, you can assign a default VirtualMachineClass. This class will be used in the spec.virtualMachineClassName field if it is not specified in the virtual machine manifest.
The default VirtualMachineClass is set via the virtualmachineclass.virtualization.deckhouse.io/is-default-class annotation. There can be only one default class in the cluster. To change the default class, remove the annotation from one class and add it to another.
It is not recommended to set the annotation on the generic class, since the annotation may be removed during an update. It is recommended to create your own class and assign it as the default.
To list all VirtualMachineClass resources, run the following command:
d8 k get virtualmachineclass
Example output (no default class):
NAME                                    PHASE   ISDEFAULT   AGE
generic                                 Ready               1d
host-passthrough-custom                 Ready               1d
To assign the default class, run:
d8 k annotate vmclass host-passthrough-custom virtualmachineclass.virtualization.deckhouse.io/is-default-class=true
Example output:
virtualmachineclass.virtualization.deckhouse.io/host-passthrough-custom annotated
After assigning the default class, list all VirtualMachineClass resources again:
d8 k get vmclass
Example output (with default class):
NAME                                    PHASE   ISDEFAULT   AGE
generic                                 Ready               1d
host-passthrough-custom                 Ready   true        1d
When creating a VM without specifying the spec.virtualMachineClassName field, it will be set to host-passthrough-custom.
VirtualMachineClass settings
The structure of the VirtualMachineClass resource is as follows:
apiVersion: virtualization.deckhouse.io/v1alpha2
kind: VirtualMachineClass
metadata:
  name: <vmclass-name>
  # (optional) Set class as a default.
  # annotations:
  #   virtualmachineclass.virtualization.deckhouse.io/is-default-class: "true"
spec:
  # The section describes virtual processor parameters for virtual machines.
  # This block cannot be changed after the resource has been created.
  cpu: ...
  # (optional) Describes the rules for allocating virtual machines between nodes.
  # When changed, it is automatically applied to all virtual machines using this VirtualMachineClass.
  nodeSelector: ...
  # (optional) Describes the sizing policy for configuring virtual machine resources.
  # When changed, it is automatically applied to all virtual machines using this VirtualMachineClass.
  sizingPolicies: ...
How to configure VirtualMachineClass in the web interface:
- Go to the “System” tab, then to the “Virtualization” → “VM Classes” section.
- Click the “Create” button.
- In the window that opens, enter a name for the VM class in the “Name” field.
Next, let’s take a closer look at the setting blocks.
vCPU settings
The .spec.cpu block allows you to specify or configure the vCPU for the VM.
Settings in the .spec.cpu block cannot be changed after the VirtualMachineClass resource is created.
Examples of the .spec.cpu block settings:
-
A class with a vCPU with the required set of processor instructions. In this case, use
type: Featuresto specify the required set of supported instructions for the processor:spec: cpu: features: - vmx type: FeaturesHow to configure vCPU in the web interface in the VM class creation form:
- In the “CPU Settings” block, select
Featuresin the “Type” field. - In the “Required set of supported instructions” field, select the instructions you need for the processor.
- To create a VM class, click the “Create” button.
- In the “CPU Settings” block, select
-
A class with a universal vCPU for a given set of nodes. In this case, use
type: Discovery:spec: cpu: discovery: nodeSelector: matchExpressions: - key: node-role.kubernetes.io/control-plane operator: DoesNotExist type: DiscoveryHow to perform the operation in the web interface in the VM class creation form:
- In the “CPU Settings” block, select
Discoveryin the “Type” field. - Click “Add” in the “Conditions for creating a universal processor” → “Labels and expressions” block.
- In the pop-up window, you can set the “Key”, “Operator” and “Value” of the key that corresponds to the
spec.cpu.discovery.nodeSelectorsettings. - To confirm the key parameters, click the “Enter” button.
- To create a VM class, click the “Create” button.
- In the “CPU Settings” block, select
-
The vmclass with
type: Hostuses a virtual vCPU that matches the platform node’s vCPU instruction set as closely as possible, ensuring high performance and functionality. It also guarantees compatibility with live migration for nodes with similar vCPU types. For example, it is not possible to migrate a virtual machine between nodes with Intel and AMD processors. This also applies to processors of different generations, as their instruction sets may differ.spec: cpu: type: HostHow to perform the operation in the web interface in the VM class creation form:
- In the “CPU Settings” block, select
Hostin the “Type” field. - To create a VM class, click the “Create” button.
- In the “CPU Settings” block, select
-
A vmclass with
type: HostPassthroughuses a physical CPU of the platform node without modification. A virtual machine using this class can only be migrated to a node that has a CPU that exactly matches the CPU of the source node.spec: cpu: type: HostPassthroughHow to perform the operation in the web interface in the VM class creation form:
- In the “CPU Settings” block, select
HostPassthroughin the “Type” field. - To create a VM class, click the “Create” button.
- In the “CPU Settings” block, select
-
To create a vCPU of a specific CPU with a predefined instruction set, use
type: Model. To get a list of supported CPU names for the cluster node, run the command in advance:d8 k get nodes <node-name> -o json | jq '.metadata.labels | to_entries[] | select(.key | test("cpu-model.node.virtualization.deckhouse.io")) | .key | split("/")[1]' -rExample output:
Broadwell-noTSX
Broadwell-noTSX-IBRS
Haswell-noTSX
Haswell-noTSX-IBRS
IvyBridge
IvyBridge-IBRS
Nehalem
Nehalem-IBRS
Penryn
SandyBridge
SandyBridge-IBRS
Skylake-Client-noTSX-IBRS
Westmere
Westmere-IBRS
After that specify the following in the VirtualMachineClass resource specification:
spec:
  cpu:
    model: IvyBridge
    type: Model
How to perform the operation in the web interface in the VM class creation form:
- In the “CPU Settings” block, select
Modelin the “Type” field. - Select the required processor model in the “Model” field.
- To create a VM class, click the “Create” button.
- In the “CPU Settings” block, select
Placement settings
The .spec.nodeSelector block is optional. It allows you to specify the nodes that will host VMs using this vmclass:
  spec:
    nodeSelector:
      matchExpressions:
        - key: node.deckhouse.io/group
          operator: In
          values:
          - green
Since changing the .spec.nodeSelector parameter affects all virtual machines using this VirtualMachineClass, consider the following:
- For the Enterprise edition, this may cause virtual machines to be migrated to new destination nodes if the current nodes do not meet placement requirements.
- For the Community edition, this may cause virtual machines to restart according to the automatic change application policy set in the
.spec.disruptions.restartApprovalModeparameter.
How to perform the operation in the web interface in the VM class creation form:
- Click “Add” in the “VM scheduling conditions on nodes” → “Labels and expressions” block.
- In the pop-up window, you can set the “Key”, “Operator” and “Value” of the key that corresponds to the
spec.nodeSelectorsettings. - To confirm the key parameters, click the “Enter” button.
- To create a VM class, click the “Create” button.
Sizing policy settings
The .spec.sizingPolicy block allows you to set sizing policies for virtual machine resources that use vmclass.
Changes in the .spec.sizingPolicy block can also affect virtual machines. For virtual machines whose sizing policy will not meet the new policy requirements, the SizingPolicyMatched condition in the .status.conditions block will be false (status: False).
When configuring sizingPolicy, be sure to consider the CPU topology for virtual machines.
The cores block is mandatory and specifies the range of cores to which the rule described in the same block applies.
The ranges [min; max] for the cores parameter must be strictly sequential and non-overlapping.
Correct structure (the ranges follow one another without intersections):
- cores:
    min: 1
    max: 4...

- cores:
    min: 5   # Start of next range = (previous max + 1)
    max: 8
Invalid option (overlapping values):
- cores:
    min: 1
    max: 4...

- cores:
    min: 4   # Error: Value 4 is already included in the previous range
    max: 8
Rule: Each new range must start with a value that immediately follows the max of the previous range.
Additional requirements can be specified for each range of cores:
-
Memory — specify:
- Either minimum and maximum memory for all cores in the range.
- Either the minimum and maximum memory per core (
memory.perCore).
-
Allowed fractions of cores (
coreFractions) — a list of allowed values (for example, [25, 50, 100] for 25%, 50%, or 100% core usage). If thecoreFractionparameter is explicitly specified in the virtual machine specification, its value must be from this list. -
Default core fraction value (
defaultCoreFraction) — specifies which core fraction will be used by default for this range of cores if thecoreFractionparameter is not explicitly specified in the virtual machine specification. This value must be present in thecoreFractionslist. IfdefaultCoreFractionis not set, the default value of100%is applied.
For each range of cores, be sure to specify:
- Either memory (or
memory.perCore). - Either
coreFractions. - Or both parameters at the same time.
Examples of memory volume dependency on the number of cores:
-
When using the
memoryparameter, the allowed memory volume is fixed for the entire range of cores and does not depend on their number:- cores: min: 1 max: 4 memory: min: 2Gi max: 8GiIn this example, for any virtual machine with 1 to 4 cores, you can choose any memory volume from 2 to 8 GB — regardless of the number of cores. Memory does not depend on the number of cores in the range.
-
When using the
memory.perCoreparameter, the allowed memory volume is calculated as the product of the number of cores multiplied by the specified memory range per core:- cores: min: 1 max: 4 memory: perCore: min: 1Gi max: 2GiIn this case:
- For a virtual machine with 1 core: from 1×1 GiB = 1 GiB to 1×2 GiB = 2 GiB of memory
- For a virtual machine with 2 cores: from 2×1 GiB = 2 GiB to 2×2 GiB = 4 GiB of memory
- For a virtual machine with 3 cores: from 3×1 GiB = 3 GiB to 3×2 GiB = 6 GiB of memory
- For a virtual machine with 4 cores: from 4×1 GiB = 4 GiB to 4×2 GiB = 8 GiB of memory
Thus, when using
memory.perCore, the allowed memory volume automatically scales proportionally to the number of cores, providing more flexible and fair resource distribution. -
Examples of using the
memory.stepparameter for memory discretization:The
stepparameter defines the memory size discretization step. It allows you to limit available memory values to specific increments, which simplifies resource management and prevents setting arbitrary values.-
Example with
memory.minandmemory.maxwith a 1 GB step:- cores: min: 1 max: 4 memory: min: 2Gi max: 8Gi step: 1GiIn this case, only the following memory values are available: 2 GB, 3 GB, 4 GB, 5 GB, 6 GB, 7 GB, 8 GB. You cannot set, for example, 2.5 GB or 7.5 GB.
-
Example with
memory.perCoreand step:- cores: min: 1 max: 4 memory: perCore: min: 1Gi max: 2Gi step: 512MiIn this case, for each virtual machine, available memory values are calculated taking into account the step:
- For 1 core: 1 GB, 1.5 GB, 2 GB
- For 2 cores: 2 GB, 3 GB, 4 GB
- For 3 cores: 3 GB, 4.5 GB, 6 GB
- For 4 cores: 4 GB, 6 GB, 8 GB
Note that the step is applied to the total memory volume, not to the memory per core.
-
Here is an example of a policy with similar settings:
spec:
  sizingPolicies:
    # For a range of 1–4 cores, it is possible to use 1–8 GB of RAM in 512Mi increments,
    # i.e., 1 GB, 1.5 GB, 2 GB, 2.5 GB, etc.
    # No dedicated cores are allowed.
    # All `corefraction` options are available.
    - cores:
        min: 1
        max: 4
      memory:
        min: 1Gi
        max: 8Gi
        step: 512Mi
      coreFractions: [5, 10, 20, 50, 100]
      defaultCoreFraction: 50  # Default value for the 1–4 core range
    # For a range of 5–8 cores, it is possible to use 5–16 GB of RAM in 1 GB increments,
    # i.e., 5 GB, 6 GB, 7 GB, etc.
    # No dedicated cores are allowed.
    # Some `corefraction` options are available.
    - cores:
        min: 5
        max: 8
      memory:
        min: 5Gi
        max: 16Gi
        step: 1Gi
      coreFractions: [20, 50, 100]
      defaultCoreFraction: 100  # Default value for the 5–8 core range
    # For a range of 9–16 cores, it is possible to use 9–32 GB of RAM in 1 GB increments.
    # You can use dedicated cores if needed.
    # Some `corefraction` options are available.
    - cores:
        min: 9
        max: 16
      memory:
        min: 9Gi
        max: 32Gi
        step: 1Gi
      coreFractions: [50, 100]
    # For the range of 17–248 cores, it is possible to use 1–2 GB of RAM per core.
    # Only the dedicated cores are available for use.
    # The only available `corefraction` parameter is 100%.
    - cores:
        min: 17
        max: 248
      memory:
        perCore:
          min: 1Gi
          max: 2Gi
      coreFractions: [100]
How to configure sizing policies in the web interface in the VM class creation form:
- Click “Add” in the “Resource allocation rules for virtual machines” block.
- In the “CPU” block, enter
1in the “Min” field. - In the “CPU” block, enter
4in the “Max” field. - In the “CPU” block, select the values
5%,10%,20%,50%,100%in order in the “Allow setting core fractions” field. - In the “Memory” block, set the switch to “Amount per core”.
- In the “Memory” block, enter
1in the “Min” field. - In the “Memory” block, enter
8in the “Max” field. - In the “Memory” block, enter
1in the “Sampling step” field. - You can add more ranges using the “Add” button.
- To create a VM class, click the “Create” button.
CPU oversubscription
CPU oversubscription is the practice of allocating more virtual cores to virtual machines than there are physical cores available on the hypervisor node. This allows for more efficient use of cluster computational resources, as not all VMs run at full capacity simultaneously.
Oversubscription is managed using the coreFraction parameter, which is set in VirtualMachineClass through the sizing policy (sizingPolicies). The parameter defines the guaranteed minimum share of computational power per VM core (for example, coreFraction: 20% means the VM is guaranteed 20% of the core’s power but can use up to 100% when free resources are available). The administrator sets the allowed coreFractions values and defaultCoreFraction (the default value if the user does not specify coreFraction).
If the coreFractions parameter is not set in VirtualMachineClass (or multiple values are set), users can manage oversubscription themselves by specifying coreFraction when creating VMs.
When planning VM placement, the sum of guaranteed resources is considered: Σ(cores × coreFraction / 100) for all VMs on the node. If this sum exceeds the number of physical cores, the VM will not be started on that node.
Example: A node with 4 physical cores, 5 VMs with cores: 2 and coreFraction: 20%:
- Guaranteed resources: 5 × 2 × 0.2 = 2 CPU
- Virtual cores: 10 on 4 physical (oversubscription ratio 2.5:1)
- All VMs can be placed, as 2 CPU < 4 CPU
Example 1: Hard-coded oversubscription
The administrator hard-codes the oversubscription level — the user cannot change it:
apiVersion: virtualization.deckhouse.io/v1alpha2
kind: VirtualMachineClass
metadata:
  name: oversubscribed
spec:
  sizingPolicies:
    - cores:
        min: 1
        max: 8
      memory:
        perCore:
          min: 1Gi
          max: 8Gi
      coreFractions: [20]  # Only one value
      defaultCoreFraction: 20
For all VMs of this class, coreFraction: 20% is hard-coded, ensuring a fixed oversubscription ratio of 5:1.
Example 2: Flexible configuration
Users can choose from multiple values:
apiVersion: virtualization.deckhouse.io/v1alpha2
kind: VirtualMachineClass
metadata:
  name: standard
spec:
  sizingPolicies:
    - cores:
        min: 1
        max: 4
      memory:
        perCore:
          min: 1Gi
          max: 8Gi
      coreFractions: [5, 10, 20, 50, 100]
      defaultCoreFraction: 20
Users can select coreFraction from the list; if not specified, the value 20% is applied.
vCPU Discovery configuration example
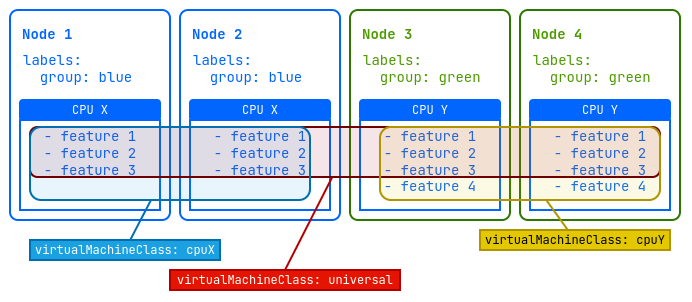
Let’s imagine that we have a cluster of four nodes. Two of these nodes labeled group=blue have a “CPU X” processor with three instruction sets, and the other two nodes labeled group=green have a newer “CPU Y” processor with four instruction sets.
To optimally utilize the resources of this cluster, it is recommended that you create three additional virtual machine classes (VirtualMachineClass):
universal: This class will allow virtual machines to run on all nodes in the platform and migrate between them. It will use the instruction set for the lowest CPU model to ensure the greatest compatibility.cpuX: This class will be for virtual machines that should only run on nodes with a “CPU X” processor. VMs will be able to migrate between these nodes using the available “CPU X” instruction sets.cpuY: This class is for VMs that should only run on nodes with a “CPU Y” processor. VMs will be able to migrate between these nodes using the available “CPU Y” instruction sets.
A CPU instruction set is a list of all the instructions that a processor can execute, such as addition, subtraction, or memory operations. They determine what operations are possible, affect program compatibility and performance, and can vary from one generation of processors to the next.
Resource configuration examples for a given cluster:
---
apiVersion: virtualization.deckhouse.io/v1alpha2
kind: VirtualMachineClass
metadata:
  name: universal
spec:
  cpu:
    discovery: {}
    type: Discovery
  sizingPolicies: { ... }
---
apiVersion: virtualization.deckhouse.io/v1alpha2
kind: VirtualMachineClass
metadata:
  name: cpuX
spec:
  cpu:
    discovery:
      nodeSelector:
        matchExpressions:
          - key: group
            operator: In
            values: ["blue"]
    type: Discovery
  nodeSelector:
    matchExpressions:
      - key: group
        operator: In
        values: ["blue"]
  sizingPolicies: { ... }
---
apiVersion: virtualization.deckhouse.io/v1alpha2
kind: VirtualMachineClass
metadata:
  name: cpuY
spec:
  cpu:
    discovery:
      nodeSelector:
        matchExpressions:
          - key: group
            operator: In
            values: ["green"]
    type: Discovery
  sizingPolicies: { ... }