The module lifecycle stage: Generally available version
The module has requirements for installation
Security
How we secure communication between components?
We use TLS encryption for all internal communications between GitLab services within the Kubernetes cluster. We also ensure that any external access is also secured with HTTPS or other secure protocol.
How we secure metrics scraping?
We secure metrics scraping by using kube-rbac-proxy sidecar container alongside Kubernetes RBAC. Kube-rbac-proxy acts as an authentication and authorization layer, ensuring that only requests with valid permissions can access the metrics endpoints.
How to allow monitoring access from outside the cluster
By default, the Code metrics endpoint (/metrics) is only accessible from 127.0.0.0/8 and the cluster pod network CIDR. Requests from any other address are rejected by Code itself.
To allow access from an external monitoring system (for example, a Prometheus instance running outside the cluster), add its IP address or CIDR range to spec.monitoring.ipWhitelist:
spec:
  monitoring:
    ipWhitelist:
      - 10.0.0.0/24    # external Prometheus subnet
      - 192.168.1.100  # specific monitoring host
The listed addresses are appended to the default allowlist — existing defaults (127.0.0.0/8 and the pod CIDR) are preserved.
Note: only IPv4 and IPv6 addresses and CIDR ranges in standard notation are accepted. Single host addresses without a prefix length (e.g.
192.168.1.100) are also valid.
What TLS encryption is supported?
- TLS 1.2 or higher is required for all incoming and outgoing TLS connections.
- TLS certificates must have at least 112 bits of security. RSA, DSA, and DH keys shorter than 2048 bits, and ECC keys shorter than 224 bits are considered insecure and prohibited.
How does Istio mTLS work in the Code module?
When spec.network.istio.enabled is set to true, the operator creates a PeerAuthentication resource in the d8-code namespace.
When strict: true — STRICT mTLS mode: plain text is rejected on all ports except metrics (9090, 9254) and shell SSH (22, only when ownLoadBalancer.enabled=false).
Critical: the ingress controller must be in the Istio mesh — set
IngressNginxController.spec.enableIstioSidecar=true(see Deckhouse docs). Without this, the web UI, Pages, and Registry will be inaccessible.
When strict: false (default) — PERMISSIVE mTLS mode: both mTLS and plain text are accepted on all ports. Works without the ingress controller being in the mesh.
Some properties support following template secret/<secret-name>/<key-name> to fetch secret values for work.
Operator will automatically find and prepare data from Secret resource located in d8-code namespace.
Gitaly related topics
Why service so privileged?
Gitaly uses cgroup mechanism to control resources consumption during operations over git repositories.
To be able to work in Kubernetes, we should allow pod to write to its cgroup on host path /sys/fs/cgroup
Capabilities:
SETUID,SETGID,CHOWN- Used by init container to set usergit:gitin pod cgroupFOWNER- to bypass checks when git data directory has owner mismatchSYS_ADMIN- required for mounting cgroupfs and working with cgroup hierarchiesSYS_RESOURCE- required to work with cgroup resources limits (CPU, Memory, IO)SYS_PTRACE- to make syscalls likeprocess_vm_readv/process_vm_writevKILL- required for terminating or signaling processes in managed cgroups
How to refresh Gitaly replica?
Cases:
- Refill data on Gitaly node after PV recreation
- Update manually node when data is out-of-date
To refresh specific Gitaly node run:
kubectl exec -i -t -n d8-code praefect-0 -c praefect -- praefect -config /etc/gitaly/config.toml verify --virtual-storage <virtual_storage> --storage <gitaly_pod_name>All repositories data on <gitaly_pod_name> will be marked as unverified to prioritize reverification. Reverification
runs asynchronously in the background.
Repository exists but its files are not found
If a repository is visible in the Code UI but operations on it fail with file access errors, follow the steps below to diagnose the issue.
-
Make sure the
praefectandgitalypods are running and inReadystate:kubectl -n d8-code get pods -l app.kubernetes.io/component=praefect kubectl -n d8-code get pods -l app.kubernetes.io/component=gitaly -
Check the Praefect database state and Gitaly node availability:
kubectl -n d8-code exec -it sts/praefect -- praefect --config /etc/gitaly/config.toml checkThe output should contain no errors. If errors are present — contact support.
-
Check whether the repository metadata exists in the Praefect database. The project ID can be found in the Code UI under Settings > General:
kubectl -n d8-code exec -it sts/praefect -- praefect --config /etc/gitaly/config.toml metadata --repository-id <project-id>Example of a healthy output:
Repository ID: 2238
Virtual Storage: "default"
Relative Path: "@hashed/45/1b/451b...git"
Replica Path: "@cluster/repositories/7a/98/2238"
Primary: "gitaly-default-0"
Generation: 0
Replicas:
- Storage: "gitaly-default-0"
  Assigned: true
  Generation: 0, fully up to date
  Healthy: true
  Valid Primary: true
  Verified At: 2026-03-16 13:43:34 +0000 UTC
How to interpret the result:
- The
Replicassection contains an entry withHealthy: true— Praefect metadata is intact. Praefect knows which Gitaly node holds the repository and considers it healthy. In this case the problem is on the Gitaly side: repository files are missing from disk — deleted or lost during migration. Restore the repository from a backup. - The output is empty or the
Replicassection is missing — the Praefect database has no record of this repository. This can be caused by manual changes to the database, an error during migration, or running the migration against a non-empty Praefect database (data already existed in the database before the migration started — this must be ruled out during migration preparation). In all these cases, restore the Praefect database from a backup.
- The
Network configuration
How to use ownLoadBalancer with reserved public IPV4 address in Yandex Cloud
To assign a reserved public IPv4 address to your ownLoadBalancer, simply specify the following label when creating or updating your resource.
Example:
network:
    ownLoadBalancer:
      annotations:
        yandex.cpi.flant.com/listener-address-ipv4: xx.xx.xx.xx
      enabled: true
Important: The specified IPv4 address must be pre-reserved in your Yandex Cloud project via the Console or CLI.
How to set LoadBalancer class for service when ownLoadBalancer is used
If your cluster setup doesn’t have default LoadBalancer class, you can use ownLoadBalancer.loadBalancerClass option to set needed
Example:
network:
    ownLoadBalancer:
      enabled: true
      loadBalancerClass: my-lb-class
Important: field
loadBalancerClassis immutable. In order to change it you would need to re-create CR
How to configure web UI with custom certificate
Create a TLS Secret in d8-code and reference it in spec.network.web.https:
spec:
  network:
    certificates:
      customCAs:
        - secret: code-web-tls
          keys:
            - tls.crt
    web:
      hostname: code.example.com
      https:
        mode: CustomCertificate
        customCertificate:
          secretName: code-web-tls
For detailed step-by-step instructions and verification checklist, see Network documentation.
Migration from/to Omnibus
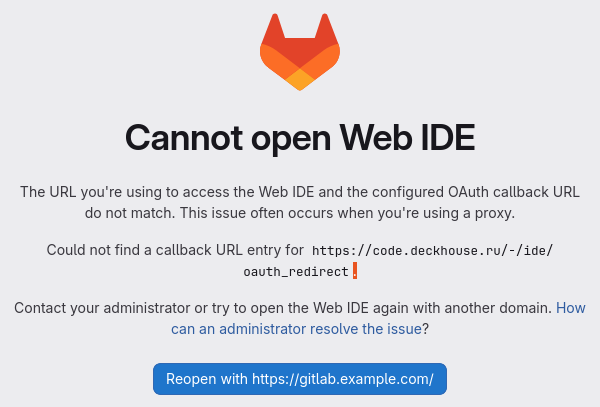
Can not open Gitlab Web IDE
If you encounter error Could not find a callback URL, you should update its auth URL in Admin > Applications to actual one.
Importing a project from an isolated GitLab instance
When the source GitLab instance is in an isolated network (air-gapped) and direct “import by URL” is not possible, you can transfer projects using GitLab’s file export/import feature. The process consists of two stages: export the project to a file on the source instance, then import that file into Code.
Prerequisites
- The GitLab version on the source instance must be the same or up to two minor versions older than the Code version. For example, if Code runs GitLab 19.1, exports from 19.1, 19.0, and 18.11 are compatible.
- You need the Maintainer or Owner role on the project you want to export.
- You need the Maintainer or Owner role on the destination group in Code where the project will be imported.
Step 1. Enable project export on the source instance
An administrator of the source GitLab must enable the export feature:
- Go to Admin > Settings > General.
- Expand Import and export settings.
- Under Project export, select Enabled.
- Select Save changes.
If project export is already enabled, skip this step.
Step 2. Export the project
- Open the project you want to transfer.
- Go to Settings > General.
- Expand Advanced.
- Select Export project.
- After the export is generated, download the resulting file (a
.tar.gzarchive) via the email link or by selecting Download export on the same page.
Save the exported file to your workstation — you will upload it to Code.
Step 3. Enable GitLab export as an import source in Code
An administrator of the Code instance must enable the import source:
- Go to Admin > Settings > General.
- Expand Import and export settings.
- Under Import sources, select the GitLab export checkbox.
- Select Save changes.
Step 4. Import the project into Code
- In the top-right corner, select Create new (+) → New project/repository.
- Select Import project.
- In Import project from, select GitLab export.
- Enter the project name and URL, then choose the exported file.
- Select Import project.
You can check the import status via the API.
What is and is not transferred
Transferred: repository, wiki, issues, merge requests, labels, milestones, snippets, releases, project members (direct), LFS objects, issue boards, CI/CD pipelines (archived), protected branches and tags, push rules.
Not transferred: CI/CD variables, webhooks, CI/CD job traces and artifacts, package and container registry images, encrypted tokens, deploy keys, pipeline triggers, security policies.
For the full list of exported and non-exported items, see the GitLab documentation.
For large projects, consider using Rake tasks for import.
Components
How to enable or disable the toolbox component
toolbox is an optional component and is enabled by default.
- To explicitly enable
toolbox:
spec:
  features:
    toolbox:
enabled: true # default- To disable
toolbox:
spec:
  features:
    toolbox:
      enabled: false
If you use procedures that rely on the Toolbox Pod (for example, Rails console or some backup/restore workflows), make sure toolbox is enabled.
How to disable Code Operator?
To pause resource management by the operator without disabling the module entirely, set spec.maintenance to NoResourceReconciliation in the ModuleConfig:
apiVersion: deckhouse.io/v1alpha1
kind: ModuleConfig
metadata:
  name: code
spec:
  enabled: true
  version: 1
  maintenance: NoResourceReconciliation
After applying, scale down the operator pod:
kubectl -n d8-code scale --replicas=0 deploy/code-operatorBefore applying this setting, make sure you understand its implications — see the ModuleConfig documentation.
How to restore the operator after disabling it?
-
Remove
spec.maintenancefromModuleConfig:apiVersion: deckhouse.io/v1alpha1 kind: ModuleConfig metadata: name: code spec: enabled: true version: 1 -
Scale the operator pod back up:
kubectl -n d8-code scale --replicas=1 deploy/code-operator -
Wait for the operator pod to reach
Runningstate and resume resource management.
Backup S3 bucket grows fast
Use property backup.keepLast for backup retentions. See more.
Migrate to registry with metadata database(v2)
Module deletion
You can fully cleanup cluster from module in 2 steps:
- disable it following the steps as for any other module in Deckhouse Kubernetes Platform
- annotate moduleConfig with
modules.deckhouse.io/allow-disable: "true"to bypass deckhouse-controller errors - change
enableflag in moduleConfig fromtruetofalse - delete namespace as it may have some secrets/configmaps left:
kubectl delete ns d8-code
Please keep in mind to save
secrets/rails-secretprior to deletion, otherwise you would we unable to fully restore from existing backups in future
Does Code support incremental backups?
Code does not support full incremental backups.