The module lifecycle stage: General Availability
The module has requirements for installation
Introduction
This guide is intended for users of the virtualization module in the Deckhouse ecosystem and describes the procedure for creating and modifying resources that are available for creation in cluster projects and namespaces.
Quick start on creating a VM
Example of creating a virtual machine with Ubuntu 24.04.
-
Create a virtual machine image from an external source:
d8 k apply -f - <<EOF
apiVersion: virtualization.deckhouse.io/v1alpha2
kind: VirtualImage
metadata:
  name: ubuntu
spec:
  storage: ContainerRegistry
  dataSource:
    type: HTTP
    http:
      url: https://cloud-images.ubuntu.com/noble/current/noble-server-cloudimg-amd64.img
EOF
How to create a virtual machine image from an external source in the web interface:
- Go to the “Projects” tab and select the desired project.
- Go to the “Virtualization” → “Disk Images” section.
- Click “Create Image”.
- Select “Load data from link (HTTP)” from the list.
- In the form that opens, enter
ubuntuin the “Image Name” field. - Select
ContainerRegistryin the “Storage” field. - In the “URL” field, paste
https://cloud-images.ubuntu.com/noble/current/noble-server-cloudimg-amd64.img. - Click the “Create” button.
- The image status is displayed at the top left, under the image name.
-
Create a virtual machine disk from the image created in the previous step (Caution: Make sure that the default StorageClass is present on the system before creating it):
d8 k apply -f - <<EOF
apiVersion: virtualization.deckhouse.io/v1alpha2
kind: VirtualDisk
metadata:
  name: linux-disk
spec:
  dataSource:
    type: ObjectRef
    objectRef:
      kind: VirtualImage
      name: ubuntu
EOF
How to create a virtual machine disk from the image created in the previous step in the web interface (this step can be skipped and performed when creating a VM):
- Go to the “Projects” tab and select the desired project.
- Go to the “Virtualization” section → “VM Disks”.
- Click “Create Disk”.
- In the form that opens, enter
linux-diskin the “Disk Name” field. - In the “Source” field, make sure that the “Project” checkbox is selected.
- Select
ubuntufrom the drop-down list - In the “Size” field, you can change the size to a larger one, for example,
5Gi. - In the “StorageClass Name” field, you can select StorageClass or leave the default selection.
- Click the “Create” button.
- The disk status is displayed at the top left, under the disk name.
Remember, if your StorageClass has the WaitForFirstConsumer setting, the disk will wait for a VM to be created with that disk. In this case, the disk status will be “CREATING 0%,” but the disk will already be selectable when creating a VM, see the disks section.
-
Creating a virtual machine:
The example uses the cloud-init script to create a cloud user with the cloud password generated as follows:
mkpasswd --method=SHA-512 --rounds=4096You can change the user name and password in this section:
users:
  - name: cloud
    passwd: $6$rounds=4096$G5VKZ1CVH5Ltj4wo$g.O5RgxYz64ScD5Ach5jeHS.Nm/SRys1JayngA269wjs/LrEJJAZXCIkc1010PZqhuOaQlANDVpIoeabvKK4j1
Create a virtual machine from the following specification:
d8 k apply -f - <<EOF
apiVersion: virtualization.deckhouse.io/v1alpha2
kind: VirtualMachine
metadata:
  name: linux-vm
spec:
  virtualMachineClassName: generic
  cpu:
    cores: 1
  memory:
    size: 1Gi
  provisioning:
    type: UserData
    userData: |
      #cloud-config
      ssh_pwauth: True
      users:
        - name: cloud
          passwd: "$6$rounds=4096$saltsalt$fPmUsbjAuA7mnQNTajQM6ClhesyG0.yyQhvahas02ejfMAq1ykBo1RquzS0R6GgdIDlvS.kbUwDablGZKZcTP/"
          shell: /bin/bash
          sudo: ALL=(ALL) NOPASSWD:ALL
          lock_passwd: False
  blockDeviceRefs:
    - kind: VirtualDisk
      name: linux-disk
EOF
How to create a virtual machine in the web interface:
-
Go to the “Projects” tab and select the desired project.
-
Go to the “Virtualization” → “Virtual Machines” section.
-
Click “Create”.
-
In the form that opens, enter
linux-vmin the “Name” field. -
In the “Machine Parameters” section, you can leave the settings at their default values.
-
In the “Disks and Images” section, in the “Boot Disks” subsection, click “Add”.
If you have already created a disk:
- In the form that opens, click “Choose from existing”.
- Select the
linux-diskdisk from the list.
If you have not created a disk:
- In the form that opens, click “Create new disk””
- In the “Name” field, enter
linux-disk. - In the “Source” field, click the arrow to expand the list and make sure that the “Project” checkbox is selected.
- Select
ubuntufrom the drop-down list. - In the “Size” field, you can change the size to a larger one, for example,
5Gi. - In the “Storage Class” field, you can select StorageClass or leave the default selection.
- Click the “Create and add” button.
-
Scroll down to the “Additional parameters” section.
-
Enable the “Cloud-init” switch.
-
Enter your data in the field that appears:
#cloud-config ssh_pwauth: True users: - name: cloud passwd: "$6$rounds=4096$saltsalt$fPmUsbjAuA7mnQNTajQM6ClhesyG0.yyQhvahas02ejfMAq1ykBo1RquzS0R6GgdIDlvS.kbUwDablGZKZcTP/" shell: /bin/bash sudo: ALL=(ALL) NOPASSWD:ALL lock_passwd: False -
Click the “Create” button.
-
The VM status is displayed at the top left, under its name.
Useful links:
-
-
Verify with the command that the image and disk have been created and the virtual machine is running. Resources are not created instantly, so you will need to wait a while before they are ready.
d8 k get vi,vd,vmExample output:
NAME PHASE CDROM PROGRESS AGE virtualimage.virtualization.deckhouse.io/ubuntu Ready false 100% # NAME PHASE CAPACITY AGE virtualdisk.virtualization.deckhouse.io/linux-disk Ready 300Mi 7h40m # NAME PHASE NODE IPADDRESS AGE virtualmachine.virtualization.deckhouse.io/linux-vm Running virtlab-pt-2 10.66.10.2 7h46m -
Connect to the virtual machine using the console (press
Ctrl+]to exit the console):d8 v console linux-vmExample output:
Successfully connected to linux-vm console. The escape sequence is ^]
#
linux-vm login: cloud
Password: cloud
...
cloud@linux-vm:~$
How to connect to a virtual machine using the console in the web interface:
- Go to the “Projects” tab and select the desired project.
- Go to the “Virtualization” → “Virtual Machines” section.
- Select the required VM from the list and click on its name.
- In the form that opens, go to the “TTY” tab.
- Go to the console window that opens. Here you can connect to the VM.
-
Use the following commands to delete previously created resources:
d8 k delete vm linux-vm
d8 k delete vd linux-disk
d8 k delete vi ubuntu
Images
The VirtualImage resource is designed for uploading virtual machine images and subsequently using them to create virtual machine disks.
Please note that VirtualImage is a project resource, which means it is only available within the project or namespace where it was created. To use images at the cluster level, a separate resource is provided — ClusterVirtualImage.
When connected to a virtual machine, the image is accessed in read-only mode.
The image creation process includes the following steps:
- The user creates a
VirtualImageresource. - After creation, the image is automatically downloaded from the source specified in the specification to DVCR or PVC storage, depending on the type.
- Once the download is complete, the resource becomes available for disk creation.
There are different types of images:
- ISO image: an installation image used for the initial installation of an operating system. Such images are released by OS vendors and are used for installation on physical and virtual servers.
- Preinstalled disk image: contains an already installed and configured operating system ready for use after the virtual machine is created. Ready images can be obtained from the distribution developers’ resources or created by yourself.
Examples of resources for obtaining virtual machine images:
| Distribution | Default user. |
|---|---|
| AlmaLinux | almalinux |
| AlpineLinux | alpine |
| CentOS | cloud-user |
| Debian | debian |
| Rocky | rocky |
| Ubuntu | ubuntu |
The following preinstalled image formats are supported:
- qcow2
- raw
- vmdk
- vdi
Image files can also be compressed with one of the following compression algorithms: gz, xz.
Once a share is created, the image type and size are automatically determined, and this information is reflected in the share status.
The image status shows two sizes:
STOREDSIZE(storage size) — the amount of space the image actually occupies in storage (DVCR or PVC). For images uploaded in a compressed format (for example,.gzor.xz), this value is smaller than the unpacked size.UNPACKEDSIZE(unpacked size) — the image size after unpacking. It is used when creating a disk from the image and defines the minimum disk size that can be created.
When creating a disk from an image, set the disk size to UNPACKEDSIZE or larger.
If the size is not specified, the disk will be created with a size equal to UNPACKEDSIZE.
Images can be downloaded from various sources, such as HTTP servers where image files are located or container registries. It is also possible to download images directly from the command line using the curl utility.
Images can be created from other images and virtual machine disks.
Project image two storage options are supported:
ContainerRegistry- the default type in which the image is stored inDVCR.PersistentVolumeClaim- the type that usesPVCas the storage for the image. This option is preferred if you are using storage that supportsPVCfast cloning, which allows you to create disks from images faster.
Using an image with the storage: PersistentVolumeClaim parameter is only supported for creating disks in the same storage class (StorageClass).
A full description of the VirtualImage resource configuration settings can be found at link.
Creating image from HTTP server
Consider creating an image with the option of storing it in DVCR. Execute the following command to create a VirtualImage:
d8 k apply -f - <<EOF
apiVersion: virtualization.deckhouse.io/v1alpha2
kind: VirtualImage
metadata:
  name: ubuntu-24-04
spec:
  # Save the image to DVCR
  storage: ContainerRegistry
  # The source for the image.
  dataSource:
    type: HTTP
    http:
      url: https://cloud-images.ubuntu.com/noble/current/noble-server-cloudimg-amd64.img
EOF
Check the result of the VirtualImage creation:
d8 k get virtualimage ubuntu-24-04
# or a shorter version
d8 k get vi ubuntu-24-04
Example output:
NAME           PHASE   CDROM   PROGRESS   AGE
ubuntu-24-04   Ready   false   100%       23h
After creation the VirtualImage resource can be in the following states (phases):
Pending- waiting for all dependent resources required for image creation to be ready.WaitForUserUpload- waiting for the user to upload the image (the phase is present only fortype=Upload).Provisioning- the image creation process is in progress.Ready- the image is created and ready for use.Failed- an error occurred during the image creation process.Terminating- the image is being deleted. The image may “hang” in this state if it is still connected to the virtual machine.ImageLost- the image is missing in DVCR. The resource cannot be used.PVCLost- the child PVC of the resource is missing. The resource cannot be used.
As long as the image has not entered the Ready phase, the contents of the .spec block can be changed. If you change it, the disk creation process will start again. After entering the Ready phase, the contents of the .spec block cannot be changed!
Diagnosing problems with a resource is done by analyzing the information in the .status.conditions block
You can trace the image creation process by adding the -w key to the previous command:
d8 k get vi ubuntu-24-04 -wExample output:
NAME           PHASE          CDROM   PROGRESS   AGE
ubuntu-24-04   Provisioning   false              4s
ubuntu-24-04   Provisioning   false   0.0%       4s
ubuntu-24-04   Provisioning   false   28.2%      6s
ubuntu-24-04   Provisioning   false   66.5%      8s
ubuntu-24-04   Provisioning   false   100.0%     10s
ubuntu-24-04   Provisioning   false   100.0%     16s
ubuntu-24-04   Ready          false   100%       18s
The VirtualImage resource description provides additional information about the downloaded image:
d8 k describe vi ubuntu-24-04How to create an image from an HTTP server in the web interface:
- Go to the “Projects” tab and select the desired project.
- Go to the “Virtualization” → “Disk Images” section.
- Click “Create Image”.
- Select “Load data from link (HTTP)” from the list.
- In the form that opens, enter the image name in the “Image name” field.
- Select
ContainerRegistryin the “Storage” field. - Specify the link to the image in the “URL” field.
- Click the “Create” button.
- The image status is displayed at the top left, under the image name.
Now let’s look at an example of creating an image and storing it in PVC:
d8 k apply -f - <<EOF
apiVersion: virtualization.deckhouse.io/v1alpha2
kind: VirtualImage
metadata:
  name: ubuntu-24-04-pvc
spec:
  storage: PersistentVolumeClaim
  persistentVolumeClaim:
    # Substitute your StorageClass name.
    storageClassName: rv-thin-r2
  # Source for image creation.
  dataSource:
    type: HTTP
    http:
      url: https://cloud-images.ubuntu.com/noble/current/noble-server-cloudimg-amd64.img
EOF
Check the result of the VirtualImage creation:
d8 k get vi ubuntu-24-04-pvcExample output:
NAME              PHASE   CDROM   PROGRESS   AGE
ubuntu-24-04-pvc  Ready   false   100%       23h
If the .spec.persistentVolumeClaim.storageClassName parameter is not specified, the default StorageClass at the cluster level will be used, or for images if specified in module settings.
How to create an image and store it in PVC in the web interface:
- Go to the “Projects” tab and select the desired project.
- Go to the “Virtualization” → “Disk Images” section.
- Click “Create Image”.
- Select “Load data from link (HTTP)” from the list.
- In the form that opens, enter the image name in the “mage name” field.
- In the “Storage” field, select
PersistentVolumeClaim. - In the “Storage class” field, you can select StorageClass or leave the default selection.
- In the URL field, specify the link to the image.
- Click the Create button.
- The image status is displayed at the top left, under the image name.
Creating an image from Container Registry
An image stored in Container Registry has a certain format. Let’s look at an example:
-
Download the image locally:
curl -L https://cloud-images.ubuntu.com/minimal/releases/noble/release/ubuntu-24.04-minimal-cloudimg-amd64.img -o ubuntu2404.img -
Create a
Dockerfilewith the following contents:FROM scratch COPY ubuntu2404.img /disk/ubuntu2404.img -
Build the container image. The example below uses docker.com as the container registry. You need an account on the service and a properly configured environment:
docker build -t docker.io/<username>/ubuntu2404:latestWhere
usernameis the username specified when registering with docker.com. -
Push the created image to the container registry:
docker push docker.io/<username>/ubuntu2404:latest -
To use this image, create a resource as an example:
d8 k apply -f - <<EOF
apiVersion: virtualization.deckhouse.io/v1alpha2
kind: VirtualImage
metadata:
  name: ubuntu-2404
spec:
  storage: ContainerRegistry
  dataSource:
    type: ContainerImage
    containerImage:
      image: docker.io/<username>/ubuntu2404:latest
EOF
How to create an image from Container Registry in the web interface:
- Go to the “Projects” tab and select the desired project.
- Go to the “Virtualization” → “Disk Images” section.
- Click “Create Image”.
- Select “Upload data from container image” from the list.
- In the form that opens, enter the image name in the “Image Name” field.
- In the “Storage” field, select
ContainerRegistry. - In the “Image in Container Registry” field, specify
docker.io/<username>/ubuntu2404:latest. - Click the “Create” button.
- The image status is displayed at the top left, under the image name.
Load an image from the command line
To load an image from the command line, first create the following resource as shown below with the VirtualImage example:
d8 k apply -f - <<EOF
apiVersion: virtualization.deckhouse.io/v1alpha2
kind: VirtualImage
metadata:
  name: some-image
spec:
  storage: ContainerRegistry
  dataSource:
    type: Upload
EOF
Once created, the resource will enter the WaitForUserUpload phase, which means it is ready for image upload.
There are two options available for uploading from a cluster node and from an arbitrary node outside the cluster:
d8 k get vi some-image -o jsonpath="{.status.imageUploadURLs}" | jqExample output:
{
  "external":"https://virtualization.example.com/upload/g2OuLgRhdAWqlJsCMyNvcdt4o5ERIwmm",
  "inCluster":"http://10.222.165.239/upload"
}
As an example, download the Cirros image:
curl -L http://download.cirros-cloud.net/0.5.1/cirros-0.5.1-x86_64-disk.img -o cirros.imgUpload the image using the following command:
curl https://virtualization.example.com/upload/g2OuLgRhdAWqlJsCMyNvcdt4o5ERIwmm --progress-bar -T cirros.img | catAfter the upload is complete, the image should be created and enter the Ready phase
d8 k get vi some-imageExample output:
NAME         PHASE   CDROM   PROGRESS   AGE
some-image   Ready   false   100%       1m
How to upload an image from the command line in the web interface:
- Go to the “Projects” tab and select the desired project.
- Go to the “Virtualization” -> “Disk Images” section.
- Click “Create Image” then select “Upload from computer” from the drop-down menu.
- Enter the image name in the “Image Name” field.
- In the “Upload File” field, click the “Choose a file from your computer” link.
- Select the file in the file manager that opens.
- Click the “Create” button.
- Wait until the image changes to
Readystatus.
Creating an image from a disk
It is possible to create an image from disk. To do so, one of the following conditions must be met:
- The disk is not attached to any virtual machine.
- The virtual machine to which the disk is attached is in a powered off state.
Example of creating an image from a disk:
d8 k apply -f - <<EOF
apiVersion: virtualization.deckhouse.io/v1alpha2
kind: VirtualImage
metadata:
  name: linux-vm-root
spec:
  storage: ContainerRegistry
  dataSource:
    type: ObjectRef
    objectRef:
      kind: VirtualDisk
      name: linux-vm-root
EOF
How to create an image from a disk in the web interface:
- Go to the “Projects” tab and select the desired project.
- Go to the “Virtualization” → “Disk Images” section.
- Click “Create Image”.
- Select “Write data from disk” from the list.
- In the form that opens, enter
linux-vm-rootin the “Image Name” field. - In the “Storage” field, select
ContainerRegistry. - In the “Disk” field, select the desired disk from the drop-down list.
- Click the “Create” button.
- The image status is displayed at the top left, under its name.
Creating an image from a disk snapshot
It is possible to create an image from snapshot. This requires that the disk snapshot is in the ready phase.
Example of creating an image from a disk snapshot:
d8 k apply -f - <<EOF
apiVersion: virtualization.deckhouse.io/v1alpha2
kind: VirtualImage
metadata:
  name: linux-vm-root
spec:
  storage: ContainerRegistry
  dataSource:
    type: ObjectRef
    objectRef:
      kind: VirtualDiskSnapshot
      name: linux-vm-root-snapshot
EOF
Disks
Virtual machine disks are used to write and store data required for operating systems and applications to run. Various types of storage can be used for this purpose.
The disk specification contains two main blocks:
persistentVolumeClaim: Disk storage parameters (StorageClass and size).dataSource: The source used to create the disk (image, another disk, snapshot).
If dataSource is not specified, an empty disk is created. In this case, you must specify at least the size and StorageClass in persistentVolumeClaim.
If dataSource is specified, you can omit persistentVolumeClaim. Then:
- The disk size is determined automatically based on the source.
- The StorageClass is determined from the source. If it cannot be derived, the cluster default StorageClass is used, or the value configured for disks in the module settings.
Depending on the storage properties, the behavior of disks during creation of virtual machines during operation may differ:
Storage systems can differ in the following parameters:
- Volume type: A storage class can support filesystem volumes (
FileSystem, for example NFS) or block volumes (Block, for example iSCSI, Ceph RBD). ForFileSystemvolumes, a VM disk is created in theqcow2format. Some storage classes support both volume types. VolumeBindingMode:-
Immediate— the disk is created right after the resource is created (the disk is expected to be attachable to a VM on any node in the cluster).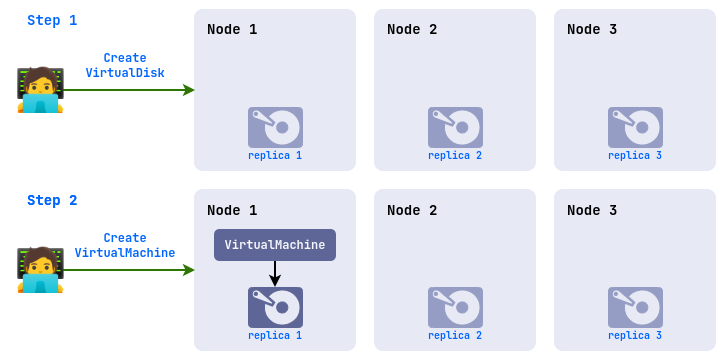
-
WaitForFirstConsumer— the disk is created only after it is attached to a VM and is provisioned on the node where the VM will run.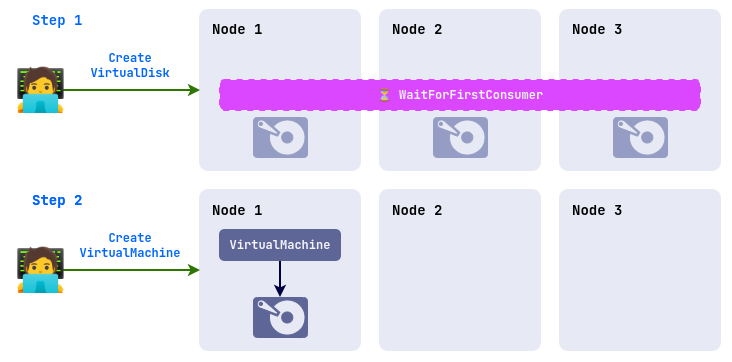
-
When a disk is created, all parameters (volume type, disk format, volume binding mode, and other settings) are determined automatically based on the capabilities of the selected StorageClass.
Creating disks from ISO images is not supported.
To find out the available storage options, run the following command:
d8 k get storageclassExample output:
NAME                                 PROVISIONER                           RECLAIMPOLICY   VOLUMEBINDINGMODE      ALLOWVOLUMEEXPANSION   AGE
rv-thin-r1 (default)                 replicated.csi.storage.deckhouse.io   Delete          Immediate              true                   48d
rv-thin-r2                           replicated.csi.storage.deckhouse.io   Delete          Immediate              true                   48d
nfs-4-1-wffc                         nfs.csi.k8s.io                        Delete          WaitForFirstConsumer   true                   30d
A full description of the disk configuration settings can be found at link.
How to find out the available storage options in the web interface:
- Go to the “System” tab, then to the “Storage” section → “Storage Classes”.
Create an empty disk
Empty disks are usually used to install an OS on them, or to store some data.
Create a disk:
d8 k apply -f - <<EOF
apiVersion: virtualization.deckhouse.io/v1alpha2
kind: VirtualDisk
metadata:
  name: blank-disk
spec:
  # Disk storage parameter settings.
  persistentVolumeClaim:
    # Substitute your StorageClass name.
    storageClassName: rv-thin-r2
    size: 100Mi
EOF
After creation, the VirtualDisk resource can be in the following phase:
Pending: Waiting for all dependent resources required for disk creation to be ready.Provisioning: Disk creation process is in progress.Resizing: Process of resizing the disk is in progress.WaitForFirstConsumer: Disk is waiting for the virtual machine that will use it to be created.WaitForUserUpload: Disk is waiting for the user to upload an image (type: Upload).Ready: Disk has been created and is ready for use.Migrating: Live migration of a disk.Exporting: The disk export process is in progress.Failed: An error occurred during the creation process.PVCLost: System error, PVC with data has been lost.Terminating: Disk is being deleted. The disk may “hang” in this state if it is still connected to the virtual machine.
As long as the disk has not reached the Ready phase, you can modify any fields in the .spec block. When changes are made, the disk creation process is restarted.
After the disk reaches the Ready phase, you can still change .spec.persistentVolumeClaim.size and .spec.persistentVolumeClaim.storageClassName. All other .spec fields are immutable.
If the .spec.persistentVolumeClaim.storageClassName parameter is not specified, the default StorageClass at the cluster level will be used, or for images if specified in module settings.
Diagnosing problems with a resource is done by analyzing the information in the .status.conditions block
Check the status of the disk after creation with the command:
d8 k get vd blank-diskExample output:
NAME       PHASE   CAPACITY   AGE
blank-disk   Ready   100Mi      1m2s
How to create an empty disk in the web interface (this step can be skipped and performed when creating a VM):
- Go to the “Projects” tab and select the desired project.
- Go to the “Virtualization” → “VM Disks” section.
- Click “Create Disk”.
- In the form that opens, enter
blank-diskin the “Disk Name” field. - In the “Size” field, set the size with the measurement units
100Mi. - In the “StorageClass Name” field, you can select a StorageClass or leave the default selection.
- Click the “Create” button.
- The disk status is displayed at the top left, under the disk name.
Creating a disk from an image
A disk can also be created and populated with data from previously created ClusterVirtualImage and VirtualImage images.
When creating a disk, you can specify its desired size, which must be equal to or larger than the size of the extracted image. If no size is specified, a disk will be created with the size corresponding to the original disk image.
Using the example of the previously created image VirtualImage, let’s consider the command that allows you to determine the size of the unpacked image:
d8 k get vi ubuntu-24-04 -o wideExample output:
NAME           PHASE   CDROM   PROGRESS   STOREDSIZE   UNPACKEDSIZE   REGISTRY URL                                                                       AGE
ubuntu-24-04   Ready   false   100%       285.9Mi      2.5Gi          dvcr.d8-virtualization.svc/cvi/ubuntu-24-04:eac95605-7e0b-4a32-bb50-cc7284fd89d0   122m
The size you are looking for is specified in the UNPACKEDSIZE column and is 2.5Gi.
Let’s create a disk from this image:
d8 k apply -f - <<EOF
apiVersion: virtualization.deckhouse.io/v1alpha2
kind: VirtualDisk
metadata:
  name: linux-vm-root
spec:
  # Disk storage parameter settings.
  persistentVolumeClaim:
    # Specify a size larger than the value of the unpacked image.
    size: 10Gi
    # Substitute your StorageClass name.
    storageClassName: rv-thin-r2
  # The source from which the disk is created.
  dataSource:
    type: ObjectRef
    objectRef:
      kind: VirtualImage
      name: ubuntu-24-04
EOF
Now create a disk, without explicitly specifying the size:
d8 k apply -f - <<EOF
apiVersion: virtualization.deckhouse.io/v1alpha2
kind: VirtualDisk
metadata:
  name: linux-vm-root-2
spec:
  # Disk storage settings.
  persistentVolumeClaim:
    # Substitute your StorageClass name.
    storageClassName: rv-thin-r2
  # The source from which the disk is created.
  dataSource:
    type: ObjectRef
    objectRef:
      kind: VirtualImage
      name: ubuntu-24-04
EOF
Check the status of the disks after creation:
d8 k get vdExample output:
NAME           PHASE   CAPACITY   AGE
linux-vm-root    Ready   10Gi       7m52s
linux-vm-root-2  Ready   2590Mi     7m15s
How to create a disk from an image in the web interface (this step can be skipped and performed when creating a VM):
- Go to the “Projects” tab and select the desired project.
- Go to the “Virtualization” → “VM Disks” section.
- Click “Create Disk”.
- In the form that opens, enter
linux-vm-rootin the “Disk Name” field. - In the “Source” field, make sure that the “Project” checkbox is selected.
- Select the image you want from the drop-down list.
- In the “Size” field, you can change the size to a larger one or leave the default selection.
- In the “StorageClass Name” field, you can select a StorageClass or leave the default selection.
- Click the “Create” button.
- The disk status is displayed at the top left, under the disk name.
Upload a disk from the command line
To upload a disk from the command line, first create the VirtualDisk resource as shown in the following example:
d8 k apply -f - <<EOF
apiVersion: virtualization.deckhouse.io/v1alpha2
kind: VirtualDisk
metadata:
  name: uploaded-disk
spec:
  dataSource:
    type: Upload
EOF
Once created, the resource enters the WaitForUserUpload phase, which means it is ready to accept a disk upload.
Two upload options are available: from a cluster node and from any node outside the cluster:
d8 k get vd uploaded-disk -o jsonpath="{.status.imageUploadURLs}" | jqExample output:
{
  "external": "https://virtualization.example.com/upload/<secret-url>",
  "inCluster": "http://10.222.165.239/upload"
}
Upload the disk using the following command:
curl https://virtualization.example.com/upload/<secret-url> --progress-bar -T <image.name> | catAfter the upload completes, the disk should be created and enter the Ready phase:
d8 k get vd uploaded-diskExample output:
NAMESPACE   NAME                  PHASE   CAPACITY    AGE
default     uploaded-disk         Ready   3Gi         7d23h
Change disk size
You can increase the size of disks even if they are already attached to a running virtual machine. To do this, edit the spec.persistentVolumeClaim.size field:
Check the size before the change:
d8 k get vd linux-vm-rootExample output:
NAME          PHASE   CAPACITY   AGE
linux-vm-root   Ready   10Gi       10m
Let’s apply the changes:
d8 k patch vd linux-vm-root --type merge -p '{"spec":{"persistentVolumeClaim":{"size":"11Gi"}}}'

# Alternatively, apply the changes by editing the resource.

d8 k edit vd linux-vm-root
Let’s check the size after the change:
d8 k get vd linux-vm-rootExample output:
NAME          PHASE   CAPACITY   AGE
linux-vm-root   Ready   11Gi       12m
How to change the disk size in the web interface:
Method #1:
- Go to the “Projects” tab and select the desired project.
- Go to the “Virtualization” → “VM Disks” section.
- Select the desired disk and click on the pencil icon in the “Size” column.
- In the pop-up window, you can change the size to a larger one.
- Click on the “Apply” button.
- The disk status is displayed in the “Status” column.
Method #2:
- Go to the “Projects” tab and select the desired project.
- Go to the “Virtualization” → “VM Disks” section.
- Select the desired disk and click on its name.
- In the form that opens, on the “Configuration” tab, in the “Size” field, you can change the size to a larger one.
- Click on the “Save” button that appears.
- The disk status is displayed at the top left, under its name.
Migrating disks to other storage
In commercial editions, you can migrate (move) a virtual machine disk to another storage by changing its StorageClass.
Migration is supported for both statically attached disks and dynamically attached (hotplug) disks.
Limitations of disk migration between storage:
- Migration is only available for virtual machines in the
Runningstate. - Migration is only supported between disks of the same type:
Block↔Block,FileSystem↔FileSystem; conversion between different types is not possible.
Example of migrating a disk to the new-storage-class-name StorageClass:
d8 k patch vd disk --type=merge --patch '{"spec":{"persistentVolumeClaim":{"storageClassName":"new-storage-class-name"}}}'

# Alternatively, apply the changes by editing the resource.

d8 k edit vd disk
After the disk configuration is updated, a live migration of the VM is triggered, during which the VM disk is moved to the new storage.
If a VM has multiple disks attached, and you need to change the storage class for several of them, this operation must be performed sequentially:
d8 k patch vd disk1 --type=merge --patch '{"spec":{"persistentVolumeClaim":{"storageClassName":"new-storage-class-name"}}}'
d8 k patch vd disk2 --type=merge --patch '{"spec":{"persistentVolumeClaim":{"storageClassName":"new-storage-class-name"}}}'
If migration fails, retry attempts are performed with increasing delays (exponential backoff algorithm). The maximum delay is 300 seconds (5 minutes). Delays are: 5 seconds (1st attempt), 10 seconds (2nd), then each delay doubles until it reaches 300 seconds (7th and subsequent attempts). The first attempt is performed without delay.
To cancel migration, the StorageClass in the specification must be reverted to its original value.
Virtual machines
The VirtualMachine resource is used to create a virtual machine, its parameters allow you to configure:
- Virtual machine class.
- Resources required for virtual machine operation (processor, memory, disks and images).
- Rules of virtual machine placement on cluster nodes.
- Bootloader settings and optimal parameters for the guest OS.
- Virtual machine startup policy and policy for applying changes.
- Initial configuration scenarios (cloud-init).
- List of block devices.
The full description of virtual machine configuration parameters can be found at link
Creating a virtual machine
Below is an example of a simple virtual machine configuration running Ubuntu OS 24.04. The example uses the initial virtual machine initialization script (cloud-init), which installs the qemu-guest-agent guest agent and the nginx service, and creates the cloud user with the cloud password:
The password in the example was generated using the command mkpasswd --method=SHA-512 --rounds=4096 -S saltsalt and you can change it to your own if necessary:
Create a virtual machine with the disk created previously:
d8 k apply -f - <<EOF
apiVersion: virtualization.deckhouse.io/v1alpha2
kind: VirtualMachine
metadata:
  name: linux-vm
spec:
  # VM class name.
  virtualMachineClassName: generic
  # Block of scripts for the initial initialization of the VM.
  provisioning:
    type: UserData
    # Example cloud-init script to create cloud user with cloud password and install qemu-guest-agent service and nginx service.
    userData: |
      #cloud-config
      package_update: true
      packages:
        - nginx
        - qemu-guest-agent
      runcmd:
        - systemctl daemon-reload
        - systemctl enable --now nginx.service
        - systemctl enable --now qemu-guest-agent.service
      ssh_pwauth: True
      users:
        - name: cloud
          passwd: "$6$rounds=4096$saltsalt$fPmUsbjAuA7mnQNTajQM6ClhesyG0.yyQhvahas02ejfMAq1ykBo1RquzS0R6GgdIDlvS.kbUwDablGZKZcTP/"
          shell: /bin/bash
          sudo: ALL=(ALL) NOPASSWD:ALL
          lock_passwd: False
      final_message: "The system is finally up, after $UPTIME seconds"
  # VM resource settings.
  cpu:
    # Number of CPU cores.
    cores: 1
    # Request 10% of the CPU time of one physical core.
    coreFraction: 10%
  memory:
    # Amount of RAM.
    size: 1Gi
  # List of disks and images used in the VM.
  blockDeviceRefs:
    # The order of disks and images in this block determines the boot priority.
    - kind: VirtualDisk
      name: linux-vm-root
EOF
Check the state of the virtual machine after creation:
d8 k get vm linux-vmExample output:
NAME        PHASE     NODE           IPADDRESS     AGE
linux-vm   Running   virtlab-pt-2   10.66.10.12   11m
After creation, the virtual machine will automatically get an IP address from the range specified in the module settings (virtualMachineCIDRs block).
How to create a virtual machine in the web interface:
-
Go to the “Projects” tab and select the desired project.
-
Go to the “Virtualization” → “Virtual Machines” section.
-
Click “Create”.
-
In the form that opens, enter
linux-vmin the “Name” field. -
In the “Machine Parameters” section, set
1in the “Cores” field. -
In the “Machine Parameters” section, set
10%in the “CPU Share” field. -
In the “Machine Parameters” section, set
1Giin the “Size” field. -
In the “Disks and Images” section, in the “Boot Disks” subsection, click “Add”.
-
In the form that opens, click “Choose from existing”.
-
Select the
linux-vm-rootdisk from the list. -
Scroll down to the “Additional Parameters” section.
-
Enable the “Cloud-init” switch.
-
Enter your data in the field that appears:
#cloud-config package_update: true packages: - nginx - qemu-guest-agent runcmd: - systemctl daemon-reload - systemctl enable --now nginx.service - systemctl enable --now qemu-guest-agent.service ssh_pwauth: True users: - name: cloud passwd: "$6$rounds=4096$saltsalt$fPmUsbjAuA7mnQNTajQM6ClhesyG0.yyQhvahas02ejfMAq1ykBo1RquzS0R6GgdIDlvS.kbUwDablGZKZcTP/" shell: /bin/bash sudo: ALL=(ALL) NOPASSWD:ALL lock_passwd: False final_message: "The system is finally up, after $UPTIME seconds" -
Click the “Create” button.
-
The VM status is displayed at the top left, under its name.
Virtual Machine Life Cycle
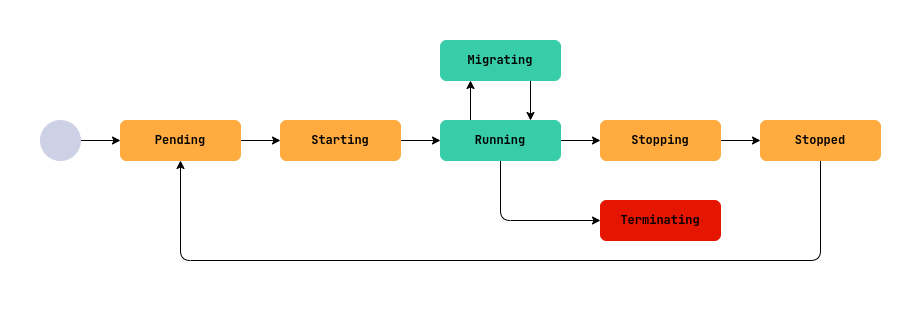
A virtual machine (VM) goes through several phases in its existence, from creation to deletion. These stages are called phases and reflect the current state of the VM. To understand what is happening with the VM, you should check its status (.status.phase field), and for more detailed information - .status.conditions block. All the main phases of the VM life cycle, their meaning and peculiarities are described below.
-
Pending- waiting for resources to be readyA VM has just been created, restarted or started after a shutdown and is waiting for the necessary resources (disks, images, ip addresses, etc.) to be ready.
-
Possible problems:
- Dependent resources are not ready: disks, images, VM classes, secret with initial configuration script, etc.
-
Diagnostics: In
.status.conditionsyou should pay attention to*Readyconditions. By them you can determine what is blocking the transition to the next phase, for example, waiting for disks to be ready (BlockDevicesReady) or VM class (VirtualMachineClassReady).d8 k get vm <vm-name> -o json | jq '.status.conditions[] | select(.type | test(".*Ready"))'
-
-
Starting- starting the virtual machineAll dependent VM resources are ready and the system is attempting to start the VM on one of the cluster nodes.
- Possible problems:
- There is no suitable node to start.
- There is not enough CPU or memory on suitable nodes.
- Namespace or project quotas have been exceeded.
- Diagnostics:
-
If the startup is delayed, check
.status.conditions, thetype: Runningconditiond8 k get vm <vm-name> -o json | jq '.status.conditions[] | select(.type=="Running")'
-
- Possible problems:
-
Running- the virtual machine is runningThe VM is successfully started and running.
- Features:
- When qemu-guest-agent is installed in the guest system, the
AgentReadycondition will be true and.status.guestOSInfowill display information about the running guest OS.- The
type: FirmwareUpToDate, status: Falsecondition informs that the VM firmware needs to be updated. - Condition
type: ConfigurationApplied, status: Falseinforms that the VM configuration is not applied to the running VM. - The
type: SizingPolicyMatched, status: Falsecondition informs that the VM resource configuration does not match the sizing policy requirements for the VirtualMachineClass being used and requires that these settings be brought into compliance otherwise new changes to the VM configuration cannot be saved. - The
type: AwaitingRestartToApplyConfiguration, status: Truecondition displays information about the need to manually reboot the VM because some configuration changes cannot be applied without rebooting the VM.
- The
- Possible problems:
- An internal failure in the VM or hypervisor.
- Diagnosis:
-
Check
.status.conditions, conditiontype: Running.d8 k get vm <vm-name> -o json | jq '.status.conditions[] | select(.type=="Running")'
-
- When qemu-guest-agent is installed in the guest system, the
- Features:
-
Stopping- The VM is stopped or rebooted. -
Stopped- The VM is stopped and is not consuming computational resources -
Terminating- the VM is deleted.This phase is irreversible. All resources associated with the VM are released, but are not automatically deleted.
-
Migrating- live migration of a VMThe VM is migrated to another node in the cluster (live migration).
- Features:
- The
type: Migratablecondition indicates whether the VM can be migrated.
- The
- Possible issues:
- Incompatibility of processor instructions (when using host or host-passthrough processor types).
- Difference in kernel versions on hypervisor nodes.
- Not enough CPU or memory on eligible nodes.
- Neumspace or project quotas have been exceeded.
- Diagnostics:
-
Check the
.status.conditionsconditiontype: Migratingas well as the.status.migrationStateblockd8 k get vm <vm-name> -o json | jq '.status | {condition: .conditions[] | select(.type=="Migrating"), migrationState}'
-
- Features:
The type: SizingPolicyMatched, status: False condition indicates that the resource configuration does not comply with the sizing policy of the VirtualMachineClass being used. If the policy is violated, it is impossible to save VM parameters without making the resources conform to the policy.
Conditions display information about the state of the VM, as well as on problems that arise. You can understand what is wrong with the VM by analyzing them:
d8 k get vm fedora -o json | jq '.status.conditions[] | select(.message != "")'Configuring CPU and coreFraction
When creating a virtual machine, you can configure how much CPU resources it will use using the cores and coreFraction parameters.
The cores parameter specifies the number of virtual CPU cores allocated to the VM.
The coreFraction parameter specifies the guaranteed minimum share of processing power allocated to each core.
Available coreFraction values may be defined in the VirtualMachineClass resource for a given range of cores (cores), in which case only those values may be used.
For example, if you specify cores: 2, the VM will be allocated two virtual cores corresponding to the two physical cores of the hypervisor.
If coreFraction: 20%, the VM is guaranteed to receive at least 20% of the processing power of each core, regardless of the hypervisor node utilization. At the same time, if there are free resources on the node, the VM can use up to 100% of each core’s power to maximize performance.
Thus, the VM is guaranteed to receive 0.2 CPU of the processing power of each physical core and can utilize up to 100% of the power of two cores (2 CPUs) if there are idle resources on the node.
If the coreFraction parameter is not defined, each VM virtual core is allocated 100% of the physical hypervisor CPU core.
Let’s look at an example configuration:
spec:
  cpu:
    cores: 2
    coreFraction: 10%
This approach allows for stable VM performance even under high load under conditions of CPU resource oversubscription, where more cores are allocated to virtual machines than are available on the hypervisor.
The cores and coreFraction parameters are taken into account when planning the placement of VMs on nodes. The guaranteed capacity (minimum fraction of each core) is considered when selecting a node so that it can provide the required performance for all VMs. If a node does not have sufficient resources to fulfill the guarantees, the VM will not run on that node.
Visualization on the example of virtual machines with the following CPU configurations, when placed on the same node:
VM1:
spec:
  cpu:
    cores: 1
    coreFraction: 20%
VM2:
spec:
  cpu:
    cores: 1
    coreFraction: 80%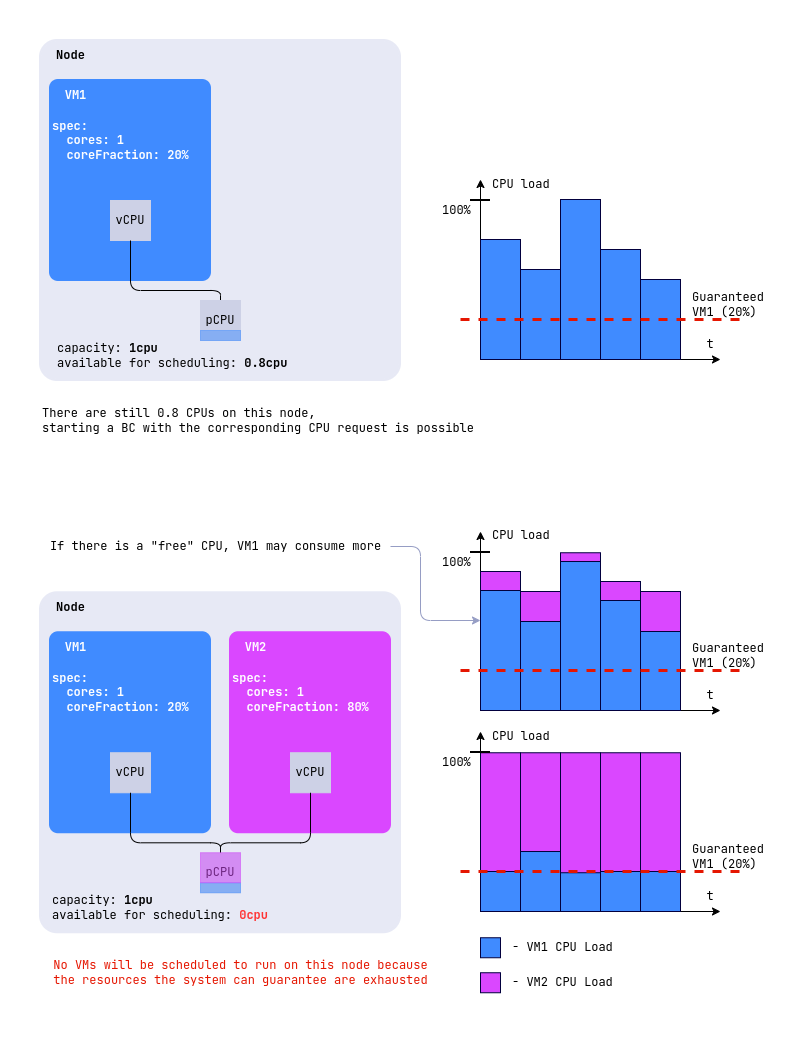
Virtual machine resource configuration and sizing policy
The sizing policy in VirtualMachineClass, defined in the .spec.sizingPolicies section, defines the rules for configuring virtual machine resources, including the number of cores, memory size, and core utilization fraction (coreFraction). This policy is not mandatory. If it is not present for a VM, you can specify arbitrary values for resources without strict requirements. However, if a sizing policy is present, the VM configuration must strictly comply with it. Otherwise, it will not be possible to save the configuration.
The policy divides the number of cores (cores) into ranges, such as 1-4 cores or 5-8 cores. For each range, it specifies how much memory can be allocated (memory) per core and/or what coreFraction values are allowed.
If the VM configuration (cores, memory, or coreFraction) does not match the policy, the VM status will show the condition type: SizingPolicyMatched, status: False.
If you change the policy in VirtualMachineClass, the configuration of existing VMs may need to be changed to match the new policy. Virtual machines that do not comply with the new policy will continue to run, but any changes to their configuration cannot be saved until they comply with the new policy.
For example:
spec:
  sizingPolicies:
    - cores:
        min: 1
        max: 4
      memory:
        min: 1Gi
        max: 8Gi
      coreFractions: [5, 10, 20, 50, 100]
    - cores:
        min: 5
        max: 8
      memory:
        min: 5Gi
        max: 16Gi
      coreFractions: [20, 50, 100]
If the VM uses 2 cores, it falls in the range of 1-4 cores. Then memory can be selected from 1 GB to 8 GB, and coreFraction is only 5%, 10%, 20%, 50%, or 100%. For 6 cores, the range is 5-8 cores, where memory is from 5GB to 16GB and coreFraction is 20%, 50% or 100%.
In addition to VM sizing, the policy also allows you to implement the desired maximum oversubscription for VMs.
For example, by specifying coreFraction: 20% in the policy, you guarantee any VM at least 20% of the CPU compute resources, which would effectively define a maximum possible oversubscription of 5:1.
If you try to create or update a VM whose configuration violates the sizing policy, the request is rejected with a message that names the parameter to change and the values to use. Each message about a specific policy also ends with the hint check the sizing policy of the VirtualMachineClass or contact the administrator for more information (omitted below for brevity). Examples for a class supercpu with the policy above:
- Cores outside all ranges (
cores: 10):does not match any sizing policy of VirtualMachineClass "supercpu": its 10 CPU core(s) fall outside the allowed ranges (1-4, 5-8); set the number of cores (spec.cpu.cores) accordingly - Core fraction not allowed (
cores: 2,coreFraction: 30%):the CPU core fraction "30%" is not allowed; set the core fraction (spec.cpu.coreFraction) to one of: 5%, 10%, 20%, 50%, 100% - Memory out of range (
cores: 2,size: 16Gi):the memory size (16Gi) is out of the range allowed by the sizing policy; set the memory size (spec.memory.size) between 1Gi and 8Gi - Cores not on the step grid (
cores.step):the number of CPU cores (7) does not match the sizing policy step; set the number of cores (spec.cpu.cores) to 6 or 8 - Memory not on the step grid (
memory.step):the memory size (1536Mi) does not match the sizing policy step; set the memory size (spec.memory.size) to 1Gi or 2Gi - Per-core memory out of range (
memory.perCore):the memory size (18Gi) is not allowed for 6 CPU core(s); set the memory size (spec.memory.size) between 6Gi and 12Gi, or change the number of cores (spec.cpu.cores) (the sizing policy allows between 1Gi and 2Gi of memory per core) - Per-core memory not on the step grid:
the memory size (2560Mi) does not match the per-core sizing policy step for 2 CPU core(s); set the memory size (spec.memory.size) to 2Gi or 4Gi, or change the number of cores (spec.cpu.cores) - Several violations at once: all reasons are listed in a single message under
does not match the sizing policy of VirtualMachineClass "supercpu" for several reasons:.
Automatic CPU topology configuration
The CPU topology of a virtual machine (VM) determines how the CPU cores are allocated across sockets. This is important to ensure optimal performance and compatibility with applications that may depend on the CPU configuration. In the VM configuration, you specify only the total number of processor cores, and the topology (the number of sockets and cores in each socket) is automatically calculated based on this value.
The number of processor cores is specified in the VM configuration as follows:
spec:
  cpu:
    cores: 1
Next, the system automatically determines the topology depending on the specified number of cores. The calculation rules depend on the range of the number of cores and are described below.
- If the number of cores is between 1 and 16 (1 ≤
.spec.cpu.cores≤ 16):- 1 socket is used.
- The number of cores in the socket is equal to the specified value.
- Change step: 1 (you can increase or decrease the number of cores one at a time).
- Valid values: any integer from 1 to 16 inclusive.
- Example: If
.spec.cpu.cores= 8, topology: 1 socket with 8 cores.
- If the number of cores is from 17 to 32 (16 <
.spec.cpu.cores≤ 32):- 2 sockets are used.
- Cores are evenly distributed between sockets (the number of cores in each socket is the same).
- Change step: 2 (total number of cores must be even).
- Allowed values: 18, 20, 22, 24, 26, 28, 30, 32.
- Limitations: minimum 9 cores per socket, maximum 16 cores per socket.
- Example: If
.spec.cpu.cores= 20, topology: 2 sockets with 10 cores each.
- If the number of cores is between 33 and 64 (32 <
.spec.cpu.cores≤ 64):- 4 sockets are used.
- Cores are evenly distributed among the sockets.
- Step change: 4 (the total number of cores must be a multiple of 4).
- Allowed values: 36, 40, 44, 48, 52, 56, 60, 64.
- Limitations: minimum 9 cores per socket, maximum 16 cores per socket.
- Example: If
.spec.cpu.cores= 40, topology: 4 sockets with 10 cores each.
- If the number of cores is greater than 64 (
.spec.cpu.cores> 64):- 8 sockets are used.
- Cores are evenly distributed among the sockets.
- Step change: 8 (the total number of cores must be a multiple of 8).
- Valid values: 72, 80, 88, 96, and so on up to 248.
- Limitations: minimum 9 cores per socket.
- Example: If
.spec.cpu.cores= 80, topology: 8 sockets with 10 cores each.
The change step indicates by how much the total number of cores can be increased or decreased so that they are evenly distributed across the sockets.
The maximum possible number of cores is 248.
Summary table by spec.cpu.cores range:
| Cores range | Number of sockets | Change step | Minimum cores per socket | Maximum cores per socket |
|---|---|---|---|---|
1 ≤ cores ≤ 16 |
1 | 1 | 1 | 16 |
16 < cores ≤ 32 |
2 | 2 | 9 | 16 |
32 < cores ≤ 64 |
4 | 4 | 9 | 16 |
64 < cores ≤ 248 |
8 | 8 | 9 | 16 |
Memory overhead does not depend on the maximum possible vCPU topology; it is calculated from actively used cores: (sockets × cores per socket × threads per core) × 8 MiB per logical CPU.
Example: with spec.cpu.cores: 20, the status shows a topology of two sockets with 10 cores each:
spec:
  cpu:
    cores: 20
# ...
status:
  resources:
    cpu:
      topology:
        coresPerSocket: 10
        sockets: 2
The current VM topology (number of sockets and cores in each socket) is displayed in the VM status in the following format:
status:
  resources:
    cpu:
      coreFraction: 10%
      cores: 1
      requestedCores: "1"
      runtimeOverhead: "0"
      topology:
        sockets: 1
        coresPerSocket: 1
OS type and bootloader configuration
The osType parameter determines the operating system type and applies an optimal set of virtual devices and parameters for correct VM operation.
Supported values:
Generic(default): For Linux and other operating systems. Uses standard virtual device configuration.Windows: For Microsoft Windows family operating systems. Automatically enables Hyper-V features, TPM device, and other settings optimized for Windows.
The TPM device provided to the virtual machine is not persistent (TPM emulation in memory). This means that when the VM is rebooted or migrated, the TPM state is reset. It is recommended to consider this limitation when planning to use Windows security features that depend on TPM.
The bootloader parameter determines the bootloader type for the virtual machine:
BIOS(default): Use legacy BIOS.EFI: Use Unified Extensible Firmware Interface (UEFI/EFI).EFIWithSecureBoot: Use UEFI/EFI with Secure Boot support.
Example configuration for a Windows virtual machine:
spec:
  osType: Windows
  bootloader: EFI
  # other parameters...
Example configuration for a Linux virtual machine (default values can be omitted):
spec:
  osType: Generic
  bootloader: BIOS
  # other parameters...
For most modern Linux distributions, it is recommended to use bootloader: EFI. For Windows, bootloader: EFI or bootloader: EFIWithSecureBoot is usually required.
The enableParavirtualization parameter controls the use of the virtio bus for connecting virtual devices to the VM. Changing the parameter value takes effect only after the VM is restarted.
true(default): Thevirtiobus is used for disks, network interfaces, and other devices, which provides better performance. You can change.spec.blockDeviceRefson a running VM without rebooting by adding and removing devices if the disk is available on the node where the VM runs.false: Standard device emulation is used (SATA for disks, e1000e for network interfaces), which may be required for compatibility with older guest OSes withoutVirtIOdrivers. Changes to.spec.blockDeviceRefson a running VM (adding or removing disks and images, including ISO images) take effect after rebooting the VM. To attach and detach disks without rebooting, use the VirtualMachineBlockDeviceAttachment (vmbda) resource without changing the list in the VM specification.
To use paravirtualization mode (virtio), some operating systems require installing the corresponding drivers. If drivers are not installed, the VM may fail to boot or devices may not work correctly.
Example configuration with paravirtualization disabled:
spec:
  enableParavirtualization: false
  # other parameters...
Initialization scripts
Initialization scripts are used for the initial configuration of a virtual machine when it is started.
The following initialization scripts are supported:
Cloud-Init
Cloud-Init is a tool for automatically configuring virtual machines on first boot. It allows you to perform a wide range of configuration tasks without manual intervention.
Cloud-Init configuration is written in YAML format and must start with the #cloud-config header at the beginning of the configuration block. For information about other possible headers and their purpose, see the official Cloud-Init documentation.
The main capabilities of Cloud-Init include:
- Creating users, setting passwords, and adding SSH keys for access.
- Automatically installing necessary software on first boot.
- Running arbitrary commands and scripts for system configuration.
- Automatically starting and enabling system services (for example,
qemu-guest-agent).
Typical usage scenarios
-
Adding an SSH key for a pre-installed user that may already be present in the cloud image (for example, the
ubuntuuser in official Ubuntu images). The name of such a user depends on the image. Check the documentation for your distribution.#cloud-config ssh_authorized_keys: - ssh-rsa AAAAB3NzaC1yc2EAAAADAQABAAABAQD... your-public-key ... -
Creating a user with a password and SSH key:
#cloud-config
users:
  - name: cloud
    passwd: "$6$rounds=4096$saltsalt$..."
    lock_passwd: false
    sudo: ALL=(ALL) NOPASSWD:ALL
    shell: /bin/bash
    ssh-authorized-keys:
      - ssh-rsa AAAAB3NzaC1yc2EAAAADAQABAAABAQD... your-public-key ...
ssh_pwauth: True
To generate a password hash, use the command
mkpasswd --method=SHA-512 --rounds=4096. -
Installing packages and services:
#cloud-config
package_update: true
packages:
  - nginx
  - qemu-guest-agent
runcmd:
  - systemctl daemon-reload
  - systemctl enable --now nginx.service
  - systemctl enable --now qemu-guest-agent.service
Using Cloud-Init
The Cloud-Init script can be embedded directly into the virtual machine specification, but its size is limited to a maximum of 2048 bytes:
spec:
  provisioning:
    type: UserData
    userData: |
      #cloud-config
      package_update: true
      ...
For longer scenarios and/or when private data is involved, the script for initial initialization of the virtual machine can be created in a Secret resource. An example of a Secret with a Cloud-Init script is shown below:
apiVersion: v1
kind: Secret
metadata:
  name: cloud-init-example
data:
  userData: <base64 data>
type: provisioning.virtualization.deckhouse.io/cloud-init
A fragment of the virtual machine configuration when using the Cloud-Init initialization script stored in a Secret:
spec:
  provisioning:
    type: UserDataRef
    userDataRef:
      kind: Secret
      name: cloud-init-example
The value of the .data.userData field must be Base64 encoded. To encode it, you can use the base64 -w 0 command or echo -n "content" | base64.
Sysprep
When configuring virtual machines running Windows using Sysprep, only the Secret-based option is supported.
An example of a Secret with a Sysprep script is shown below:
apiVersion: v1
kind: Secret
metadata:
  name: sysprep-example
data:
  unattend.xml: <base64 data>
type: provisioning.virtualization.deckhouse.io/sysprep
The value of the .data.unattend.xml field must be Base64 encoded. To encode, you can use the command base64 -w 0 or echo -n "content" | base64.
A fragment of the virtual machine configuration using the Sysprep initialization script in a Secret:
spec:
  provisioning:
    type: SysprepRef
    sysprepRef:
      kind: Secret
      name: sysprep-example
Guest OS agent
To improve VM management efficiency, it is recommended to install the QEMU Guest Agent, a tool that enables communication between the hypervisor and the operating system inside the VM.
How will the agent help?
-
It will provide consistent snapshots of disks and VMs.
-
It will provide information about the running OS, which will be reflected in the status of the VM. Example:
status: guestOSInfo: id: fedora kernelRelease: 6.11.4-301.fc41.x86_64 kernelVersion: '#1 SMP PREEMPT_DYNAMIC Sun Oct 20 15:02:33 UTC 2024' machine: x86_64 name: Fedora Linux prettyName: Fedora Linux 41 (Cloud Edition) version: 41 (Cloud Edition) versionId: "41" -
Will allow tracking that the OS has actually booted:
d8 k get vm -o wideExample output (see
AGENTcolumn):NAME PHASE CORES COREFRACTION MEMORY NEED RESTART AGENT MIGRATABLE NODE IPADDRESS AGE fedora Running 6 5% 8000Mi False True True virtlab-pt-1 10.66.10.1 5d21h
How to install QEMU Guest Agent:
For Debian-based OS:
sudo apt install qemu-guest-agentFor CentOS-based OS:
sudo yum install qemu-guest-agentStarting the agent service:
sudo systemctl enable --now qemu-guest-agentYou can automate the installation of the agent for Linux OS using a cloud-init initialization script. Below is an example snippet of such a script to install qemu-guest-agent:
  #cloud-config
  package_update: true
  packages:
    - qemu-guest-agent
  runcmd:
    - systemctl enable --now qemu-guest-agent.service
QEMU Guest Agent does not require additional configuration after installation. However, to ensure application-level snapshot consistency (without stopping services), you can add scripts that are executed automatically in the guest OS before and after filesystem freeze and thaw operations. The scripts must be executable and placed in a special directory, whose path depends on the Linux distribution in use:
/etc/qemu-ga/hooks.d/: For Debian/Ubuntu-based distributions./etc/qemu/fsfreeze-hook.d/: For RHEL/CentOS/Fedora-based distributions.
Connecting to a virtual machine
The following methods are available for connecting to the virtual machine:
- remote management protocol (such as SSH), which must be preconfigured on the virtual machine.
- serial console
- VNC protocol
An example of connecting to a virtual machine using a serial console:
d8 v console linux-vmExample output:
Successfully connected to linux-vm console. The escape sequence is ^]
#
linux-vm login: cloud
Password: cloud
Press Ctrl+] to finalize the serial console.
The serial console does not support automatic terminal resizing. If full-screen applications or text editors are displayed incorrectly, run the following command after you log in:
stty rows <number_of_rows> cols <number_of_columns>For example: stty rows 50 cols 200
If the xterm package is installed on the system, you can also use the resize command.
Example command for connecting via VNC:
d8 v vnc linux-vmExample command for connecting via SSH.
d8 v ssh cloud@linux-vmHow to connect to a virtual machine in the web interface:
- Go to the “Projects” tab and select the desired project.
- Go to the “Virtualization” → “Virtual Machines” section.
- Select the required VM from the list and click on its name.
- In the form that opens, go to the “TTY” tab to work with the serial console.
- In the form that opens, go to the “VNC” tab to connect via VNC.
- Go to the window that opens. Here you can connect to the VM.
Virtual machine startup policy and virtual machine state management
The virtual machine startup policy is intended for automated virtual machine state management. It is defined as the .spec.runPolicy parameter in the virtual machine specification. The following policies are supported:
AlwaysOnUnlessStoppedManually- (default) after creation, the VM is always in a running state. In case of failures the VM operation is restored automatically. It is possible to stop the VM only by calling thed8 v stopcommand or creating a corresponding operation.AlwaysOn- after creation the VM is always in a running state, even in case of its shutdown by OS means. In case of failures the VM operation is restored automatically.Manual- after creation, the state of the VM is controlled manually by the user using commands or operations. The VM is powered off immediately after creation. To power it on, thed8 v startcommand must be executed.AlwaysOff- after creation the VM is always in the off state. There is no possibility to turn on the VM through commands/operations.
How to select a VM startup policy in the web interface:
- Go to the “Projects” tab and select the desired project.
- Go to the “Virtualization” → “Virtual Machines” section.
- Select the desired VM from the list and click on its name.
- On the “Configuration” tab, scroll down to the “Additional Settings” section.
- Select the desired policy from the Startup Policy combo box.
The state of the virtual machine can be controlled using the following methods:
Creating a VirtualMachineOperation (vmop) resource.
Using the d8 utility with the corresponding subcommand.
The VirtualMachineOperation resource declaratively defines an imperative action to be performed on the virtual machine. This action is applied to the virtual machine immediately after it is created by the corresponding vmop. The action is applied to the virtual machine once.
Example operation to perform a reboot of a virtual machine named linux-vm:
d8 k create -f - <<EOF
apiVersion: virtualization.deckhouse.io/v1alpha2
kind: VirtualMachineOperation
metadata:
  generateName: restart-linux-vm-
spec:
  virtualMachineName: linux-vm
  type: Restart
EOF
You can view the result of the action using the command:
d8 k get virtualmachineoperation
# or
d8 k get vmop
The same action can be performed using the d8 utility:
d8 v restart linux-vmA list of possible operations is given in the table below:
| d8 | vmop type | Action |
|---|---|---|
d8 v stop |
Stop |
Stop VM |
d8 v start |
Start |
Start the VM |
d8 v restart |
Restart |
Restart the VM |
d8 v evict |
Evict |
Evict the VM to another host |
d8 v migrate |
Migrate |
Migrate the VM to another host |
Only one active operation is executed for a VM at a time. If a new operation is compatible with an already active operation, it can supersede the older operation. The older operation is completed with status.phase: Completed and the Completed condition reason Superseded, while the new operation continues execution. For example, Stop can supersede an active Start, Stop with force: true can supersede a regular Stop, and Restart can supersede an active Migrate or Evict.
If operations are incompatible, the new operation is rejected until the active operation finishes. Restore and clone operations do not supersede other VM operations.
How to perform the operation in the web interface:
- Go to the “Projects” tab and select the desired project.
- Go to the “Virtualization” → “Virtual Machines” section.
- Select the desired virtual machine from the list and click the ellipsis button.
- In the pop-up menu, you can select possible operations for the VM.
Change virtual machine configuration
You can change the configuration of a virtual machine at any time after the VirtualMachine resource has been created. However, how these changes are applied depends on the current phase of the virtual machine and the nature of the changes made.
Changes to the virtual machine configuration can be made using the following command:
d8 k edit vm linux-vmIf the virtual machine is in a shutdown state (.status.phase: Stopped), the changes made will take effect immediately after the virtual machine is started.
If the virtual machine is running (.status.phase: Running), the way the changes are applied depends on the type of change:
| Configuration block | How changes are applied |
|---|---|
.metadata.labels |
Applies immediately and propagates to the VM pod |
.metadata.annotations |
Applies immediately and propagates to the VM pod |
.spec.liveMigrationPolicy |
Applies immediately |
.spec.runPolicy |
Applies immediately |
.spec.disruptions.restartApprovalMode |
Applies immediately |
.spec.affinity |
EE, SE+: Applies immediately, CE: Only after VM restart |
.spec.nodeSelector |
EE, SE+: Applies immediately, CE: Only after VM restart |
.spec.cpu.cores |
May apply immediately if hotplug is enabled (EE, SE+), see CPU hotplug; otherwise a restart is required. |
.spec.networks |
Adding or removing Network or ClusterNetwork on a running VM applies without reboot. Changes to Main or the order of existing networks require a VM restart (see Additional network interfaces) |
.spec.* |
Only after VM restart |
How to change the VM configuration in the web interface:
- Go to the “Projects” tab and select the desired project.
- Go to the “Virtualization” → “Virtual Machines” section.
- Select the required VM from the list and click on its name.
- You are now on the “Configuration” tab, where you can make changes.
- The list of changed parameters and a warning if the VM needs to be restarted are displayed at the top of the page.
Let’s consider an example of changing the configuration of a virtual machine:
Suppose we want to change the number of processor cores. The virtual machine is currently running and using one core, which can be confirmed by connecting to it through the serial console and executing the nproc command.
d8 v ssh cloud@linux-vm --command "nproc"Example output:
1Apply the following patch to the virtual machine to change the number of cores from 1 to 2.
d8 k patch vm linux-vm --type merge -p '{"spec":{"cpu":{"cores":2}}}'

# Alternatively, apply the changes by editing the resource.

d8 k edit vm linux-vm
Example output:
# virtualmachine.virtualization.deckhouse.io/linux-vm patchedConfiguration changes have been made but not yet applied to the virtual machine. Check this by re-executing:
d8 v ssh cloud@linux-vm --command "nproc"Example output:
1A restart of the virtual machine is required to apply this change. Run the following command to see the changes waiting to be applied (requiring a restart):
d8 k get vm linux-vm -o jsonpath="{.status.restartAwaitingChanges}" | jq .Example output:
[
  {
    "currentValue": 1,
    "desiredValue": 2,
    "operation": "replace",
    "path": "cpu.cores"
  }
]
Run the command:
d8 k get vm linux-vm -o wideExample output:
NAME        PHASE     CORES   COREFRACTION   MEMORY   NEED RESTART   AGENT   MIGRATABLE   NODE           IPADDRESS     AGE
linux-vm   Running   2       100%           1Gi      True           True    True         virtlab-pt-1   10.66.10.13   5m16s
In the NEED RESTART column we see the value True, which means that a reboot is required to apply the changes.
Let’s reboot the virtual machine:
d8 v restart linux-vmAfter a reboot, the changes will be applied and the .status.restartAwaitingChanges block will be empty.
Execute the command to verify:
d8 v ssh cloud@linux-vm --command "nproc"Example output:
2The default behavior is to apply changes to the virtual machine through a “manual” restart. If you want to apply the changes immediately and automatically, you need to change the change application policy:
spec:
  disruptions:
    restartApprovalMode: Automatic
How to perform the operation in the web interface:
- Go to the “Projects” tab and select the desired project.
- Go to the “Virtualization” → “Virtual Machines” section.
- Select the required VM from the list and click on its name.
- On the “Configuration” tab, scroll down to the “Additional Settings” section.
- Enable the “Auto-apply changes” switch.
- Click on the “Save” button that appears.
CPU hotplug
CPU hotplug lets you change spec.cpu.cores for a running VM without restart when the change can be applied through live migration. Within the current CPU topology, you can both increase and decrease the number of cores.
This functionality is disabled by default.
To enable this functionality, add HotplugCPUWithLiveMigration to .spec.settings.featureGates array in the ModuleConfig/virtualization:
kind: ModuleConfig
metadata:
  name: virtualization
spec:
  settings:
    featureGates:
    - HotplugCPUWithLiveMigration
If the new .spec.cpu.cores value falls within the hotplug range for the current topology and the VM is migratable, the change is applied through live migration. If the new value requires a different CPU topology or the VM cannot be migrated, a VM restart is required. The need for restart is reflected by the AwaitingRestartToApplyConfiguration condition.
Topology calculation rules and allowed change steps for spec.cpu.cores are described in Automatic CPU topology configuration.
Guest OS specifics:
-
After live migration, new vCPUs may require explicit activation inside the guest OS.
-
On Linux, added CPUs can be enabled through sysfs:
echo 1 > /sys/devices/system/cpu/cpu1/online -
To automatically enable new CPUs on Linux, configure a
udevrule. After that, added CPUs become visible incat /proc/cpuinfoandtop:cat <<'EOF' > /etc/udev/rules.d/99-hotplug-cpu.rules SUBSYSTEM=="cpu",ACTION=="add",RUN+="/bin/sh -c '[ ! -e /sys$devpath/online ] || echo 1 > /sys$devpath/online'" EOF
Limitations:
- Changing
spec.cpu.coreswithout restart is possible only within the hotplug range of the current CPU topology. - If the change requires CPU topology reconfiguration, a VM restart is required.
- When decreasing CPU count within the current topology, CPU distribution across sockets may become uneven.
Memory hotplug
Memory hotplug lets you increase spec.memory.size for a running VM without restart when the change can be applied through live migration. Decreasing memory always requires a VM restart.
This functionality is disabled by default.
To enable this functionality, add HotplugMemoryWithLiveMigration to .spec.settings.featureGates array in the ModuleConfig virtualization:
kind: ModuleConfig
metadata:
  name: virtualization
spec:
  settings:
    featureGates:
    - HotplugMemoryWithLiveMigration
If the new spec.memory.size is greater than the current value and the VM is migratable, the change is applied through live migration. If you need to shrink memory, the VM originally had less than 1 GiB of memory, or the VM cannot be migrated, a VM restart is required. The need for restart is reflected by the AwaitingRestartToApplyConfiguration condition.
Guest OS specifics:
-
After live migration, newly added memory blocks may require explicit activation inside the guest OS; memory configured at VM creation does not require extra activation.
-
On Linux, added memory can be enabled through sysfs (see device names in
ls /sys/bus/memory/devices/):echo 1 > /sys/bus/memory/devices/memoryXXX/online -
To automatically enable added memory on Linux, configure a
udevrule. After that, added memory becomes visible infreeandlsmem:cat <<'EOF' > /etc/udev/rules.d/99-hotplug-memory.rules SUBSYSTEM=="memory",ACTION=="add",DEVPATH=="/devices/system/memory/memory[0-9]*", TEST=="state", ATTR{state}!="online", ATTR{state}="online" EOF
Limitations:
- Increasing memory without restart is possible only if the VM memory size is at least 1 GiB. If the VM was created with less than 1 GiB, any memory size change requires a restart.
- In the current module version, the maximum VM memory size is limited to 256 GiB.
Placement of VMs by nodes
The following methods can be used to manage the placement of virtual machines (placement parameters) across nodes:
- Simple label selection (
nodeSelector) — the basic method for selecting nodes with specified labels. - Preferred selection (
Affinity): nodeAffinity— specifies priority nodes for placement.virtualMachineAndPodAffinity— defines workload co-location rules for VMs or containers.
- Co-location avoidance (
AntiAffinity): virtualMachineAndPodAntiAffinity— defines workload rules for VMs or containers to be placed on the same node.
All of the above parameters (including the .spec.nodeSelector parameter from VirtualMachineClass) are applied together when scheduling VMs. If at least one condition cannot be met, the VM will not be started. To minimize risks, we recommend:
- Creating consistent placement rules.
- Checking the compatibility of rules before applying them.
- Consider the types of conditions:
- Strict (
requiredDuringSchedulingIgnoredDuringExecution) — require strict compliance. - Soft (
preferredDuringSchedulingIgnoredDuringExecution) — allow partial compliance. - Use combinations of labels instead of single restrictions. For example, instead of required for a single label (e.g. env=prod), use several preferred conditions.
- Consider the order in which interdependent VMs are launched. When using Affinity between VMs (for example, the backend depends on the database), launch the VMs referenced by the rules first to avoid lockouts.
- Plan backup nodes for critical workloads. For VMs with strict requirements (e.g., AntiAffinity), provide backup nodes to avoid downtime in case of failure or maintenance.
- Consider existing
taintson nodes. If necessary, you can add appropriatetolerationsto the VM.
When changing placement parameters:
-
If the current location of the VM meets the new requirements, it remains on the current node.
-
If the requirements are violated:
- In commercial editions: The VM is automatically moved to a suitable node using live migration.
- In the CE edition: The VM will require a reboot to apply.
How to manage VM placement parameters by nodes in the web interface:
- Go to the “Projects” tab and select the desired project.
- Go to the “Virtualization” → “Virtual Machines” section.
- Select the required VM from the list and click on its name.
- On the “Configuration” tab, scroll down to the “Placement” section.
Tolerance to node restrictions
tolerations allow VMs to be scheduled onto nodes with taints that would otherwise block placement. This is useful when you need to run VMs on special nodes (for example, test nodes) or nodes with specific characteristics.
Example of using tolerations to allow scheduling on nodes with the node.deckhouse.io/group=:NoSchedule taint:
spec:
  tolerations:
    - key: "node.deckhouse.io/group"
      operator: "Exists"
      effect: "NoSchedule"
Each entry in tolerations must match a node taint for the VM to be scheduled onto that node.
Viewing node information (including taints) requires an appropriate role with access to cluster-level resources.
To view taints on cluster nodes, run:
d8 k get nodes -o custom-columns=NAME:.metadata.name,TAINTS:.spec.taintsFor more details:
d8 k describe node <node-name>Simple label binding (nodeSelector)
A nodeSelector is the simplest way to control the placement of virtual machines using a set of labels. It allows you to specify on which nodes virtual machines can run by selecting nodes with the desired labels.
spec:
  nodeSelector:
    disktype: ssd
In this example, there are three nodes in the cluster: two with fast disks (disktype=ssd) and one with slow disks (disktype=hdd). The virtual machine will only be placed on nodes that have the disktype label with the value ssd.
How to perform the operation in the web interface in the Placement section:
- Click “Add” in the “Run on nodes” -> “Select nodes by labels” block.
- In the pop-up window, you can set the “Key” and “Value” of the key that corresponds to the
spec.nodeSelectorsettings. - To confirm the key parameters, click the “Enter” button.
- Click the “Save” button that appears.
Preferred Binding (Affinity)
Placement requirements can be:
- Strict (
requiredDuringSchedulingIgnoredDuringExecution) — The VM is placed only on nodes that meet the condition. - Soft (
preferredDuringSchedulingIgnoredDuringExecution) — The VM is placed on suitable nodes, if possible.
nodeAffinity - determines on which nodes a VM can be launched using tag expressions.
Example of using nodeAffinity with a strict rule:
spec:
  affinity:
    nodeAffinity:
      requiredDuringSchedulingIgnoredDuringExecution:
        nodeSelectorTerms:
          - matchExpressions:
              - key: disktype
                operator: In
                values:
                  - ssd
In this example, there are three nodes in the cluster, two with fast disks (disktype=ssd) and one with slow disks (disktype=hdd). The virtual machine will only be deployed on nodes that have the disktype label with the value ssd.
If you use a soft requirement (preferredDuringSchedulingIgnoredDuringExecution), then if there are no resources to start the VM on nodes with disks labeled disktype=ssd, it will be scheduled on a node with disks labeled disktype=hdd.
virtualMachineAndPodAffinity controls the placement of virtual machines relative to other virtual machines. It allows you to specify a preference for placing virtual machines on the same nodes where certain virtual machines are already running.
Example of a soft rule:
spec:
  affinity:
    virtualMachineAndPodAffinity:
      requiredDuringSchedulingIgnoredDuringExecution:
        - weight: 1
          podAffinityTerm:
            labelSelector:
              matchLabels:
                server: database
            topologyKey: "kubernetes.io/hostname"
In this example, the virtual machine will be placed, if possible (since preferred is used) only on hosts that have a virtual machine with the server label and database value.
To place VMs across availability zones instead of specific nodes, set topologyKey to topology.kubernetes.io/zone (see Placing VMs by availability zones).
How to set “preferences” and “mandatories” for placing virtual machines in the web interface in the Placement section:
- Click “Add” in the “Run VM near other VMs” block.
- In the pop-up window, you can set the “Key” and “Value” of the key that corresponds to the
spec.affinity.virtualMachineAndPodAffinitysettings. - To confirm the key parameters, click the “Enter” button.
- Select one of the options “On one server” or “In one zone” that corresponds to the
topologyKeyparameter. - Click the “Save” button that appears.
Avoid co-location (AntiAffinity)
AntiAffinity is the opposite of Affinity, which allows you to specify requirements to avoid co-location of virtual machines on the same hosts. This is useful for load balancing or fault tolerance.
Placement requirements can be strict or soft:
- Strict (
requiredDuringSchedulingIgnoredDuringExecution) — The VM is scheduled only on nodes that meet the condition. - Soft (
preferredDuringSchedulingIgnoredDuringExecution) — The VM is scheduled on suitable nodes if possible.
Be careful when using strict requirements in small clusters with few nodes for VMs. If you apply virtualMachineAndPodAntiAffinity with requiredDuringSchedulingIgnoredDuringExecution, each VM replica must run on a separate node. In a cluster with limited nodes, this may cause some VMs to fail to start due to insufficient available nodes.
The terms Affinity and AntiAffinity apply only to the relationship between virtual machines. For nodes, the bindings used are called nodeAffinity. There is no separate antithesis in nodeAffinity as with virtualMachineAndPodAffinity, but you can create opposite conditions by specifying negative operators in label expressions: to emphasize the exclusion of certain nodes, you can use nodeAffinity with an operator such as NotIn.
Example of using virtualMachineAndPodAntiAffinity:
spec:
  affinity:
    virtualMachineAndPodAntiAffinity:
      requiredDuringSchedulingIgnoredDuringExecution:
        - labelSelector:
            matchLabels:
              server: database
          topologyKey: "kubernetes.io/hostname"
In this example, the virtual machine being created will not be placed on the same host as the virtual machine labeled server: database.
To place VMs across availability zones instead of specific nodes, set topologyKey to topology.kubernetes.io/zone (see Placing VMs by availability zones).
How to configure VM AntiAffinity on nodes in the web interface in the Placement section:
- Click “Add” in the “Identify similar VMs by labels” -> “Select labels” block.
- In the pop-up window, you can set the “Key” and “Value” of the key that corresponds to the
spec.affinity.virtualMachineAndPodAntiAffinitysettings. - To confirm the key parameters, click the “Enter” button.
- Check the boxes next to the labels you want to use in the placement settings.
- Select one of the options in the “Select options” section.
- Click the “Save” button that appears.
Placing VMs by availability zones
Availability zones must be pre-configured on cluster nodes. For this, nodes must have the topology.kubernetes.io/zone label set with the availability zone specified.
In the examples above, topologyKey: "kubernetes.io/hostname" is used, which places VMs on the same node. For placing VMs by availability zones instead of nodes, use topologyKey: "topology.kubernetes.io/zone".
When using Affinity with topologyKey: "topology.kubernetes.io/zone", VMs will be placed in the same availability zone where a virtual machine with the specified labels is present.
When using AntiAffinity with topologyKey: "topology.kubernetes.io/zone", VMs will not be placed in the same availability zone as the virtual machine with the specified labels. This is useful for ensuring fault tolerance when distributing VMs across different availability zones.
To view availability zones on cluster nodes (if these zones are configured), run the following command:
d8 k get nodes -o custom-columns=NAME:.metadata.name,ZONE:.metadata.labels.topology\.kubernetes\.io/zoneAttaching block devices (disks and images)
You can attach disks and images to a virtual machine. They are described as block devices (BlockDevices).
Block device types and access modes:
| Block device type | Comment |
|---|---|
| VirtualImage | Connected in read-only mode, or as a CD-ROM for ISO images. |
| ClusterVirtualImage | Connected in read-only mode, or as a CD-ROM for ISO images. |
| VirtualDisk | Connected in read/write mode. |
Two attachment methods are available:
- Via the VM specification (
.spec.blockDeviceRefs): Disks are listed in the VirtualMachine configuration and boot order is set for them (by position in the list or via thebootOrderfield). Recommended when configuring the VM manually or via GitOps, or when you need to control boot order (e.g., an ISO for OS installation). - Via VirtualMachineBlockDeviceAttachment (
vmbda): Disk is attached via a separate resource and does not participate in boot order. Disks are always attached using thevirtio-scsibus regardless ofenableParavirtualization. Recommended for automation and when you do not have permission to edit the VM.
With enableParavirtualization: true, both methods let you attach and detach disks on a running VM without rebooting, if the disk is available on the node where the VM runs. With enableParavirtualization: false, the .spec.blockDeviceRefs list on a running VM changes only after a reboot; you can still attach and detach disks without rebooting using VirtualMachineBlockDeviceAttachment (vmbda).
For VMs with enableParavirtualization: false, the following applies:
- devices in
.spec.blockDeviceRefsuse the SATA bus; changes to the list on a running VM (adding or removing a disk, including an ISO image) take effect after rebooting the VM. Account for this when using the web interface and in automation; - disks attached through VirtualMachineBlockDeviceAttachment use the
virtio-scsibus and can be attached and detached without rebooting the VM;VirtIOdrivers for the SCSI controller must be installed in the guest OS, otherwise the disk may not appear in the OS even when thevmbdaresource is created successfully in the cluster.
Hot-plugging (hotplug) is only possible if the storage is available on the cluster node where the virtual machine runs. When you create or update a VM, or create a vmbda, placement rules (nodeSelector, affinity, tolerations) for the volume, the VM, and the VM class are taken into account: there must be at least one valid combined placement. If the VM is already running on a specific node, a new disk must be available on that node.
Attaching via the VM specification
The list of block devices is defined in the .spec.blockDeviceRefs field of the VirtualMachine resource.
By default, boot order follows the order of devices in the list. You can set it explicitly with the optional bootOrder field (smaller value means higher priority). If bootOrder is set for at least one device, only devices with bootOrder set are included in the boot sequence. Allowed values: integers ≥ 1, unique within the list. When you remove a device from the list, boot order is recalculated for the remaining devices.
Changing the order of devices in the list or their bootOrder values takes effect after a VM reboot. For example, you can attach an ISO image for OS installation with the desired boot priority, then remove it from the list after installation. If paravirtualization is disabled (enableParavirtualization: false), edits to .spec.blockDeviceRefs on a running VM, including for ISO images, apply after rebooting the VM.
Virtual machine configuration fragment with block devices and explicit boot order:
spec:
  blockDeviceRefs:
    - kind: VirtualDisk
      name: <virtual-disk-name>
      bootOrder: 1
    - kind: VirtualImage
      name: <virtual-image-name>
      bootOrder: 2
To attach a disk to a running virtual machine, add it to the .spec.blockDeviceRefs list:
spec:
  blockDeviceRefs:
    - kind: VirtualDisk
      name: <virtual-disk-name>
    - kind: VirtualImage
      name: <virtual-image-name>
    - kind: VirtualDisk
      name: <additional-disk-name>
To detach a disk, remove it from the list. When enableParavirtualization: false, list changes on a running VM take effect after rebooting the VM.
How to work with bootable block devices in the web interface:
- Go to the “Projects” tab and select the desired project.
- Go to the “Virtualization” → “Virtual Machines” section.
- Select the required VM from the list and click on its name.
- On the “Configuration” tab, scroll down to the “Disks and Images” section.
- In the “Boot Disks” section you can:
- Add: Attach a new disk or image to the VM.
- Extract: Detach the device from the VM (the image or disk remains in the project and can be attached again to this or another VM).
- Delete: Remove the image or disk resource from the cluster (after deletion it cannot be reused).
- Resize: Change the size of the disk.
- Reorder: Change the boot order of devices.
Attaching via VirtualMachineBlockDeviceAttachment (vmbda)
The VirtualMachineBlockDeviceAttachment resource attaches and detaches a block device to or from a VM without changing its spec. Suited for automation and scenarios when the user does not have permission to edit the VM.
Create a resource that attaches the empty disk blank-disk to the virtual machine linux-vm:
d8 k apply -f - <<EOF
apiVersion: virtualization.deckhouse.io/v1alpha2
kind: VirtualMachineBlockDeviceAttachment
metadata:
  name: attach-blank-disk
spec:
  blockDeviceRef:
    kind: VirtualDisk
    name: blank-disk
  virtualMachineName: linux-vm
EOF
After creation, VirtualMachineBlockDeviceAttachment can be in the following states:
Pending- waiting for all dependent resources to be ready.InProgress- the process of device connection is in progress.Attached- the device is connected.
Diagnosing problems with the resource is done by analyzing the information in the .status.conditions block.
Check the state of your resource:
d8 k get vmbda attach-blank-diskExample output:
NAME                PHASE      VIRTUAL MACHINE NAME   AGE
attach-blank-disk   Attached   linux-vm              3m7s
Connect to the virtual machine and make sure the disk is connected:
d8 v ssh cloud@linux-vm --command "lsblk"Example output:
NAME    MAJ:MIN RM  SIZE RO TYPE MOUNTPOINTS
sda       8:0    0   10G  0 disk <--- statically attached linux-vm-root disk
|-sda1    8:1    0  9.9G  0 part /
|-sda14   8:14   0    4M  0 part
`-sda15   8:15   0  106M  0 part /boot/efi
sdb       8:16   0    1M  0 disk <--- cloudinit
sdc       8:32   0 95.9M  0 disk <--- dynamically attached disk blank-disk
To detach the disk from the virtual machine, delete the previously created resource:
d8 k delete vmbda attach-blank-diskAttaching images is done by analogy: set the kind field to VirtualImage or ClusterVirtualImage and the image name.
d8 k apply -f - <<EOF
apiVersion: virtualization.deckhouse.io/v1alpha2
kind: VirtualMachineBlockDeviceAttachment
metadata:
  name: attach-ubuntu-iso
spec:
  blockDeviceRef:
    kind: VirtualImage # or ClusterVirtualImage
    name: ubuntu-iso
  virtualMachineName: linux-vm
EOF
How to work with additional block devices in the web interface:
- Go to the “Projects” tab and select the desired project.
- Go to the “Virtualization” → “Virtual Machines” section.
- Select the required VM from the list and click on its name.
- On the “Configuration” tab, scroll down to the “Disks and Images” section.
- In the “Additional Disks” section you can:
- Add: Attach a new disk or image to the VM.
- Extract: Detach the device from the VM (the image or disk remains in the project and can be attached again to this or another VM).
- Delete: Remove the image or disk resource from the cluster (after deletion it cannot be reused).
- Resize: Change the size of the disk.
Disk naming in guest OS
Block device names (/dev/sda, /dev/sdb, /dev/sdc, etc.) are assigned by the Linux kernel in the order devices are discovered during boot. This order may change between reboots, so device names can change even if SCSI addresses remain the same.
Using /dev/sdX in configuration files (for example, /etc/fstab) or scripts may cause the wrong disk to be mounted or the VM to behave incorrectly after a reboot.
Example:
After the first VM boot:
$ lsscsi
[0:0:0:1]  disk    QEMU     QEMU HARDDISK   /dev/sda
[0:0:0:2]  disk    QEMU     QEMU HARDDISK   /dev/sdb
After VM reboot:
$ lsscsi
[0:0:0:1]  disk    QEMU     QEMU HARDDISK   /dev/sdb
[0:0:0:2]  disk    QEMU     QEMU HARDDISK   /dev/sda
SCSI addresses (0:0:0:1, 0:0:0:2) remain unchanged, but device names (/dev/sda, /dev/sdb) are swapped.
Use stable identifiers instead of /dev/sdX:
/dev/disk/by-uuid/— by partition UUID (preferred for/etc/fstab)/dev/disk/by-path/— by SCSI connection path/dev/disk/by-id/— by SCSI device ID
In configuration files and scripts, use partition UUIDs or symlinks from /dev/disk/by-* instead of /dev/sdX names.
Network interface naming in guest OS
In systems without predictable network interface naming support, network interface names (eth0, eth1, eth2, etc.) are assigned by the Linux kernel in the order devices are discovered during boot. When adding new network interfaces or changing the order of networks in .spec.networks, the interface order may change, which can cause IP addresses to be assigned to the wrong interfaces.
Using ethX in configuration files (for example, /etc/network/interfaces, netplan, systemd-networkd) or scripts may lead to unexpected network behavior or connection to the wrong network when adding new interfaces or changing the network order.
Modern distributions with systemd (Ubuntu 16.04+, Debian 9+, CentOS 7+, RHEL 7+) use predictable interface names (enpXsY, ensX, enoX) by default, which are based on the physical characteristics of the device (PCI coordinates) and remain stable between reboots and when adding new interfaces.
However, even when using predictable names, it is recommended to bind network configuration to interface MAC addresses for guaranteed stability, especially when changing the order of networks in .spec.networks or adding new interfaces.
Example for systems without predictable naming:
Initially, the VM has two interfaces:
$ ip link show
1: lo: <LOOPBACK,UP,LOWER_UP> mtu 65536
2: eth0: <BROADCAST,MULTICAST,UP,LOWER_UP> mtu 1500
3: eth1: <BROADCAST,MULTICAST,UP,LOWER_UP> mtu 1500
After adding a new interface at the beginning of the .spec.networks list and rebooting the VM:
$ ip link show
1: lo: <LOOPBACK,UP,LOWER_UP> mtu 65536
2: eth0: <BROADCAST,MULTICAST,UP,LOWER_UP> mtu 1500  # New interface
3: eth1: <BROADCAST,MULTICAST,UP,LOWER_UP> mtu 1500  # Old eth0
4: eth2: <BROADCAST,MULTICAST,UP,LOWER_UP> mtu 1500  # Old eth1
MAC addresses remain unchanged, but interface names (eth0, eth1) shift, which can lead to IP addresses being assigned to the wrong interfaces.
Use stable identifiers instead of ethX:
enpXsY— predictable names based on physical location (systemd networkd naming scheme, enabled by default in modern systems)- MAC address binding — in
netplan,systemd-networkd, or/etc/network/interfacesconfiguration (preferred for guaranteed stability)
In configuration files and scripts, use stable interface names (enpXsY) or MAC address binding instead of ethX names.
Predictable interface order works only on guest OS with systemd (e.g. Ubuntu, Debian). On Alpine and other distros without systemd the order may not match.
Organizing interaction with virtual machines
Virtual machines can be accessed directly via their fixed IP addresses. However, this approach has limitations: direct use of IP addresses requires manual management, complicates scaling, and makes the infrastructure less flexible. An alternative is services—a mechanism that abstracts access to VMs by providing logical entry points instead of binding to physical addresses.
If connecting to a VM from a cluster node does not work, check NetworkPolicy in the project. Project network policies can restrict access to the VM, including connections from cluster nodes.
Services simplify interaction with both individual VMs and groups of similar VMs. For example, the ClusterIP service type creates a fixed internal address that can be used to access both a single VM and a group of VMs, regardless of their actual IP addresses. This allows other system components to interact with resources through a stable name or IP, automatically directing traffic to the right machines.
Services also serve as a load balancing tool: they distribute requests evenly among all connected machines, ensuring fault tolerance and ease of expansion without the need to reconfigure clients.
For scenarios where direct access to specific VMs within the cluster is important (for example, for diagnostics or cluster configuration), headless services can be used. Headless services do not assign a common IP, but instead link the DNS name to the real addresses of all connected machines. A request to such a name returns a list of IPs, allowing you to select the desired VM manually while maintaining the convenience of predictable DNS records.
For external access, services are supplemented with mechanisms such as NodePort, which opens a port on a cluster node, LoadBalancer, which automatically creates a cloud load balancer, or Ingress, which manages HTTP/HTTPS traffic routing.
All these approaches are united by their ability to hide the complexity of the infrastructure behind simple interfaces: clients work with a specific address, and the system itself decides how to route the request to the desired VM, even if its number or status changes.
The service name is formed as <service-name>.<namespace or project name>.svc.<clustername>, or more briefly: <service-name>.<namespace or project name>.svc. For example, if your service name is http and the namespace is default, the full DNS name will be http.default.svc.cluster.local.
The VM’s membership in the service is determined by a set of labels. To set labels on a VM in the context of infrastructure management, use the following command:
d8 k label vm <vm-name> label-name=label-valueExample:
d8 k label vm linux-vm app=nginxExample output:
virtualmachine.virtualization.deckhouse.io/linux-vm labeledHow to add labels and annotations to VMs in the web interface:
- Go to the “Projects” tab and select the desired project.
- Go to the “Virtualization” → “Virtual Machines” section.
- Select the desired VM from the list and click on its name.
- Go to the “Meta” tab.
- You can add labels in the “Labels” section.
- You can add annotations in the “Annotations” section.
- Click “Add” in the desired section.
- In the pop-up window, you can set the “Key” and “Value” of the key.
- To confirm the key parameters, click the “Enter” button.
- Click the “Save” button that appears.
Headless service
A headless service allows you to easily route requests within a cluster without the need for load balancing. Instead, it simply returns all IP addresses of virtual machines connected to this service.
Even if you use a headless service for only one virtual machine, it is still useful. By using a DNS name, you can access the machine without depending on its current IP address. This simplifies management and configuration because other applications within the cluster can use this DNS name to connect instead of using a specific IP address, which may change.
Example of creating a headless service:
d8 k apply -f - <<EOF
apiVersion: v1
kind: Service
metadata:
  name: http
  namespace: default
spec:
  clusterIP: None
  selector:
    # Label by which the service determines which virtual machine to direct traffic to.
    app: nginx
EOF
After creation, the VM or VM group can be accessed by name: http.default.svc
ClusterIP service
ClusterIP is a standard service type that provides an internal IP address for accessing the service within the cluster. This IP address is used to route traffic between different components of the system. ClusterIP allows virtual machines to interact with each other through a predictable and stable IP address, which simplifies internal communication within the cluster.
Example ClusterIP configuration:
d8 k apply -f - <<EOF
apiVersion: v1
kind: Service
metadata:
  name: http
spec:
  selector:
    # Label by which the service determines which virtual machine to route traffic to.
    app: nginx
EOF
How to perform the operation in the web interface:
- Go to the “Projects” tab and select the desired project.
- Go to the “Network” → “Services” section.
- In the window that opens, configure the service settings.
- Click on the “Create” button.
Publish virtual machine services using a service with the NodePort type
NodePort is an extension of the ClusterIP service that provides access to the service through a specified port on all nodes in the cluster. This makes the service accessible from outside the cluster through a combination of the node’s IP address and port.
NodePort is suitable for scenarios where direct access to the service from outside the cluster is required without using a external load balancer.
Create the following service:
d8 k apply -f - <<EOF
apiVersion: v1
kind: Service
metadata:
  name: linux-vm-nginx-nodeport
spec:
  type: NodePort
  selector:
    # label by which the service determines which virtual machine to direct traffic to
    app: nginx
  ports:
    - protocol: TCP
      port: 80
      targetPort: 80
      nodePort: 31880
EOF
In this example, a service with the type NodePort will be created that opens external port 31880 on all nodes in your cluster. This port will forward incoming traffic to internal port 80 on the virtual machine where the Nginx application is running.
If you do not explicitly specify the nodePort value, an arbitrary port will be assigned to the service, which can be viewed in the service status immediately after its creation.
Publishing virtual machine services using a service with the LoadBalancer service type
LoadBalancer is a type of service that automatically creates an external load balancer with a static IP address. This balancer distributes incoming traffic among virtual machines, ensuring the service’s availability from the Internet.
d8 k apply -f - <<EOF
apiVersion: v1
kind: Service
metadata:
  name: linux-vm-nginx-lb
spec:
  type: LoadBalancer
  selector:
    # label by which the service determines which virtual machine to direct traffic to
    app: nginx
  ports:
    - protocol: TCP
      port: 80
      targetPort: 80
EOF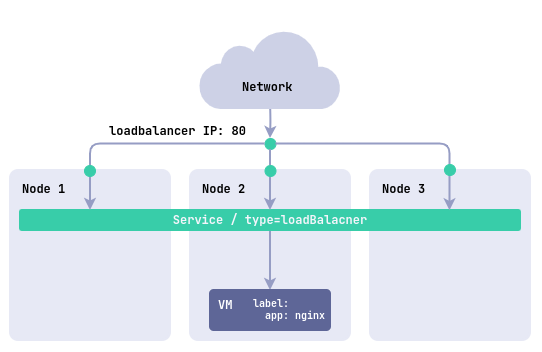
Publish virtual machine services using Ingress
Ingress allows you to manage incoming HTTP/HTTPS requests and route them to different servers within your cluster. This is the most appropriate method if you want to use domain names and SSL termination to access your virtual machines.
To publish a virtual machine service through Ingress, you must create the following resources:
An internal service to bind to Ingress. Example:
d8 k apply -f - <<EOF
apiVersion: v1
kind: Service
metadata:
  name: linux-vm-nginx
spec:
  selector:
    # label by which the service determines which virtual machine to direct traffic to
    app: nginx
  ports:
    - protocol: TCP
      port: 80
      targetPort: 80
EOF
And an Ingress resource for publishing. Example:
d8 k apply -f - <<EOF
apiVersion: networking.k8s.io/v1
kind: Ingress
metadata:
  name: linux-vm
spec:
  rules:
    - host: linux-vm.example.com
      http:
        paths:
          - path: /
            pathType: Prefix
            backend:
              service:
                name: linux-vm-nginx
                port:
                  number: 80
EOF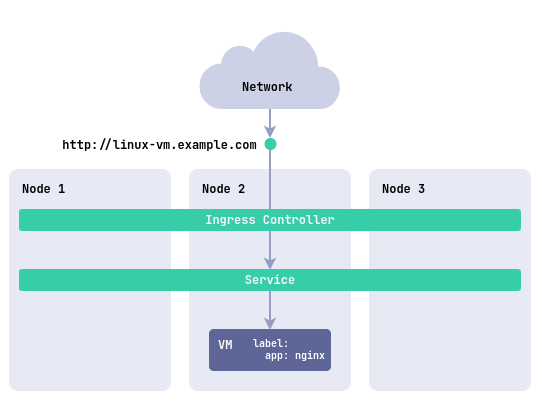
How to publish a VM service using Ingress in the web interface:
- Go to the “Projects” tab and select the desired project.
- Go to the “Network” → “Ingresses” section.
- Click the “Create Ingress” button.
- In the window that opens, configure the service settings.
- Click the “Create” button.
Live virtual machine migration
Live virtual machine (VM) migration is the process of moving a running VM from one physical host to another without shutting it down. This feature plays a key role in managing virtualized infrastructure, ensuring application continuity during maintenance, load balancing, or upgrades.
How live migration works
The live migration process involves several steps:
-
Creation of a new VM instance
A new VM is created on the target node in a suspended state. Its configuration (CPU, disks, network) is copied from the source node.
-
Primary memory transfer
The entire RAM of the VM is copied to the target node over the network. This is called primary transfer.
-
Change tracking (Dirty Pages)
While memory is being transferred, the VM continues to run on the source node and may change some memory pages. These pages are called dirty pages, and the hypervisor marks them.
-
Iterative synchronization
After the initial transfer, only the modified pages are sent again. This process is repeated over several cycles:
- The higher the load on the VM, the more “dirty” pages appear, and the longer the migration takes.
- With good network bandwidth, the amount of unsynchronized data gradually decreases.
-
Final synchronization and switching
When the number of dirty pages becomes minimal, the VM on the source node is suspended (typically for 100 milliseconds):
- The remaining memory changes are transferred to the target node.
- The state of the CPU, devices, and open connections are synchronized.
- The VM is started on the new node, and the source copy is deleted.
Until the VM switches to the new node (Phase 5), the VM on the source node continues to operate normally and provide services to users.
Requirements and limitations
For successful live migration, certain requirements must be met. Failure to meet these requirements can lead to limitations and issues during migration.
-
Disk availability: All disks attached to the VM must be accessible on the target node, otherwise migration will be impossible. For network storage (NFS, Ceph, etc.), this requirement is usually met automatically, as disks are accessible on all cluster nodes. For local storage, the situation is different: the storage system must be available on the target node to create a new local volume. If local storage exists only on the source node, migration cannot be performed.
-
Network bandwidth: Network speed is critical for live migration. With low bandwidth, the number of memory synchronization iterations increases, VM downtime during the final stage of migration increases, and in the worst case, migration may not complete due to a timeout. To manage the migration process, configure the live migration policy
.spec.liveMigrationPolicyin the virtual machine settings. For network problems, use the AutoConverge mechanism (see the Migration with insufficient network bandwidth section). -
Kernel versions on nodes: For stable live migration operation, all cluster nodes must use the same Linux kernel version. Differences in kernel versions can lead to incompatible interfaces, system calls, and resource handling features, which can disrupt the virtual machine migration process.
-
CPU compatibility: CPU compatibility depends on the CPU type specified in the virtual machine class. When using the
Hosttype, migration is only possible between nodes with similar CPU types: migration between nodes with Intel and AMD processors does not work, and it also does not work between different CPU generations due to differences in instruction sets. When using theHostPassthroughtype, the VM can only migrate to a node with exactly the same processor as on the source node. To ensure migration compatibility between nodes with different processors, use theDiscovery,Model, orFeaturestypes in the virtual machine class. -
Migration execution time: A completion timeout is set for live migration, which is calculated using the formula:
Completion timeout = 800 seconds × (Memory size in GiB + Disk size in GiB (if Block Migration is used)). If migration does not complete within this time, the operation is considered failed and is canceled automatically. For example, for a virtual machine with 4 GiB of memory and 20 GiB of disk, the timeout will be800 seconds × (4 GiB + 20 GiB) = 19200 seconds (320 minutes or ~5.3 hours). With low network speed or high load on the VM, migration may not complete within the allotted time.
How to perform a live VM migration
Let’s look at an example. Before starting the migration, view the current status of the virtual machine:
d8 k get vmExample output:
NAME                                   PHASE     NODE           IPADDRESS     AGE
linux-vm                              Running   virtlab-pt-1   10.66.10.14   79m
We can see that it is currently running on the virtlab-pt-1 node.
To migrate a virtual machine from one node to another while taking into account VM placement requirements, use the following command:
d8 v migrate -n <namespace> <vm-name> [--force] [--target-node-name string]Running this command creates a VirtualMachineOperations resource.
When used during virtual machine migration, the --force flag activates a special mechanism called AutoConverge (for more details, see the Migration with insufficient network bandwidth section). This mechanism automatically reduces the CPU load of the virtual machine (slows down its CPU) when it is necessary to speed up the completion of migration and help it complete successfully, even when the virtual machine memory transfer is too slow. Use this flag if a standard migration cannot complete due to high virtual machine activity.
To place the virtual machine on a specific target node, specify that node’s name using the --target-node-name option. For example, if a virtual machine should be placed on the node production-1:
d8 v migrate -n project-1 linux-vm --target-node-name production-1Under the hood, a virtual machine operation will be created with the specific node selector kubernetes.io/hostname: production-1, where production-1 is the node name.
You can also start the migration by manually creating a VirtualMachineOperation (vmop) resource of type Migrate:
d8 k create -f - <<EOF
apiVersion: virtualization.deckhouse.io/v1alpha2
kind: VirtualMachineOperation
metadata:
  generateName: migrate-linux-vm-
  namespace: project-1
spec:
  # virtual machine name
  virtualMachineName: linux-vm
  # operation to evict
  type: Migrate
  # Defines the Migrate operation.
  migrate:
    nodeSelector:
      # Additionally, you can set any suitable node selector.
      kubernetes.io/hostname: production-1
  # Allow CPU slowdown by AutoConverge mechanism to guarantee that migration will complete.
  force: true
EOF
To prevent the unschedulable state of a virtual machine, the node selector should not conflict with other placement rules such as virtual machine affinity, node selectors, and virtual machine class node selector rules.
Targeted migration to a specific node is not available in the Community Edition version.
If you don’t need to specify target node parameters, you can omit the migrate field or evict the virtual machine to another suitable node using the d8 v evict command or by creating a VirtualMachineOperation resource of type Evict.
To track the migration of a virtual machine immediately after the vmop resource is created, run the command:
d8 k get vm -wExample output:
NAME                                  PHASE       NODE           IPADDRESS     AGE
linux-vm                              Running     virtlab-pt-1   10.66.10.14   79m
linux-vm                              Migrating   virtlab-pt-1   10.66.10.14   79m
linux-vm                              Migrating   virtlab-pt-1   10.66.10.14   79m
linux-vm                              Running     virtlab-pt-2   10.66.10.14   79m
You can interrupt any live migration while it is in the Pending or InProgress phase by deleting the corresponding VirtualMachineOperations resource.
How to perform a live VM migration in the web interface:
- Go to the “Projects” tab and select the desired project.
- Go to the “Virtualization” → “Virtual Machines” section.
- Select the desired virtual machine from the list and click the ellipsis button.
- Select “Migrate” from the pop-up menu.
- Confirm or cancel the migration in the pop-up window.
Configuring migration policy
The migration policy determines when to use the AutoConverge mechanism (CPU slowdown) to guarantee migration completion.
The AutoConverge mechanism helps complete migration even with low network bandwidth, guaranteeing that the migration will complete successfully. However, it slows down the virtual machine’s CPU, which can affect the performance of applications running on the virtual machine.
The AutoConverge mechanism works in two stages:
-
Virtual machine CPU slowdown
The hypervisor gradually reduces the CPU frequency of the source virtual machine. This reduces the rate at which new “dirty” pages appear. The higher the load on the virtual machine, the greater the slowdown.
-
Automatic migration completion
Once the data transfer rate exceeds the memory change rate, final synchronization is started, and the virtual machine switches to the new node.
To configure the migration policy, use the .spec.liveMigrationPolicy parameter in the virtual machine configuration. The following options are available:
AlwaysSafe: Migration is always performed without slowing down the CPU (AutoConverge is not used). Suitable for cases where maximum virtual machine performance is important, but it requires high network bandwidth.PreferSafe(used as the default policy): Migration is performed without slowing down the CPU (AutoConverge is not used). However, you can start migration with CPU slowdown using the VirtualMachineOperation resource with parameterstype=Migrateandforce=true.AlwaysForced: Migration always uses AutoConverge, meaning the CPU is slowed down when necessary. This guarantees migration completion even with poor network, but may reduce virtual machine performance.PreferForced: Migration uses AutoConverge, meaning the CPU is slowed down when necessary. However, you can start migration without slowing down the CPU using the VirtualMachineOperation resource with parameterstype=Migrateandforce=false.
Migration with insufficient network bandwidth
During live migration of a virtual machine, a situation may arise when network bandwidth is insufficient to transfer data faster than it changes in the virtual machine’s memory. In this case, the number of “dirty” pages continues to grow, and the migration may not complete within the timeout.
To solve this problem, the AutoConverge mechanism is used, which is configured through the migration policy.
To determine whether network bandwidth is insufficient for live migration of a virtual machine, check the graphs in the “Namespace / Virtual Machine” → “VM Status details” → “Live migration memory metrics” section:
- Processed memory rate is less than Dirty memory rate.
- Remaining memory rate does not decrease for a long time.
This means that the network has become a bottleneck for migration.
Example of a situation where migration cannot be completed due to insufficient network bandwidth: memory is continuously changed inside the virtual machine using stress-ng.
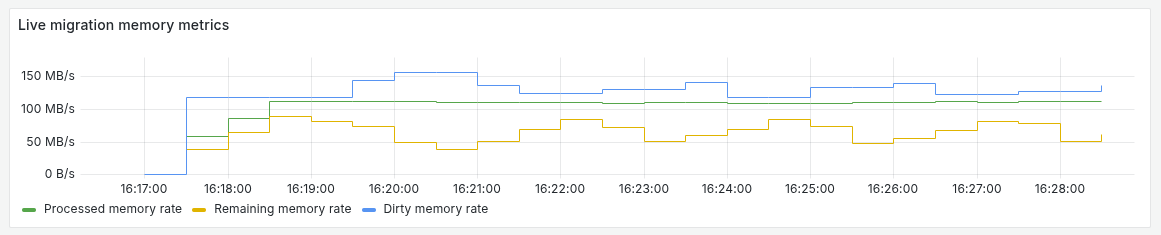
Example of migrating the same virtual machine using the --force flag of the d8 v migrate command (which enables AutoConverge). The example shows the CPU frequency decreasing step by step to reduce the memory change rate.

If the network limits the migration speed, you can:
-
Wait for the operation to complete with an error due to timeout.
-
Cancel the current migration operation by deleting the vmop object:
d8 k delete vmop <operation-name>Then restart the migration using the
--forceflag to enable the AutoConverge mechanism. Using the--forceflag must comply with the current virtual machine migration policy.
System-initiated migrations
Migration can be performed automatically by the following system events:
- Updating the “firmware” of a virtual machine.
- Redistribution of load in the cluster.
- Transferring a node into maintenance mode (Node drain).
- When you change VM placement settings (not available in Community edition).
The trigger for live migration is the appearance of the VirtualMachineOperations resource with the Evict type.
The table shows the VirtualMachineOperations resource name prefixes with the Evict type that are created for live migrations caused by system events:
| Type of system event | Resource name prefix |
|---|---|
| Firmware update | firmware-update-* |
| Load redistribution in the cluster | evacuation-* |
| Node drain | evacuation-* |
| VM placement settings change | nodeplacement-update-* |
| Disk storage migration | volume-migration-* |
This resource can be in the following states:
Pending: The operation is pending.InProgress: Live migration is in progress.Completed: Live migration of the virtual machine has completed successfully.Failed: Live migration of the virtual machine has failed.
You can view active operations using the command:
d8 k get vmopExample output:
NAME                    PHASE       TYPE    VIRTUALMACHINE      AGE
firmware-update-fnbk2   Completed   Evict   linux-vm            148m
To cancel the migration, delete the corresponding resource.
How to view active operations in the web interface:
- Go to the “Projects” tab and select the desired project.
- Go to the “Virtualization” → “Virtual Machines” section.
- Select the required VM from the list and click on its name.
- Go to the “Events” tab.
Live migration of virtual machine when changing placement parameters (not available in CE edition)
Let’s consider the migration mechanism on the example of a cluster with two node groups (NodeGroups): green and blue. Suppose a virtual machine (VM) is initially running on a node in the green group and its configuration contains no placement restrictions.
Step 1: Add the placement parameter Let’s specify in the VM specification the requirement for placement in the green group :
spec:
  nodeSelector:
    node.deckhouse.io/group: green
After saving the changes, the VM will continue to run on the current node, since the nodeSelector condition is already met.
Step 2: Change the placement parameter Let’s change the placement requirement to group blue :
spec:
  nodeSelector:
    node.deckhouse.io/group: blue
Now the current node (groups green) does not match the new conditions. The system will automatically create a VirtualMachineOperations object of type Evict, which will initiate a live migration of the VM to an available node in group blue .
Collecting debug information
The collect-debug-info command requires d8 version v0.27.0 or higher.
Use collect-debug-info to gather diagnostic data about a virtual machine and all related resources into a single compressed archive.
The command collects the following information:
- Virtual machine configuration
- Virtual machine operations
- Migration information
- Block devices
- Related PVCs and PVs
- Pods associated with the VM, including their logs (last 10000 lines)
- Events for all related resources
- VM domain XML configuration
The command output is written to a compressed archive (tar.gz) that is output to stdout. To save the archive, you must redirect the output to a file.
Usage example:
# Collect debug information for virtual machine 'linux-vm'
d8 v collect-debug-info linux-vm > debug-info.tar.gz

# Collect debug information for VM with namespace specified
d8 v collect-debug-info linux-vm -n mynamespace > debug-info.tar.gz

# Collect debug information for VM with full name specified (name.namespace)
d8 v collect-debug-info linux-vm.mynamespace > debug-info.tar.gz
The command cannot output data directly to the terminal. You must redirect the output to a file, otherwise the command will fail with an error.
After executing the command, you will receive a debug-info.tar.gz archive that contains all collected data in YAML format (for resources) and text files (for logs). This archive can be sent to technical support for problem analysis.
Virtual machine pools
Available in the EE and SE+ editions. Requires the VirtualMachinePool feature gate.
The VirtualMachinePool resource maintains a requested number of identical virtual machines and lets you scale them via the scale subresource, a HorizontalPodAutoscaler (HPA), or KEDA. Its virtualMachineTemplate.spec is an ordinary VirtualMachineSpec, so a replica is no different from a manually created virtual machine.
This functionality is disabled by default. To enable it, add VirtualMachinePool to the .spec.settings.featureGates array in the ModuleConfig virtualization:
kind: ModuleConfig
metadata:
  name: virtualization
spec:
  settings:
    featureGates:
    - VirtualMachinePool
Create a pool with the desired number of replicas and a template. Each per-replica disk is described once in virtualDiskTemplates (reclaim policy, size, data source), and the template’s blockDeviceRefs references those disks — by name, with kind: VirtualDisk — to set the device (boot) order, exactly as in a plain VirtualMachine. Every virtualDiskTemplates entry must be referenced exactly once (admission enforces this bijection; disk-template names are unique). Alongside the per-replica disks you may list shared read-only images (VirtualImage/ClusterVirtualImage) — for example a common ISO/CD-ROM attached to every replica — they are not per-replica and need no virtualDiskTemplates entry.
d8 k apply -f - <<EOF
apiVersion: virtualization.deckhouse.io/v1alpha2
kind: VirtualMachinePool
metadata:
  name: runners
  namespace: ci
spec:
  replicas: 3
  scaleDownPolicy: NewestFirst
  virtualMachineTemplate:
    spec:
      runPolicy: AlwaysOn
      virtualMachineClassName: generic
      cpu:
        cores: 2
      memory:
        size: 4Gi
      # Cloud-init: every replica self-configures on first boot (same for all).
      provisioning:
        type: UserData
        userData: |
          #cloud-config
          users:
            - name: cloud
              sudo: ALL=(ALL) NOPASSWD:ALL
              ssh_authorized_keys:
                - ssh-ed25519 AAAAC3Nz... user@example
      # Devices and boot order (first = boot). VirtualDisk entries reference
      # virtualDiskTemplates by name (per-replica, resolved by the controller);
      # a VirtualImage/ClusterVirtualImage is shared read-only by every replica.
      blockDeviceRefs:
        - kind: VirtualDisk
          name: root          # boot disk
        - kind: VirtualDisk
          name: cache
        - kind: ClusterVirtualImage
          name: tools-iso      # shared CD-ROM attached to every replica
  # Per-replica disk parameters (reclaim/size/source). Each must be referenced above.
  virtualDiskTemplates:
    # Writable root disk: one per replica, cloned from an image, removed with the replica.
    - name: root
      reclaim:
        onScaleDown: Delete
      spec:
        persistentVolumeClaim:
          size: 30Gi
        dataSource:
          type: ObjectRef
          objectRef:
            kind: VirtualImage
            name: ubuntu
    # Reusable cache: survives scale-down and is reattached on scale-up.
    - name: cache
      reclaim:
        onScaleDown: Retain
        keep: 5
        ttl: 30m
      spec:
        persistentVolumeClaim:
          size: 50Gi
EOF
Replicas are named <pool>-<random>. Disks follow the same scheme: a per-replica (Delete) disk is named <replica>-<template> (for example runners-1b2e84-root), a reusable (Retain) disk is named <pool>-<template>-<random>. List replicas with d8 k get vm -l vmpool.virtualization.deckhouse.io/pool=runners.
Attaching a shared CD-ROM (or any shared image) to every replica
Besides the per-replica disks, blockDeviceRefs may reference read-only images — a ClusterVirtualImage or a VirtualImage. Such an image is not per-replica: every replica attaches the same image (for example a common ISO with tools or drivers). Images are not listed in virtualDiskTemplates (they have no per-replica state) and are not subject to the bijection.
Add the image to blockDeviceRefs at the position where you want it in the boot order — for an OS-installation ISO, place it before the disk; for a tools CD-ROM, after:
spec:
  virtualMachineTemplate:
    spec:
      blockDeviceRefs:
        - kind: VirtualDisk           # per-replica writable root, boots first
          name: root
        - kind: ClusterVirtualImage   # shared read-only CD-ROM, attached to every replica
          name: tools-iso
  virtualDiskTemplates:
    - name: root
      spec:
        persistentVolumeClaim:
          size: 30Gi
        dataSource:
          type: ObjectRef
          objectRef:
            kind: ClusterVirtualImage
            name: ubuntu
The image is attached to existing replicas the same way as any other device — a change to blockDeviceRefs applies to a live replica on its next recreation (rotation or scale-up).
Scaling
The pool supports the standard scale subresource, which works with manual replica changes and autoscalers.
To change the number of replicas manually, run:
d8 k scale virtualmachinepool/runners -n ci --replicas=8The pool publishes status.selector, so an HPA reads CPU/memory metrics from the replicas directly without extra wiring:
apiVersion: autoscaling/v2
kind: HorizontalPodAutoscaler
metadata:
  name: runners
  namespace: ci
spec:
  scaleTargetRef:
    apiVersion: virtualization.deckhouse.io/v1alpha2
    kind: VirtualMachinePool
    name: runners
  minReplicas: 3
  maxReplicas: 20
  metrics:
    - type: Resource
      resource:
        name: cpu
        target:
          type: Utilization
          averageUtilization: 70
Beyond CPU/memory, the pool also works with custom metrics (Pods/External via custom.metrics.k8s.io/external.metrics.k8s.io) and KEDA, for example to scale on an external queue length. With scaleDownPolicy: Explicit an autoscaler can only scale up: anonymous scale-down through the scale subresource is rejected (remove replicas by name, see below).
The spec.scaleDownPolicy field selects which replica is removed on anonymous scale-down:
NewestFirst: the youngest replicas are removed first.OldestFirst: the oldest replicas are removed first.Explicit: anonymous scale-down is rejected; replicas can be removed only by name (see below). Use it when only the caller knows which replica is safe to remove (for example, an idle one).
Removing specific replicas
By default, when the pool shrinks the controller chooses which replica to remove.
To remove particular replicas (and shrink the pool by that count), use the scaleDownWith subresource:
kubectl create --raw \
  /apis/subresources.virtualization.deckhouse.io/v1alpha2/namespaces/ci/virtualmachinepools/runners/scaledownwith \
  -f - <<'EOF'
{"targets": ["runners-1b2e84", "runners-9c0d11"]}
EOF
A plain kubectl delete vm does not shrink the pool: the controller treats it as a lost replica and creates a replacement.
Reusable disks (reclaim)
The reclaim policy defines what happens to a replica’s disk when the replica is removed from the pool.
The reclaim.onScaleDown field of a virtualDiskTemplates entry controls this behavior. reclaim is optional; if omitted, the disk defaults to Delete.
Delete(default): the disk belongs to the virtual machine and is removed with it; nothing survives the replica.Retain: the disk belongs to the pool, outlives the replica and is reattached to the next replica on scale-up. Use it for state that is expensive to rebuild and should survive VM recreation, so scaling back up is warm instead of cold.
keep and ttl tune the pool of free Retain disks (they apply only to Retain):
keep: how many recently-freed disks to always keep warm for instant scale-up; these are immune tottl.ttl: how long a free disk lives beyond the warm buffer before it is garbage-collected.
Examples:
# Ephemeral disk: removed with the replica (Delete is the default).
- name: root
  spec:
    persistentVolumeClaim: { size: 30Gi }
    dataSource: { type: ObjectRef, objectRef: { kind: VirtualImage, name: ubuntu } }

# Reusable disk: keep 3 warm for fast scale-up, collect the rest after 1h idle.
- name: cache
  reclaim:
    onScaleDown: Retain
    keep: 3
    ttl: 1h
  spec:
    persistentVolumeClaim: { size: 100Gi }

# Reusable disk kept indefinitely: reused forever, never auto-collected (no ttl).
- name: data
  reclaim:
    onScaleDown: Retain
  spec:
    persistentVolumeClaim: { size: 20Gi }
Invalid combinations are rejected on create/update: keep/ttl may be set only with Retain, and keep > 0 requires a ttl (without a ttl nothing is ever collected, so keep would do nothing). A Retain disk with no ttl keeps every freed disk indefinitely; bound it with a ttl unless that is what you want.
Notes
Below are pool limitations and non-obvious behavior to keep in mind in production.
- Removing a
virtualDiskTemplatesentry deletes its disks. ForRetaindisks this destroys reusable data, so remove a template only when you no longer need it. - The pool maintains the replica count, not health. An existing but unhealthy VM is not replaced (VM-level restart handles liveness), and a
Stoppedreplica is kept, not replaced; only a fully deleted replica is recreated. Retaindisks are shared across replicas. On scale-up a new replica may reuse another replica’s freed disk together with its data; there is no fixed binding between a replica and a disk.- Editing a
virtualDiskTemplates[].specaffects only new disks, exceptsize, which grows existing disks (never shrinks).dataSource,storageClassName, etc. are not re-applied to already-created disks. - Each
virtualDiskTemplatesdisk is per-replica: every replica gets its own copy. Shared read-only images (VirtualImage/ClusterVirtualImage, e.g. a common ISO/CD-ROM) can be attached to all replicas by listing them in the template’sblockDeviceRefs; a writable disk cannot be shared between replicas. - Editing the template’s
blockDeviceRefs(reordering, adding or removing a shared image) applies to new replicas; live replicas keep their current devices until they are recreated (rotation or scale-up), like other restart-requiring template changes. - Template changes that require a restart take effect only after the replica restarts according to
.spec.disruptions.restartApprovalModein the template.
Network configuration
IP addresses of virtual machines
The .spec.settings.virtualMachineCIDRs block in the virtualization module configuration specifies a list of subnets to assign ip addresses to virtual machines (a shared pool of ip addresses). All addresses in these subnets are available for use except the first (network address) and the last (broadcast address).
VirtualMachineIPAddressLease (vmipl) resource: A cluster resource that manages IP address leases from the shared pool specified in virtualMachineCIDRs.
To see a list of IP address leases (vmipl), use the command:
d8 k get vmiplExample output:
NAME             VIRTUALMACHINEIPADDRESS                              STATUS   AGE
ip-10-66-10-14   {"name":"linux-vm-7prpx","namespace":"default"}     Bound    12h
VirtualMachineIPAddress (vmip) resource: A project/namespace resource that is responsible for reserving leased IP addresses and binding them to virtual machines. IP addresses can be allocated automatically or by explicit request.
After creation, the VirtualMachineIPAddress resource can have the following Phase values:
Pending: Resource is being created.Bound: VirtualMachineIPAddress is bound to the VirtualMachineIPAddressLease resource.Attached: VirtualMachineIPAddress is attached to the VirtualMachine resource.
By default, an ip address is automatically assigned to a virtual machine from the subnets defined in the module and is assigned to it until it is deleted. You can check the assigned ip address using the command:
d8 k get vmipExample output:
NAME              ADDRESS       STATUS     VM          AGE
linux-vm-7prpx   10.66.10.14   Attached   linux-vm   12h
The algorithm for automatically assigning an ip address to a virtual machine is as follows:
- The user creates a virtual machine named
<vmname>. - The module controller automatically creates a
vmipresource named<vmname>-<hash>to request an IP address and associate it with the virtual machine. - To do this,
vmipcreates avmipllease resource that selects a random IP address from a shared pool. - Once the
vmipresource is created, the virtual machine receives the assigned IP address.
The virtual machine’s IP address is assigned automatically from the subnets defined in the module and remains assigned to the machine until it is deleted. After the virtual machine is deleted, the vmip resource is also deleted, but the IP address remains temporarily assigned to the project/namespace and can be re-requested explicitly.
The full description of vmip and vmipl machine resource configuration parameters can be found at the links:
How to request a required ip address?
Task: request a specific ip address from the virtualMachineCIDRs subnets.
Create a vmip resource:
d8 k apply -f - <<EOF
apiVersion: virtualization.deckhouse.io/v1alpha2
kind: VirtualMachineIPAddress
metadata:
  name: linux-vm-custom-ip
spec:
  staticIP: 10.66.20.77
  type: Static
EOF
Create a new or modify an existing virtual machine and specify the required vmip resource explicitly in the specification:
spec:
  virtualMachineIPAddressName: linux-vm-custom-ip
How to save the ip address assigned to the virtual machine?
Objective: to save the ip address issued to a virtual machine for reuse after the virtual machine is deleted.
To ensure that the automatically assigned ip address of a virtual machine is not deleted along with the virtual machine itself, perform the following steps.
Obtain the vmip resource name for the specified virtual machine:
d8 k get vm linux-vm -o jsonpath="{.status.virtualMachineIPAddressName}"

# linux-vm-7prpx
Remove the .metadata.ownerReferences blocks from the resource found:
d8 k patch vmip linux-vm-7prpx --type=merge --patch '{"metadata":{"ownerReferences":null}}'

# Alternatively, apply the changes by editing the resource.

d8 k edit vmip linux-vm-7prpx
After the virtual machine is deleted, the vmip resource is preserved and can be reused again in the newly created virtual machine:
spec:
  virtualMachineIPAddressName: linux-vm-7prpx
Even if the vmip resource is deleted, IP address remains rented for the current project/namespace for another 10 minutes. Therefore, it is possible to reoccupy it on request:
d8 k apply -f - <<EOF
apiVersion: virtualization.deckhouse.io/v1alpha2
kind: VirtualMachineIPAddress
metadata:
  name: linux-vm-custom-ip
spec:
  staticIP: 10.66.20.77
  type: Static
EOF
Additional network interfaces
To work with additional networks, the sdn module must be enabled.
Virtual machines can be connected to additional networks: project networks (Network) or cluster networks (ClusterNetwork).
To do this, specify the desired networks in the configuration section .spec.networks. If this block is not specified (which is the default behavior), the VM will use only the main cluster network.
Specifying the main cluster network (type: Main) in .spec.networks is optional. If you do not need connectivity to the main cluster network, you can use only additional networks (Network or ClusterNetwork).
If you specify the main network, it must be the first entry in the .spec.networks list.
Important considerations when working with additional network interfaces:
- The order of listing networks in
.spec.networksdetermines the order in which interfaces are connected inside the virtual machine. - Adding or removing an additional network (
NetworkorClusterNetwork) on a running VM is applied live without reboot. ACPI indexes of existing interfaces are preserved across add/remove cycles, so interface names in the guest OS stay stable. - Adding or removing the main network (
type: Main) still requires a VM reboot, because it is tied to the pod’s primary network interface and cannot be reconfigured on a running pod. - To preserve the order of network interfaces inside the guest operating system, it is recommended to add new networks to the end of the
.spec.networkslist (do not change the order of existing ones). - Network security policies (NetworkPolicy) do not apply to additional network interfaces.
- Network parameters (IP addresses, gateways, DNS, etc.) for additional networks are configured manually from within the guest OS (for example, using Cloud-Init).
When configuring network interfaces in the guest OS, use stable identifiers (predictable names enpXsY or MAC address binding) instead of ethX names. For more details, see the Network interface naming in guest OS section.
On a Linux guest system with multiple interfaces in the same subnet, the ARP Flux issue may occur, where the kernel responds to ARP requests via any arbitrary interface rather than the one the request was received on, leading to unstable connections and packet loss due to an incorrect MAC address in the router’s ARP cache.
To resolve this, set the following parameters to force the system to respond to requests strictly via the interface holding the target IP and to use the correct source address:
sysctl -w net.ipv4.conf.all.arp_ignore=1
sysctl -w net.ipv4.conf.all.arp_announce=2
Cloud-init example:
write_files:
  - path: /etc/sysctl.d/90-arp-strict.conf
    content: |
      net.ipv4.conf.all.arp_ignore=1
      net.ipv4.conf.all.arp_announce=2
For more details, see the IP sysctl documentation.
Example of connecting a VM to the main cluster network and the project network user-net:
spec:
  networks:
    - type: Main # If specified, must be first
    - type: Network # Network type (Network \ ClusterNetwork)
      name: user-net # Network name
Example of connecting to multiple networks, including the cluster network corp-net:
spec:
  networks:
    - type: Main # If specified, must be first
    - type: Network
      name: user-net
    - type: ClusterNetwork
      name: corp-net # Network name
Example of connecting a VM only to additional networks (without the main cluster network):
spec:
  networks:
    - type: Network
      name: isolated-net
    - type: ClusterNetwork
      name: corp-net
You can view information about connected networks and their MAC addresses in the VM status:
status:
  networks:
    - type: Main
    - type: Network
      name: user-net
      macAddress: aa:bb:cc:dd:ee:01
    - type: ClusterNetwork
      name: corp-net
      macAddress: aa:bb:cc:dd:ee:02
For each additional network interface, a unique MAC address is automatically generated and reserved to avoid collisions. The following resources are used for this: VirtualMachineMACAddress (vmmac) and VirtualMachineMACAddressLease (vmmacl).
The MAC address is generated randomly from the allowed ranges:
- Ranges:
x2-xx-xx-xx-xx-xx,x6-xx-xx-xx-xx-xx,xA-xx-xx-xx-xx-xx,xE-xx-xx-xx-xx-xx. - The first three octets (OUI) are formed based on the cluster UUID, the last three (NIC) are chosen randomly from 16 million possible combinations.
VirtualMachineMACAddressLease (vmmacl) is a cluster resource that manages the lease of MAC addresses from the shared MAC address pool.
To see the list of MAC address leases (vmmacl), use the command:
d8 k get vmmaclExample output:
NAME                    VIRTUALMACHINEMACADDRESS                      STATUS   AGE
mac-5e-e6-19-22-0f-d8   {"name":"vm-01-fz9cr","namespace":"pr-sdn"}   Bound    45s
mac-5e-e6-19-29-89-cf   {"name":"vm-01-99qj6","namespace":"pr-sdn"}   Bound    45s
mac-5e-e6-19-54-f9-be   {"name":"vm-01-5jqxg","namespace":"pr-sdn"}   Bound    45s
VirtualMachineMACAddress (vmmac) is a project-level resource that is responsible for reserving leased MAC addresses and binding them to virtual machines.
MAC addresses are automatically assigned to each additional VM interface from the shared address pool and remain assigned until the VM is deleted.
You can check the assigned MAC addresses using the command:
d8 k get vmmacExample output:
NAME          ADDRESS             STATUS     VM      AGE
vm-01-5jqxg   5e:e6:19:54:f9:be   Attached   vm-01   5m42s
vm-01-99qj6   5e:e6:19:29:89:cf   Attached   vm-01   5m42s
vm-01-fz9cr   5e:e6:19:22:0f:d8   Attached   vm-01   5m42s
When a network is removed from the VM configuration:
- The MAC address of the interface is released.
- The associated
VirtualMachineMACAddressandVirtualMachineMACAddressLeaseresources are automatically deleted.
Snapshots
Snapshots allow you to capture the current state of a resource for later recovery or cloning: a disk snapshot saves only the data from the selected disk, while a virtual machine snapshot includes the VM settings and the state of all its disks.
Consistent snapshots
Snapshots can be consistent or inconsistent; this is controlled by the requiredConsistency parameter. By default, requiredConsistency is set to true, which means a consistent snapshot is required.
A consistent snapshot captures a complete and consistent state of disk data. You can create such a snapshot when one of the following conditions is met:
- The disk is not attached to any virtual machine — the snapshot will always be consistent.
- The virtual machine is turned off.
qemu-guest-agentis installed and running in the guest OS. When a snapshot is created, it temporarily suspends (“freezes”) the file system to ensure consistency.
An inconsistent snapshot may not reflect a consistent state of the virtual machine’s disks and its components. Such a snapshot is created if the VM is running and qemu-guest-agent is not installed or not running in the guest OS.
If the snapshot manifest explicitly specifies the requiredConsistency: false parameter, but qemu-guest-agent is running, an attempt will be made to freeze the file system to ensure that the snapshot is consistent.
QEMU Guest Agent supports hook scripts that allow you to prepare applications for snapshot creation without stopping services, ensuring application-level consistency. For more information on configuring hooks scripts, see the Guest OS agent section.
When restoring from such a snapshot, file system integrity issues may occur, as the data state may be inconsistent.
Creating disk snapshots
The VirtualDiskSnapshot resource is used to create snapshots of virtual disks. These snapshots can serve as a data source when creating new disks, such as for cloning or information recovery.
To ensure data integrity, a disk snapshot can be created in the following cases:
- The disk is not attached to any virtual machine.
- The VM is powered off.
- The VM is running, but qemu-guest-agent is installed in the guest OS. The file system has been successfully “frozen” (fsfreeze operation).
If data consistency is not required (for example, for test scenarios), a snapshot can be created:
- On a running VM without “freezing” the file system.
- Even if the disk is attached to an active VM.
To do this, specify in the VirtualDiskSnapshot manifest:
spec:
  requiredConsistency: false
An example manifest for creating a disk snapshot:
d8 k apply -f - <<EOF
apiVersion: virtualization.deckhouse.io/v1alpha2
kind: VirtualDiskSnapshot
metadata:
  name: linux-vm-root-$(date +%s)
spec:
  requiredConsistency: true
  virtualDiskName: linux-vm-root
EOF
To view a list of disk snapshots, run the following command:
d8 k get vdsnapshotExample output:
NAME                     PHASE     CONSISTENT   AGE
linux-vm-root-1728027905   Ready     true         3m2s
The CONSISTENT field indicates whether the snapshot is consistent (true) or not (false). This value is determined automatically based on the snapshot creation conditions and cannot be changed.
After creation, VirtualDiskSnapshot can be in the following states (phases):
Pending- waiting for all dependent resources required for snapshot creation to be ready.InProgress- the process of creating a virtual disk snapshot is in progress.Ready- snapshot creation has been successfully completed and the virtual disk snapshot is available for use.Failed- an error occurred during the virtual disk snapshot creation process.Terminating- the resource is in the process of being deleted.
Diagnosing problems with a resource is done by analyzing the information in the .status.conditions block.
A full description of the VirtualDiskSnapshot resource configuration parameters for machines can be found at link.
How to create a disk image in the web interface:
- Go to the “Projects” tab and select the desired project.
- Go to the “Virtualization” → “Disk Images” section.
- Click “Create Disk Snapshot”.
- In the “Disk Snapshot Name” field, enter a name for the snapshot.
- On the “Configuration” tab, in the “Disk Name” field, select the disk from which the snapshot will be created.
- Enable the “Consistency Guarantee” switch.
- Click the “Create” button.
- The image status is displayed at the top left, under the snapshot name.
Recovering disks from snapshots
In order to restore a disk from a previously created disk snapshot, you must specify a corresponding object as dataSource:
d8 k apply -f - <<EOF
apiVersion: virtualization.deckhouse.io/v1alpha2
kind: VirtualDisk
metadata:
  name: linux-vm-root
spec:
  persistentVolumeClaim:
    size: 10Gi
    # Substitute your StorageClass name.
    storageClassName: rv-thin-r2
  dataSource:
    type: ObjectRef
    objectRef:
      kind: VirtualDiskSnapshot
      name: linux-vm-root-1728027905
EOF
How to restore a disk from a previously created snapshot in the web interface:
- Go to the “Projects” tab and select the desired project.
- Go to the “Virtualization” → “VM Disks” section.
- Click “Create Disk”"
- In the form that opens, enter a name for the disk in the “Disk Name” field.
- In the “Source” field, make sure the “Snapshots” checkbox is selected.
- From the drop-down list, select the disk snapshot you want to restore from.
- In the “Size” field, set a size that is the same or larger than the size of the original disk.
- In the “StorageClass Name” field, enter the “StorageClass” of the original disk.
- Click the “Create” button.
- The disk status is displayed at the top left, under the disk name.
Creating snapshots of virtual machines
A virtual machine snapshot is a saved state of a virtual machine at a specific point in time. The VirtualMachineSnapshot resource is used to create virtual machine snapshots.
It is recommended to disconnect all images (VirtualImage/ClusterVirtualImage) from the virtual machine before creating its snapshot. Disk images are not saved together with the VM snapshot, and their absence in the cluster during recovery may cause the virtual machine to fail to start and remain in a Pending state while waiting for the images to become available.
Creating snapshots
Creating a virtual machine snapshot will fail if at least one of the following conditions is met:
- not all dependencies of the virtual machine are ready;
- there is a disk in the process of resizing among the dependent devices.
If there are pending VM changes awaiting a restart when the snapshot is created, the snapshot will include the updated VM configuration.
When a snapshot is created, the dynamic IP address of the VM is automatically converted to a static IP address and saved for recovery.
If you do not want to convert and use the old IP address of the virtual machine, you can set the corresponding policy to Never. In this case, the address type without conversion (Auto or Static) will be used.
spec:
  keepIPAddress: Never
An example manifest to create a snapshot of a virtual machine:
d8 k apply -f - <<EOF
apiVersion: virtualization.deckhouse.io/v1alpha2
kind: VirtualMachineSnapshot
metadata:
  name: linux-vm-snapshot
spec:
  virtualMachineName: linux-vm
  requiredConsistency: true
  keepIPAddress: Never
EOF
After successfully creating a snapshot, its status will show the list of resources saved in the snapshot.
Output example:
status:
  ...
  resources:
  - apiVersion: virtualization.deckhouse.io/v1alpha2
    kind: VirtualMachine
    name: linux-vm
  - apiVersion: v1
    kind: Secret
    name: cloud-init
  - apiVersion: virtualization.deckhouse.io/v1alpha2
    kind: VirtualDisk
    name: linux-vm-root
How to create a VM snapshot in the web interface:
- Go to the “Projects” tab and select the desired project.
- Go to the “Virtualization” → “Virtual Machines” section.
- Select the required VM from the list and click on its name.
- Go to the “Snapshots” tab.
- Click the “Create” button.
- In the form that opens, enter
linux-vm-snapshotin the “Snapshot name” field. - On the “Configuration” tab, select
Neverin the “IP address conversion policy” field. - Enable the “Consistency Guarantee” switch.
- In the “Snapshot Storage Class” field, select a class for the disk snapshot.
- Click the “Create” button.
- The snapshot status is displayed at the top left, under the snapshot name.
Restore a virtual machine
To restore a VM from a snapshot, use the VirtualMachineOperation resource with the restore type.
Example:
apiVersion: virtualization.deckhouse.io/v1alpha2
kind: VirtualMachineOperation
metadata:
  name: restore-vm
spec:
  type: Restore
  virtualMachineName: <name of the VM to be restored>
  restore:
    mode: DryRun | Strict | BestEffort
    virtualMachineSnapshotName: <name of the VM snapshot from which to restore>
One of three modes can be used for this operation:
DryRun: Idle run of the restore operation, used to check for possible conflicts, which will be displayed in the resource status (status.resources).Strict: Strict recovery mode, used when the VM must be restored exactly as captured in the snapshot; missing external dependencies may cause the VM to remain inPendingstatus after recovery.BestEffort: Missing external dependencies (ClusterVirtualImage,VirtualImage) are ignored and removed from the VM configuration.
Restoring a virtual machine from a snapshot is only possible if all the following conditions are met:
- The VM to be restored exists in the cluster (the
VirtualMachineresource exists and its.metadata.uidmatches the identifier used when creating the snapshot). - The disks to be restored (identified by name) are either not attached to other VMs or do not exist in the cluster.
- The IP address to be restored is either not used by any other VM or does not exist in the cluster.
- The MAC addresses to be restored are either not used by any other VMs or do not exist in the cluster.
If some resources on which the VM depends (for example, VirtualMachineClass, VirtualImage, ClusterVirtualImage) are missing from the cluster but existed when the snapshot was taken, the VM will remain in the Pending state after recovery.
In this case, you must manually edit the VM configuration to update or remove the missing dependencies.
You can view information about conflicts when restoring a VM from a snapshot in the resource status:
d8 k get vmop <vmop-name> -o json | jq “.status.resources”It is not recommended to cancel the restore operation (delete the VirtualMachineOperation resource in the InProgress phase) from a snapshot, which can result in an inconsistent state of the restored virtual machine.
When restoring a VM from a snapshot, the disks associated with it are also restored from the corresponding snapshots, so the disk specification will contain a dataSource parameter with a reference to the required disk snapshot.
Creating a VM clone
You can create a VM clone in two ways: from an existing VM or from a previously created snapshot of that VM.
The cloned VM will be assigned a new IP address for the cluster network and MAC addresses for additional network interfaces (if any), so you will need to reconfigure the guest OS network settings after cloning.
Labels are not copied from the source VM to the clone. This prevents Service traffic (Services select VMs by labels) from being routed to the clone. If the clone should be part of a Service, add the required labels after cloning. For example:
d8 k label vm <vm-name> label-name=label-valueCloning creates a copy of a VM, so the resources of the new VM must have unique names. To do this, use the nameReplacements and/or customization parameters:
nameReplacements: Allows you to replace the names of existing resources with new ones to avoid conflicts.customization: Sets a prefix or suffix for the names of all cloned VM resources (disks, IP addresses, etc.).
Example of renaming specific resources:
nameReplacements:
  - from:
      kind: VirtualMachine
      name: <old-vm-name>
    to:
      name: <new-vm-name>
  - from:
      kind: VirtualDisk
      name: <old-disk-name>
    to:
      name: <new-disk-name>
  ...
As a result, a VM named <new-vm-name> will be created, and the specified resources will be renamed according to the replacement rules.
Example of adding a prefix or suffix to all resources:
customization:
  namePrefix: <prefix>
  nameSuffix: <suffix>
As a result, a VM named <prefix><original-vm-name><suffix> will be created, and all resources (disks, IP addresses, etc.) will receive the prefix and suffix.
One of three modes can be used for the cloning operation:
DryRun: Test run to check for possible conflicts. The results are displayed in thestatus.resourcesfield of the corresponding operation resource.Strict: Strict mode requiring all resources with new names and their dependencies (e.g., images) to be present in the cloned VM.BestEffort: Mode in which missing external dependencies (e.g., ClusterVirtualImage, VirtualImage) are automatically removed from the configuration of the cloned VM.
Information about conflicts that arose during cloning can be viewed in the operation resource status:
# For cloning from an existing VM.
d8 k get vmop <vmop-name> -o json | jq '.status.resources'

# For cloning from a VM snapshot.
d8 k get vmsop <vmsop-name> -o json | jq '.status.resources'
Creating a clone from an existing VM
VM cloning is performed using the VirtualMachineOperation resource with the Clone operation type.
Cloning is supported for both powered-off and running virtual machines. When cloning a running VM, a consistent snapshot is automatically created, from which the clone is then formed.
It is recommended to set the .spec.runPolicy: AlwaysOff parameter in the configuration of the VM being cloned if you want to prevent the VM clone from starting automatically. This is because the clone inherits the behaviour of the parent VM.
Before cloning, you need to prepare the guest OS to avoid conflicts with unique identifiers and network settings.
Linux:
- Clear the
machine-idusingsudo truncate -s 0 /etc/machine-id(for systemd) or delete the/var/lib/dbus/machine-idfile. - Remove SSH host keys:
sudo rm -f /etc/ssh/ssh_host_*. - Clear network interface configuration (if static settings are used).
- Clear the Cloud-Init cache (if used):
sudo cloud-init clean.
Windows:
- Run
sysprepwith the/generalizeoption, or use tools to reset unique identifiers (SID, hostname, etc.).
To create a VM clone, use the following resource:
apiVersion: virtualization.deckhouse.io/v1alpha2
kind: VirtualMachineOperation
metadata:
  name: <vmop-name>
spec:
  type: Clone
  virtualMachineName: <name of the VM to be cloned>
  clone:
    mode: DryRun | Strict | BestEffort
    nameReplacements: []
    customization: {}
The nameReplacements and customization parameters are configured in the .spec.clone block (see general description above).
During cloning, temporary snapshots are automatically created for the virtual machine and all its disks. The new VM is then assembled from these snapshots. After cloning is complete, the temporary snapshots are automatically deleted, so they are not visible in the resource list. However, the specification of cloned disks still contains a reference (dataSource) to the corresponding snapshot, even if the snapshot itself no longer exists. This is expected behavior and does not indicate a problem: such references remain valid because, by the time the clone starts, all necessary data has already been transferred to the new disks.
The following example demonstrates cloning a VM named database with an attached disk database-root:
Example with renaming specific resources:
apiVersion: virtualization.deckhouse.io/v1alpha2
kind: VirtualMachineOperation
metadata:
  name: clone-database
spec:
  type: Clone
  virtualMachineName: database
  clone:
    mode: Strict
    nameReplacements:
      - from:
          kind: VirtualMachine
          name: database
        to:
          name: database-clone
      - from:
          kind: VirtualDisk
          name: database-root
        to:
          name: database-clone-root
As a result, a VM named database-clone and a disk named database-clone-root will be created.
Example with using a prefix for all resources:
apiVersion: virtualization.deckhouse.io/v1alpha2
kind: VirtualMachineOperation
metadata:
  name: clone-database
spec:
  type: Clone
  virtualMachineName: database
  clone:
    mode: Strict
    customization:
      namePrefix: clone-
      nameSuffix: -prod
As a result, a VM named clone-database-prod and a disk named clone-database-root-prod will be created.
Creating a clone from a VM snapshot
Cloning a VM from a snapshot is performed using the VirtualMachineSnapshotOperation resource with the CreateVirtualMachine operation type.
To create a VM clone from a snapshot, use the following resource:
apiVersion: virtualization.deckhouse.io/v1alpha2
kind: VirtualMachineSnapshotOperation
metadata:
  name: <vmsop-name>
spec:
  type: CreateVirtualMachine
  virtualMachineSnapshotName: <name of the VM snapshot from which to clone>
  createVirtualMachine:
    mode: DryRun | Strict | BestEffort
    nameReplacements: []
    customization: {}
The nameReplacements and customization parameters are configured in the .spec.createVirtualMachine block (see general description above).
To view the list of resources saved in a snapshot, use the command:
d8 k get vmsnapshot <snapshot-name> -o jsonpath='{.status.resources}' | jqWhen cloning a VM from a snapshot, the disks associated with it are also created from the corresponding snapshots, so the disk specification will contain a dataSource parameter with a reference to the required disk snapshot.
The following example demonstrates cloning from a VM snapshot named database-snapshot, which contains a VM database and a disk database-root:
Example with renaming specific resources:
apiVersion: virtualization.deckhouse.io/v1alpha2
kind: VirtualMachineSnapshotOperation
metadata:
  name: clone-database-from-snapshot
spec:
  type: CreateVirtualMachine
  virtualMachineSnapshotName: database-snapshot
  createVirtualMachine:
    mode: Strict
    nameReplacements:
      - from:
          kind: VirtualMachine
          name: database
        to:
          name: database-clone
      - from:
          kind: VirtualDisk
          name: database-root
        to:
          name: database-clone-root
As a result, a VM named database-clone and a disk named database-clone-root will be created.
Example with using a prefix for all resources:
apiVersion: virtualization.deckhouse.io/v1alpha2
kind: VirtualMachineSnapshotOperation
metadata:
  name: clone-database-from-snapshot
spec:
  type: CreateVirtualMachine
  virtualMachineSnapshotName: database-snapshot
  createVirtualMachine:
    mode: Strict
    customization:
      namePrefix: clone-
      nameSuffix: -prod
As a result, a VM named clone-database-prod and a disk named clone-database-root-prod will be created.
USB Devices
USB device passthrough is available only in the Deckhouse Virtualization Platform Enterprise Edition (EE).
The virtualization module supports USB device passthrough to virtual machines using DRA (Dynamic Resource Allocation). This section describes how to use USB devices with virtual machines.
USB device passthrough requires:
containerd v2: Detailed requirements for cluster nodes are described in thedefaultCRIparameter.- Kubernetes version 1.34 or higher.
- Deckhouse Kubernetes Platform (DKP) version 1.75 or higher.
Overview
The module provides two custom resources for managing USB devices:
- NodeUSBDevice (cluster-wide resource) — represents a USB device discovered on a specific node.
- USBDevice (namespaced resource) — represents a USB device available for attachment to virtual machines in a given namespace.
How It Works
USB device passthrough follows a defined lifecycle — from device discovery on a node to attachment to a virtual machine:
-
The DRA driver discovers USB devices on cluster nodes and publishes them to the Kubernetes API as ResourceSlices. The module controller creates NodeUSBDevice resources from that data.
-
An administrator assigns a namespace to the NodeUSBDevice resource by setting the
.spec.assignedNamespaceresource field. This makes the device available in that namespace. -
After the namespace is assigned, the module controller automatically creates a corresponding USBDevice resource in that namespace.
-
The USBDevice is attached to a virtual machine by adding it to the
.spec.usbDevicesfield of the VirtualMachine resource.
Quick Start
The following steps describe the minimal workflow for attaching a USB device to a virtual machine:
-
Connect the USB device to a cluster node.
-
Verify that a NodeUSBDevice resource has been created:
d8 k get nodeusbdevice -
Assign a namespace to the NodeUSBDevice by setting the
.spec.assignedNamespaceresource field.d8 k apply -f - <<EOF apiVersion: virtualization.deckhouse.io/v1alpha2 kind: NodeUSBDevice metadata: name: logitech-webcam spec: assignedNamespace: my-project EOF -
Verify that a corresponding USBDevice resource has been created in the target namespace:
d8 k get usbdevice -n my-project -
Add the device to the
.spec.usbDevicesfield of a VirtualMachine resource.d8 k apply -f - <<EOF apiVersion: virtualization.deckhouse.io/v1alpha2 kind: VirtualMachine metadata: name: linux-vm spec: # ... other VM settings ... usbDevices: - name: logitech-webcam EOF
NodeUSBDevice
NodeUSBDevice resource reflects the state of a physical USB device detected on a cluster node. It is a cluster-wide resource that represents a physical USB device on a node.
Example of viewing all discovered USB devices:
d8 k get nodeusbdeviceExample output:
NAME NODE READY ASSIGNED NAMESPACE AGE
usb-flash-drive node-1 True False 10m
logitech-webcam node-2 True True my-project 15m
NodeUSBDevice Conditions
The status of a NodeUSBDevice resource is represented by a set of conditions that describe its availability and assignment state. These conditions are available in .status.conditions:
-
Ready: Indicates whether the device is ready to use.
Ready: Device is ready to use.NotReady: Device exists but is not ready.NotFound: Device is absent on the host.
-
Assigned: Indicates whether a namespace is assigned to the device.
Assigned: Namespace is assigned and USBDevice resource is created.Available: No namespace is assigned for the device.InProgress: Device connection to namespace is in progress.
Assigning a Namespace
Before a USB device can be attached to a virtual machine, it must be exposed to a specific namespace. To make a USB device available in a specific namespace, set the .spec.assignedNamespace parameter of the NodeUSBDevice resource:
d8 k apply -f - <<EOF
apiVersion: virtualization.deckhouse.io/v1alpha2
kind: NodeUSBDevice
metadata:
  name: logitech-webcam
spec:
  assignedNamespace: my-project
EOFAfter assigning the namespace, a corresponding USBDevice resource is automatically created in the specified namespace.
USBDevice
When the related NodeUSBDevice has the .spec.assignedNamespace field set, a corresponding USBDevice resource is created in that namespace. It is a namespaced resource that represents a USB device available for attachment to virtual machines within a given namespace.
Example of viewing USB devices in a namespace:
d8 k get usbdevice -n my-projectExample output:
NAME NODE MANUFACTURER PRODUCT SERIAL ATTACHED AGE
logitech-webcam node-2 Logitech Webcam C920 ABC123456 False 10m
USBDevice Attributes
The USBDevice resource exposes detailed information about the physical USB device. These attributes are available in .status.attributes:
vendorID: USB vendor ID (hexadecimal format).productID: USB product ID (hexadecimal format).bus: USB bus number.deviceNumber: USB device number on the bus.serial: Device serial number.manufacturer: Device manufacturer name.product: Device product name.name: Device name.
USBDevice Conditions
The USBDevice resource provides status conditions that reflect its readiness and attachment state. These conditions are available in .status.conditions.
-
Ready: Indicates whether the device is ready to use.
Ready: Device is ready to use.NotReady: Device exists but is not ready.NotFound: Device is absent on the host.
-
Attached: Indicates whether the device is attached to a virtual machine.
AttachedToVirtualMachine: Device is attached to a VM.Available: Device is available for attachment.NoFreeUSBIPPort: Device is requested by a VM but cannot be attached because there are no free USBIP ports on the target node. In this case,Attached=False.
Attaching USB Device to VM
After the USBDevice resource is available in a namespace, it can be attached to a virtual machine. To attach a USB device to a virtual machine, add the device to the .spec.usbDevices field of the VirtualMachine resource specification:
d8 k apply -f - <<EOF
apiVersion: virtualization.deckhouse.io/v1alpha2
kind: VirtualMachine
metadata:
  name: linux-vm
spec:
  # ... other VM settings ...
  usbDevices:
    - name: logitech-webcam
EOFAfter creating or updating the VM, the USB device will be attached to the specified virtual machine.
The USB device is automatically forwarded to the node where the virtual machine is running via the network (USBIP). There is no need to manually place the VM on the same node as the device.
During VM migration, the USB device briefly disconnects and reconnects on the new node when the VM switches to it. If migration fails, the device will remain on the original node.
Viewing USB Device Details
To view detailed information about a USB device:
d8 k describe nodeusbdevice <device-name>Example output:
Name:         logitech-webcam
Namespace:
Labels:       <none>
Annotations:  <none>
API Version:  virtualization.deckhouse.io/v1alpha2
Kind:         NodeUSBDevice
Metadata:
  Creation Timestamp:  2024-01-15T10:30:00Z
  Generation:          1
  UID:                 abc123-def456-ghi789
Spec:
  Assigned Namespace:  my-project
Status:
  Node Name:           node-2
  Attributes:
    Bus:               1
    Device Number:     2
    Manufacturer:      Logitech
    Name:              Webcam C920
    Product:           Webcam C920
    Product ID:        082d
    Serial:            ABC123456
    Vendor ID:         046d
  Conditions:
    Type:              Ready
    Status:            True
    Reason:            Ready
    Message:           Device is ready to use
    Type:              Assigned
    Status:            True
    Reason:            Assigned
    Message:           Namespace is assigned for the device
  Observed Generation: 1
If a USB device is physically disconnected from the node, the Attached condition becomes False.
Both USBDevice and NodeUSBDevice resources update their status conditions to indicate that the device is no longer present on the host.
Requirements and Limitations
USB device passthrough has several operational requirements and limitations that must be considered before use:
- The DRA driver must be installed on nodes where USB devices are to be discovered.
- USB devices are forwarded to the VM node over the network using USBIP. The VM does not need to run on the same node where the device is physically connected. When connecting over the network, the following limitations on the number of devices and hub selection apply:
- Node can attach at most 16 USB devices: up to 8 on the USB 2.0 hub and up to 8 on the USB 3.0 hub.
- Hub is determined by the device speed and cannot be changed. A device that operates at USB 2.0 speed cannot be attached to the USB 3.0 hub, and vice versa.
- USB devices support hot-plug — they can be attached to and detached from a running VM without stopping it.
- USB device passthrough requires proper kernel modules on the node.
Data export
You can export virtual machine disks and disk snapshots using the d8 utility (version 0.20.7 and above). For this function to work, the module storage-volume-data-manager must be enabled.
The disk must not be in use at the time of export. If it is attached to a VM, that VM must be stopped first.
Example: export a disk (run on a cluster node):
d8 data export download -n <namespace> vd/<virtual-disk-name> -o file.imgExample: export a disk snapshot (run on a cluster node):
d8 data export download -n <namespace> vds/<virtual-disksnapshot-name> -o file.imgIf you are exporting data from a machine other than a cluster node (for example, from your local machine), use the --publish flag.