The module lifecycle stage: General Availability
The module has requirements for installation
Introduction
This guide is intended for administrators of Deckhouse Virtualization Platform (DVP) and describes how to create and modify cluster resources.
The administrator also has rights to manage project resources, which are described in the User guide.
Module parameters
The configuration of the virtualization module is specified via the ModuleConfig resource in YAML format. The following is an example of a basic configuration:
apiVersion: deckhouse.io/v1alpha1
kind: ModuleConfig
metadata:
  name: virtualization
spec:
  enabled: true
  version: 1
  settings:
    ingressClass: nginx # optional parameter
    dvcr:
      storage:
        persistentVolumeClaim:
          size: 50G
          storageClassName: rv-thin-r1
        type: PersistentVolumeClaim
    virtualMachineCIDRs:
      - 10.66.10.0/24
How to configure the virtualization module in the web interface:
- Go to the “System” tab, then to the
Deckhouse-> “Modules” section. - Select the
virtualizationmodule from the list. - In the pop-up window, select the “Configuration” tab.
- To display the settings, click the “Advanced settings” switch.
- Configure the settings. The names of the fields on the form correspond to the names of the parameters in YAML.
- To apply the settings, click the “Save” button.
Parameter description
Enable the module
The module state is controlled through the .spec.enabled field. Specify:
true: To enable the module.false: To disable the module.
Disable the module
After you disable the virtualization module, all services that create and run virtual machines will stop.
To disable the module, add the modules.deckhouse.io/allow-disabling annotation with the value true
to ModuleConfig virtualization and set the spec.enabled parameter to false.
Before disabling:
-
Delete all module resources: virtual machines, disks, images, and so on.
-
Make sure no active resources remain in the cluster:
d8 k get virtualization
Edit ModuleConfig virtualization:
apiVersion: deckhouse.io/v1alpha1
kind: ModuleConfig
metadata:
  name: virtualization
  annotations:
    modules.deckhouse.io/allow-disabling: "true"
spec:
  enabled: false
  version: 1
  settings:
    # Specify the existing settings.
If module resources are not deleted, disabling the module may result in data loss.
Configuration version
The .spec.version parameter defines the version of the configuration schema. The parameter structure may change between versions. The current values are given in the settings section.
Deckhouse Virtualization Container Registry (DVCR)
The .spec.settings.dvcr.storage block configures a persistent volume for storing images:
.spec.settings.dvcr.storage.persistentVolumeClaim.size: Volume size (for example,50G). To expand the storage, increase the value of the parameter..spec.settings.dvcr.storage.persistentVolumeClaim.storageClassName: StorageClass name (for example,rv-thin-r1).
Ingress settings
The .spec.settings.ingressClass parameter defines the Ingress controller class that will be used to upload virtual machine images via the web interface or CLI.
- If the parameter is not specified, the global value from the Deckhouse configuration is used.
- The parameter is optional and should only be specified when you need to use an Ingress controller different from the global one.
Example:
spec:
  settings:
    ingressClass: nginx
When uploading large virtual machine images (especially over slow connections), it is recommended to increase the Ingress controller worker shutdown timeout. This prevents upload interruption during Ingress controller restart or update.
Example:
apiVersion: deckhouse.io/v1
kind: IngressNginxController
metadata:
  name: nginx
spec:
  config:
    worker-shutdown-timeout: 1800s  # 30 minutes or more if needed
Network settings
The .spec.settings.virtualMachineCIDRs block specifies subnets in CIDR format (for example, 10.66.10.0/24). IP addresses for virtual machines are allocated from these ranges automatically or on request.
Example:
spec:
  settings:
    virtualMachineCIDRs:
      - 10.66.10.0/24
      - 10.66.20.0/24
      - 10.77.20.0/16
For each subnet, the first and last IP addresses are reserved by the system and cannot be assigned to virtual machines. For example, for the 10.66.10.0/24 subnet, addresses 10.66.10.0 and 10.66.10.255 are not available for use by VMs.
The subnets in the .spec.settings.virtualMachineCIDRs block must not overlap with cluster node subnets, services subnet, or pods subnet (podCIDR).
It is forbidden to delete subnets if addresses from them have already been issued to virtual machines.
Storage class settings for images
The storage class settings for images are defined in the .spec.settings.virtualImages parameter of the module settings.
Example:
spec:
#  ...
  settings:
    virtualImages:
      allowedStorageClassSelector:
        matchNames:
        - sc-1
        - sc-2
      defaultStorageClassName: sc-1
Where:
matchNames(optional): List of the allowed StorageClasses for creating a VirtualImage that can be explicitly specified in the resource specification.defaultStorageClassName(optional): StorageClass used by default when creating a VirtualImage if the.spec.persistentVolumeClaim.storageClassNameparameter is not set.
Storage class settings for disks
The storage class settings for disks are defined in the .spec.settings.virtualDisks parameter of the module settings.
Example:
spec:
#  ...
  settings:
    virtualDisks:
      allowedStorageClassSelector:
        matchNames:
        - sc-1
        - sc-2
      defaultStorageClassName: sc-1
Where:
matchNames(optional): List of the allowed StorageClass for creating a VirtualDisk that can be explicitly specified in the resource specification.defaultStorageClassName(optional): StorageClass used by default when creating a VirtualDisk if the.spec.persistentVolumeClaim.storageClassNameparameter is not specified.
Security Event Audit
Not available in CE edition.
To enable security event auditing:
-
Enable
log-shipperandruntime-audit-enginemodules. -
Enable Kubernetes API audit by setting
.spec.settings.apiserver.auditPolicyEnabled: truein thecontrol-plane-managermodule. -
Set
.spec.settings.audit.enabled: truein thevirtualizationmodule:spec: settings: audit: enabled: true
For a complete list of configuration options, see Configuration.
Events are collected by the virtualization-audit-* pod in the d8-virtualization namespace. To forward events to the cluster logging system (e.g., Loki), create a ClusterLoggingConfig:
apiVersion: deckhouse.io/v1alpha1
kind: ClusterLoggingConfig
metadata:
  name: virtualization-audit-logs
spec:
  destinationRefs:
    - d8-loki
  kubernetesPods:
    namespaceSelector:
      matchNames:
        - d8-virtualization
    labelSelector:
      matchLabels:
        app: virtualization-audit
  type: KubernetesPods
To view events in Grafana, use a Loki query:
{namespace="d8-virtualization", pod=~"virtualization-audit-.*"}Available fields in the logs:
type: Event type (Access to VM, VM Management, etc.).name: Human-readable description.request_subject: Username or ServiceAccount.datetime: Event timestamp.virtualmachine_name: Affected VM.source_ip: Request source IP (for forbidden operations).
Security events
The audit system logs the following events:
- Access to VM: Connection via console, VNC, or port forward. Includes VM name, OS, versions, storage, and node address.
- VM Management: Create, update, patch, or delete operations on VirtualMachine resources.
- VM Control Operations: Start, stop, restart, migrate, or evict via VirtualMachineOperation resource.
- Integrity Check: SHA256 verification of VM configuration. Logs when checksum changes.
- Module Control: Create, update, or delete operations on ModuleConfig.
- Forbidden Operations: Operations blocked by the platform. Includes user, operation, resource, source IP, and denial reason.
Images
The ClusterVirtualImage resource is used to load virtual machine images into the intra-cluster storage. After that it can be used to create virtual machine disks. It is available in all cluster namespaces and projects.
The image creation process includes the following steps:
- The user creates a ClusterVirtualImage resource.
- Once created, the image is automatically uploaded from the source specified in the specification to the storage (DVCR).
- Once the upload is complete, the resource becomes available for disk creation.
There are different types of images:
- ISO image: An installation image used for the initial installation of an operating system (OS). Such images are released by OS vendors and are used for installation on physical and virtual servers.
- Preinstalled disk image: contains an already installed and configured operating system ready for use after the virtual machine is created. You can obtain pre-configured images from the distribution developers’ resources or create them manually.
Examples of resources for obtaining virtual machine images:
| Distribution | Default user. |
|---|---|
| AlmaLinux | almalinux |
| AlpineLinux | alpine |
| CentOS | cloud-user |
| Debian | debian |
| Rocky | rocky |
| Ubuntu | ubuntu |
The following preinstalled image formats are supported:
qcow2rawvmdkvdi
Image files can also be compressed with one of the following compression algorithms: gz, xz.
Once a resource is created, the image type and size are automatically determined, and this information is reflected in the resource status.
The image status shows two sizes:
STOREDSIZE(storage size) — the amount of space the image actually occupies in storage (DVCR or PVC). For images uploaded in a compressed format (for example,.gzor.xz), this value is smaller than the unpacked size.UNPACKEDSIZE(unpacked size) — the image size after unpacking. It is used when creating a disk from the image and defines the minimum disk size that can be created.
When creating a disk from an image, set the disk size to UNPACKEDSIZE or larger .
If the size is not specified, the disk will be created with a size equal to UNPACKEDSIZE.
Images can be downloaded from various sources, such as HTTP servers where image files are located or container registries. It is also possible to download images directly from the command line using the curl utility.
Images can be created from other images and virtual machine disks.
For a full description of the ClusterVirtualImage resource configuration parameters, refer to Custom Resources.
Creating an image from an HTTP server
In this example, let’s create a cluster image.
-
To create a ClusterVirtualImage resource, run the following command:
d8 k apply -f - <<EOF apiVersion: virtualization.deckhouse.io/v1alpha2 kind: ClusterVirtualImage metadata: name: ubuntu-24-04 spec: # Source for creating an image. dataSource: type: HTTP http: url: https://cloud-images.ubuntu.com/noble/current/noble-server-cloudimg-amd64.img EOF -
To verify that the ClusterVirtualImage has been created, run the following command:
d8 k get clustervirtualimage ubuntu-24-04

# A short version of the command.
d8 k get cvi ubuntu-24-04
In the output, you should see information about the resource:
NAME           PHASE   CDROM   PROGRESS   AGE
ubuntu-24-04   Ready   false   100%       23h
Once created, the ClusterVirtualImage resource can be in one of the following states (phases):
Pending: Waiting for all dependent resources required for image creation to be ready.WaitForUserUpload: Waiting for the user to upload the image (this phase is present only fortype=Upload).Provisioning: The image is being created.Ready: The image has been created and is ready for use.Failed: An error occurred when creating the image.Terminating: The image is being deleted. It may “get stuck” in this state if it is still connected to the virtual machine.ImageLost: The image is missing in DVCR. The resource cannot be used.
As long as the image has not entered the Ready phase, the contents of the .spec block can be changed. If you change it, the disk creation process will start again. Once it is in the Ready phase, the .spec block contents cannot be changed.
Diagnosing problems with a resource is done by analyzing the information in the .status.conditions block.
You can trace the image creation process by adding the -w key to the command used for verification of the created resource:
d8 k get cvi ubuntu-24-04 -wExample output:
NAME           PHASE          CDROM   PROGRESS   AGE
ubuntu-24-04   Provisioning   false              4s
ubuntu-24-04   Provisioning   false   0.0%       4s
ubuntu-24-04   Provisioning   false   28.2%      6s
ubuntu-24-04   Provisioning   false   66.5%      8s
ubuntu-24-04   Provisioning   false   100.0%     10s
ubuntu-24-04   Provisioning   false   100.0%     16s
ubuntu-24-04   Ready          false   100%       18s
You can get additional information about the downloaded image from the description of the ClusterVirtualImage resource. To check on the description, run the following command:
d8 k describe cvi ubuntu-24-04How to create an image from an HTTP server in the web interface:
- Go to the “System” tab, then to the “Virtualization” -> “Cluster Images” section.
- Click “Create Image”, then select “Load data from link (HTTP)” from the drop-down menu.
- Enter the image name in the “Image Name” field.
- Specify the link to the image in the “URL” field.
- Click “Create”.
- Wait until the image status changes to
Ready.
Creating an image from a container registry
An image stored in a container registry has a certain format. Let’s look at an example:
-
First, download the image locally:
curl -L https://cloud-images.ubuntu.com/minimal/releases/noble/release/ubuntu-24.04-minimal-cloudimg-amd64.img -o ubuntu2404.img -
Next, create a
Dockerfilewith the following contents:FROM scratch COPY ubuntu2404.img /disk/ubuntu2404.img -
Build the container image. The example below uses docker.com as the container registry. You need an account on the service and a properly configured environment:
docker build -t docker.io/<username>/ubuntu2404:latestWhere
usernameis the username you specified during registration on docker.com. -
Upload the created image to the container registry:
docker push docker.io/<username>/ubuntu2404:latest -
To use this image, create a resource as an example:
d8 k apply -f - <<EOF
apiVersion: virtualization.deckhouse.io/v1alpha2
kind: ClusterVirtualImage
metadata:
  name: ubuntu-2404
spec:
  dataSource:
    type: ContainerImage
    containerImage:
      image: docker.io/<username>/ubuntu2404:latest
EOF
How to create an image from the container registry in the web interface:
- Go to the “System” tab, then to the “Virtualization” -> “Cluster Images” section.
- Click “Create Image”, then select “Load data from container image” from the drop-down list.
- Enter the image name in the “Image Name” field.
- Specify the link to the image in the “Image in Container Registry” field.
- Click “Create”.
- Wait until the image changes to the
Readystatus.
Uploading an image via CLI
-
To upload an image using CLI, first create the following resource as shown below with the ClusterVirtualImage example:
d8 k apply -f - <<EOF
apiVersion: virtualization.deckhouse.io/v1alpha2
kind: ClusterVirtualImage
metadata:
  name: some-image
spec:
  dataSource:
    type: Upload
EOF
Once created, the resource will enter the
WaitForUserUploadphase, which means it is ready for uploading the image. -
There are two options available for uploading: from a cluster node and from an arbitrary node outside the cluster:
d8 k get cvi some-image -o jsonpath="{.status.imageUploadURLs}" | jqExample output:
{
  "external":"https://virtualization.example.com/upload/g2OuLgRhdAWqlJsCMyNvcdt4o5ERIwmm",
  "inCluster":"http://10.222.165.239/upload"
}
Where:
inCluster: A URL used to download the image from one of the cluster nodes.external: A URL used in all other cases.
-
As an example, download the Cirros image:
curl -L http://download.cirros-cloud.net/0.5.1/cirros-0.5.1-x86_64-disk.img -o cirros.img -
Upload the image using the following command:
curl https://virtualization.example.com/upload/g2OuLgRhdAWqlJsCMyNvcdt4o5ERIwmm --progress-bar -T cirros.img | cat -
After the upload is complete, the image should have been created and entered the
Readyphase: To verify this, run the following command:d8 k get cvi some-imageExample output:
NAME         PHASE   CDROM   PROGRESS   AGE
some-image   Ready   false   100%       1m
How to perform the operation in the web interface:
- Go to the “System” tab, then to the “Virtualization” -> “Cluster Images” section.
- Click “Create Image”, then select “Upload from Computer” from the drop-down menu.
- Enter the image name in the “Image Name” field.
- In the “Upload File” field, click the “Select a file on your computer” link.
- Select the file in the file manager that opens.
- Click the “Create” button.
- Wait until the image changes to
Readystatus.
Cleaning up image storage
Over time, the creation and deletion of ClusterVirtualImage, VirtualImage, and VirtualDisk resources leads to the accumulation of outdated images in the intra-cluster storage. Scheduled garbage collection is implemented to keep the storage up to date, but this feature is disabled by default.
apiVersion: deckhouse.io/v1alpha1
kind: ModuleConfig
metadata:
  name: virtualization
spec:
  # ...
  settings:
    dvcr:
      gc:
        schedule: "0 20 * * *"
  # ...
While garbage collection is running, the storage is switched to read-only mode, and all resources created during this time will wait for the cleanup to finish.
To check for outdated images in the storage, you can run the following command:
d8 k -n d8-virtualization exec deploy/dvcr -- dvcr-cleaner gc checkIt prints information about the storage status and a list of outdated images that can be deleted.
Found 2 cvi, 5 vi, 1 vd manifests in registry
Found 1 cvi, 5 vi, 11 vd resources in cluster
  Total     Used    Avail     Use%
36.3GiB  13.1GiB  22.4GiB      39%
Images eligible for cleanup:
KIND                   NAMESPACE            NAME
ClusterVirtualImage                         debian-12
VirtualDisk            default              debian-10-root
VirtualImage           default              ubuntu-2404
Virtual machine classes
The VirtualMachineClass resource is designed for centralized configuration of preferred virtual machine settings. It allows you to define CPU instructions, configuration policies for CPU and memory resources for virtual machines, as well as define ratios of these resources. In addition, VirtualMachineClass provides management of virtual machine placement across platform nodes. This allows administrators to effectively manage virtualization platform resources and optimally place virtual machines on platform nodes.
During installation, a single VirtualMachineClass generic resource is automatically created. It represents a universal CPU type based on the older, but widely supported, Nehalem architecture. This enables running VMs on any nodes in the cluster and allows live migration.
The administrator can modify the parameters of the generic VirtualMachineClass resource (except for the .spec.cpu section) or delete this resource.
It is not recommended to use the generic VirtualMachineClass for running workloads in production environments, since this class corresponds to a CPU with the smallest feature set.
After all nodes are configured and added to the cluster, it is recommended to create at least one VirtualMachineClass resource of the Discovery type. This ensures that the best available CPU configuration compatible with all CPUs in your cluster is selected, allows virtual machines to make full use of CPU capabilities, and enables seamless migration between nodes.
For a configuration example, see vCPU Discovery configuration example.
To list all VirtualMachineClass resources, run the following command:
d8 k get virtualmachineclassExample output:
NAME               PHASE   AGE
generic            Ready   6d1h
Make sure to specify the VirtualMachineClass resource in the virtual machine configuration. The following is an example of specifying a class in the VM specification:
apiVersion: virtualization.deckhouse.io/v1alpha2
kind: VirtualMachine
metadata:
  name: linux-vm
spec:
  virtualMachineClassName: generic # VirtualMachineClass resource name.
  ...
Default VirtualMachineClass
For convenience, you can assign a default VirtualMachineClass. This class will be used in the spec.virtualMachineClassName field if it is not specified in the virtual machine manifest.
The default VirtualMachineClass is set via the virtualmachineclass.virtualization.deckhouse.io/is-default-class annotation. There can be only one default class in the cluster. To change the default class, remove the annotation from one class and add it to another.
It is not recommended to set the annotation on the generic class, since the annotation may be removed during an update. It is recommended to create your own class and assign it as the default.
Example output of the class list without a default class:
$ d8 k get vmclass

NAME                                    PHASE   ISDEFAULT   AGE
generic                                 Ready               1d
host-passthrough-custom                 Ready               1d
Example command of assigning the default class:
d8 k annotate vmclass host-passthrough-custom virtualmachineclass.virtualization.deckhouse.io/is-default-class=true
virtualmachineclass.virtualization.deckhouse.io/host-passthrough-custom annotated
After assigning the default class, the output will be:
$ d8 k get vmclass

NAME                                    PHASE   ISDEFAULT   AGE
generic                                 Ready               1d
host-passthrough-custom                 Ready   true        1d
When creating a VM without specifying the spec.virtualMachineClassName field, it will be set to host-passthrough-custom.
VirtualMachineClass settings
The VirtualMachineClass resource structure is as follows:
apiVersion: virtualization.deckhouse.io/v1alpha2
kind: VirtualMachineClass
metadata:
  name: <vmclass-name>
  # (optional) Set class as a default.
  # annotations:
  #   virtualmachineclass.virtualization.deckhouse.io/is-default-class: "true"
spec:
  # The section describes virtual processor parameters for virtual machines.
  # This block cannot be changed after the resource has been created.
  cpu: ...

  # (optional) Describes the rules for allocating virtual machines between nodes.
  # When changed, it is automatically applied to all virtual machines using this VirtualMachineClass.
  nodeSelector: ...

  # (optional) Describes the sizing policy for configuring virtual machine resources.
  # When changed, it is automatically applied to all virtual machines using this VirtualMachineClass.
  sizingPolicies: ...
How to configure VirtualMachineClass in the web interface:
- Go to the “System” tab, then to the “Virtualization” -> “VM Classes” section.
- Click the “Create” button.
- In the window that opens, enter a name for the VM class in the “Name” field.
Next, let’s take a closer look at the setting blocks.
vCPU settings
The .spec.cpu block allows you to specify or configure the vCPU for the VM.
Settings in the .spec.cpu block cannot be changed after the VirtualMachineClass resource is created.
Examples of the .spec.cpu block settings:
-
A class with a vCPU with the required set of processor instructions. In this case, use
type: Featuresto specify the required set of supported instructions for the processor:spec: cpu: features: - vmx type: FeaturesHow to configure vCPU in the web interface in the VM class creation form:
- In the “CPU Settings” block, select
Featuresin the “Type” field. - In the “Required set of supported instructions” field, select the instructions you need for the processor.
- To create a VM class, click the “Create” button.
- In the “CPU Settings” block, select
-
A class with a universal vCPU for a given set of nodes. In this case, use
type: Discovery:spec: cpu: discovery: nodeSelector: matchExpressions: - key: node-role.kubernetes.io/control-plane operator: DoesNotExist type: DiscoveryHow to perform the operation in the web interface in the VM class creation form:
- In the “CPU Settings” block, select
Discoveryin the “Type” field. - Click “Add” in the “Conditions for creating a universal processor” -> “Labels and expressions” block.
- In the pop-up window, you can set the “Key”, “Operator” and “Value” of the key that corresponds to the
spec.cpu.discovery.nodeSelectorsettings. - To confirm the key parameters, click the “Enter” button.
- To create a VM class, click the “Create” button.
- In the “CPU Settings” block, select
-
The vmclass with
type: Hostuses a virtual vCPU that matches the platform node’s vCPU instruction set as closely as possible, ensuring high performance and functionality. It also guarantees compatibility with live migration for nodes with similar vCPU types. For example, it is not possible to migrate a virtual machine between nodes with Intel and AMD processors. This also applies to processors of different generations, as their instruction sets may differ.spec: cpu: type: HostHow to perform the operation in the web interface in the VM class creation form:
- In the “CPU Settings” block, select
Hostin the “Type” field. - To create a VM class, click the “Create” button.
- In the “CPU Settings” block, select
-
A vmclass with
type: HostPassthroughuses a physical CPU of the platform node without modification. A virtual machine using this class can only be migrated to a node that has a CPU that exactly matches the CPU of the source node.spec: cpu: type: HostPassthroughHow to perform the operation in the web interface in the VM class creation form:
- In the “CPU Settings” block, select
HostPassthroughin the “Type” field. - To create a VM class, click the “Create” button.
- In the “CPU Settings” block, select
-
To create a vCPU of a specific CPU with a predefined instruction set, use
type: Model. To get a list of supported CPU names for the cluster node, run the command in advance:d8 k get nodes <node-name> -o json | jq '.metadata.labels | to_entries[] | select(.key | test("cpu-model.node.virtualization.deckhouse.io")) | .key | split("/")[1]' -rExample output:
Broadwell-noTSX
Broadwell-noTSX-IBRS
Haswell-noTSX
Haswell-noTSX-IBRS
IvyBridge
IvyBridge-IBRS
Nehalem
Nehalem-IBRS
Penryn
SandyBridge
SandyBridge-IBRS
Skylake-Client-noTSX-IBRS
Westmere
Westmere-IBRS
After that specify the following in the VirtualMachineClass resource specification:
spec:
  cpu:
    model: IvyBridge
    type: Model
How to perform the operation in the web interface in the VM class creation form:
- In the “CPU Settings” block, select
Modelin the “Type” field. - Select the required processor model in the “Model” field.
- To create a VM class, click the “Create” button.
- In the “CPU Settings” block, select
Placement settings
The .spec.nodeSelector block is optional. It allows you to specify the nodes that will host VMs using this vmclass:
  spec:
    nodeSelector:
      matchExpressions:
        - key: node.deckhouse.io/group
          operator: In
          values:
          - green
Since changing the .spec.nodeSelector parameter affects all virtual machines using this VirtualMachineClass, consider the following:
- For the Enterprise edition, this may cause virtual machines to be migrated to new destination nodes if the current nodes do not meet placement requirements.
- For the Community edition, this may cause virtual machines to restart according to the automatic change application policy set in the
.spec.disruptions.restartApprovalModeparameter.
How to perform the operation in the web interface in the VM class creation form:
- Click “Add” in the “VM scheduling conditions on nodes” -> “Labels and expressions” block.
- In the pop-up window, you can set the “Key”, “Operator” and “Value” of the key that corresponds to the
spec.nodeSelectorsettings. - To confirm the key parameters, click the “Enter” button.
- To create a VM class, click the “Create” button.
Sizing policy settings
The .spec.sizingPolicy block allows you to set sizing policies for virtual machine resources that use vmclass.
Changes in the .spec.sizingPolicy block can also affect virtual machines. For virtual machines whose sizing policy will not meet the new policy requirements, the SizingPolicyMatched condition in the .status.conditions block will be false (status: False).
When configuring sizingPolicy, be sure to consider the CPU topology for virtual machines.
The cores block is mandatory and specifies the range of cores to which the rule described in the same block applies.
The ranges [min; max] for the cores parameter must be strictly sequential and non-overlapping.
Correct structure (the ranges follow one another without intersections):
- cores:
    min: 1
    max: 4...

- cores:
    min: 5   # Start of next range = (previous max + 1)
    max: 8
Invalid option (overlapping values):
- cores:
    min: 1
    max: 4...

- cores:
    min: 4   # Error: Value 4 is already included in the previous range
    max: 8
Rule: Each new range must start with a value that immediately follows the max of the previous range.
Additional requirements can be specified for each range of cores:
-
Memory — specify:
- Either minimum and maximum memory for all cores in the range,
- Either the minimum and maximum memory per core (
memory.perCore).
-
Allowed fractions of cores (
coreFractions) — a list of allowed values (for example, [25, 50, 100] for 25%, 50%, or 100% core usage). If thecoreFractionparameter is explicitly specified in the virtual machine specification, its value must be from this list. -
Default core fraction value (
defaultCoreFraction) — specifies which core fraction will be used by default for this range of cores if thecoreFractionparameter is not explicitly specified in the virtual machine specification. This value must be present in thecoreFractionslist. IfdefaultCoreFractionis not set, the default value of100%is applied.
Important: For each range of cores, be sure to specify:
- Either memory (or
memory.perCore), - Either coreFractions,
- Or both parameters at the same time.
Examples of memory volume dependency on the number of cores:
-
When using the
memoryparameter, the allowed memory volume is fixed for the entire range of cores and does not depend on their number:- cores: min: 1 max: 4 memory: min: 2Gi max: 8GiIn this example, for any virtual machine with 1 to 4 cores, you can choose any memory volume from 2 to 8 GB — regardless of the number of cores. Memory does not depend on the number of cores in the range.
-
When using the
memory.perCoreparameter, the allowed memory volume is calculated as the product of the number of cores multiplied by the specified memory range per core:- cores: min: 1 max: 4 memory: perCore: min: 1Gi max: 2GiIn this case:
- For a virtual machine with 1 core: from 1×1 GiB = 1 GiB to 1×2 GiB = 2 GiB of memory
- For a virtual machine with 2 cores: from 2×1 GiB = 2 GiB to 2×2 GiB = 4 GiB of memory
- For a virtual machine with 3 cores: from 3×1 GiB = 3 GiB to 3×2 GiB = 6 GiB of memory
- For a virtual machine with 4 cores: from 4×1 GiB = 4 GiB to 4×2 GiB = 8 GiB of memory
Thus, when using
memory.perCore, the allowed memory volume automatically scales proportionally to the number of cores, providing more flexible and fair resource distribution. -
Examples of using the
memory.stepparameter for memory discretization:The
stepparameter defines the memory size discretization step. It allows you to limit available memory values to specific increments, which simplifies resource management and prevents setting arbitrary values.-
Example with
memory.minandmemory.maxwith a 1 GB step:- cores: min: 1 max: 4 memory: min: 2Gi max: 8Gi step: 1GiIn this case, only the following memory values are available: 2 GB, 3 GB, 4 GB, 5 GB, 6 GB, 7 GB, 8 GB. You cannot set, for example, 2.5 GB or 7.5 GB.
-
Example with
memory.perCoreand step:- cores: min: 1 max: 4 memory: perCore: min: 1Gi max: 2Gi step: 512MiIn this case, for each virtual machine, available memory values are calculated taking into account the step:
- For 1 core: 1 GB, 1.5 GB, 2 GB
- For 2 cores: 2 GB, 3 GB, 4 GB
- For 3 cores: 3 GB, 4.5 GB, 6 GB
- For 4 cores: 4 GB, 6 GB, 8 GB
Note that the step is applied to the total memory volume, not to the memory per core.
-
Here is an example of a policy with similar settings:
spec:
  sizingPolicies:
    # For a range of 1–4 cores, it is possible to use 1–8 GB of RAM in 512Mi increments,
    # i.e., 1 GB, 1.5 GB, 2 GB, 2.5 GB, etc.
    # No dedicated cores are allowed.
    # All `corefraction` options are available.
    - cores:
        min: 1
        max: 4
      memory:
        min: 1Gi
        max: 8Gi
        step: 512Mi
      coreFractions: [5, 10, 20, 50, 100]
      defaultCoreFraction: 50  # Default value for the 1–4 core range
    # For a range of 5–8 cores, it is possible to use 5–16 GB of RAM in 1 GB increments,
    # i.e., 5 GB, 6 GB, 7 GB, etc.
    # No dedicated cores are allowed.
    # Some `corefraction` options are available.
    - cores:
        min: 5
        max: 8
      memory:
        min: 5Gi
        max: 16Gi
        step: 1Gi
      coreFractions: [20, 50, 100]
      defaultCoreFraction: 100  # Default value for the 5–8 core range
    # For a range of 9–16 cores, it is possible to use 9–32 GB of RAM in 1 GB increments.
    # You can use dedicated cores if needed.
    # Some `corefraction` options are available.
    - cores:
        min: 9
        max: 16
      memory:
        min: 9Gi
        max: 32Gi
        step: 1Gi
      coreFractions: [50, 100]
    # For the range of 17–248 cores, it is possible to use 1–2 GB of RAM per core.
    # Only the dedicated cores are available for use.
    # The only available `corefraction` parameter is 100%.
    - cores:
        min: 17
        max: 248
      memory:
        perCore:
          min: 1Gi
          max: 2Gi
      coreFractions: [100]
How to configure sizing policies in the web interface in the VM class creation form:
- Click “Add” in the “Resource allocation rules for virtual machines” block.
- In the “PU” block, enter
1in the “Min” field. - In the “CPU” block, enter
4in the “Max” field. - In the “CPU” block, select the values
5%,10%,20%,50%,100%in order in the “Allow setting core fractions” field. - In the “Memory” block, set the switch to “Amount per core”.
- In the “Memory” block, enter
1in the “Min” field. - In the “Memory” block, enter
8in the “Max” field. - In the “Memory” block, enter
1in the “Sampling step” field. - You can add more ranges using the “Add” button.
- To create a VM class, click the “Create” button.
CPU oversubscription
CPU oversubscription is the practice of allocating more virtual cores to virtual machines than there are physical cores available on the hypervisor node. This allows for more efficient use of cluster computational resources, as not all VMs run at full capacity simultaneously.
Oversubscription is managed using the coreFraction parameter, which is set in VirtualMachineClass through the sizing policy (sizingPolicies). The parameter defines the guaranteed minimum share of computational power per VM core (for example, coreFraction: 20% means the VM is guaranteed 20% of the core’s power but can use up to 100% when free resources are available). The administrator sets the allowed coreFractions values and defaultCoreFraction (the default value if the user does not specify coreFraction).
If the coreFractions parameter is not set in VirtualMachineClass (or multiple values are set), users can manage oversubscription themselves by specifying coreFraction when creating VMs.
When planning VM placement, the sum of guaranteed resources is considered: Σ(cores × coreFraction / 100) for all VMs on the node. If this sum exceeds the number of physical cores, the VM will not be started on that node.
Example: A node with 4 physical cores, 5 VMs with cores: 2 and coreFraction: 20%:
- Guaranteed resources: 5 × 2 × 0.2 = 2 CPU
- Virtual cores: 10 on 4 physical (oversubscription ratio 2.5:1)
- All VMs can be placed, as 2 CPU < 4 CPU
Example 1: Hard-coded oversubscription
The administrator hard-codes the oversubscription level — the user cannot change it:
apiVersion: virtualization.deckhouse.io/v1alpha2
kind: VirtualMachineClass
metadata:
  name: oversubscribed
spec:
  sizingPolicies:
    - cores:
        min: 1
        max: 8
      memory:
        perCore:
          min: 1Gi
          max: 8Gi
      coreFractions: [20]  # Only one value
      defaultCoreFraction: 20
For all VMs of this class, coreFraction: 20% is hard-coded, ensuring a fixed oversubscription ratio of 5:1.
Example 2: Flexible configuration
Users can choose from multiple values:
apiVersion: virtualization.deckhouse.io/v1alpha2
kind: VirtualMachineClass
metadata:
  name: standard
spec:
  sizingPolicies:
    - cores:
        min: 1
        max: 4
      memory:
        perCore:
          min: 1Gi
          max: 8Gi
      coreFractions: [5, 10, 20, 50, 100]
      defaultCoreFraction: 20
Users can select coreFraction from the list; if not specified, the value 20% is applied.
vCPU Discovery configuration example
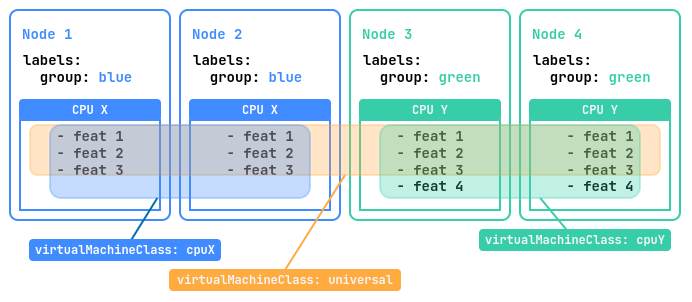
Let’s imagine that we have a cluster of four nodes. Two of these nodes labeled group=blue have a “CPU X” processor with three instruction sets, and the other two nodes labeled group=green have a newer “CPU Y” processor with four instruction sets.
To optimally utilize the resources of this cluster, it is recommended that you create three additional virtual machine classes (VirtualMachineClass):
universal: This class will allow virtual machines to run on all nodes in the platform and migrate between them. It will use the instruction set for the lowest CPU model to ensure the greatest compatibility.cpuX: This class will be for virtual machines that should only run on nodes with a “CPU X” processor. VMs will be able to migrate between these nodes using the available “CPU X” instruction sets.cpuY: This class is for VMs that should only run on nodes with a “CPU Y” processor. VMs will be able to migrate between these nodes using the available “CPU Y” instruction sets.
A CPU instruction set is a list of all the instructions that a processor can execute, such as addition, subtraction, or memory operations. They determine what operations are possible, affect program compatibility and performance, and can vary from one generation of processors to the next.
Resource configuration examples for a given cluster:
---
apiVersion: virtualization.deckhouse.io/v1alpha2
kind: VirtualMachineClass
metadata:
  name: universal
spec:
  cpu:
    discovery: {}
    type: Discovery
  sizingPolicies: { ... }
---
apiVersion: virtualization.deckhouse.io/v1alpha2
kind: VirtualMachineClass
metadata:
  name: cpuX
spec:
  cpu:
    discovery:
      nodeSelector:
        matchExpressions:
          - key: group
            operator: In
            values: ["blue"]
    type: Discovery
  sizingPolicies: { ... }
---
apiVersion: virtualization.deckhouse.io/v1alpha2
kind: VirtualMachineClass
metadata:
  name: cpuY
spec:
  cpu:
    discovery:
      nodeSelector:
        matchExpressions:
          - key: group
            operator: In
            values: ["green"]
    type: Discovery
  sizingPolicies: { ... }
Reliability mechanisms
Migration and maintenance mode
Virtual machine migration is an important feature in virtualized infrastructure management. It allows you to move running virtual machines from one physical node to another without shutting them down. Virtual machine migration is required for a number of tasks and scenarios:
- Load balancing: Moving virtual machines between nodes allows you to evenly distribute the load on servers, ensuring that resources are utilized in the best possible way.
- Node maintenance: Virtual machines can be moved from nodes that need to be taken out of service to perform routine maintenance or software upgrade.
- Upgrading a virtual machine firmware: The migration allows you to upgrade the firmware of virtual machines without interrupting their operation.
Live migration has the following limitations:
- Only one virtual machine can migrate from each node simultaneously.
- The total number of concurrent migrations in the cluster cannot exceed the number of nodes where running virtual machines is permitted.
- The bandwidth for a single migration is limited to 5 Gbps.
Start migration of an arbitrary machine
The following is an example of migrating a selected virtual machine.
-
Before starting the migration, check the current status of the virtual machine:
d8 k get vmExample output:
NAME                                   PHASE     NODE           IPADDRESS     AGE
linux-vm                              Running   virtlab-pt-1   10.66.10.14   79m
We can see that it is currently running on the
virtlab-pt-1node. -
To migrate a virtual machine from one node to another taking into account the virtual machine placement requirements, the VirtualMachineOperation (
vmop) resource with theEvicttype is used. Create this resource following the example:d8 k create -f - <<EOF apiVersion: virtualization.deckhouse.io/v1alpha2 kind: VirtualMachineOperation metadata: generateName: evict-linux-vm- spec: # Virtual machine name. virtualMachineName: linux-vm # An operation for the migration. type: Evict EOF -
Immediately after creating the
vmopresource, run the following command:d8 k get vm -wExample output:
NAME PHASE NODE IPADDRESS AGE linux-vm Running virtlab-pt-1 10.66.10.14 79m linux-vm Migrating virtlab-pt-1 10.66.10.14 79m linux-vm Migrating virtlab-pt-1 10.66.10.14 79m linux-vm Running virtlab-pt-2 10.66.10.14 79m -
If you need to abort the migration, delete the corresponding
vmopresource while it is in thePendingorInProgressphase.
How to start VM migration in the web interface:
- Go to the “Projects” tab and select the desired project.
- Go to the “Virtualization” -> “Virtual Machines” section.
- Select the desired virtual machine from the list and click the ellipsis button.
- Select
Migratefrom the pop-up menu. - Confirm or cancel the migration in the pop-up window.
Dedicated migration network
By default, live migration traffic flows over the node’s default network and competes with workload traffic. You can also route it over a dedicated VLAN provisioned by the sdn module.
Prerequisites:
- The
sdnmodule is enabled. - A SystemNetwork resource exists and is in the
Readystate.
To enable the feature, set spec.settings.liveMigration.network on the virtualization ModuleConfig: use type: SystemNetwork and specify the name of the prepared SystemNetwork under systemNetwork.name. Once configured, every VM migration in the cluster runs over the specified SystemNetwork VLAN.
spec:
  settings:
    liveMigration:
      network:
        type: SystemNetwork
        systemNetwork:
          name: migration-net
To route migration traffic back over the default node network, remove the network block (it is the implicit default when unset).
Maintenance mode
When working on nodes with virtual machines running, there is a risk of disrupting their performance. To avoid this, you can put a node into the maintenance mode and migrate the virtual machines to other free nodes.
To do this, run the following command:
d8 k drain <nodename> --ignore-daemonsets --delete-emptydir-dataWhere <nodename> is a node scheduled for maintenance, which needs to be freed from all resources (including system resources).
If you need to evict only virtual machines off the node, run the following command:
d8 k drain <nodename> --pod-selector vm.kubevirt.internal.virtualization.deckhouse.io/name --delete-emptydir-dataAfter running the d8 k drain command, the node will enter maintenance mode and no virtual machines will be able to start on it.
To take it out of maintenance mode, stop the drain command (Ctrl+C), then execute:
d8 k uncordon <nodename>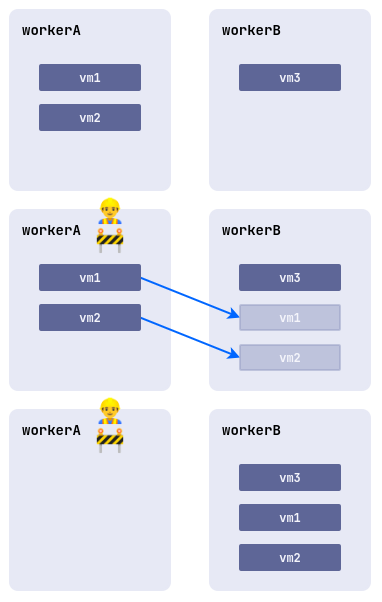
How to perform the operation in the web interface:
- Go to the “System”“tab, then to the “Nodes” section -> “Nodes of all groups”.
- Select the desired node from the list and click the “Cordon + Drain” button.
- To remove it from maintenance mode, click the “Uncordon” button.
VM Rebalancing
The platform allows you to automatically manage the placement of running virtual machines in the cluster. To enable this feature, activate the descheduler module.
Live migration of virtual machines between cluster nodes is used for rebalancing.
After the module is enabled, the system automatically monitors the distribution of virtual machines and maintains optimal node utilization. The main features of the module are:
- Load balancing: The system monitors CPU reservation on each node. If more than 80% of CPU resources are reserved on a node, some virtual machines will be automatically migrated to less-loaded nodes. This helps avoid overloads and ensures stable VM operation.
- Correct placement: The system checks whether the current node meets the mandatory requirements of the virtual machine’s requests, as well as rules regarding their relative placement. For example, if rules prohibit placing certain VMs on the same node, the module will automatically move them to a suitable server.
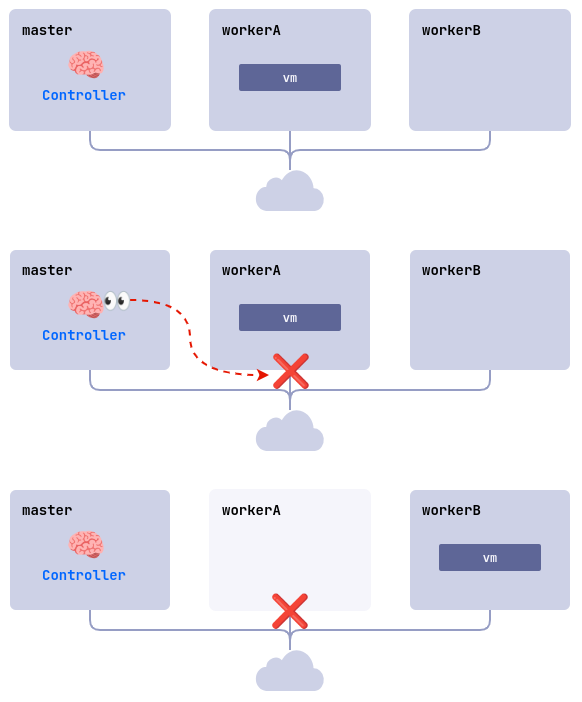
ColdStandby
ColdStandby provides a mechanism to recover a virtual machine from a failure on a node it was running on.
The following requirements must be met for this mechanism to work:
- The virtual machine startup policy (
.spec.runPolicy) must be set to one of the following values:AlwaysOnUnlessStoppedManually,AlwaysOn. - The Fencing mechanism must be enabled on nodes running the virtual machines.
Let’s see how it works on the example:
- A cluster consists of three nodes:
master,workerA, andworkerB. The worker nodes have the Fencing mechanism enabled. Thelinux-vmvirtual machine is running on theworkerAnode. - A problem occurs on the
workerAnode (power outage, no network connection, etc.). - The controller checks the node availability and finds that
workerAis unavailable. - The controller removes the
workerAnode from the cluster. - The
linux-vmvirtual machine is started on another suitable node (workerB).