The module lifecycle stage: General Availability
The module has requirements for installation
Feature: Pages
Assuming public domain template is %s.example.com, the Pages will be available at https://code-pages.example.com (code subdomain).
Generic
Example of usage Generic S3 (S3-compatible service) for deployment:
...
features:
  pages:
    enabled: true
    s3:
      mode: External
      bucketName: d8-code-pages
      external:
        provider: Generic
        region: <REPLACE_ME>
        accessKey: "<REPLACE_ME>"
        secretKey: "<REPLACE_ME>"
        endpoint: <REPLACE_ME> # e.g. http://minio.example.com:9090

...
YCloud
Example of usage YCloud S3 for deployment:
...
features:
  pages:
    enabled: true
    s3:
      mode: External
      bucketName: d8-code-pages
      external:
        provider: YCloud
        accessKey: "<REPLACE_ME>"
        secretKey: "<REPLACE_ME>"
...
AzureRM
Example of usage AzureRM for deployment:
...
features:
  pages:
    enabled: true
    s3:
      mode: External
      bucketName: d8-code-pages
      external:
        provider: AzureRM
        azureAccountName: <REPLACE_ME>
        azureAccessKey: <REPLACE_ME>
...
External Redis
Examples for different configuration of external redis cluster
Single node
...
storages:
  redis:
    external:
      auth:
        enabled: true
        password: "<REPLACE_ME>"
      host: <REPLACE_ME>
      port: 6379
    mode: External
...
Single node (with TLS)
...
storages:
  redis:
    external:
      auth:
        enabled: true
        password: "<REPLACE_ME>"
      host: <REPLACE_ME>
      port: 6380
      serverCA: <CERTIFICATE>
    mode: External
...
With sentinels
Note: Authentication is supported only on Redis servers and is not available on Redis Sentinels.
...
storages:
  redis:
    external:
      auth:
        enabled: true
        password: "<REPLACE_ME>"
      masterName: <REPLACE_ME>
      port: 6379
      sentinels:
        - host: <REPLACE_ME> # sentinel host #1
          port: 26379
        - host: <REPLACE_ME> # sentinel host #2
    mode: External
...
With sentinels (with TLS)
Note: Authentication is supported only on Redis servers and is not available on Redis Sentinels.
Warning: Ensure that the Redis servers and Sentinels are configured to work with a TLS certificate.
...
storages:
  redis:
    external:
      auth:
        enabled: true
        password: "<REPLACE_ME>"
      masterName: <REPLACE_ME>
      port: 6380
      serverCA: <CERTIFICATE>
      sentinels:
        - host: <REPLACE_ME> # sentinel host #1
          port: 26380
        - host: <REPLACE_ME> # sentinel host #2
    mode: External
...
External Postgres
TLS disabled
...
storages:
  postgres:
    external:
      database: db
      host: <REPLACE_ME> # master host fqdn
      port: 5432
      username: <REPLACE_ME>
      password: "<REPLACE_ME>"
      praefectDatabase: praefect
      praefectUsername: <REPLACE_ME>
      praefectPassword: "<REPLACE_ME>"
    mode: External
...
TLS enabled
You can also use TLS authentication for connection to main database:
...
storages:
  postgres:
    external:
      database: db
      host: <REPLACE_ME> # master host fqdn
      port: 5432
      username: <REPLACE_ME>
      sslmode: verify-full
      serverCA: |
        # postgres server CA
    mode: External
...
Alternatively, you can reference the CA certificate stored in a Kubernetes Secret (in the d8-code namespace) using the secret/<secret-name>/<key-name> template:
...
storages:
  postgres:
    external:
      database: db
      host: <REPLACE_ME> # master host fqdn
      port: 5432
      username: <REPLACE_ME>
      sslmode: verify-full
      serverCA: secret/<secret-name>/<key-name>
    mode: External
...
External S3
Generic
Example of usage Generic S3 (S3-compatible service):
...
storages:
  s3:
    mode: External
    external:
      provider: Generic
      region: <REPLACE_ME>
      accessKey: "<REPLACE_ME>"
      secretKey: "<REPLACE_ME>"
      endpoint: <REPLACE_ME> # e.g. http://minio.example.com:9090
...
YCloud
Without server-side-encryption
For example of usage YCloud S3 look here
With server-side-encryption
Example of usage AWS with SSE (Server-Side Encryption):
...
storages:
  s3:
    mode: External
    external:
      provider: AWS
      region: us-west-2
      accessKey: "<REPLACE_ME>"
      secretKey: "<REPLACE_ME>"
      storageOptions:
        serverSideEncryption: aws:kms
        serverSideEncryptionKmsKeyId: <REPLACE_ME> # e.g. arn:aws:kms:us-west-2:111122223333:key/1234abcd-12ab-34cd-56ef-1234567890ab
...
AzureRM
Example of usage AzureRM:
...
storages:
  s3:
    mode: External
    external:
      provider: AzureRM
      azureAccountName: <REPLACE_ME>
      azureAccessKey: <REPLACE_ME>
...
Backups
backup:
  enabled: true
  cronSchedule: "0 0 1 * *"
  s3:
    bucketName: <REPLACE_ME>
    mode: External
    external:
      accessKey: "<REPLACE_ME>"
      provider: <REPLACE_ME>
      region: <REPLACE_ME>
      secretKey: "<REPLACE_ME>"
  persistentVolumeClaim:
    enabled: <true|false>
    storageClass: network-hdd
Prepare external resources with YCloud
Setup Managed Service for PostgreSQL
To create a Managed Service for PostgreSQL cluster, you need the vpc.user role and the managed-postgresql.editor role or higher. For more information on assigning roles, see the Identity and Access Management documentation.
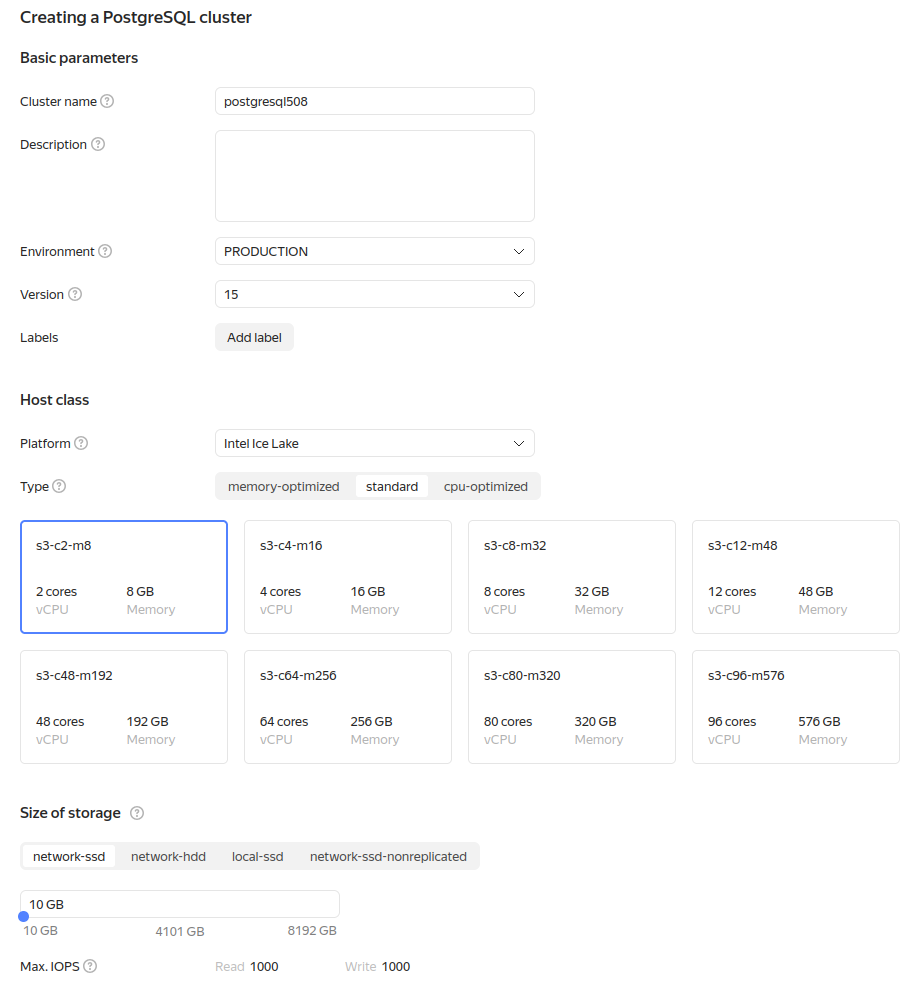
In the management console, select the folder where you want to create a DB cluster.
- Select Managed Service for PostgreSQL.
- Click Create cluster.
- Enter a name for the cluster in the Cluster name field. It must be unique within the folder.
- Select the environment where you want to create the cluster (you cannot change the environment once the cluster is created):
PRODUCTION: For stable versions of your apps.PRESTABLE: For testing purposes. The prestable environment is similar to the production environment and likewise covered by the SLA, but it is the first to get new functionalities, improvements, and bug fixes. In the prestable environment, you can test compatibility of new versions with your application.
- Select the DBMS version (16+ recommended).
- Select the host class that defines the technical specifications of the VMs where the DB hosts will be deployed. All available options are listed under Host classes. When you change the host class for a cluster, the characteristics of all the already created hosts change too.
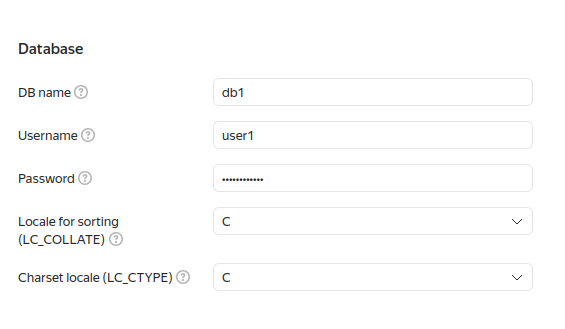
- Under Database, specify the DB attributes:
- DB name. The name must be unique within the folder.
The database name may contain Latin letters, numbers, underscores, and hyphens. The name may be up to 63 characters
long. The names
postgres,template0, andtemplate1are reserved for Managed Service for PostgreSQL. You cannot create databases with these names. - DB owner username and password. By default, the new user is assigned 50 connections to each host in the cluster.
- Locale for sorting and character set locale. These settings define the rules for sorting strings (
LC_COLLATE) and classifying characters (LC_CTYPE). In Managed Service for PostgreSQL, locale settings apply at the individual DB level. By default, theClocale is used. For more information about locale settings, see the PostgreSQL documentation.
- Click Create cluster.
- It takes sometime to create cluster.
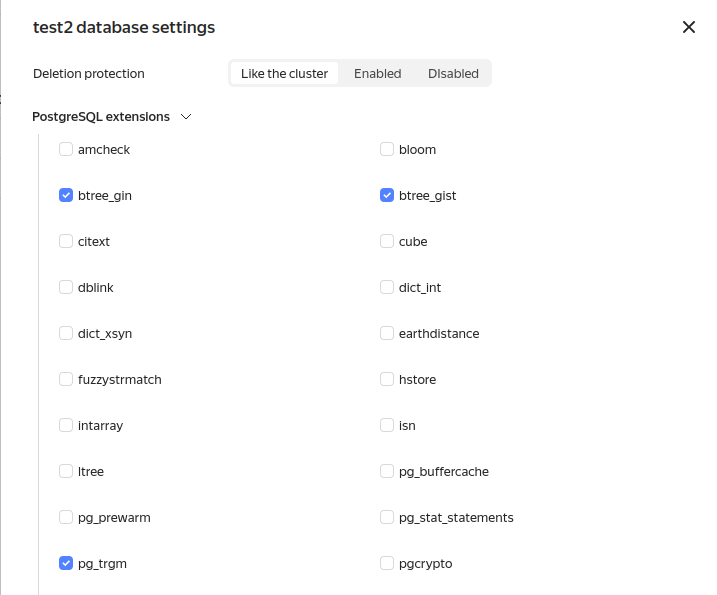
- Click on cluster name and go to Databases tab. Choose database and toggle following extensions:
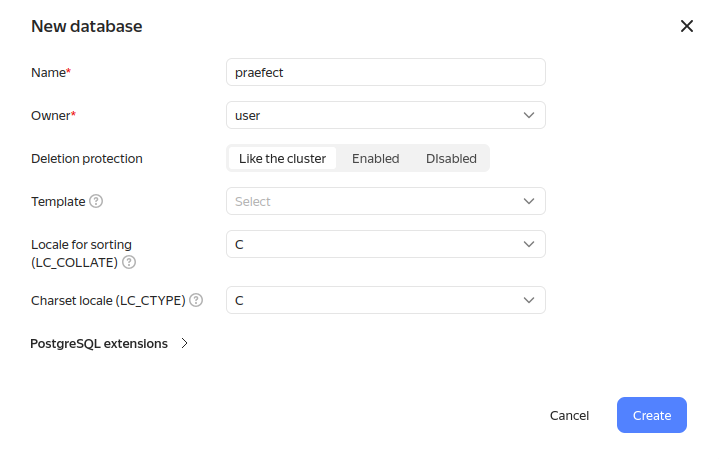
- Add database for Praefect component:
- Go to Users tab and set connection limit. We recommend set at least 150.
Postgres configuration results in snippet
...
storages:
  postgres:
    mode: External
    external:
      host: <REPLACE_ME> # YC master host fqdn
      port: 6432
      database: <REPLACE_ME>
      username: <REPLACE_ME>
      password: "<REPLACE_ME>"
      praefectDatabase: praefect
      praefectUsername: <REPLACE_ME> # the same as postgres.username
      praefectPassword: "<REPLACE_ME>" # the same as postgres.password
...
Setup Managed Service for redis
To create a Managed Service for Redis cluster, you need the vpc.user) role and the managed-redis.editor role or higher. For more information on assigning roles, see the Identity and Access Management documentation.
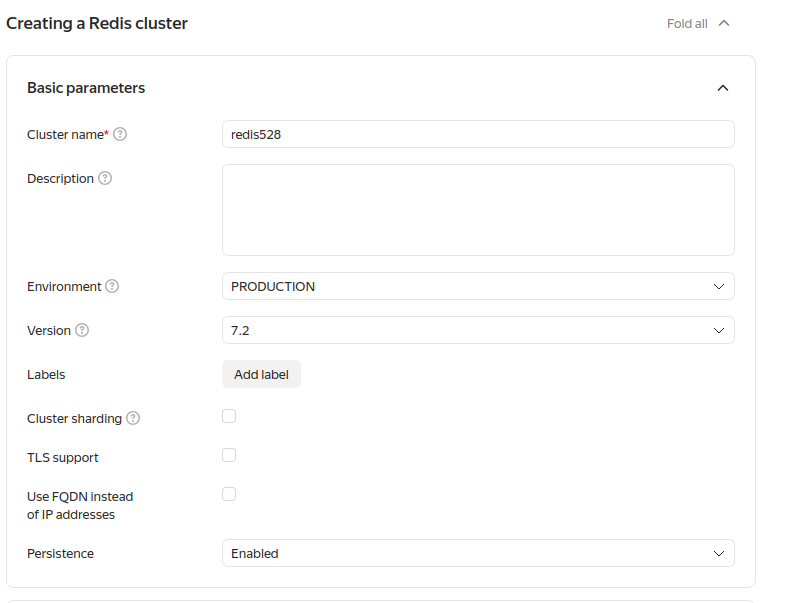
In the management console, go to the folder to create a DB cluster in.
- Select Managed Service for Redis.
- Click Create cluster.
- Under Basic parameters:
- Enter a name for the cluster in the Cluster name field. It must be unique within the folder.
- (Optional) Add a cluster description.
- Select the environment where you want to create the cluster (you cannot change the environment once the cluster is
created):
PRODUCTION: For stable versions of your apps.PRESTABLE: For testing purposes. The prestable environment is similar to the production environment and likewise covered by the SLA, but it is the first to get new functionalities, improvements, and bug fixes. In the prestable environment, you can test compatibility of new versions with your application.
- Select the DBMS version (recommended 7.0+).
- Click Create cluster.
- It takes sometime to create cluster.
Redis configuration results in snippet
Note: When using a Redis cluster with more than one host, use the example configuration for Redis Sentinels.
...
storages:
  redis:
    mode: External
    external:
      host: <REPLACE_ME> # FQDN of master host
      port: 6379
      auth:
        enabled: true
        password: "<REPLACE_ME>"
...
Setup S3
Create a user named d8-code-sa. The command response will contain its parameters:
Instruction of creating service account using web page
Example of using YC CLI:
yc iam service-account create --name d8-code-saIt returns user parameters in response:
id: <userID>
folder_id: <folderID>
created_at: "YYYY-MM-DDTHH:MM:SSZ"
name: d8-code-sa
Assign the storage.editor role to the newly created user:
yc resource-manager folder add-access-binding <folderID> --role storage.editor --subject serviceAccount:<userID>Create Access key for service account. These parameters will be used to log in to the cloud:
yc iam access-key create --service-account-name  d8-code-sa
access_key:
  id: <id>
  service_account_id: <userID>
  created_at: "YYYY-MM-DDTHH:MM:SSZ"
  key_id: <ACCESS_KEY>
secret: <SECRET_KEY>
S3 configuration results in snippet
...
features:
  pages:
    enabled: true
    s3:
      mode: External
      external:
        accessKey: "<REPLACE_ME>" # accesskey.key_id you got at previous step
        provider: YCloud
        secretKey: "<REPLACE_ME>" # secretkey you got at previous step
...
storages:
  s3:
    mode: External
    external:
      provider: YCloud
      accessKey: "<REPLACE_ME>" # accesskey.key_id you got at previous step
      secretKey: "<REPLACE_ME>" # secretkey you got at previous step
      proxyDownload: true
...
S3 policy example
{
  "Version": "2012-10-17",
  "Statement": [
    {
      "Effect": "Allow",
      "Action": [
        "s3:ListAllMyBuckets",
        "s3:GetBucketLocation"
      ],
      "Resource": ["arn:aws:s3:::*"]
    },
    {
      "Effect": "Allow",
      "Action": ["s3:ListBucket"],
      "Resource": [
        "arn:aws:s3:::d8-code-artifacts",
        "arn:aws:s3:::d8-code-ci-secure-files",
        "arn:aws:s3:::d8-code-mr-diffs",
        "arn:aws:s3:::d8-code-git-lfs",
        "arn:aws:s3:::d8-code-packages",
        "arn:aws:s3:::d8-code-terraform-state",
        "arn:aws:s3:::d8-code-uploads",
        "arn:aws:s3:::d8-code-pages",
        "arn:aws:s3:::d8-code-registry",
        "arn:aws:s3:::d8-code-backups",
        "arn:aws:s3:::d8-code-tmp",
        "arn:aws:s3:::d8-code-dependency-proxy"
      ]
    },
    {
      "Effect": "Allow",
      "Action": ["s3:ListBucketMultipartUploads"],
      "Resource": ["arn:aws:s3:::d8-code-registry"]
    },
    {
      "Effect": "Allow",
      "Action": [
        "s3:GetObject",
        "s3:PutObject",
        "s3:DeleteObject"
      ],
      "Resource": [
        "arn:aws:s3:::d8-code-artifacts/*",
        "arn:aws:s3:::d8-code-ci-secure-files/*",
        "arn:aws:s3:::d8-code-mr-diffs/*",
        "arn:aws:s3:::d8-code-git-lfs/*",
        "arn:aws:s3:::d8-code-packages/*",
        "arn:aws:s3:::d8-code-terraform-state/*",
        "arn:aws:s3:::d8-code-uploads/*",
        "arn:aws:s3:::d8-code-pages/*",
        "arn:aws:s3:::d8-code-registry/*",
        "arn:aws:s3:::d8-code-backups/*",
        "arn:aws:s3:::d8-code-tmp/*",
        "arn:aws:s3:::d8-code-dependency-proxy/*"
      ]
    },
    {
      "Effect": "Allow",
      "Action": [
        "s3:AbortMultipartUpload",
        "s3:ListMultipartUploadParts"
      ],
      "Resource": ["arn:aws:s3:::d8-code-registry/*"]
    }
  ]
}
BucketsCountQuotaInCloudExceeded- A Yandex Cloud Object Storage error indicating that the bucket count quota in the cloud has been exceeded.Possible causes: The limit for creating new buckets in the folder or cloud has been reached, incorrect write permissions for the bucket, which triggers an attempt to create it.
Solution: Verify that your account or service account has the required IAM roles for working with the bucket (e.g.,
storage.editororstorage.admin), or increase the bucket count quota in the Yandex Cloud settings.
Setup website metrics
Example based on Yandex.Metrica
Add following snippet to CodeInstance:
...
appConfig:
  contentSecurityPolicy:
    directives:
      default_src: "'self'"
      img_src: "'self' data: blob: https://mc.yandex.ru https://mc.yandex.com"
      script_src: "'self' 'unsafe-inline' 'unsafe-eval' 'nonce-<SCRIPT_ID>' https://mc.yandex.ru https://mc.yandex.az https://mc.yandex.by https://mc.yandex.co.il https://mc.yandex.com https://mc.yandex.com.am https://mc.yandex.com.ge https://mc.yandex.com.tr https://mc.yandex.ee https://mc.yandex.fr https://mc.yandex.kg https://mc.yandex.kz https://mc.yandex.lt https://mc.yandex.lv https://mc.yandex.md https://mc.yandex.tj https://mc.yandex.tm https://mc.yandex.uz https://mc.webvisor.com https://mc.webvisor.org https://yastatic.net"
      connect_src: "'self' https://mc.yandex.ru https://mc.yandex.com"
  customHtmlHeaderTags: >
    <!-- Yandex.Metrika counter -->

    <script type="text/javascript" nonce="<SCRIPT_ID>">
      (function(m,e,t,r,i,k,a){m[i]=m[i]||function(){(m[i].a=m[i].a||[]).push(arguments)};
      m[i].l=1*new Date();
      for (var j = 0; j < document.scripts.length; j++) {if (document.scripts[j].src === r) { return; }}
      k=e.createElement(t),a=e.getElementsByTagName(t)[0],k.async=1,k.src=r,a.parentNode.insertBefore(k,a)})
      (window, document, "script", "https://mc.yandex.ru/metrika/tag.js", "ym");

      ym(100866129, "init", {
            clickmap:true,
            trackLinks:true,
            accurateTrackBounce:true
      });
    </script>

    <noscript><div><img src="https://mc.yandex.ru/watch/<TARGET_ID>"
    style="position:absolute; left:-9999px;" alt="" /></div></noscript>

    <!-- /Yandex.Metrika counter -->
...
Don’t forget replace <SCRIPT_ID> and <TARGET_ID> with your values.