This section describes cluster layouts in AWS infrastructure and their related parameters. The selected layout affects how public IP addresses are assigned, NAT usage, and how nodes are accessed.
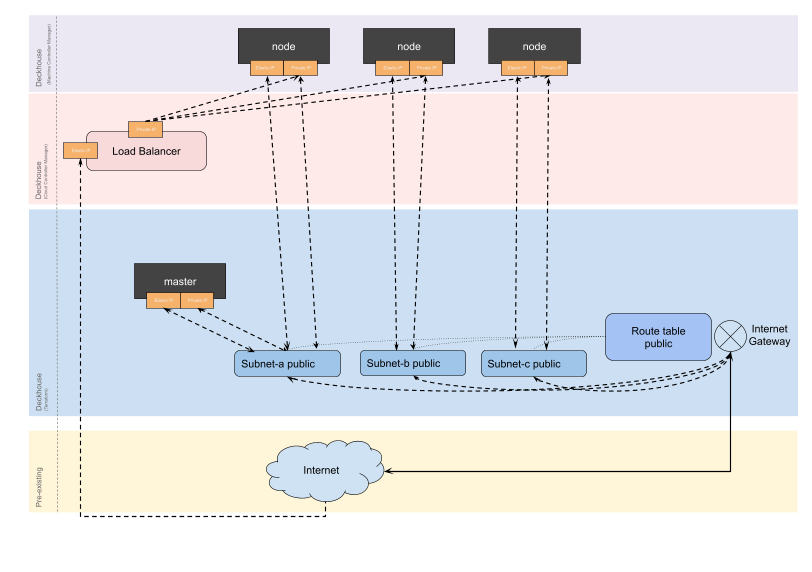
WithoutNAT
This is the recommended layout.
Each node is assigned a public IP address (Elastic IP), and no NAT Gateway is used. This layout allows direct access to nodes via public IP addresses and simplifies outgoing traffic routing.
Example layout configuration:
apiVersion: deckhouse.io/v1
kind: AWSClusterConfiguration
layout: WithoutNAT
vpcNetworkCIDR: "10.241.0.0/16"
nodeNetworkCIDR: "10.241.32.0/20"
sshPublicKey: <SSH_PUBLIC_KEY>
provider:
  providerAccessKeyId: '<AWS_ACCESS_KEY>'
  providerSecretAccessKey: '<AWS_SECRET_ACCESS_KEY>'
  region: eu-central-1
masterNodeGroup:
  # Number of master nodes.
  # If you specify more than one master node, an etcd cluster will be created automatically.
  replicas: 1
  instanceClass:
    # Instance type to use.
    instanceType: m5.xlarge
    # ID of the Amazon Machine Image (AMI).
    # AMI catalog can be found in the AWS Console: EC2 → AMI Catalog.
    ami: ami-0caef02b518350c8b
    # Disk size for the master node VM.
    diskSizeGb: 30
    # Disk type to use for the master node VM.
    diskType: gp3
nodeGroups:
  - name: mydb
    nodeTemplate:
      labels:
        node-role.kubernetes.io/mydb: ""
    replicas: 2
    instanceClass:
      instanceType: t2.medium
      ami: ami-0caef02b518350c8b
    additionalTags:
      backup: srv1
tags:
  team: torpedo
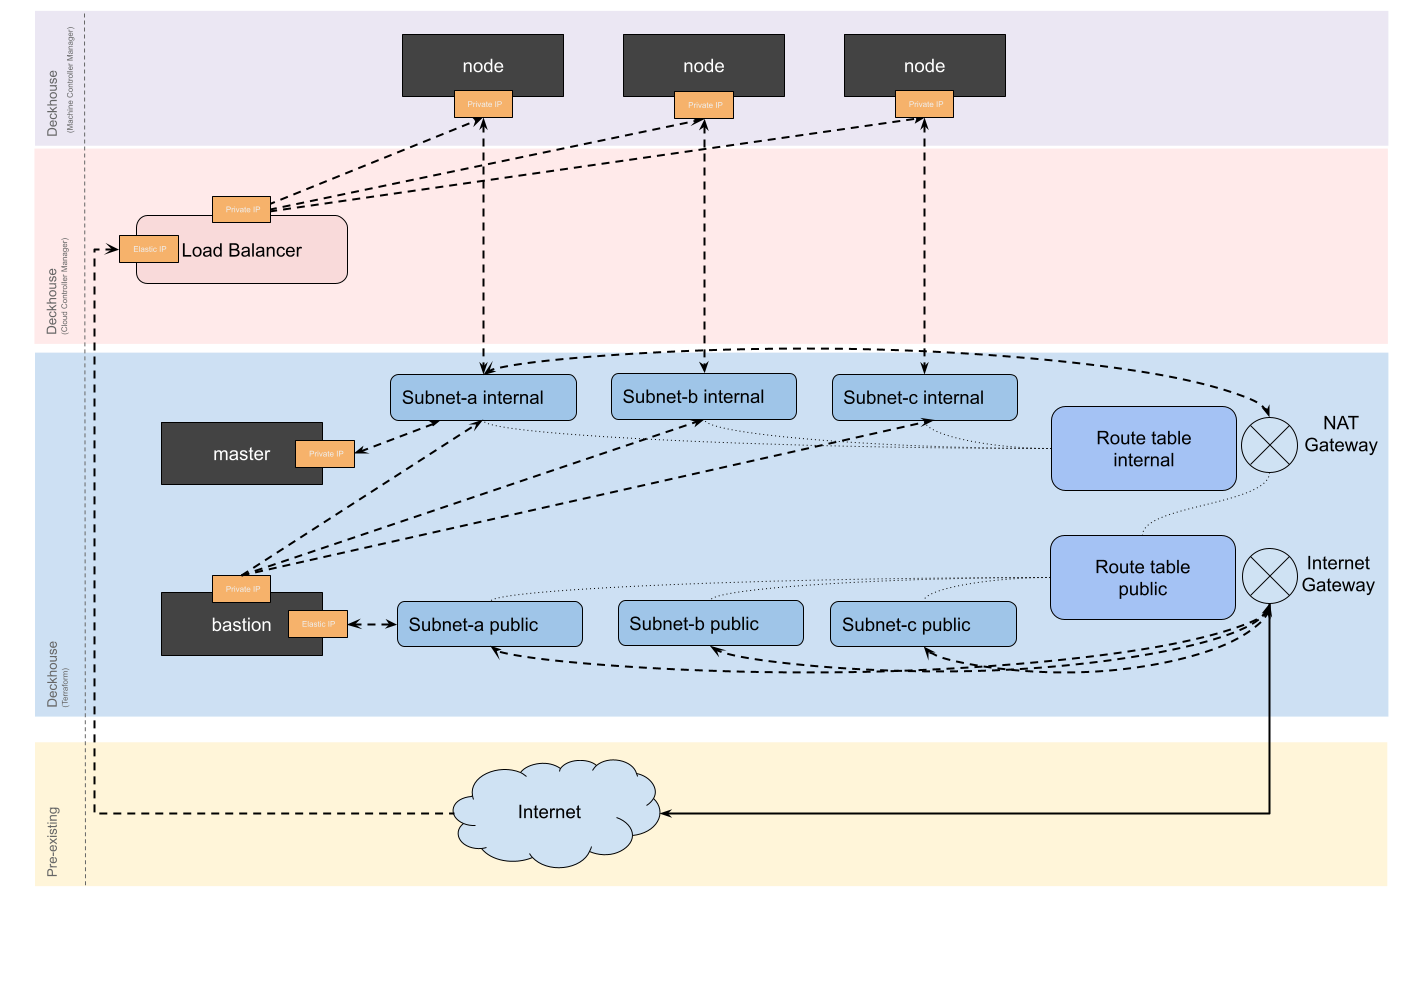
WithNAT
In this layout, the NAT Gateway is always created in zone a.
If cluster nodes are placed in other zones, a failure in zone a may cause the cluster to become unavailable.
A bastion host is required to connect to the nodes.
In this layout, a NAT Gateway is used for accessing the internet, and nodes do not receive public IP addresses. Access to nodes is only possible through a bastion host, which is placed in a separate subnet.
Example layout configuration:
apiVersion: deckhouse.io/v1
kind: AWSClusterConfiguration
layout: WithNAT
provider:
  providerAccessKeyId: '<AWS_ACCESS_KEY>'
  providerSecretAccessKey: '<AWS_SECRET_ACCESS_KEY>'
  region: eu-central-1
withNAT:
  bastionInstance:
    zone: eu-central-1a
    instanceClass:
      instanceType: m5.large
      ami: ami-0caef02b518350c8b
      diskType: gp3
masterNodeGroup:
  # Number of master nodes.
  # If you specify more than one master node, an etcd cluster will be created automatically.
  replicas: 1
  instanceClass:
    # Instance type to use.
    instanceType: m5.xlarge
    # ID of the Amazon Machine Image (AMI).
    # AMI catalog can be found in the AWS Console: EC2 → AMI Catalog.
    ami: ami-0caef02b518350c8b
    # Disk size for the master node VM.
    diskSizeGb: 30
    # Disk type to use for the master node VM.
    diskType: gp3
nodeGroups:
  - name: mydb
    nodeTemplate:
      labels:
        node-role.kubernetes.io/mydb: ""
    replicas: 2
    instanceClass:
      instanceType: t2.medium
      ami: ami-0caef02b518350c8b
    additionalTags:
      backup: me
vpcNetworkCIDR: "10.241.0.0/16"
nodeNetworkCIDR: "10.241.32.0/20"
sshPublicKey: "<SSH_PUBLIC_KEY>"
tags:
  team: torpedo
Defining AWSClusterConfiguration
The AWSClusterConfiguration resource describes the cluster settings and is used by Deckhouse Kubernetes Platform (DKP) to:
- Define the layout and network CIDRs.
- Configure master and worker nodes.
- Specify AWS API connection parameters (such as access keys and region).
- Define common and custom tags.
- Configure the bastion host (for the WithNAT layout).
Required fields:
apiVersion: Must be set todeckhouse.io/v1.kind: Always AWSClusterConfiguration.
Example resource header:
apiVersion: deckhouse.io/v1
kind: AWSClusterConfiguration
To edit this resource in a running cluster, run the following command:
d8 platform edit provider-cluster-configuration
After editing, apply the changes with the following command:
dhctl converge
Internal addressing and subnets
The nodeNetworkCIDR parameter defines the address range to be split among availability zones.
This range must match or be a subset of vpcNetworkCIDR.
Subnets are automatically created based on the number of zones in the region.
Example:
nodeNetworkCIDR: 10.241.1.0/20
vpcNetworkCIDR: 10.241.0.0/16
Security groups
AWS security groups are used to manage incoming and outgoing traffic to virtual machines. In DKP, they can be used to:
- Allow access to cluster nodes from other subnets.
- Open access to applications running on static nodes.
- Restrict or allow access to external resources based on security policies.
DKP does not create security groups automatically. In the cluster configuration, you must specify existing security groups created manually via the AWS Console or other means.
You can assign additional security groups in the following cases:
| Node type | Where to configure |
|---|---|
| Master nodes | In the masterNodeGroup.instanceClass.additionalSecurityGroups field of the AWSClusterConfiguration resource |
| Static worker nodes | In the nodeGroups[].instanceClass.additionalSecurityGroups field of the same resource |
| Ephemeral nodes | In the spec.additionalSecurityGroups field of the AWSInstanceClass object |
In all cases, the additionalSecurityGroups parameter must be an array of strings (AWS security group IDs or names).
If disableDefaultSecurityGroup: true is set, the default security groups will not be created.
When using disableDefaultSecurityGroup: true, you must manually create all required security groups to allow access to cluster nodes. Additionally, you must explicitly specify them in the following parameters:
additionalSecurityGroupsin themasterNodeGroupsection of the AWSClusterConfiguration resource;additionalSecurityGroupsin the AWSInstanceClass resource;additionalSecurityGroupsin thenodeGroups.instanceClasssection.
To configure the security groups used by load balancers, specify them using the service.beta.kubernetes.io/aws-load-balancer-security-groups annotation.
Setting up VPC peering
The following example shows how to set up VPC peering between two sample VPCs: vpc-a and vpc-b.
The IPv4 CIDR blocks of both VPCs must be different.
To configure peering, follow these steps:
- Go to the region where
vpc-ais working. - Navigate to VPC → VPC Peering Connections → Create Peering Connection, then configure the peering:
- Name:
vpc-a-vpc-b. - Fill in “Local” and “Another VPC” sections.
- Name:
- Go to the region where
vpc-bis working. - Navigate to VPC → VPC Peering Connections.
- Select the created connection and click Accept Request.
- In
vpc-a, add routes to thevpc-bCIDR in all route tables via the peering connection. - In
vpc-b, add routes to thevpc-aCIDR in all route tables via the peering connection.
Configuring access via bastion host
To access nodes in private subnets, use the withNAT.bastionInstance parameter in AWSClusterConfiguration.
The bastion host is provisioned with the infrastructure according to the instanceClass settings.
The following scenarios are supported:
- The bastion host already exists in an external VPC:
- Run the base infrastructure bootstrap:
dhctl bootstrap-phase base-infra. - Set up VPC peering between the external and new VPC.
- Continue installation using the bastion host:
dhctl bootstrap --ssh-bastion....
- Run the base infrastructure bootstrap:
- The bastion host is required in the new VPC:
- Run the base infrastructure bootstrap:
dhctl bootstrap-phase base-infra. - Manually launch the bastion host in the
<prefix>-public-0subnet. - Continue installation using the bastion host:
dhctl bootstrap --ssh-bastion....
- Run the base infrastructure bootstrap:
Creating a cluster in a new VPC with an existing bastion host
-
Bootstrap the cluster’s base infrastructure:
dhctl bootstrap-phase base-infra --config config - Set up VPC peering as described above.
-
Continue cluster installation. When prompted about the Terraform cache, answer with
y:dhctl bootstrap --config config --ssh-...
Creating a cluster in a new VPC and deploying a bastion host
-
Bootstrap the cluster’s base infrastructure:
dhctl bootstrap-phase base-infra --config config - Manually launch a bastion host in the
<prefix>-public-0subnet. -
Continue cluster installation. When prompted about the Terraform cache, answer with
y:dhctl bootstrap --config config --ssh-...
Using an existing VPC (existingVPCID)
The existingVPCID parameter in the AWSClusterConfiguration resource lets you use an existing VPC
for DKP cluster deployment instead of automatically creating a new one.
This may be useful when:
- Your AWS infrastructure is already partially deployed.
- You need to integrate with other services or resources in the same VPC.
- Security policies or architectural guidelines prevent automatic VPC creation.
If the existing VPC already has an Internet Gateway, the base infrastructure bootstrap will fail. Reusing an existing Internet Gateway is not supported in the current DKP version.
Compatibility with other parameters:
- If
existingVPCIDis specified, do not specifyvpcNetworkCIDRas they are mutually exclusive. - The
nodeNetworkCIDRparameter can (and should) be specified. It must be a subset of the existing VPC.