Layouts
This section describes the possible node placement layouts in Yandex Cloud infrastructure and the related configuration options. The selected layout affects networking behavior, availability of public IP addresses, outgoing traffic routing, and how nodes are accessed.
Standard
In this layout, nodes will not have public IP addresses and will access the internet via a Yandex Cloud NAT Gateway. The NAT Gateway uses random public IP addresses from dedicated address ranges. Because of this, you cannot whitelist the IP addresses of cloud resources behind a specific NAT Gateway in third-party services.

Example layout configuration:
apiVersion: deckhouse.io/v1
kind: YandexClusterConfiguration
layout: Standard
sshPublicKey: "<SSH_PUBLIC_KEY>"
nodeNetworkCIDR: 192.168.12.13/24
existingNetworkID: <EXISTING_NETWORK_ID>
provider:
  cloudID: <CLOUD_ID>
  folderID: <FOLDER_ID>
  serviceAccountJSON: |
    {
    "id": "id",
    "service_account_id": "service_account_id",
    "key_algorithm": "RSA_2048",
    "public_key": "-----BEGIN PUBLIC KEY-----\nMIIwID....AQAB\n-----END PUBLIC KEY-----\n",
    "private_key": "-----BEGIN PRIVATE KEY-----\nMIIE....1ZPJeBLt+\n-----END PRIVATE KEY-----\n"
    }
masterNodeGroup:
  replicas: 3
  zones:
  - ru-central1-a
  - ru-central1-b
  - ru-central1-d
  instanceClass:
    cores: 4
    memory: 8192
    imageID: <IMAGE_ID>
    externalIPAddresses:
    - "<ZONE_A_EXTERNAL_IP_MASTER_1>"
    - "Auto"
    - "Auto"
    externalSubnetIDs:
    - <ZONE_A_SUBNET_ID>
    - <ZONE_B_SUBNET_ID>
    - <ZONE_D_SUBNET_ID>
    additionalLabels:
      takes: priority
nodeGroups:
- name: worker
  replicas: 2
  zones:
  - ru-central1-a
  - ru-central1-b
  instanceClass:
    cores: 4
    memory: 8192
    imageID: <IMAGE_ID>
    coreFraction: 50
    externalIPAddresses:
    - "Auto"
    - "Auto"
    externalSubnetIDs:
    - <ZONE_A_SUBNET_ID>
    - <ZONE_B_SUBNET_ID>
    additionalLabels:
      role: example
labels:
  billing: prod
dhcpOptions:
  domainName: test.local
  domainNameServers:
  - <DNS_SERVER_1>
  - <DNS_SERVER_2>
WithoutNAT
In this layout, no form of NAT is used, and each node is assigned a public IP address.
DKP does not support security groups, so all cluster nodes will be accessible without connection restrictions.
Example layout configuration:
apiVersion: deckhouse.io/v1
kind: YandexClusterConfiguration
layout: WithoutNAT
provider:
  cloudID: <CLOUD_ID>
  folderID: <FOLDER_ID>
  serviceAccountJSON: |
    {
    "id": "id",
    "service_account_id": "service_account_id",
    "key_algorithm": "RSA_2048",
    "public_key": "-----BEGIN PUBLIC KEY-----\nMIIwID....AQAB\n-----END PUBLIC KEY-----\n",
    "private_key": "-----BEGIN PRIVATE KEY-----\nMIIE....1ZPJeBLt+\n-----END PRIVATE KEY-----\n"
    }
masterNodeGroup:
  replicas: 3
  instanceClass:
    cores: 4
    memory: 8192
    imageID: <IMAGE_ID>
    externalIPAddresses:
    - "Auto"
    - "Auto"
    - "Auto"
    externalSubnetIDs:
    - <ZONE_A_SUBNET_ID>
    - <ZONE_B_SUBNET_ID>
    - <ZONE_D_SUBNET_ID>
    zones:
    - ru-central1-a
    - ru-central1-b
    - ru-central1-d
nodeGroups:
- name: worker
  replicas: 2
  instanceClass:
    cores: 4
    memory: 8192
    imageID: <IMAGE_ID>
    coreFraction: 50
    externalIPAddresses:
    - "<ZONE_A_EXTERNAL_IP_WORKER_1>"
    - "Auto"
    externalSubnetIDs:
    - <ZONE_A_SUBNET_ID>
    - <ZONE_B_SUBNET_ID>
    zones:
    - ru-central1-a
    - ru-central1-b
sshPublicKey: "<SSH_PUBLIC_KEY>"
nodeNetworkCIDR: 192.168.12.13/24
existingNetworkID: <EXISTING_NETWORK_ID>
dhcpOptions:
  domainName: test.local
  domainNameServers:
  - <DNS_SERVER_1>
  - <DNS_SERVER_2>
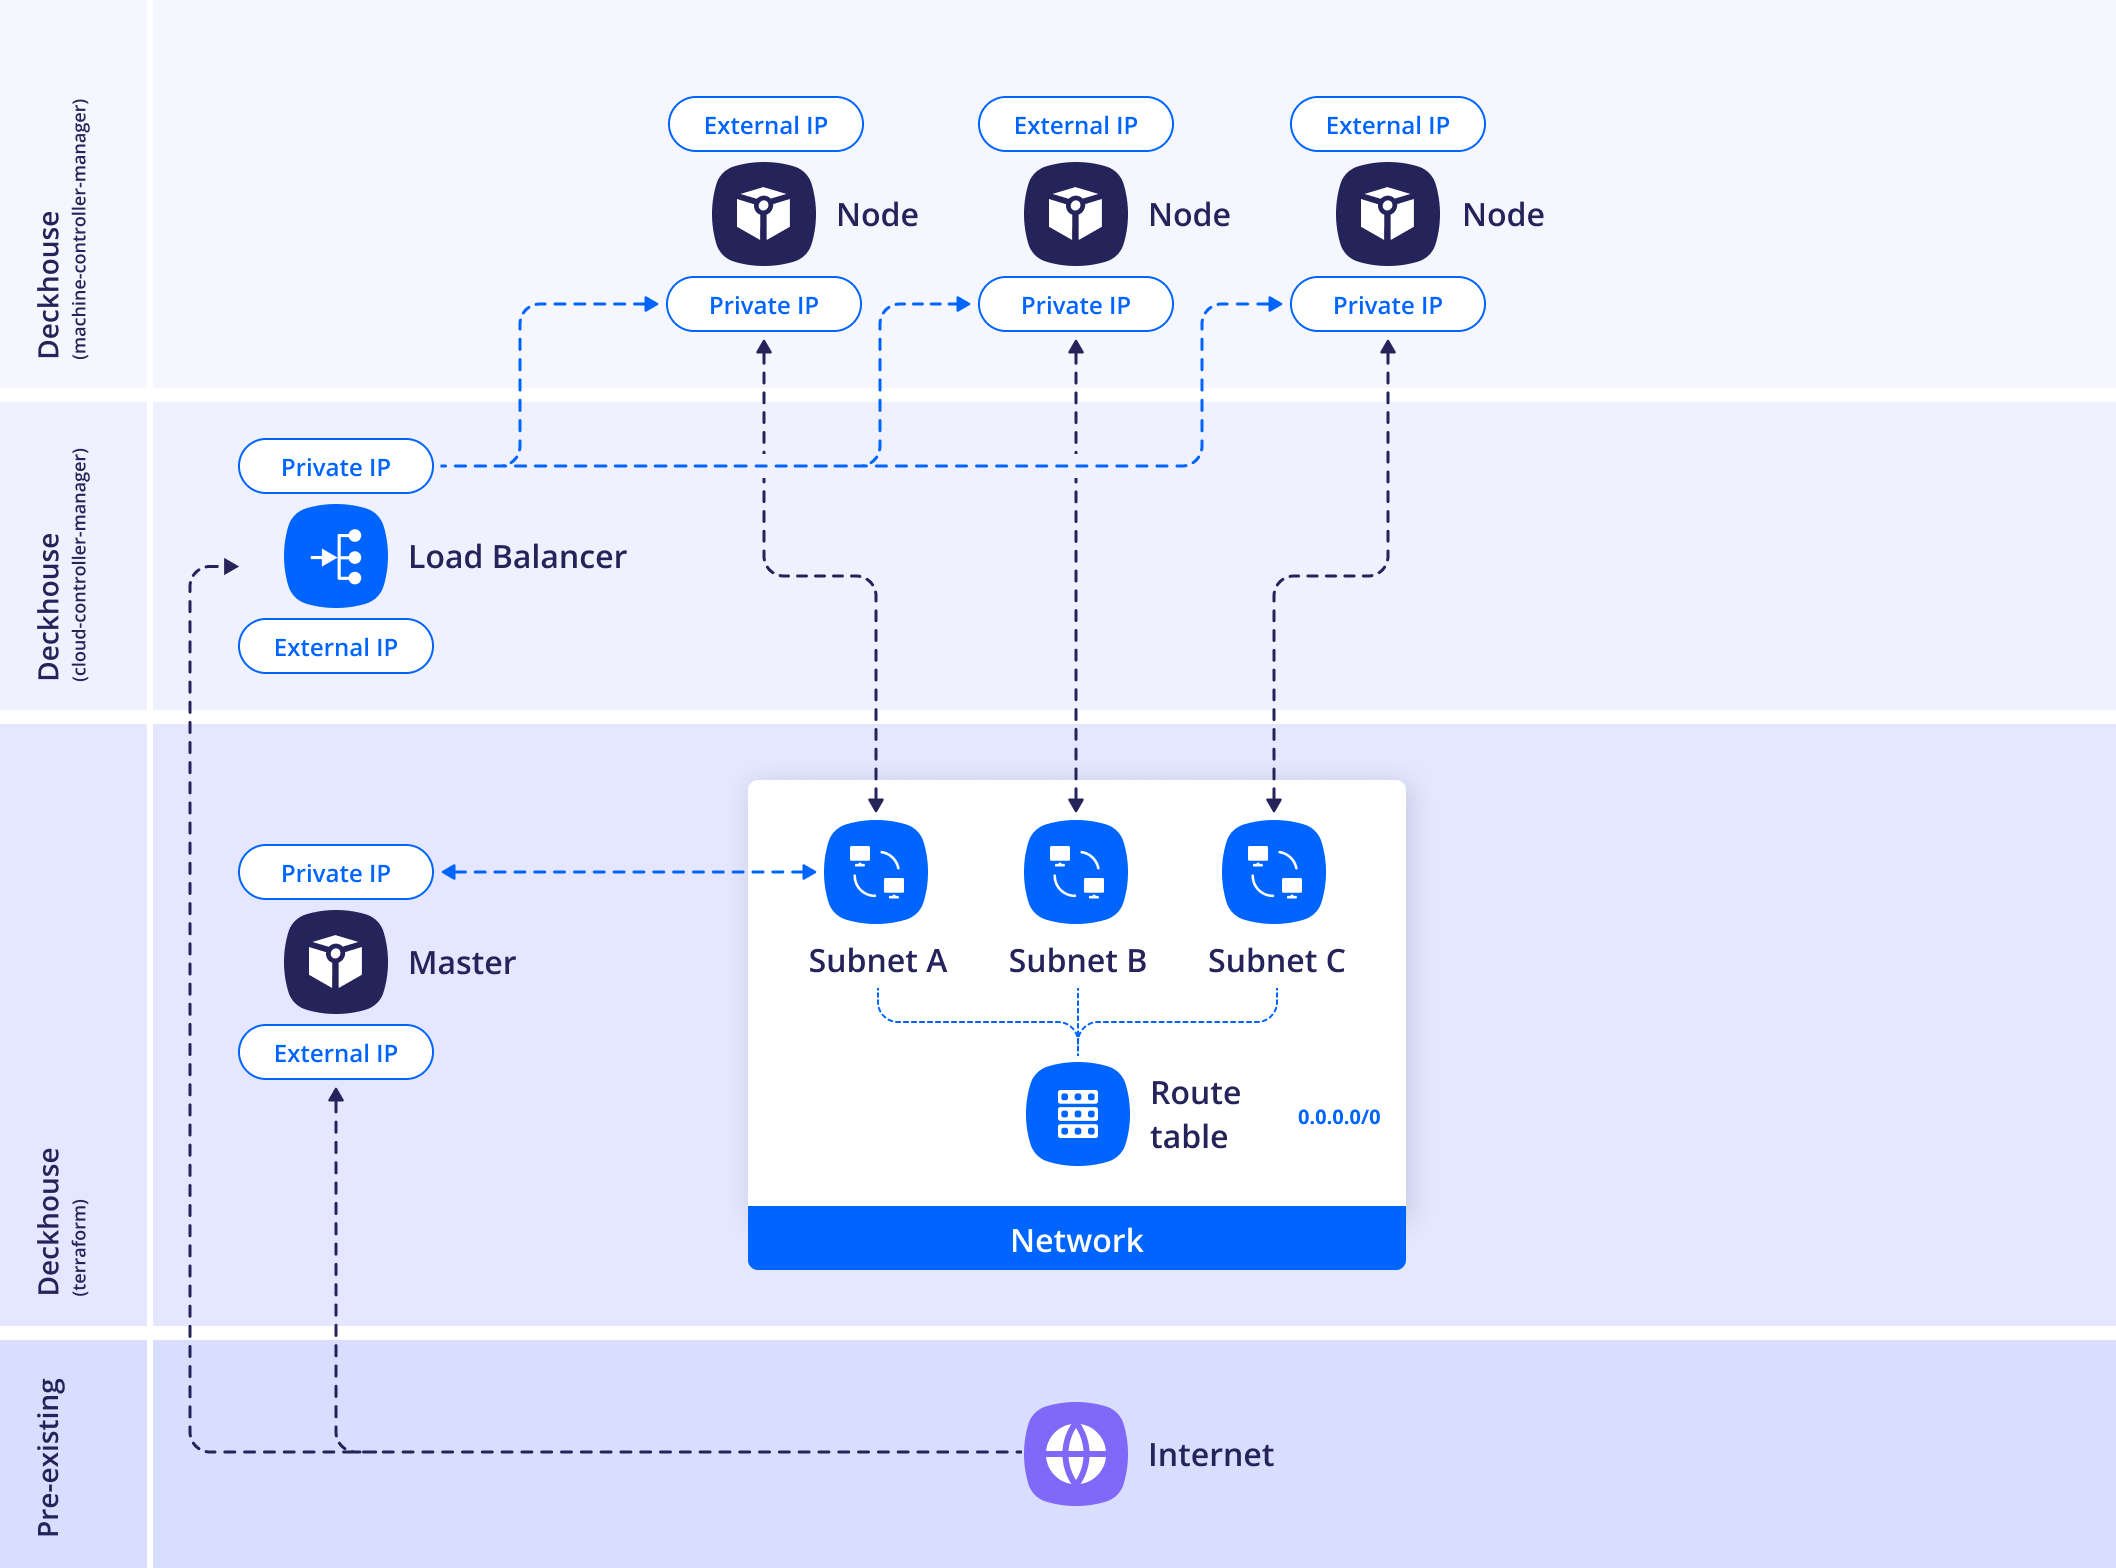
WithNATInstance
In this layout, a NAT instance is created in a separate subnet,
and the route tables of the zone subnets are updated with a 0.0.0.0/0 route using the NAT instance as the next hop.
The subnet is isolated to prevent routing loops and must not overlap with any other networks used in the cluster.
To place the NAT instance in an existing subnet, use the withNATInstance.internalSubnetID parameter.
The instance will be created in the zone corresponding to this subnet.
If you need to create a new subnet, specify the withNATInstance.internalSubnetCIDR parameter.
The NAT instance will be placed in this subnet.
One of the following parameters is required:
withNATInstance.internalSubnetIDorwithNATInstance.internalSubnetCIDR.
If withNATInstance.externalSubnetID is also specified,
the NAT instance will be connected to that subnet via a secondary network interface.

Example layout configuration:
apiVersion: deckhouse.io/v1
kind: YandexClusterConfiguration
layout: WithNATInstance
withNATInstance:
  natInstanceExternalAddress: <NAT_INSTANCE_EXTERNAL_ADDRESS>
  internalSubnetID: <INTERNAL_SUBNET_ID>
  externalSubnetID: <EXTERNAL_SUBNET_ID>
provider:
  cloudID: <CLOUD_ID>
  folderID: <FOLDER_ID>
  serviceAccountJSON: |
    {
    "id": "id",
    "service_account_id": "service_account_id",
    "key_algorithm": "RSA_2048",
    "public_key": "-----BEGIN PUBLIC KEY-----\nMIIwID....AQAB\n-----END PUBLIC KEY-----\n",
    "private_key": "-----BEGIN PRIVATE KEY-----\nMIIE....1ZPJeBLt+\n-----END PRIVATE KEY-----\n"
    }
masterNodeGroup:
  replicas: 1
  instanceClass:
    cores: 4
    memory: 8192
    imageID: <IMAGE_ID>
    externalIPAddresses:
    - "Auto"
    externalSubnetID: <EXTERNAL_SUBNET_ID>
    zones:
    - ru-central1-a
nodeGroups:
- name: worker
  replicas: 1
  instanceClass:
    cores: 4
    memory: 8192
    imageID: <IMAGE_ID>
    coreFraction: 50
    externalIPAddresses:
    - "Auto"
    externalSubnetID: <EXTERNAL_SUBNET_ID>
    zones:
    - ru-central1-a
sshPublicKey: "<SSH_PUBLIC_KEY>"
nodeNetworkCIDR: 192.168.12.13/24
existingNetworkID: <EXISTING_NETWORK_ID>
dhcpOptions:
  domainName: test.local
  domainNameServers:
  - <DNS_SERVER_1>
  - <DNS_SERVER_2>
Defining the YandexClusterConfiguration
To integrate DKP with Yandex Cloud, you need to describe the cluster infrastructure using the YandexClusterConfiguration resource.
YandexClusterConfiguration is a custom resource (CR) that defines the parameters for integrating with Yandex Cloud. DKP uses this resource to:
- Deploy master and worker nodes in the cloud.
- Define the network layout.
- Connect to the Yandex Cloud API using an authorization JSON key.
- Configure subnets, public IP addresses, VM resources, and more.
Required fields:
apiVersion: Must bedeckhouse.io/v1.kind: Must be YandexClusterConfiguration.
Example resource header:
apiVersion: deckhouse.io/v1
kind: YandexClusterConfiguration
To edit this resource in a running cluster, execute the following command:
d8 platform edit provider-cluster-configuration
After making changes, apply them using the following command:
dhctl converge
Configuration example
Below is a minimal example of a YandexClusterConfiguration resource that defines a cluster with one master group and one worker node group. It uses the Standard layout and includes basic compute resource parameters, an SSH public key, and cloud and folder identifiers:
apiVersion: deckhouse.io/v1
kind: YandexClusterConfiguration
layout: Standard
nodeNetworkCIDR: 127.0.0.1/8
labels:
  label-2: b
sshPublicKey: "<SSH_PUBLIC_KEY>"
masterNodeGroup:
  replicas: 1
  instanceClass:
    cores: 4
    memory: 8192
    imageID: fd8nb7ecsbvj76dfaa8b
nodeGroups:
- name: worker
  replicas: 1
  zones:
  - ru-central1-a
  instanceClass:
    cores: 4
    memory: 8192
    imageID: fd8nb7ecsbvj76dfaa8b
    coreFraction: 50
    externalIPAddresses:
    - 198.51.100.5
    - Auto
provider:
  cloudID: "<CLOUD_ID>"
  folderID: "<FOLDER_ID>"
  serviceAccountJSON: |
    {
    "id": "id",
    "service_account_id": "service_account_id",
    "key_algorithm": "RSA_2048",
    "public_key": "-----BEGIN PUBLIC KEY-----\nMIIwID....AQAB\n-----END PUBLIC KEY-----\n",
    "private_key": "-----BEGIN PRIVATE KEY-----\nMIIE....1ZPJeBLt+\n-----END PRIVATE KEY-----\n"
    }
- The master group consists of a single node, with no explicit zone specified.
- The worker group includes one node located in the
ru-central1-azone, with two external IP addresses: one manually specified (198.51.100.5), the other automatically allocated (Auto). - The
serviceAccountJSONfield is specified for accessing the Yandex Cloud API. - The configuration uses the
127.0.0.1/8CIDR subnet and includes a cluster-level labellabel-2: b.
Network parameters and security
This section describes the settings related to addressing, routing, external traffic, and network security in a DKP cluster deployed in Yandex Cloud.
Internal node addressing
The nodeNetworkCIDR parameter defines the IP address range for splitting between availability zones
and applying to the internal node interfaces.
nodeNetworkCIDR: 192.168.12.13/24
Depending on the selected layout (Standard or WithNATInstance), this subnet will be automatically divided into three equal parts for each availability zone:
- ru-central1-a
- ru-central1-b
- ru-central1-d
Each part will be used as a separate internal subnet to which the nodes created in the corresponding zone will be connected.
If you plan to use the same subnet across multiple clusters (for example, with cni-simple-bridge),
keep in mind the limitation: one cluster = one routing table = one subnet.
It impossible to deploy two clusters using cni-simple-bridge in the same subnet.
If you need to reuse subnets across clusters, use cni-cilium.
Assigning external IP addresses and outgoing traffic
The externalSubnetIDs parameter is specified in the masterNodeGroup.instanceClass and nodeGroups.instanceClass sections.
It is an array of Yandex Cloud subnet IDs used to attach external network interfaces to nodes.
This parameter is required when:
- Assigning a public IP address.
- Defining a default route for outgoing traffic from nodes.
- Using
Autovalues in theexternalIPAddressesfield.
Example:
externalSubnetIDs:
  - <RU-CENTRAL1-A-SUBNET-ID>
  - <RU-CENTRAL1-B-SUBNET-ID>
  - <RU-CENTRAL1-D-SUBNET-ID>
The externalSubnetIDs parameter is required for the automatic assignment of public IPs
using externalIPAddresses: ["Auto", ...].
DNS and DHCP settings for internal networks
The dhcpOptions parameter lets you set the DHCP server configuration
applied to all subnets created within the DKP cluster in Yandex Cloud.
Available fields:
domainName: The search domain to be set in the network configuration.domainNameServers: An array of IP addresses of DNS servers to be used as recursive resolvers.
Example:
dhcpOptions:
  domainName: test.local
  domainNameServers:
  - 192.168.0.2
  - 192.168.0.3
The DNS servers listed in domainNameServers must resolve both external and internal domain zones used by the cluster.
Otherwise, service disruptions may occur.
After updating dhcpOptions:
- Force renew the
DHCP leaseon all VMs. - Restart all pods with
hostNetwork: true, such askube-dns, to refresh theresolv.confcontents.
You can apply changes using the following command:
netplan apply
or another appropriate method depending on your system (such as systemd-networkd, dhclient, etc.).
Using pre-existing subnets
The existingZoneToSubnetIDMap parameter lets you specify mappings
between availability zones and pre-created subnets in Yandex Cloud.
This is important if you don’t want DKP to automatically create subnets and prefer to use existing ones.
Example:
existingZoneToSubnetIDMap:
  ru-central1-a: e2lu8r1tbbtryhdpa9ro
  ru-central1-b: e2lu8r1tbbtryhdpa9ro
  ru-central1-d: e2lu8r1tbbtryhdpa9ro
DKP creates a routing table automatically but does not associate it with subnets. You need to do that manually via the Yandex Cloud interface.
Additional external networks
DKP allows you to explicitly specify a list of additional external networks
whose IP addresses will be treated as public (external IPs).
This is configured via the settings.additionalExternalNetworkIDs parameter in the ModuleConfig resource.
This is useful when:
- There are external subnets not listed in
externalSubnetIDsbut that should be treated as external. - You need precise control over how IP addresses are interpreted for load balancing, routing, and status export.
- You use custom network configurations (for example, external NAT gateways or manually reserved IPs).
Example:
apiVersion: deckhouse.io/v1alpha1
kind: ModuleConfig
metadata:
  name: cloud-provider-yandex
spec:
  version: 1
  enabled: true
  settings:
    additionalExternalNetworkIDs:
      - enp6t4sno
If this parameter is not set, DKP will only use the subnets explicitly specified in the YandexClusterConfiguration
(for example, via externalSubnetIDs) to determine whether an IP is public.
Configuring security groups in Yandex Cloud
When a cloud network is created, Yandex Cloud automatically adds a default security group for all attached networks, including the one used by the DKP cluster. This default group includes rules that allow all incoming and outgoing traffic. It applies to all subnets in the cloud network unless a different security group is explicitly assigned to a VM interface.
Do not remove the default rules allowing all traffic until your security group configuration is fully completed. Doing so may disrupt cluster functionality.
Below are general guidelines for configuring security groups. Misconfiguring security group rules may negatively impact on cluster operation. Read through the security group specifics in Yandex Cloud before using them in production environments.
-
Identify the cloud network used by the DKP cluster.
The network name matches the
prefixfield in the ClusterConfiguration resource. You can retrieve it using the following command:kubectl get secrets -n kube-system d8-cluster-configuration -ojson | \ jq -r '.data."cluster-configuration.yaml"' | base64 -d | grep prefix | cut -d: -f2 - In the Yandex Cloud Console, go to the Virtual Private Cloud service and open the Security Groups section.
You should see a security group marked
Default. - Create rules according to the Yandex Cloud instructions.
- Delete the rule that allows all incoming traffic and save your changes.
Configuring access via bastion host
To connect to nodes located in private subnets (for example, when using the Standard or WithNATInstance layout), you can use a bastion host — an intermediary VM with a public IP address that provides SSH access to the nodes.
To configure access, follow these steps:
-
Bootstrap the base infrastructure. Before creating a bastion host, perform the initial installation phase of DKP, which sets up the network infrastructure:
dhctl bootstrap-phase base-infra --config config.yml -
Create a bastion host in Yandex Cloud:
yc compute instance create \
  --name bastion \
  --hostname bastion \
  --create-boot-disk image-family=ubuntu-2204-lts,image-folder-id=standard-images,size=20,type=network-hdd \
  --memory 2 \
  --cores 2 \
  --core-fraction 100 \
  --ssh-key ~/.ssh/id_rsa.pub \
  --zone ru-central1-a \
  --public-address 178.154.226.159
Ensure the IP address specified in
--public-addressis accessible from your network and is correct. -
Start the main DKP bootstrap through the bastion host:
dhctl bootstrap --ssh-bastion-host=178.154.226.159 --ssh-bastion-user=yc-user \
  --ssh-user=ubuntu --ssh-agent-private-keys=/tmp/.ssh/id_rsa --config=/config.yml
Where:
--ssh-bastion-user: User for connecting to the bastion host.--ssh-user: User on the target cluster nodes.--ssh-agent-private-keys: Path to the private SSH key.--config: Path to the DKP configuration file.