Overview
Authentication is the process of verifying a user’s identity. In Deckhouse Kubernetes Platform (DKP), end-to-end authentication is implemented, allowing user verification when accessing any DKP interface or cluster resources. Cluster users can also use DKP to enable authentication for their applications.
Depending on the DKP configuration, authentication can use either an internal user database or external authentication providers. Connecting an external provider allows the use of existing credentials (e.g., LDAP, GitLab, GitHub, etc.) for access. It also enables using the same credentials to authenticate in multiple DKP clusters.
From the perspective of a cluster user or an application developer, it does not matter how the DKP administrator configured authentication — the user interface and authentication methods for applications will be the same.
To use authentication in DKP, configuration is required.
Interface
The authentication interface appears upon the first request to a resource for which authentication is enabled — DKP redirects the user to the authentication page. If the user is already authenticated (e.g., via an external identity provider), DKP will redirect the request back to the original resource, enriched with authentication data. If authentication has not yet occurred, the user will see the authentication interface.
Example of DKP authentication interface:
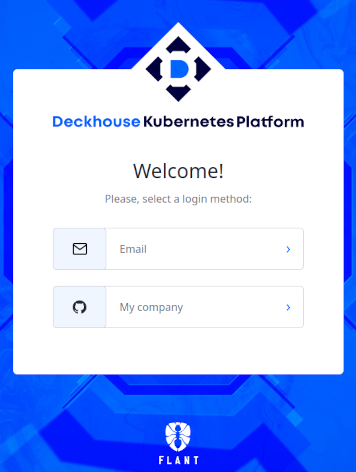
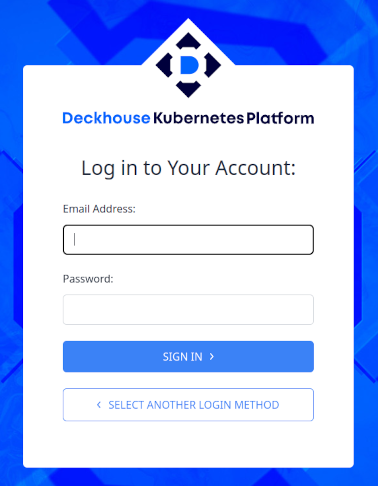
The authentication interface allows users to choose an authentication method if multiple methods are configured. If only one external provider is configured, the user is redirected directly to that provider’s login page. If local users are defined in DKP, the user will be prompted to enter a username and password.
Example of DKP authentication interface with username and password input:
Enabling Authentication in a Web Application
To enable authentication in an application, authentication must first be configured at the Deckhouse Kubernetes Platform level.
DKP supports two ways of enabling authentication for an application, depending on whether the application is capable of handling authentication requests (i.e., acting as an OIDC client) or not. Both approaches are described below.
Authentication via proxy (for applications without OIDC support)
Authentication for applications that cannot independently handle authentication requests is implemented via a special proxy server. This proxy handles both authentication and authorization, hiding the details of these processes from the application.
To enable authentication for an application deployed in DKP, follow these steps:
-
Create a DexAuthenticator object in the application’s namespace.
After the DexAuthenticator object is created, DKP will automatically deploy a set of components required for authentication:
- A Deployment with containers running the authentication/authorization proxy and a Redis data store;
- A Service pointing to the authentication/authorization proxy;
- An Ingress resource that handles requests at
https://<applicationDomain>/dex-authenticatorand forwards them to the proxy Service; - Secrets required for integration with the DKP authentication system.
Example DexAuthenticator manifest:
apiVersion: deckhouse.io/v1
kind: DexAuthenticator
metadata:
  # Prefix for Dex authenticator pod names.
  # For example, if the name prefix is `app-name`, pods will be named like `app-name-dex-authenticator-7f698684c8-c5cjg`.
  name: app-name
  # Namespace where Dex authenticator will be deployed.
  namespace: app-ns
spec:
  # Domain name of your application. Requests to this domain will be redirected to Dex for authentication.
  applicationDomain: "app-name.kube.my-domain.com"
  # Whether to send an `Authorization: Bearer` header to the application. Useful with NGINX's auth_request.
  sendAuthorizationHeader: false
  # Name of the Secret containing the TLS certificate.
  applicationIngressCertificateSecretName: "ingress-tls"
  # Name of the Ingress class to use for the Ingress resource created for the Dex authenticator.
  applicationIngressClassName: "nginx"
  # Duration for which the user session remains active.
  keepUsersLoggedInFor: "720h"
  # List of groups whose users are allowed to authenticate.
  allowedGroups:
  - everyone
  - admins
  # List of IP addresses and CIDRs allowed to authenticate.
  whitelistSourceRanges:
  - 1.1.1.1/32
  - 192.168.0.0/24
Note the following capabilities when configuring authentication:
- The
applicationDomainparameter in the DexAuthenticator defines the main domain of the application. Additional domains can be specified via theadditionalApplications.domainparameter. -
The
whitelistSourceRangesandadditionalApplications.whitelistSourceRangesparameters allow you to restrict authentication access to a specific list of IP addresses.Refer to the Authorization section for information about configuring authorization.
-
Add the following annotations to the application’s Ingress resource:
nginx.ingress.kubernetes.io/auth-signin: https://$host/dex-authenticator/sign_innginx.ingress.kubernetes.io/auth-response-headers: X-Auth-Request-User,X-Auth-Request-Email-
nginx.ingress.kubernetes.io/auth-url: https://<NAME>-dex-authenticator.<NS>.svc.<CLUSTER_DOMAIN>/dex-authenticator/authWhere:
<NAME>is the value ofmetadata.namefrom the DexAuthenticator;<NS>is the value ofmetadata.namespacefrom the DexAuthenticator;-
<CLUSTER_DOMAIN>is the cluster domain (defined in theclusterDomainfield of the ClusterConfiguration, by default it iscluster.local).Example (for a DexAuthenticator named
app-namein namespaceapp-ns):annotations: nginx.ingress.kubernetes.io/auth-signin: https://$host/dex-authenticator/sign_in nginx.ingress.kubernetes.io/auth-url: https://app-name-dex-authenticator.app-ns.svc.cluster.local/dex-authenticator/auth nginx.ingress.kubernetes.io/auth-response-headers: X-Auth-Request-User,X-Auth-Request-Email
Authentication for applications with OIDC support
Applications that can handle authentication requests on their own and act as OIDC clients can directly integrate with the DKP authentication system. In this case, the application independently redirects the user to the login page and processes the received OIDC tokens.
To enable authentication for such an application, follow these steps:
-
Create a DexClient object in the application’s namespace.
After the DexClient object is created, Deckhouse will perform the following:
- An OIDC client will be registered in the DKP authentication system with an identifier (
clientID) in the format:
dex-client-<NAME>@<NAMESPACE>
where<NAME>and<NAMESPACE>aremetadata.nameandmetadata.namespacefrom the DexClient resource; - A
clientSecretwill be automatically generated and saved in a Kubernetes Secret nameddex-client-<NAME>in the same namespace; - You can then use the generated
clientIDandclientSecretto configure OIDC support in your application.
- An OIDC client will be registered in the DKP authentication system with an identifier (
-
Specify the allowed redirect URIs.
These URIs define where the provider (Dex) can redirect the user after successful authentication. -
Restrict access by groups, if needed.
Use theallowedGroupsparameter to specify which user groups are allowed to authenticate via this client. -
(Optional) Define trusted peers.
Use thetrustedPeersparameter to allow authentication delegation between applications.Example of a DexClient object:
apiVersion: deckhouse.io/v1 kind: DexClient metadata: name: myname namespace: mynamespace spec: redirectURIs: - https://app.example.com/callback - https://app.example.com/callback-reserve allowedGroups: - Everyone - admins trustedPeers: - opendistro-sibling -
Retrieve the
clientSecret.
The secret will be automatically created:apiVersion: v1 kind: Secret metadata: name: dex-client-myname namespace: mynamespace type: Opaque data: clientSecret: c2VjcmV0 -
Configure your application as an OIDC client. Use the
clientID,clientSecret, andredirectURIs, along with the Dex provider URL.
You can get the Dex URL (https://dex.<publicDomainTemplate>) using the following command:d8 k -n d8-user-authn get ingress dex -o jsonpath="{.spec.rules[*].host}"