You can reach a virtual machine (VM) directly by its IP address, but this approach has limitations. You have to know the address in advance, it can change when the machine is recreated, and you can’t reach a group of machines at once. Kubernetes services solve all of these tasks.
A service gives a machine or a group of machines a permanent name that hides their addresses, and distributes requests evenly among them. The name is formed as <SERVICE_NAME>.<NAMESPACE>.svc.<CLUSTER_NAME>, and within the same namespace the short form <SERVICE_NAME> is enough.
Which service type to choose depends on the task:
Headless: Direct access to specific machines inside the cluster without a single entry point.ClusterIP: A single internal address with balancing between machines.NodePort: External access through a port on the cluster nodes.LoadBalancer: External access through an external load balancer.
If a connection to the VM from a cluster node doesn’t go through, check the NetworkPolicy in the project. The policy may deny traffic to the machine.
A machine gets into a service by labels. Assign the machine the label that the service looks for:
- Using the CLI
- Using the web interface
Assign the label with the d8 k label command:
d8 k label vm linux-vm app=nginx
Example output:
virtualmachine.virtualization.deckhouse.io/linux-vm labeled
- Go to the Projects tab and select the project you need.
- Go to Virtualization → Virtual machines.
- Select the VM you need from the list and click its name.
- Go to the Meta tab.
- Click Add in the Labels or Annotations section.
- In the window that opens, set the key and the value, then press Enter.
- Click the Save button that appears.
Headless service
A headless service doesn’t allocate an IP address of its own, but returns the addresses of the machines themselves. This way you reach a specific machine by its DNS name without setting up a separate entry point for it. Even for a single machine, this is more convenient than a fixed address, because the name doesn’t change when the machine is recreated.
- Using the CLI
- Using the web interface
Create a service with clusterIP: None:
d8 k apply -f - <<EOF
apiVersion: v1
kind: Service
metadata:
  name: http
  namespace: default
spec:
  clusterIP: None
  selector:
    # The label the service uses to select virtual machines.
    app: nginx
EOF
After creation, you can reach the machine by the http.default.svc name.
- Go to the Projects tab and select the project you need.
- Go to Network → Services.
- Click Create.
- In the form that opens, enter the service name in the Name field.
- In the Type field, select
Headless. - In the Workload selector block, mark the virtual machines you need, and their labels go into the service selector.
- In the Ports block, set the Port and Target port values.
- Click Create.
Service of the ClusterIP type
ClusterIP is the standard service type that provides an internal IP address for accessing the service inside the cluster. This IP address is used to route traffic between different system components and lets virtual machines interact with each other through a predictable and stable address.
- Using the CLI
- Using the web interface
Here is an example of a ClusterIP configuration:
d8 k apply -f - <<EOF
apiVersion: v1
kind: Service
metadata:
  name: http
spec:
  selector:
    # The label the service uses to decide which virtual machine to route traffic to.
    app: nginx
EOF
- Go to the Projects tab and select the project you need.
- Go to Network → Services.
- In the window that opens, configure the service.
- Click Create.
Service of the NodePort type
NodePort is an extension of the ClusterIP service that provides access to the service through a specified port on all cluster nodes. This makes the service reachable from outside the cluster through the combination of a node IP address and a port, and it suits the cases where an external load balancer isn’t needed.
- Using the CLI
- Using the web interface
Create the following service:
d8 k apply -f - <<EOF
apiVersion: v1
kind: Service
metadata:
  name: linux-vm-nginx-nodeport
spec:
  type: NodePort
  selector:
    # The label the service uses to decide which virtual machine to route traffic to.
    app: nginx
  ports:
    - protocol: TCP
      port: 80
      targetPort: 80
      nodePort: 31880
EOF
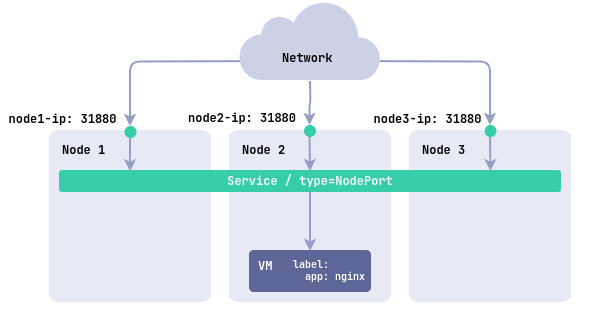
In this example, a service of the NodePort type is created, which opens external port 31880 on all nodes of your cluster. This port routes incoming traffic to internal port 80 of the virtual machine where the Nginx application runs.
If you don’t specify the nodePort value explicitly, an arbitrary port is assigned to the service, and you can see it in the service status right after creation.
- Go to the Projects tab and select the project you need.
- Go to Network → Services.
- Click Create.
- In the form that opens, enter the service name in the Name field.
- In the Type field, select
NodePort. - In the Workload selector block, mark the virtual machines you need.
- In the Ports block, set the Port, Target port, and, if required, Node port values.
- Click Create.
Service of the LoadBalancer type
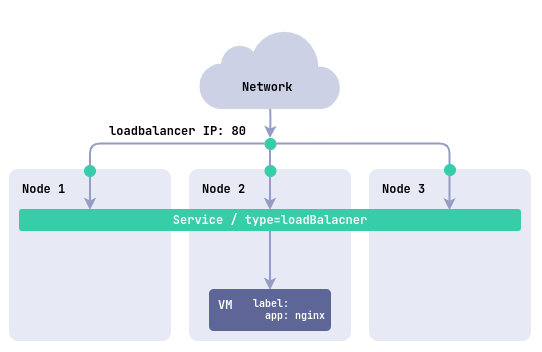
LoadBalancer is a service type that automatically creates an external load balancer with a permanent IP address. This balancer distributes incoming traffic among virtual machines, making the service available from the internet.
- Using the CLI
- Using the web interface
d8 k apply -f - <<EOF
apiVersion: v1
kind: Service
metadata:
  name: linux-vm-nginx-lb
spec:
  type: LoadBalancer
  selector:
    # The label the service uses to decide which virtual machine to route traffic to
    app: nginx
  ports:
    - protocol: TCP
      port: 80
      targetPort: 80
EOF
- Go to the Projects tab and select the project you need.
- Go to Network → Services.
- Click Create.
- In the form that opens, enter the service name in the Name field.
- In the Type field, select
LoadBalancer. - In the Workload selector block, mark the virtual machines you need.
- In the Ports block, set the Port and Target port values.
- Click Create.
- The external address of the service is shown in the service list, in the External IP column.
Publishing VM services with Ingress
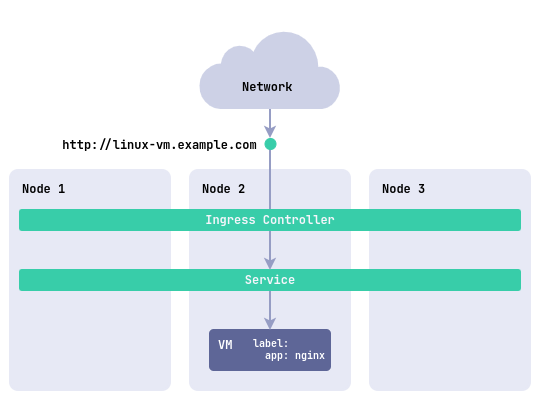
Ingress lets you manage incoming HTTP/HTTPS requests and route them to different servers within your cluster. This is the most suitable method if you want to use domain names and SSL termination to access your virtual machines.
- Using the CLI
- Using the web interface
To publish a virtual machine service through Ingress, create the following resources:
An internal service to bind with Ingress. Example:
d8 k apply -f - <<EOF
apiVersion: v1
kind: Service
metadata:
  name: linux-vm-nginx
spec:
  selector:
    # the label the service uses to decide which virtual machine to route traffic to
    app: nginx
  ports:
    - protocol: TCP
      port: 80
      targetPort: 80
EOF
And an Ingress resource for publishing. Example:
d8 k apply -f - <<EOF
apiVersion: networking.k8s.io/v1
kind: Ingress
metadata:
  name: linux-vm
spec:
  rules:
    - host: linux-vm.example.com
      http:
        paths:
          - path: /
            pathType: Prefix
            backend:
              service:
                name: linux-vm-nginx
                port:
                  number: 80
EOF
- Go to the Projects tab and select the project you need.
- Go to Network → Ingresses.
- Click Create.
- In the Create Ingress form that opens, enter the resource name in the Name field, and select the controller class (
spec.ingressClassName) in the Ingress Class field. - In the Rules block, click Add rule (host) and describe the host and the routing paths to the service you need.
- If HTTPS is required, click Add certificate in the TLS certificates block and specify the secret with the certificate; set the Default backend if required.
- Click Create.