Four mechanisms control where exactly a virtual machine (VM) starts:
.spec.nodeSelector: The simplest way, it selects nodes with the required labels..spec.affinity.nodeAffinity: Sets the preferred nodes for placement..spec.affinity.virtualMachineAndPodAffinity: Places the machine next to other machines and workloads..spec.affinity.virtualMachineAndPodAntiAffinity: On the contrary, spreads them across different nodes.
Conditions can be hard or soft. A hard requiredDuringSchedulingIgnoredDuringExecution condition is mandatory, and the machine doesn’t start if there’s no suitable node. A soft preferredDuringSchedulingIgnoredDuringExecution condition is taken into account by the scheduler where possible.
All rules, including .spec.nodeSelector from the VM class, apply together. If at least one hard condition can’t be met, the machine stays in the Pending phase. So set consistent rules, prefer combinations of labels over single hard restrictions, and keep spare nodes for critical workloads. Also consider the startup order: if one machine has to end up next to another, the second one has to start first. If the nodes you need have taints, add the matching tolerations to the machine.
When you change the placement rules of a running machine and its current node no longer meets the new requirements, in commercial editions Deckhouse Platform (DP) moves the machine by live migration, and in DP Open the changes apply only after a reboot. A machine that already meets the new requirements stays where it is.
To set the placement rules in the web interface:
- Go to the Projects tab and select the project you need.
- Go to Virtualization → Virtual machines.
- Select the VM you need from the list and click its name.
- On the Configuration tab, scroll down to the VM placement toggle.
- Select the input mode. In the Basic setup mode, the rules are set with the Co-location and Separate placement toggles, and in the Editing mode, the placement block is set manually as YAML.
- Enable the toggle you need and fill in the fields. The Select rule mode field offers Required (
requiredDuringSchedulingIgnoredDuringExecution) and Preferred (preferredDuringSchedulingIgnoredDuringExecution), and the Placement rule field offers placement relative to other VMs or relative to node labels. - Click the Save button that appears.
Tolerance to node restrictions
Tolerations let a VM start on nodes with restrictions (taints) that otherwise block scheduling. This is useful when you need to run VMs on special nodes (for example, test nodes) or nodes with certain characteristics.
Here is an example of using tolerations to allow a start on nodes with the node.deckhouse.io/group=:NoSchedule taint:
spec:
  tolerations:
    - key: "node.deckhouse.io/group"
      operator: "Exists"
      effect: "NoSchedule"
Each element of the tolerations list has to match a taint on the node for the VM to be placed on that node.
To view information about cluster nodes (including taints), you need a user role with access to cluster-level resources.
To view the taints on cluster nodes, run the following command:
d8 k get nodes -o custom-columns=NAME:.metadata.name,TAINTS:.spec.taints
To view detailed information about a node, run the following command:
d8 k describe node <NODE_NAME>
Simple label binding (nodeSelector)
nodeSelector is the simplest way to control the placement of virtual machines using a set of labels. It lets you specify which nodes virtual machines can start on by selecting nodes with the required labels.
spec:
  nodeSelector:
    disktype: ssd
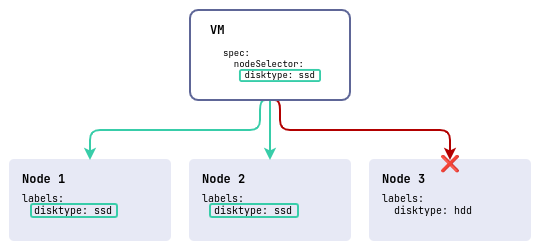
In this example, the cluster has three nodes, two of them with fast disks (disktype=ssd) and one with slow ones (disktype=hdd). The virtual machine is placed only on nodes that have the disktype label with the ssd value.
To perform the operation in the web interface in the placement section:
- Enable the Co-location toggle.
- In the Select rule mode field, select Required.
- In the Placement rule field, select On selected nodes.
- In the How to identify the node group field, select By labels and specify the node labels (for example,
disktype: ssd); the By name option lets you select specific nodes. - Click the Save button that appears.
Preferred binding (Affinity)
Affinity provides more flexible and powerful tools compared to nodeSelector. It lets you set “preferences” and “requirements” for the placement of virtual machines. Affinity supports two kinds: nodeAffinity and virtualMachineAndPodAffinity.
nodeAffinity defines the nodes to run a VM on using label selector expressions.
Here is an example of using nodeAffinity with a hard rule:
spec:
  affinity:
    nodeAffinity:
      requiredDuringSchedulingIgnoredDuringExecution:
        nodeSelectorTerms:
          - matchExpressions:
              - key: disktype
                operator: In
                values:
                  - ssd
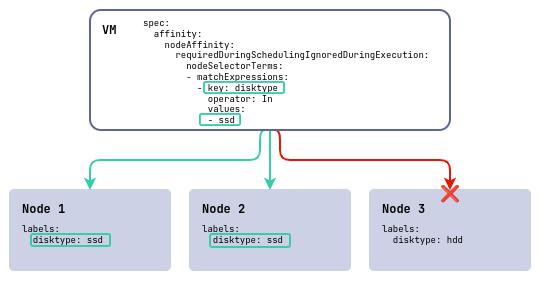
In this example, the cluster has three nodes, two of them with fast disks (disktype=ssd) and one with slow ones (disktype=hdd). The virtual machine is placed only on nodes that have the disktype label with the ssd value.
If you use a soft requirement (preferredDuringSchedulingIgnoredDuringExecution), then when there are no resources to run the VM on nodes with disktype=ssd disks, it’s scheduled on a node with disktype=hdd disks.
virtualMachineAndPodAffinity controls the placement of virtual machines relative to other virtual machines. It lets you set a preference for placing virtual machines on the same nodes where certain virtual machines are already running.
Here is an example of a soft rule:
spec:
  affinity:
    virtualMachineAndPodAffinity:
      preferredDuringSchedulingIgnoredDuringExecution:
        - weight: 1
          podAffinityTerm:
            labelSelector:
              matchLabels:
                server: database
            topologyKey: "kubernetes.io/hostname"
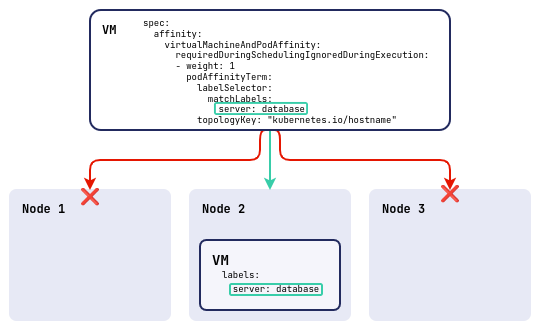
In this example, the virtual machine is placed only on nodes that already run a virtual machine with the server: database label. The rule is soft (preferred), so if there are no such nodes, the machine starts on any suitable one.
To place VMs across availability zones (instead of pinning them to specific nodes), set topologyKey: topology.kubernetes.io/zone (Placing VMs across availability zones).
To set “preferences” and “requirements” for the placement of virtual machines in the web interface, in the placement section:
- Enable the Co-location toggle, which corresponds to the
spec.affinity.virtualMachineAndPodAffinitysettings. - In the Select rule mode field, select Required or Preferred.
- In the Placement rule field, select On nodes with selected VMs.
- In the Select labels field, select the labels of the VMs you need from the list or enter your own in the
key: valueformat. - Click the Save button that appears.
Avoiding co-location (AntiAffinity)
AntiAffinity is used to prevent VMs from being placed together on nodes. It’s useful for fault tolerance or load balancing.
Be careful with hard requirements in small clusters that have few nodes to run virtual machines on. If the virtualMachineAndPodAntiAffinity parameter with the requiredDuringSchedulingIgnoredDuringExecution type is used for virtual machines, it means that each VM copy has to be placed on a separate node. With a limited number of nodes in the cluster, this can lead to a situation where some VMs can’t start because of a lack of available nodes.
The terms Affinity and AntiAffinity describe the relationships between virtual machines. There’s no such antonym for nodes, but you can achieve the same result through nodeAffinity with the NotIn operator, excluding the nodes you need.
Here is an example of using virtualMachineAndPodAntiAffinity:
spec:
  affinity:
    virtualMachineAndPodAntiAffinity:
      requiredDuringSchedulingIgnoredDuringExecution:
        - labelSelector:
            matchLabels:
              server: database
          topologyKey: "kubernetes.io/hostname"
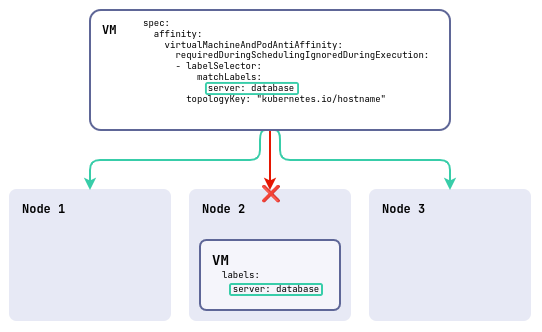
In this example, the virtual machine being created isn’t placed on the same node as a virtual machine with the server: database label.
To place VMs across availability zones (instead of pinning them to specific nodes), set topologyKey: topology.kubernetes.io/zone (Placing VMs across availability zones).
To configure the prevention of co-locating VMs on nodes in the web interface, in the placement section:
- Enable the Separate placement toggle, which corresponds to the
spec.affinity.virtualMachineAndPodAntiAffinitysettings. - In the Select rule mode field, select Required or Preferred.
- In the Placement rule field, select On nodes with selected VMs.
- In the Select labels field, select the labels of the VMs you don’t want the machine placed next to, or enter your own label in the
key: valueformat. - Click the Save button that appears.
Placing VMs across availability zones
Placement rules work not only at the node level, but also at the availability zone level.
Availability zones have to be configured on the cluster nodes in advance. To do this, the nodes have to have the topology.kubernetes.io/zone label with the availability zone specified.
The examples above use topologyKey: "kubernetes.io/hostname", which places VMs on the same node. To place VMs across availability zones instead of nodes, use topologyKey: "topology.kubernetes.io/zone".
With Affinity and topologyKey: "topology.kubernetes.io/zone", VMs are placed in the same availability zone where a virtual machine with the specified labels is present.
With AntiAffinity and topologyKey: "topology.kubernetes.io/zone", VMs aren’t placed in the same availability zone as a virtual machine with the specified labels. This is useful for fault tolerance when distributing VMs across different availability zones.
To view the availability zones on cluster nodes (if those zones are set), run the following command:
d8 k get nodes -o custom-columns=NAME:.metadata.name,ZONE:.metadata.labels.topology\.kubernetes\.io/zone