A disk stores virtual machine (VM) data, including the operating system and application files. A disk is described by the VirtualDisk resource, and its specification consists of two blocks:
persistentVolumeClaim: Storage parameters, that is, the StorageClass and the size.dataSource: The data source, which can be an image, another disk, or a snapshot.
Without the dataSource block, an empty disk is created, and then you have to specify at least the size in persistentVolumeClaim. If a source is set, you can omit the persistentVolumeClaim block, and Deckhouse Platform (DP) takes the size from the source and picks the storage class based on it too. When no class can be picked, DP uses the cluster-wide default StorageClass or the class set for disks in the module settings.
The PHASE column in the d8 k get vd output shows the progress of disk creation; for its values, see the .status.phase field. If a disk stays not ready for a long time, the .status.conditions block tells you the reason.
Until a disk reaches the Ready phase, you can change any field of the .spec block, and the creation restarts after the change. For a ready disk, only the size and the storage class remain editable, in the .spec.persistentVolumeClaim.size and .spec.persistentVolumeClaim.storageClassName parameters.
You can’t create a disk from an ISO image.
How storage affects a disk
Disk behavior depends on the storage behind the selected StorageClass. The differences show up in two properties.
The volume type determines the format in which DP creates the disk. On file system volumes (FileSystem, for example NFS), the disk is created in the qcow2 format, and on block devices (Block, for example iSCSI or Ceph RBD), data is written directly. Some storage types support both.
The volume binding mode determines when the disk is created:
-
Immediate: The disk is created right away, independently of virtual machines, and you can attach it to a machine on any cluster node.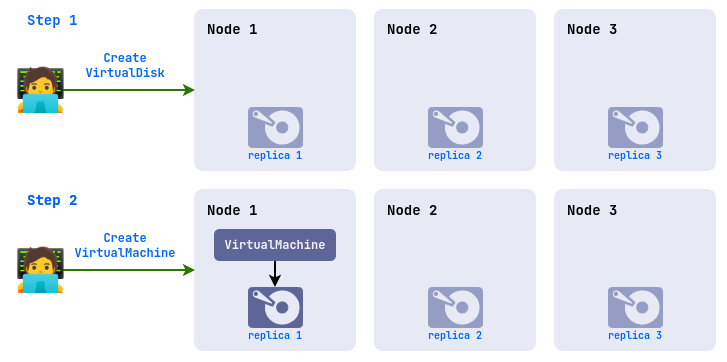
-
WaitForFirstConsumer: The disk is created only after it’s attached to a virtual machine, and it’s placed on the node where that machine starts.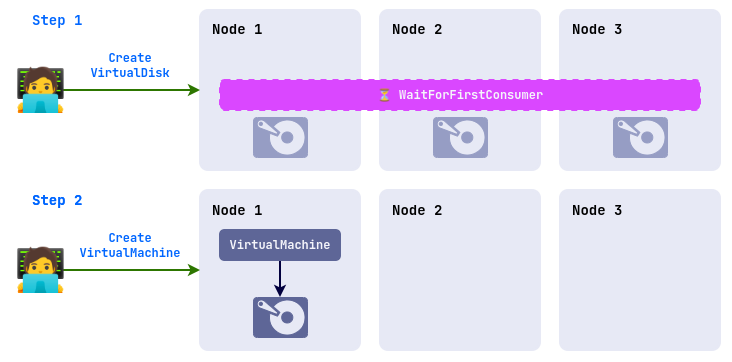
DP determines the remaining parameters, including the disk format, on its own from the capabilities of the selected StorageClass.
To view the available storage types, run the following command:
d8 k get storageclass
Example output:
NAME                   PROVISIONER                           RECLAIMPOLICY   VOLUMEBINDINGMODE      ALLOWVOLUMEEXPANSION   AGE
rv-thin-r1 (default)   replicated.csi.storage.deckhouse.io   Delete          Immediate              true                   48d
rv-thin-r2             replicated.csi.storage.deckhouse.io   Delete          Immediate              true                   48d
nfs-4-1-wffc           nfs.csi.k8s.io                        Delete          WaitForFirstConsumer   true                   30d
In the web interface, the same list is available on the System tab, in Storage → Storage classes.
Creating an empty disk
An empty disk is what you need to install an operating system on it or to store data separately from the system disk.
- Using the CLI
- Using the web interface
-
Create a VirtualDisk resource with the size and the storage class:
d8 k apply -f - <<EOF apiVersion: virtualization.deckhouse.io/v1alpha2 kind: VirtualDisk metadata: name: blank-disk spec: # Disk storage parameters. persistentVolumeClaim: # Specify the name of your StorageClass. storageClassName: rv-thin-r2 size: 100Mi EOF -
Verify that the disk is created:
d8 k get vd blank-diskExample output:
NAME         PHASE   CAPACITY   VIRTUALMACHINE   AGE
blank-disk   Ready   100Mi                       1m2s
You can skip this step and create the disk while creating the VM.
- Go to the Projects tab and select the project you need.
- Go to Virtualization → Disks.
- Click Create.
- In the form that opens, enter
blank-diskin the Disk name field. - In the Size field, specify the size with units, for example
100Mi. - In the Storage class field, select a StorageClass or keep the default one.
- Click Create.
- Check the disk status on its page.
Creating a disk from an image
You can fill a disk with data from an image created earlier, either a project VirtualImage or a cluster ClusterVirtualImage.
Specifying the disk size is optional. If you don’t set it, DP creates the disk exactly at the unpacked size of the image, and if you do set it, the size must be no smaller than the unpacked one.
- Using the CLI
- Using the web interface
-
Check the unpacked image size in the
UNPACKEDSIZEcolumn:d8 k get vi ubuntu-24-04 -o wideExample output:
NAME PHASE CDROM PROGRESS STOREDSIZE UNPACKEDSIZE REGISTRY URL TARGETPVC AGE ubuntu-24-04 Ready false 100% 285.9Mi 2.5Gi dvcr.d8-virtualization.svc/vi/default/ubuntu-24-04:eac95605-7e0b-4a32-bb50-cc7284fd89d0 122m -
Create a disk with a size larger than the unpacked one:
d8 k apply -f - <<EOF apiVersion: virtualization.deckhouse.io/v1alpha2 kind: VirtualDisk metadata: name: linux-vm-root spec: # Disk storage parameters. persistentVolumeClaim: # The size is larger than the unpacked image size. size: 10Gi # Specify the name of your StorageClass. storageClassName: rv-thin-r2 # The source the disk is created from. dataSource: type: ObjectRef objectRef: kind: VirtualImage name: ubuntu-24-04 EOF -
Create a second disk without specifying the size:
d8 k apply -f - <<EOF apiVersion: virtualization.deckhouse.io/v1alpha2 kind: VirtualDisk metadata: name: linux-vm-root-2 spec: # Disk storage parameters. persistentVolumeClaim: # Specify the name of your StorageClass. storageClassName: rv-thin-r2 # The source the disk is created from. dataSource: type: ObjectRef objectRef: kind: VirtualImage name: ubuntu-24-04 EOF -
Compare the sizes of the created disks:
d8 k get vdExample output:
NAME              PHASE   CAPACITY   VIRTUALMACHINE   AGE
linux-vm-root     Ready   10Gi                        7m52s
linux-vm-root-2   Ready   2590Mi                      7m15s
The first disk got the specified 10 GiB, and the second one got the unpacked image size.
You can skip this step and create the disk while creating the VM.
- Go to the Projects tab and select the project you need.
- Go to Virtualization → Disks.
- Click Create.
- In the form that opens, enter
linux-vm-rootin the Disk name field. - In the Source field, select the image you need from the drop-down list.
- If required, specify a larger size in the Size field or keep the default value.
- In the Storage class field, select a StorageClass or keep the default one.
- Click Create.
- Check the disk status on its page.
Uploading a disk from the command line
If the image file is on your computer, upload it straight into a disk. DP creates a temporary upload endpoint for this and waits for the data.
- Using the CLI
- Using the web interface
-
Create a VirtualDisk resource with the
Uploadsource:d8 k apply -f - <<EOF apiVersion: virtualization.deckhouse.io/v1alpha2 kind: VirtualDisk metadata: name: uploaded-disk spec: dataSource: type: Upload EOFThe resource moves to the
WaitForUserUploadphase and is ready to accept the file. Start the upload within 10 minutes, otherwise the resource moves to theFailedphase and you have to create it again. -
Get the addresses that accept the file:
d8 k get vd uploaded-disk -o jsonpath="{.status.imageUploadURLs}" | jqExample output:
{
  "external": "https://virtualization.example.com/upload/<SECRET_URL>",
  "inCluster": "http://10.222.165.239/upload"
}
Use the
inClusteraddress if you upload the file from one of the cluster nodes, andexternalin all other cases. -
Upload the file to the selected address:
curl https://virtualization.example.com/upload/<SECRET_URL> --progress-bar -T <IMAGE_FILE> | catWhere
<SECRET_URL>is the address from the previous step, and<IMAGE_FILE>is the path to the image file on your computer. -
Verify that the disk has reached the
Readyphase:d8 k get vd uploaded-diskExample output:
NAME            PHASE   CAPACITY   VIRTUALMACHINE   AGE
uploaded-disk   Ready   3Gi                         7d23h
- Go to the Projects tab and select the project you need.
- Go to Virtualization → Disks.
- Click Create.
- In the form that opens, enter the disk name in the Disk name field.
- In the Disk block, select Upload in the Data source field.
- Drag the file to the highlighted area, or click it and select the file on your computer.
- In the Size field, specify the disk size, and in the Storage class field, select a StorageClass.
- Click Create.
If the selected storage class uses the
WaitForFirstConsumervolume binding mode, the Upload option isn’t available. Without a consumer, the disk isn’t created and there’s nowhere to upload the file, so select a storage class with theImmediatemode or upload the data as an image.For the same reason, an empty disk created in advance with such a storage class stays in the “WAITING FOR VM” status and isn’t offered in the Disks / Images window when attaching to a virtual machine, because only a ready disk can be selected. Create such disks right from the virtual machine form with the Blank or Create from options.
Disk properties are convenient to review in the web interface, in Virtualization → Disks:
- The list shows the disk name, status, size, storage class in the Class column, the virtual machine that uses the disk in the Used by column, and the resource age.
- On the disk page, the Configuration tab shows the data source, size, storage class, and the list of VMs in the Used in row.
- The Diagnostics tab shows the PVC name, its phase, size, storage class, PV name, and age, as well as the duration of the disk creation stages in the Diagnostics summary block.