Live migration of virtual machines (VMs) is the process of moving a running VM from one physical node to another without shutting it down. This feature plays a key role in managing virtualized infrastructure, keeping applications running during maintenance, load balancing, or updates.
How live migration works
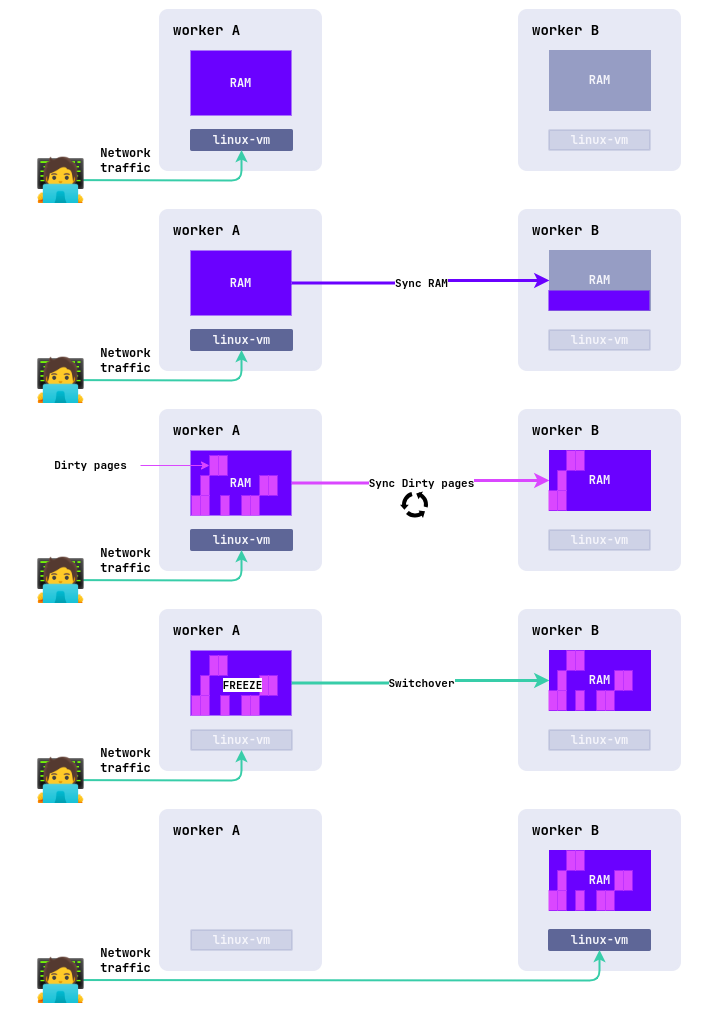
The live migration process consists of several stages:
-
A new VM is created on the target node in a paused state. Its configuration (CPU, disks, network) is copied from the source node.
-
All the RAM of the VM is copied to the target node over the network. This is called the initial transfer.
-
While the memory is being transferred, the VM keeps running on the source node and can modify some memory pages. Such pages are called dirty pages, and the hypervisor marks them.
-
After the initial transfer, only the modified pages are sent again. This process repeats in several cycles:
- The higher the load on the VM, the more dirty pages appear, and the longer the migration takes.
- With good network bandwidth, the amount of unsynchronized data gradually decreases.
-
When the number of dirty pages becomes minimal, the VM on the source node is paused (usually for 100 milliseconds):
- The remaining memory changes are transferred to the target node.
- The state of the CPU, devices, and open connections is synchronized.
- The VM starts on the new node, and the original copy is deleted.
Until the VM switches to the new node (step 5), the VM on the source node keeps running as usual and serving users.
Requirements and limitations
A live migration doesn’t always succeed. The following is what has to match on the source and target nodes.
Disk availability. All disks attached to the VM have to be available on the target node. With network storage such as NFS or Ceph, this requirement is met on its own, because the disks are visible from all cluster nodes. Local storage needs to be able to create a new local volume on the target node, and if such storage exists only on the source node, the migration doesn’t run.
Attaching and detaching disks. While a migration is preparing the target node, disks can be neither attached to the machine with a VirtualMachineBlockDeviceAttachment resource nor detached by deleting one. An attachment stays in the Pending phase with the BlockedByMigration reason in the Attached condition, and a deleted one stays in the Terminating phase, until the migration completes. While the migration is still queued and the target node isn’t being prepared yet, for example when it waits for the project quota to free up, attaching and detaching work as usual. The reverse is also true, a migration waits for an attach or detach request that has already been sent, and all that time the VirtualMachineOperation resource stays in the Pending phase with the WaitingForBlockDeviceAttachment reason. If the request doesn’t complete within 5 minutes, the operation fails.
Network bandwidth. The slower the network, the more memory synchronization iterations the migration goes through and the longer the VM downtime at the final stage, and in the worst case the migration doesn’t fit into the timeout. The migration policy controls how the migration runs, and the AutoConverge mechanism helps with a slow network.
Kernel versions. All cluster nodes have to run the same Linux kernel version. Differences in versions lead to incompatible interfaces, system calls, and resource handling, which breaks the migration.
CPU compatibility. The CPU type in the virtual machine class sets the CPU requirements. The Host type allows migration only between nodes with similar CPUs, so it works neither between Intel and AMD nor between different CPU generations with different instruction sets. The HostPassthrough type requires exactly the same CPU on the target node as on the source one. To let a machine migrate between nodes with different CPUs, set the Discovery, Model, or Features type in the class.
Duration. A migration has a completion timeout of 800 seconds per gibibyte of VM memory, plus 800 seconds per gibibyte of disk when the disks move along with it. For example, a machine with 4 GiB of memory and a 20 GiB disk gets 800 × (4 + 20) = 19200 seconds, or about 5.3 hours. A migration that doesn’t fit into this time is considered failed and is canceled, which happens with a slow network or a high load on the VM.
Checking whether a VM is ready for migration
The type: Migratable condition in the VM status shows whether the VM can be moved by live migration. It takes into account both the VM itself (disks, passed-through devices, CPU type) and the state of the cluster (whether there’s a node to move it to). The True value answers the question of whether the move is possible, not whether the VM will move at this very moment, so look at the reason along with the value.
The overall picture for all VMs:
d8 k get vm -o wide
The value in the MIGRATABLE column shows the result, and the condition describes the reason:
d8 k get vm <VM_NAME> -o json | jq '.status.conditions[] | select(.type=="Migratable")'
The most common reasons:
| Reason | What it means | What to do |
|---|---|---|
VirtualMachineMigratable |
The VM can be moved by live migration | — |
VirtualMachineNoMigrationTarget |
The VM is capable of migrating, but no other cluster node can host it | Check the spec.nodeSelector, spec.affinity, and spec.tolerations of the VM and the same parameters of its VirtualMachineClass |
VirtualMachineWaitingForMigrationTarget |
The VM is capable of migrating and suitable nodes exist in the cluster, but none of them can accept it right now, because the nodes are unschedulable, not ready, or don’t run virtualization | If maintenance is in progress, migration becomes possible as soon as such a node returns. In other cases, check why the nodes are unschedulable and whether virtualization runs on them |
VirtualMachineDisksNotMigratable |
The VM disks are in storage available from only one node | Move the disks to storage with the ReadWriteMany access mode |
VirtualMachineHostDevicesNotMigratable |
The VM has a device attached that can’t be moved to another node | Detach the device and restart the VM |
VirtualMachineNonMigratable |
The VM can’t be moved by live migration, and the reason is in the message field of the condition. |
Read the message of the condition. If it’s about the CPU, use the Discovery, Model, or Features types in the VM class |
VirtualMachineDisksShouldBeMigrating |
The VM can be moved, and its local disks are moved along with it | — |
Moving disks along with a VM is available in commercial Deckhouse Platform (DP) editions, so the VirtualMachineDisksShouldBeMigrating reason appears only there. In DP Open, a VM with disks in storage available from one node gets the VirtualMachineDisksNotMigratable reason.
Specifics of the Migratable condition
A few specifics of the condition that matter when planning maintenance and reading the status:
-
The
Migratablecondition describes not only the VM but the cluster itself. If you remove the required label from the only suitable node without changing the VM parameters, the condition still becomesFalse. When a suitable node appears, the condition returns toTrue. -
When a node is made unschedulable, the VM stays capable of migrating. Cordoning, rebooting, and node maintenance happen on their own, so the condition stays
Trueand only the reason changes toVirtualMachineWaitingForMigrationTarget. Otherwise, planned maintenance of a neighboring node would turn a CPU or memory change into a VM restart. In DP Open, such changes require a reboot in any case. -
The
Truevalue means that the VM is capable of migrating, not that it’s ready to migrate right now. Before a migration, look at the reason. TheVirtualMachineMigratablereason means there’s a node to migrate to, andVirtualMachineWaitingForMigrationTargetmeans there’s no suitable node at this moment. Thed8_virtualization_virtualmachine_migratablemetric carries the same answer in thereasonlabel, so a dashboard that filters VMs only by value counts waiting VMs together with those ready to migrate. -
A migration started with the
VirtualMachineWaitingForMigrationTargetreason doesn’t wait for a node indefinitely. If the target pod can’t be scheduled within five minutes, the operation fails, and theCompletedcondition of the VirtualMachineOperation resource gets theTargetUnschedulablereason. If maintenance drags on, restart the migration. -
A stopped VM has no such condition, because the capability to migrate is computed only for a running VM. During the downtime, the disks could have moved to different storage and a device could have been detached.
-
In DP Open, placement changes are taken into account after the VM restarts. While the VM runs, it uses the parameters it was started with, and the condition describes exactly those. New
nodeSelector,affinity, or VM class values get into the calculation only after a restart. In commercial DP editions, such changes apply without a restart and get into the condition calculation right away. -
Local disks don’t prevent migration, but a node is still needed. In commercial DP editions, a VM with local disks moves along with them, so the condition stays
Truewith theVirtualMachineDisksShouldBeMigratingreason. But if no cluster node matches its placement rules, the condition isFalse, because there’s nowhere to move the disks along with the VM.
Starting a live migration
A migration is started by the Migrate operation of the VirtualMachineOperation resource, which you create manually or with a d8 command. You can interrupt the migration while it’s in the Pending or InProgress phase by deleting that resource.
Targeted migration to a specific node is available in commercial DP editions.
To keep the virtual machine schedulable, the node selector must not conflict with other placement rules, such as the virtual machine affinity, node selectors, and the node selector rules of the virtual machine class.
- Using the CLI
- Using the web interface
Before starting the migration, check the current status of the virtual machine:
d8 k get vm
Example output:
NAME       PHASE     UPTIME   NODE           IPADDRESS     AGE
linux-vm   Running   79m      virtlab-pt-1   10.66.10.14   79m
At this moment it runs on the virtlab-pt-1 node.
To migrate a virtual machine from one node to another, taking its placement requirements into account, use the following command:
d8 v migrate -n <NAMESPACE> <VM_NAME> [--force] [--target-node-name string]
Running this command creates a VirtualMachineOperations resource.
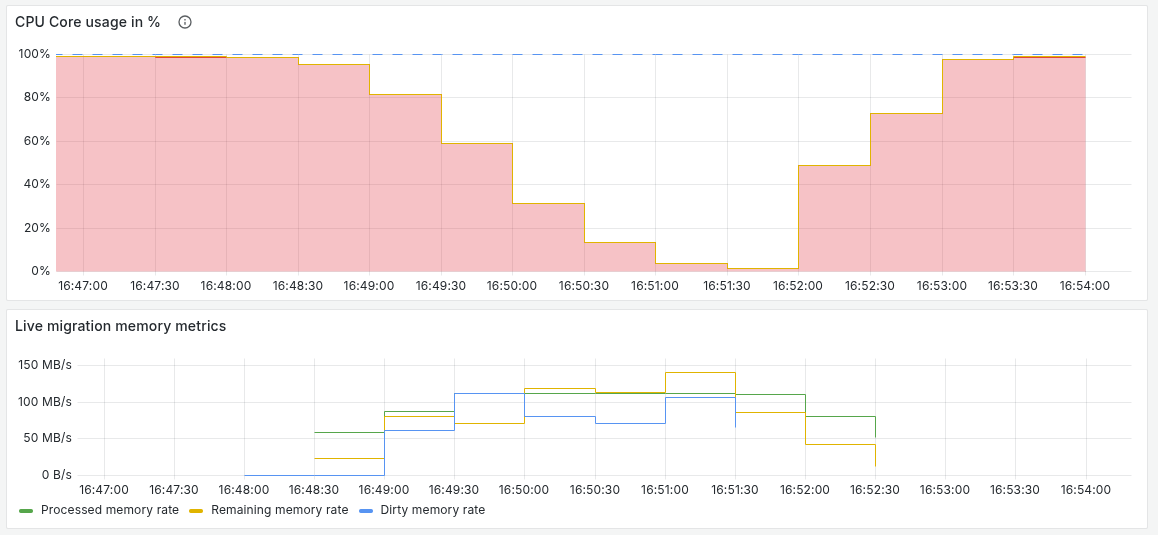
The --force flag activates the AutoConverge mechanism when migrating a virtual machine. This mechanism automatically reduces the load on the virtual machine CPU (throttles it) if the migration has to be sped up to complete successfully, even when the VM memory transfer is too slow. Use this flag if a standard migration can’t complete because of high VM activity.
To place the virtual machine on a specific target node, specify the name of that node in the --target-node-name option. For example, if the virtual machine has to be placed on the production-1 node:
d8 v migrate -n project-1 linux-vm --target-node-name production-1
Under the hood, a virtual machine operation is created with the specific node selector kubernetes.io/hostname: production-1, where production-1 is the node name.
You can also start a migration by manually creating a VirtualMachineOperation (vmop) resource of the Migrate type:
d8 k create -f - <<EOF
apiVersion: virtualization.deckhouse.io/v1alpha2
kind: VirtualMachineOperation
metadata:
  generateName: migrate-linux-vm-
  namespace: project-1
spec:
  # Virtual machine name.
  virtualMachineName: linux-vm
  # Operation for migration.
  type: Migrate
  # Defines the virtual machine migration operation.
  migrate:
    nodeSelector:
      # You can also set any suitable node selector.
      kubernetes.io/hostname: production-1
  # Allow CPU throttling by the AutoConverge mechanism to guarantee that the migration completes.
  force: true
EOF
If you don’t need to specify target node parameters, you can omit the migrate field or evict the virtual machine to another suitable node using the d8 v evict command or by creating a VirtualMachineOperation resource of the Evict type.
To track the virtual machine migration right after the VirtualMachineOperation resource is created, run the following command:
d8 k get vm -w
Example output:
NAME       PHASE       UPTIME   NODE           IPADDRESS     AGE
linux-vm   Running     79m      virtlab-pt-1   10.66.10.14   79m
linux-vm   Migrating   79m      virtlab-pt-1   10.66.10.14   79m
linux-vm   Migrating   79m      virtlab-pt-1   10.66.10.14   79m
linux-vm   Running     79m      virtlab-pt-2   10.66.10.14   79m
- Go to the Projects tab and select the project you need.
- Go to Virtualization → Virtual machines.
- Select the virtual machine you need from the list and click the ellipsis button.
- In the menu that opens, select Migrate.
- In the Virtual machine migration window that opens, select the mode:
- Migrate to an arbitrary node: The scheduler picks the target node.
- Migrate to a selected node: You pick the node manually in the Nodes available for migration field (the list contains only nodes that match the placement parameters of the VM and its class).
- Enable additional options if required:
- Migrate disks: Move the disks along with the VM (used when changing storage).
- Force (throttle guest CPU): Apply AutoConverge so that the migration completes even when network bandwidth is insufficient.
- The window shows the current migration policy of the VM, for example “VM migration policy: PreferSafe”.
- Click Migrate or cancel the operation with Cancel.
Configuring the migration policy
The migration policy determines when to use the AutoConverge mechanism (CPU throttling) to guarantee that a migration completes.
The AutoConverge mechanism helps a migration complete even with low network bandwidth, which makes a successful operation highly likely. However, it throttles the virtual machine CPU, which can affect the performance of applications running on the virtual machine.
The AutoConverge mechanism works in two stages:
-
Throttling the virtual machine CPU
The hypervisor gradually lowers the CPU frequency of the source virtual machine. This reduces the rate at which new dirty pages appear. The higher the load on the virtual machine, the stronger the throttling.
-
Automatic migration completion
As soon as the data transfer rate exceeds the memory change rate, the final synchronization starts and the virtual machine switches to the new node.
To configure the migration policy, use the .spec.liveMigrationPolicy parameter in the virtual machine configuration. Allowed values:
AlwaysSafe: The migration always runs without CPU throttling (AutoConverge isn’t used). Suitable when maximum virtual machine performance matters, but it requires high network bandwidth.PreferSafe(used as the default policy): The migration runs without CPU throttling (AutoConverge isn’t used). However, you can start a migration with CPU throttling using a VirtualMachineOperation resource with thetype=Migrateandforce=trueparameters.AlwaysForced: The migration always uses AutoConverge, that is, the CPU is throttled when required. This guarantees that the migration completes even on a poor network, but it can reduce virtual machine performance.PreferForced: The migration uses AutoConverge, that is, the CPU is throttled when required. However, you can start a migration without CPU throttling using a VirtualMachineOperation resource with thetype=Migrateandforce=falseparameters.
Migrations with insufficient network bandwidth
During a live migration of a virtual machine, the network bandwidth may not be enough to transfer data faster than it changes in the virtual machine memory. In that case, the number of dirty pages keeps growing and the migration may not complete within the timeout.
The AutoConverge mechanism, configured through the migration policy, solves this problem.
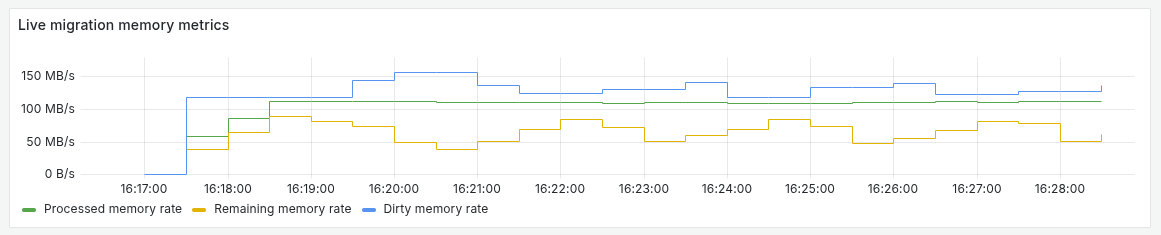
To tell that the network bandwidth isn’t enough for a live migration of a virtual machine, check the charts in Namespace / Virtual Machine → VM Status details → Live migration memory metrics:
- Processed memory rate is lower than Dirty memory rate;
- Remaining memory rate doesn’t decrease for a long time.
This means the network has become the bottleneck for the migration.
Here is an example of a situation where the migration can’t complete because of insufficient network bandwidth. Inside the virtual machine, memory changes continuously with stress-ng.
Here is an example of migrating the same virtual machine with the --force flag of the d8 v migrate command (which enables the AutoConverge mechanism). You can clearly see that the CPU frequency is lowered in stages to reduce the rate of memory content changes.
If the network limits the migration speed, you can do the following:
-
Wait until the operation fails because of a timeout.
-
Cancel the current migration operation by deleting the VirtualMachineOperation resource, where
<VMOP_NAME>is the name of that resource:d8 k delete vmop <VMOP_NAME> -
Restart the migration with the
--forceflag to enable the AutoConverge mechanism. Using the--forceflag has to match the current virtual machine migration policy.
Migrations started by the system
DP starts some migrations itself, by creating a VirtualMachineOperation resource of the Evict type. The prefix of the resource name shows what caused such a migration:
| What caused the migration | Resource name prefix |
|---|---|
| A virtual machine firmware update | firmware-update- |
| Load redistribution in the cluster | evacuation- |
| Putting a node into maintenance mode (node drain) | evacuation- |
| A change in the VM placement parameters | nodeplacement-update- |
| A change of the core count or memory size without a restart | hotplug-resources- |
| Moving disks to another storage | volume-migration- |
The migration has completed successfully when the resource moves to the Completed phase. The other phases are described in the .status.phase field, and to cancel a migration you delete the resource.
The following example shows how to view the list of such operations:
- Using the CLI
- Using the web interface
To view the active operations, run the following command:
d8 k get vmop
Example output:
NAME                    PHASE       PROGRESS   TYPE    VIRTUALMACHINE   AGE
firmware-update-fnbk2   Completed   100%       Evict   linux-vm         1m
- Go to the Projects tab and select the project you need.
- Go to Virtualization → Virtual machines.
- Select the VM you need from the list and click its name.
- Go to the Operations tab.
Live VM migration on a placement parameter change
When the placement rules of a running machine change, DP moves it to a suitable node with a live migration.
The feature is available in commercial DP editions.
The following example shows the migration mechanism in a cluster with two node groups, green and blue. Suppose a virtual machine initially runs on a node of the green group, and its configuration has no placement restrictions.
First, add a requirement to be placed in the green group to the VM specification:
spec:
  nodeSelector:
    node.deckhouse.io/group: green
After you save the changes, the VM keeps running on the current node, because the nodeSelector condition is already met.
Now change the requirement to the blue group:
spec:
  nodeSelector:
    node.deckhouse.io/group: blue
The current node from the green group no longer meets the new conditions. DP creates a VirtualMachineOperation resource of the Evict type and starts a live migration of the VM to an available node of the blue group.
Example output:
NAME                         PHASE       PROGRESS   TYPE    VIRTUALMACHINE   AGE
nodeplacement-update-dabk4   Completed   100%       Evict   linux-vm         1m